Have you ever tried to cook chicken breasts only to end up with dry tough meat that’s about as appetizing as cardboard? I’ve been there too many times to count! But everything changed when I discovered the magic of cooking chicken in a cast iron skillet. This simple method has revolutionized my weeknight dinners and I’m excited to share it with you today.
As a busy home cook, I’ve tested dozens of chicken cooking methods, but nothing beats the juicy, flavorful results you get from a well-seasoned cast iron skillet. After years of trial and error (and some truly awful chicken disasters), I’ve perfected a foolproof technique that works every single time.
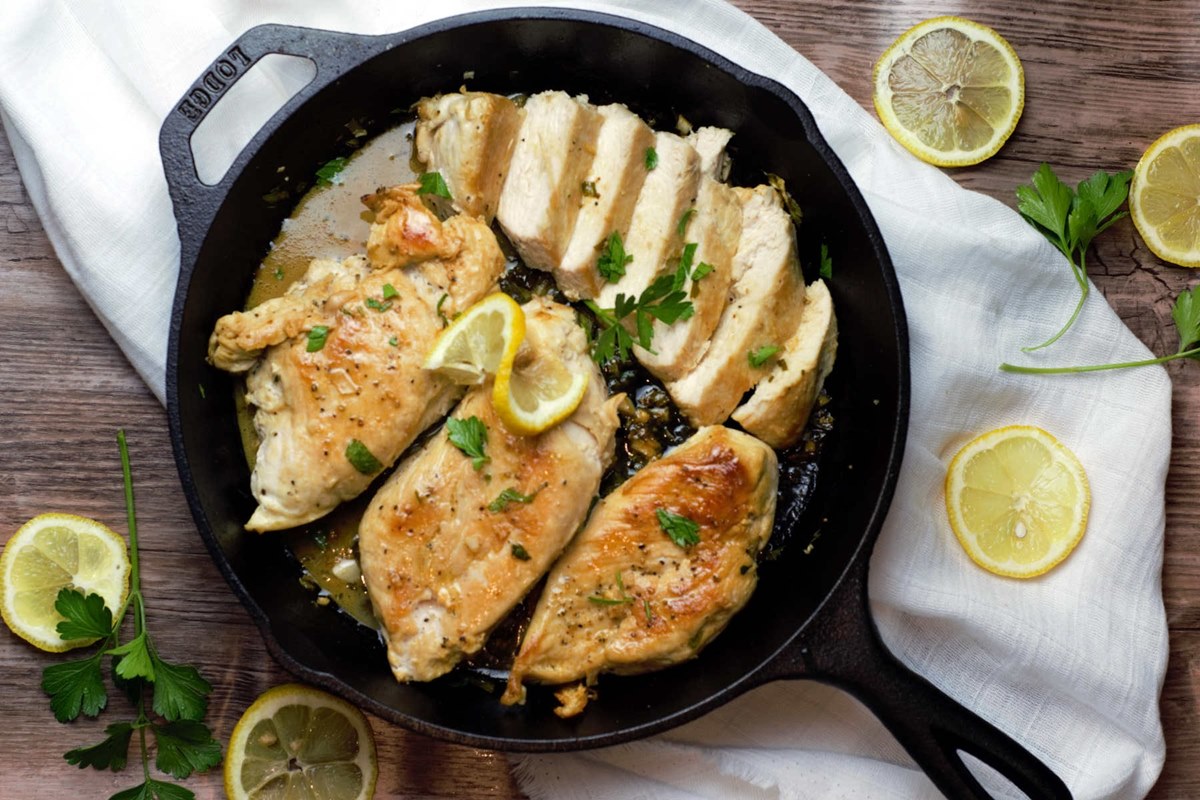
Why Cast Iron Skillet is the Secret to Perfect Chicken
Before we dive into the step-by-step process, let’s talk about why cast iron is so amazing for cooking chicken:
- Even heat distribution – Cast iron conducts heat beautifully, ensuring your chicken cooks evenly
- Amazing sear – The heavy, heat-retaining surface creates that golden-brown crust we all crave
- Stovetop to oven versatility – You can start on the stove and finish in the oven seamlessly
- Better flavor with time – A well-seasoned skillet adds subtle flavor to your chicken
- Non-stick (when properly seasoned) – No more chicken sticking to the pan!
What You’ll Need
Equipment:
- 10-12 inch cast iron skillet (well-seasoned)
- Tongs
- Meat thermometer (absolutely essential!)
- Paper towels
Ingredients:
- 2 boneless, skinless chicken breasts
- 1-2 tablespoons neutral oil (avocado oil works great)
- 1 teaspoon salt
- ½ teaspoon black pepper
- ½-1 teaspoon garlic powder
- Optional: ½ teaspoon paprika or oregano
- 2 tablespoons butter (for basting)
- ½ lemon (optional but highly recommended)
Step-by-Step: How to Cook Perfect Chicken in a Cast Iron Skillet
Step 1: Prep Your Chicken
The first thing I learned is that preparation makes all the difference! Here’s what to do:
- Pat your chicken breasts dry with paper towels (this is crucial for getting a good sear)
- If your chicken breasts are very thick or uneven, consider butterflying them or using a meat mallet to pound them to even thickness (about ¾ inch)
- Season generously on both sides with salt, pepper, and garlic powder (and any other seasonings you like)
Pro Tip: Don’t wash your chicken! The infectious disease doctor in me needs to remind you that washing chicken only spreads bacteria around your kitchen. Just pat it dry and wash your hands thoroughly after handling raw chicken.
Step 2: Heat Your Skillet Properly
The second most important thing is getting your skillet to the right temperature:
- Place your cast iron skillet on the stove over medium to medium-high heat
- Allow it to heat up for about 5 minutes (this is important – don’t rush this step!)
- Add 1-2 tablespoons of oil to the hot skillet (I prefer avocado oil because it has a higher smoke point than olive oil)
- Wait until the oil is shimmering but not smoking
Step 3: Sear Your Chicken
Now for the exciting part – creating that delicious sear:
- Carefully place your seasoned chicken breasts in the hot skillet
- Add half a lemon cut-side down in the skillet (trust me on this one!)
- DO NOT TOUCH THE CHICKEN for at least 5-7 minutes (this is where patience pays off)
- After 5-7 minutes, check if the bottom has a nice golden-brown sear
- If it sticks to the pan, it’s not ready yet – give it another minute
- Once it has a beautiful sear and releases easily, flip it over
Step 4: Finish Cooking
You have two great options here:
Option 1: Stovetop Method
- Reduce heat to medium
- Cook for another 5-7 minutes on the second side
- Use your meat thermometer to check for doneness (165°F is the magic number!)
- If needed, use tongs to sear the edges of the chicken for extra color
Option 2: Oven Method
- If your chicken is thick, preheat your oven to 425°F before you start cooking
- After searing the first side for 5-7 minutes, flip the chicken
- Transfer the entire skillet to the oven
- Bake for about 10-15 minutes until the internal temperature reaches 165°F
Step 5: The Secret Finishing Touch
Here’s my special trick for extra juicy, flavorful chicken:
- Once the chicken reaches 165°F, remove the skillet from the heat
- Add 2 tablespoons of butter to the pan
- Use a spoon to baste the chicken with the melted butter for about 30 seconds
- Grab that lemon with tongs and squeeze it over the chicken (the warm lemon juice adds amazing flavor!)
Step 6: Rest Before Cutting
This might be the hardest step because the chicken smells so good, but it’s super important:
- Transfer chicken to a cutting board
- Let it rest for 5-10 minutes (about half the time it took to cook)
- This allows the juices to redistribute throughout the meat instead of spilling out when cut
Troubleshooting Common Problems
Even with the best techniques, sometimes things go wrong. Here’s how to fix the most common issues:
| Problem | Solution |
|---|---|
| Chicken sticking to pan | Make sure pan is hot enough before adding chicken, and don’t try to flip too early |
| Burning exterior, raw interior | Your heat is too high or chicken is too thick – lower heat and/or butterfly the chicken |
| Dry, tough chicken | You’ve overcooked it – use a meat thermometer and remove at exactly 165°F |
| Smoky kitchen | Your oil’s smoke point is too low – try avocado oil instead of olive oil |
Endless Flavor Variations
One reason I love this method is that you can change up the flavor profile to suit any cuisine. Here are some of my favorite seasoning combos:
- Italian Style: Salt, pepper, garlic powder, dried oregano
- Tex-Mex: Chili powder, cumin, onion powder, salt, pepper
- Indian Inspired: Garam masala, turmeric, salt, pepper
- BBQ Style: Paprika, brown sugar, garlic powder, onion powder, salt, pepper
Serving Suggestions
Now that you’ve mastered the perfect cast iron chicken breast, here are some delicious ways to serve it:
- Slice it and add to pasta with a creamy sauce
- Serve with roasted vegetables for a healthy meal
- Add to salads for a protein boost
- Use in tacos with fresh toppings
- Sandwich between bread with some mayo and lettuce
Storing and Reheating
If you have leftovers (which is rare in my house because it’s so good!):
- Store in an airtight container in the fridge for 3-4 days
- Enjoy cold in salads (my preference to avoid drying it out)
- To reheat, microwave in 45-second intervals, flipping between each
- Or reheat by simmering in a sauce to maintain moisture
Final Thoughts
Learning how to cook chicken in a cast iron skillet has been a game-changer for my weeknight meals. It’s fast (under 30 minutes total), requires minimal ingredients, and the results are restaurant-quality.
The key things to remember are:
- Pat the chicken dry before seasoning
- Get your skillet properly hot
- Don’t disturb the chicken while it’s searing
- Use a meat thermometer for perfect doneness
- Let it rest before cutting
Do you have any special tricks for cooking chicken in a cast iron skillet? I’d love to hear about them in the comments below!
Cooking chicken to achieve that perfect balance of juicy tenderness and crispy golden-brown skin can sometimes be tricky. That’s where cast iron cookware comes in.
This versatile tool can take your chicken dishes from ordinary to extraordinary. In this post, well look at the many benefits of using cast iron for cooking chicken, from superior searing to even heat distribution. Plus, well share tips on how to select and prepare the perfect chicken breast.
How To Store and Reheat Leftovers
If you have leftover chicken, store it in an airtight container in the refrigerator. Properly stored, cooked chicken can last for three to four days. To reheat, use the oven or stovetop rather than the microwave to keep the texture and moisture. Heat the chicken gently at a low temperature until warmed through.
BEST Juiciest Cast Iron Pan-Seared Chicken Breasts | Easy & Perfect Every time!!
FAQ
How do you cook chicken in a cast iron skillet without it sticking?
Can you cook raw chicken in a cast iron skillet?
Yes, you can sear chicken in a cast iron skillet. Cast iron skillets are great for achieving a nice, crispy sear on chicken due to their ability to retain and distribute heat evenly. Allow it to cook undisturbed until it develops a golden-brown crust before flipping it to cook the other side.
Should I use butter or oil in a cast iron skillet?
Use oil, not butter. Something with a smoke point over 400F would be best. Also, pro-tip: preheat your cast iron in the oven at like 350-400F so you don’t overheat the pan on the stove. Really easy to go too hot with a cast iron pan and smoke out your entire family when the oil gets too hot.
How to cook chicken in a cast iron grill pan?
Sear the chicken breasts on one side for 5 minutes. Then flip and immediately transfer the cast iron pan to the preheated oven. Bake at 425°F for 10-15 minutes or until the chicken is fully cooked through. [Smaller, thinner breasts will only have to bake for 5-10 minutes, but thicker breasts will need 15-20 minutes.]