Are you tired of spending ages shredding chicken with two forks? I sure was! That’s why I’m super excited to share the definitive answer on which KitchenAid attachment is best for shredding chicken After testing multiple methods and reading countless reviews, I’ve got all the info you need to transform your chicken-shredding game forever
The Best KitchenAid Attachment for Shredding Chicken
Let’s cut right to the chase – there are actually two main options for shredding chicken with your KitchenAid
- The Flat Beater (or Pastry Beater) – This is the most common and recommended attachment
- The Food Grinder Attachment – An alternative option with different benefits
Let’s dive into both so you can decide which one works best for your needs!
Using the Flat Beater for Shredding Chicken
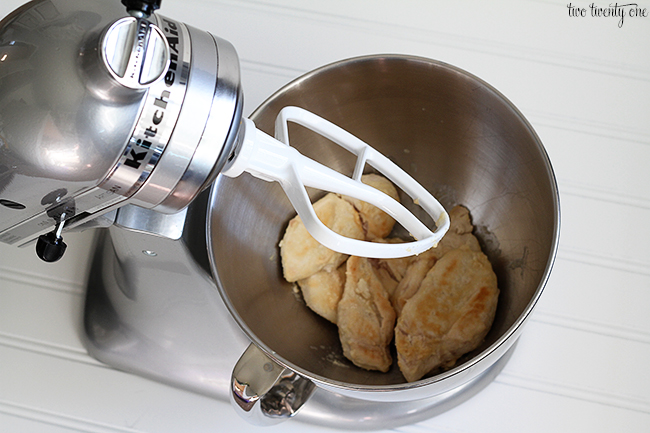
The flat beater (sometimes called paddle attachment) that came with your KitchenAid stand mixer is actually the simplest and most convenient way to shred chicken. It’s probly already in your kitchen drawer!
How to Shred Chicken Using the Flat Beater:
- Cook your boneless, skinless chicken using your preferred method (baking, poaching, grilling, etc.)
- While the chicken is still warm (this is important!), place it in your mixer bowl
- Attach the flat beater to your stand mixer
- Set your mixer to a low speed (usually speed 2-3)
- Mix for approximately 30-60 seconds until chicken reaches your desired consistency
The paddle attachment works by pulling the chicken fibers apart rather than cutting them, which gives you that perfect shredded texture.
Pro Tip: Shred chicken while it’s still warm! Cold chicken becomes firmer and more difficult to shred. If your chicken has cooled, warm it up a bit in the microwave before shredding.
Using the Food Grinder Attachment for Shredding Chicken
The food grinder attachment is another excellent option, especially if you’re looking for more consistent results or need to process larger quantities of chicken.
How to Shred Chicken Using the Food Grinder Attachment:
- Cook your chicken as usual
- Cut the chicken into small pieces that will fit through the grinder
- Chill the chicken in the refrigerator for at least 30 minutes
- Attach the food grinder to your KitchenAid stand mixer
- Use the coarse grinding plate
- Feed the chicken through the grinder and collect the shredded meat
Benefits of Using the Food Grinder Attachment:
- Consistency: Produces uniform texture and size
- Efficiency: Great for shredding large quantities
- Versatility: Can also be used for grinding other meats, nuts, and vegetables
- Control: Better control over the fineness of the shred
One KitchenJournal user said, “The food grinder attachment changed my meal prep game completely. I can shred enough chicken for the whole week in minutes!”
Comparison: Flat Beater vs. Food Grinder for Shredding Chicken
| Feature | Flat Beater | Food Grinder |
|---|---|---|
| Cost | Comes with mixer | Additional purchase |
| Setup time | Quick | Requires assembly |
| Cleanup | Easy | More parts to clean |
| Shred consistency | Good but varied | Very consistent |
| Best for | Quick, small batches | Large batches, meal prep |
| Skill level | Beginner | Intermediate |
What NOT to Use for Shredding Chicken
It’s worth mentioning that some attachments aren’t suitable for shredding chicken:
- Flex Edge Beater: Not recommended as it’s designed for mixing and creaming ingredients like cookie dough and cake batter
- Blender: Will cut or puree chicken rather than shred it
- Food Processor: Can work in a pinch but tends to cut rather than shred the chicken
Tips for Perfect Shredded Chicken Every Time
No matter which attachment you choose, these tips will help you achieve the best results:
- Use boneless, skinless chicken – Bones and skin will interfere with the shredding process
- Shred while warm – The meat separates more easily when warm
- Don’t overcook – Overcooked chicken can become too dry and crumbly when shredded
- Season before or after – You can add dry seasonings before shredding, but wait to add sauces until after to avoid splatter
- Work in small batches – Don’t overload your mixer or grinder
- Adjust the time – Shred for less time if you want larger pieces, longer for finer shreds
Storage and Meal Prep Ideas
Once you’ve mastered quick chicken shredding with your KitchenAid, you might find yourself making larger batches. Here’s how to store it properly:
- Refrigerate – Store in an airtight container for up to 3-4 days
- Freeze – Portion into freezer bags or containers and freeze for up to 3 months
- Meal prep – Shred a large batch on Sunday for multiple meals throughout the week
Delicious Recipes Using Shredded Chicken
Now that you can shred chicken like a pro, here are some amazing recipes to try:
- Chicken tacos or enchiladas
- Chicken salad sandwiches
- Buffalo chicken dip
- BBQ pulled chicken
- Chicken soup or chili
- Chicken and rice casserole
- Asian-inspired chicken lettuce wraps
Frequently Asked Questions
Can I shred frozen chicken?
No, always thaw and cook chicken before shredding.
How much chicken can I shred at once?
With the flat beater, up to 3-4 chicken breasts at a time. The food grinder can handle more but requires processing in batches.
Do I need to cook the chicken before shredding?
Yes! Raw chicken should never be shredded as it can spread bacteria.
How do I prevent chicken from becoming mushy when shredding?
Don’t overprocess. Start with 30 seconds and check the consistency, adding more time if needed.
Can I shred chicken breasts with bones using KitchenAid attachments?
No, it’s not recommended to shred chicken with bones as they can damage your attachments.
My Personal Experience
I’ve been using my KitchenAid for shredding chicken for about 3 years now, and I can honestly say it’s been a game-changer. Before discovering this hack, I would spend what felt like hours pulling apart chicken with two forks, getting sore hands in the process!
Now, I can make a big batch of shredded chicken in literally minutes. My favorite is using the flat beater because it’s so convenient – no extra attachments to buy or store. Just pop in the chicken, turn it on low for about 45 seconds, and voila! Perfect shredded chicken for my family’s favorite tacos.
For meal prep weekends when I’m making multiple meals, I sometimes use the food grinder attachment. The texture is a bit different – more uniform – which works really well for dishes like enchiladas where you want consistent pieces.
Conclusion
When it comes to shredding chicken with your KitchenAid mixer, you have two excellent options: the flat beater that came with your mixer or the food grinder attachment. The flat beater is perfect for quick, everyday use, while the food grinder excels at consistent results and larger batches.
Both methods will save you tons of time compared to manual shredding and give you perfect results for all your favorite recipes. The choice ultimately depends on your specific needs, budget, and how often you find yourself shredding chicken.
No matter which attachment you choose, your days of tediously shredding chicken with two forks are officially over! Your KitchenAid stand mixer is about to become your new favorite kitchen assistant for quick and easy meal prep.
How To Shred Chicken in Your KitchenAid Stand Mixer
1. Prep Your Chicken
Start with warm, fully cooked boneless, skinless chicken. If you’re starting with leftover cold chicken, reheat it for a bit in the microwave to loosen it up.
Breast and thighs both work—you can even use a mixture of the two. If you are using chicken breasts that are on the larger side, cut or break them in half before shredding. It helps things break down a little more evenly without leaving you with big chunks.
2. Prep Your KitchenAid Stand Mixer
Both tilt-head and bowl-lift KitchenAid models work for shredding chicken. Fit the head with the paddle mixer and add the chicken into the bowl.
3. Shred the chicken
Turn the KitchenAid mixer on to low. Let the machine run until most of the chicken is shredded to your desired consistency, about 30 seconds to one minute. If shredding more than a pound of cooked chicken at a time, there may be a few larger chunks remaining. Shred these pieces by hand to avoid over-processing the entire batch.