Ever pulled a beautiful golden-brown chicken from the oven, cut into it and found pink meat? Or worse—overcooked your bird until it’s dry as sawdust? I’ve been there too many times friends. The solution isn’t just cooking longer or hotter—it’s knowing exactly where to probe your whole chicken for an accurate temperature reading.
After years of chicken-cooking mishaps (including a memorable Christmas disaster that had us ordering Chinese food) I’ve finally mastered the art of properly checking chicken temperature. Today I’m sharing everything you need to know about probing whole chicken so you can achieve juicy, safe, perfectly-cooked poultry every single time.
Why Temperature Matters for Chicken
Before diving into probe placement, let’s talk about why getting the right temperature reading is so critical:
- Food Safety First: Chicken must reach 165°F (74°C) to kill harmful bacteria like Salmonella
- Texture and Flavor: Undercooked chicken is rubbery and unsafe; overcooked chicken is dry and flavorless
- Different Parts Cook Differently: Dark meat and white meat require different temperatures for optimal results
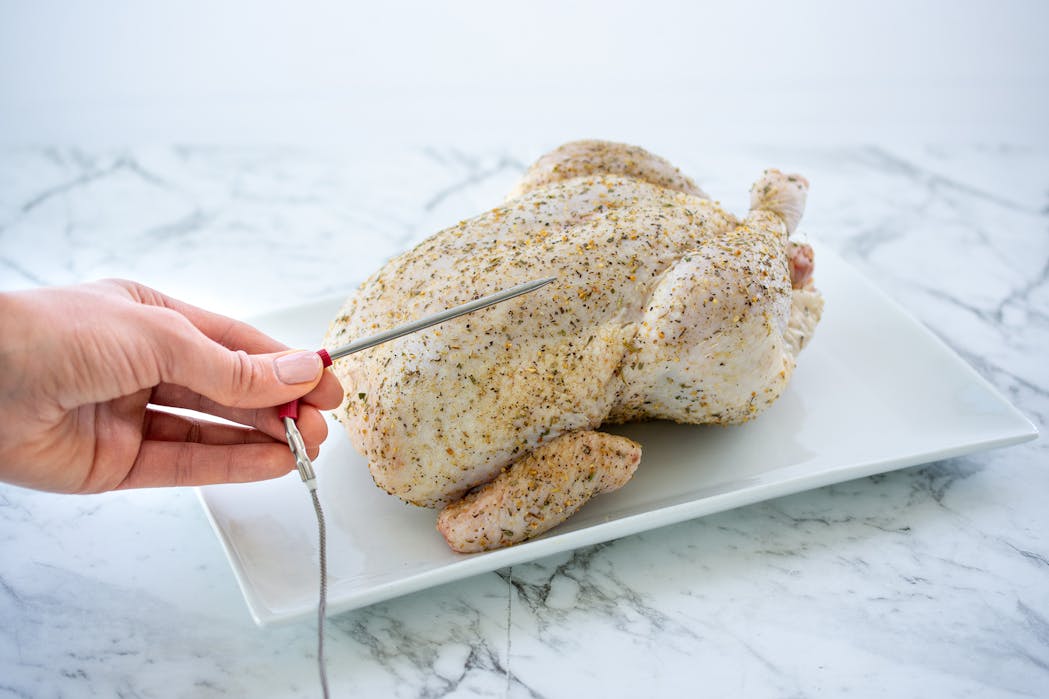
The Gold Standard: Where to Probe a Whole Chicken
After testing countless chickens and consulting with BBQ experts, I can confidently say the thickest part of the thigh is the gold standard location for probing a whole chicken. But there’s some nuance to this recommendation.
The Best Primary Probe Location: The Thigh
The thigh is considered the most reliable spot because:
- It’s the densest, thickest part of the chicken
- It’s the last part to reach target temperature
- Dark meat requires higher temperatures than white meat for optimal texture
To properly probe the thigh:
- Locate the thickest part of the thigh (typically toward the center)
- Insert the thermometer probe into the meat, avoiding the bone
- Aim for a final temperature of 175-180°F (80-82°C) for perfectly tender thigh meat
PRO TIP: If your thermometer touches bone, you’ll get a falsely high reading! Bones heat up faster than meat, so be careful with probe placement.
The Secondary Probe Location: The Breast
While the thigh is your primary indicator, it’s also wise to check the breast, especially if you’re cooking a larger bird:
- Find the thickest part of the breast, typically about three-quarters along toward the drumstick
- Insert the probe about 1.5-2 inches deep, angling toward the drumstick
- Ensure the breast reaches at least 165°F (74°C)
According to Weber’s grilling experts, you can also insert the probe deep into the front of the breast, measuring about three-quarters along the breast and marking with your fingers first
Troubleshooting Common Temperature Issues
When Breast and Thigh Temperatures Don’t Match
It’s a common dilemma: your breast meat hits 165°F but your thigh meat is still at 170°F (below the ideal 180°F). What to do?
Here’s my solution:
- Position your chicken with dark meat closest to heat source when cooking
- If breast is done but thighs aren’t, carve off the breasts and set aside
- Return the rest of the bird to the oven/smoker until thighs reach 180°F
- Let all parts rest before serving
Avoiding Bone Contact: The Crucial Detail
I cannot stress this enough: avoid touching bone with your probe. This is probably the #1 mistake people make when checking chicken temperature.
Bone conducts heat differently than meat, resulting in readings that can be 10-15 degrees higher than the actual meat temperature. This could lead you to remove the chicken too early, resulting in undercooked meat.
Choosing the Right Thermometer
Your reading is only as good as your thermometer! After trying dozens over the years, I recommend:
Instant-Read Thermometers
- Pros: Quick readings, portable, versatile
- Cons: Requires opening the oven/grill, can’t monitor continuously
- Best for: Quick checks toward the end of cooking
Leave-In Thermometers
- Pros: Continuous monitoring, no need to open the oven
- Cons: More expensive, less versatile
- Best for: Longer cooking methods like smoking or roasting
Weber recommends products like the iGrill Mini and dedicated meat temperature probes for accurate readings.
FAQ: Common Questions About Probing Chicken
Can I probe the breast instead of the thigh?
You can, but it’s not recommended as the primary indicator. The breast cooks faster than the thigh, so you might have an unsafe thigh even when the breast reads done. Always check both!
What temperature should the breast reach?
The breast should reach at least 160°F (71°C) and can safely be pulled at 162°F as it will continue cooking during rest to reach the safe 165°F.
My chicken is stuffed. Does that change where I probe?
Yes! If you’ve stuffed your chicken, you need to probe the stuffing as well. The center of the stuffing must also reach 165°F to be safe to eat.
How often should I check the temperature?
Start checking about 30-45 minutes before you expect the chicken to be done, then check every 15 minutes until you reach target temperature.
What if my thermometer shows different temperatures in different spots?
If you’re getting inconsistent readings, you’re likely touching bone or not in the thickest part. Adjust your probe placement and try again.
What is carryover cooking and how does it affect my chicken?
Carryover cooking refers to the phenomenon where internal temperature continues to rise even after removing the meat from heat. Remove your chicken when it’s about 5°F below target temperature and let it rest for 15-20 minutes.
Tips for Perfect Chicken Every Time
Beyond knowing where to probe, here are my favorite tips for amazing chicken:
- Rest your chicken for 15-20 minutes after cooking to redistribute juices
- Baste regularly with its own juices or butter to keep moisture in
- Use an oven thermometer to ensure your oven temperature is accurate
- Clean your thermometer immediately after use with hot, soapy water
- Look for visual cues like clear (not pink) juices when pierced
The Bottom Line on Probing Whole Chicken
Mastering chicken temperature is pretty simple once you know where to probe:
- Primary location: Thickest part of the thigh (aim for 175-180°F)
- Secondary check: Thickest part of the breast (minimum 165°F)
- Always avoid: Touching bone or fat pockets with your probe
- Don’t forget: Let your chicken rest after reaching temperature
I’ve ruined my fair share of chickens by either undercooking (hello, emergency microwave sessions) or overcooking them into poultry-shaped dust. But since learning these probing techniques, my success rate is nearly 100%.
Trust me—a good meat thermometer and knowing exactly where to stick it will transform your chicken game forever. Your dinner guests will wonder what magic you’ve worked to create such juicy, perfectly-cooked chicken!
How to Use a Meat Thermometer
There are basically two types of meat thermometers on the market. One is intended to be inserted into the meat while it is cooking. The other type is called an instant-read thermometer and it is intended to be used as an inspection tool to verify temperatures but cant be left in place for constant temperature monitoring like a meat thermometer probe.
In order to get an accurate thermometer reading from either type, you will need to insert the probe into the thickest part of the meat away from bones to get the most accurate reading. Measuring temperature in too thin of an area will give you a false reading and may result in parts of the chicken being undercooked.
With beef and pork cuts, you will insert the thermometer from the side toward the center of the meat to avoid touching any bone with the probe. The tip of the probe is where the temperature probe measures temperature so you will need to insert the thermometer anywhere from 3/8 inches to about one inch depending on the thickness of the cut.
What’s the Best Smoker Temperature to Use For Chicken?
Smoking a whole chicken is one of our favorite things to do. We use a process called spatchcocking when we smoke chicken that helps the breast meat and thighs cook at a similar rate while ensuring the bird is tender, juicy, and succulent. The ideal smoker temperature should be within 225 degrees to 275 degrees.
Higher temperatures will cook faster, but also might result in overcooked breast meat while the lower temperature may take a long time and could also result in dry breast meat. We prefer to put our smoker at 250 degrees when smoking a whole chicken.