Raising chickens can be incredibly rewarding, especially when you venture into hatching your own chicks. But one of the most common questions I hear from backyard chicken enthusiasts is: “When exactly should I candle my chicken eggs?” If you’re new to incubation, don’t worry – I’m going to break down everything you need to know about egg candling timing.
What Is Egg Candling Anyway?
Before diving into the timing, let’s understand what candling actually is. Egg candling is simply the process of shining a bright light through an egg to see what’s happening inside without cracking it open. The term “candling” comes from the old practice of using candles as a light source (though nowadays we use much safer alternatives).
This technique allows you to:
- Check if eggs are fertile
- Monitor embryo development
- Identify and remove non-viable eggs
- Check for cracks before incubation
- Observe air sac development
The Perfect Timing for Candling Chicken Eggs
The short answer You should candle chicken eggs at day 7 and day 14 of incubation
But there’s more to the story than just those two dates. Let’s break down the optimal candling schedule:
Before Incubation: Initial Check
When Before placing eggs in the incubator
This initial candling helps you
- Identify hairline cracks that might not be visible to the naked eye
- Discard damaged eggs that could potentially become infected
- Select the best eggs for hatching (avoid oddly shaped or wrinkled eggs)
Remember, bacteria love to enter through tiny cracks, and the last thing you want is a rotten egg exploding in your incubator! Trust me, that smell is unforgettable (and not in a good way).
Day 7: First Major Candling
When: After 7 days of incubation
This is your first real opportunity to see meaningful development:
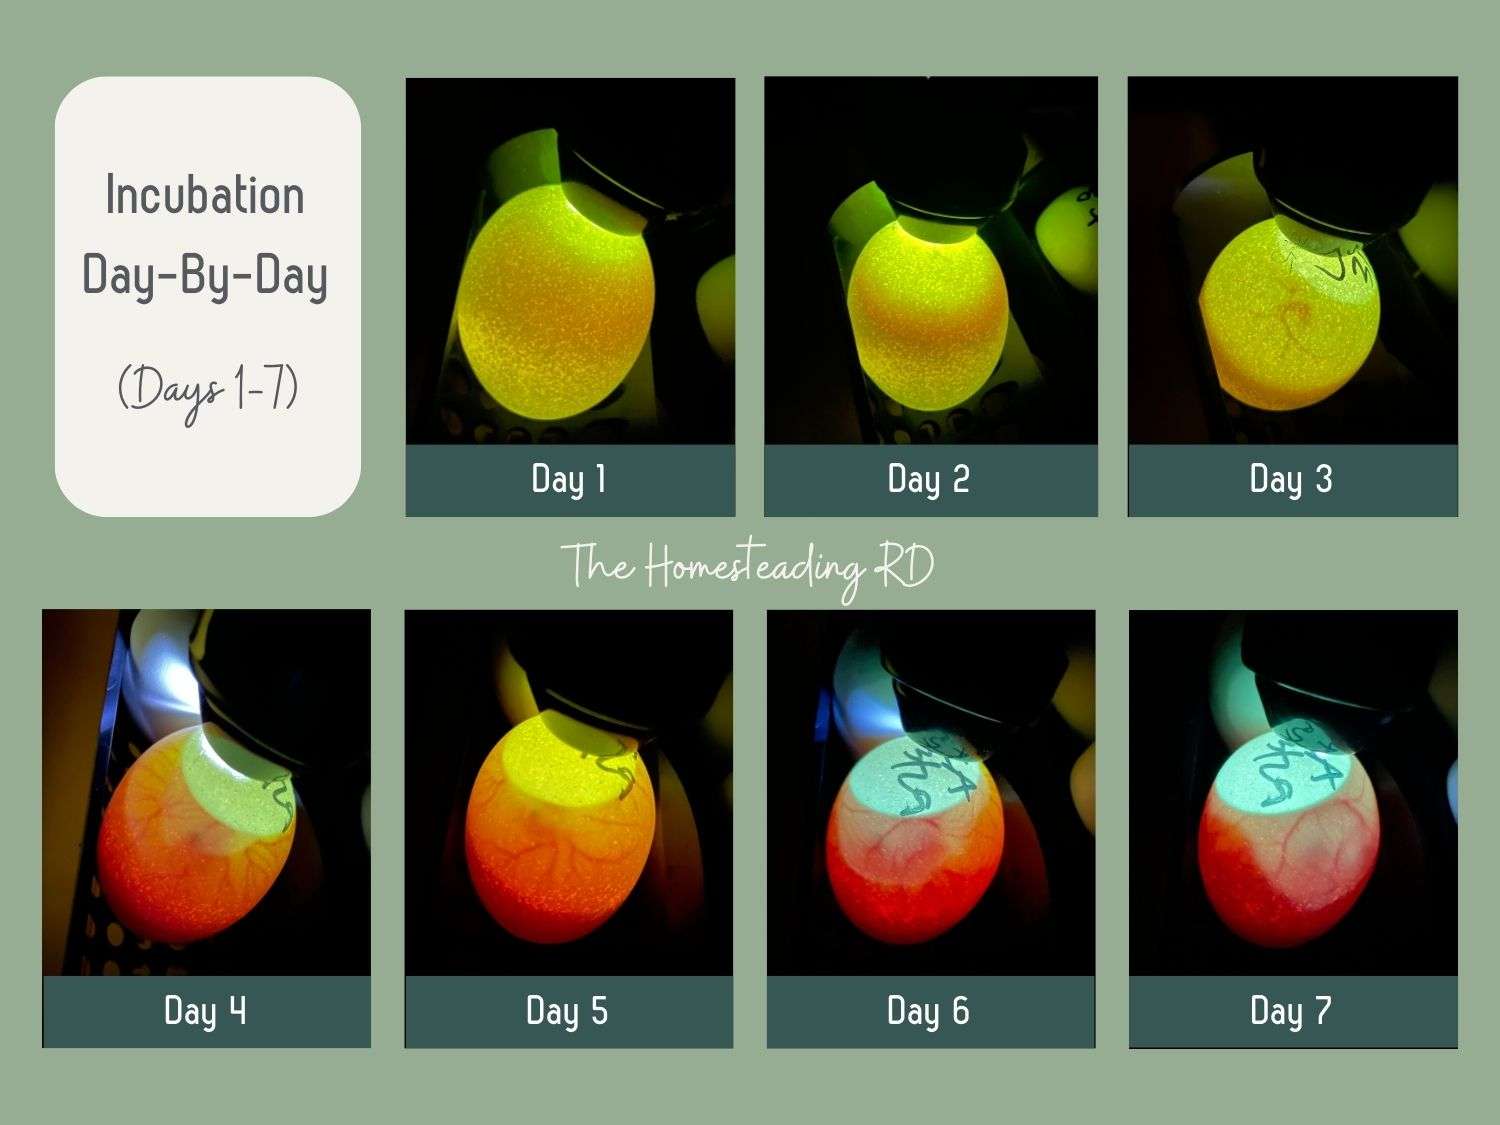
- You should see spider-like veins spreading through the egg
- A small dark spot (the embryo) should be visible
- The air cell at the blunt end of the egg should be forming
At this point, you can identify and remove clear eggs (infertile) or eggs with early embryonic death. However, if you’re not 100% sure, put it back in the incubator and check again later.
Day 14: Second Major Candling
When: After 14 days of incubation
By now, development should be quite advanced:
- The embryo will take up much more space inside the egg
- The network of blood vessels will be extensive
- The air sac will be larger
- You might see movement if you’re lucky!
This is your opportunity to remove any “quitters” – eggs where development started but then stopped. These eggs can become rotten and potentially explode, contaminating your other eggs.
Avoid Candling After Day 18
When: From day 18 until hatching
After day 18, it’s best to leave the eggs alone. At this point, the chicks are positioning themselves for hatching, and disturbing them can interfere with this process. Plus, at this stage, the chick fills almost the entire egg, so you won’t see much anyway.
Why This Timing Works Best
There’s good science behind this recommended candling schedule:
-
The first few days of incubation are critical for embryo development. Disturbing eggs during this period can reduce hatch rates.
-
By day 7, development is established enough to be visible, but if an egg isn’t developing, removing it early frees up space in your incubator.
-
By day 14, you can make your final assessment before lockdown. Any dead embryos should be removed to prevent contamination.
-
After day 18, chicken eggs enter “lockdown” phase – you stop turning them and increase humidity as the chicks prepare to hatch.
Tim Daniels from Poultry Keeper says, “The most critical period of incubation during the embryo’s development is during the first few days, so it is advisable not to disturb your eggs during this time.”
How to Candle Your Eggs Properly
Now that you know when to candle, here’s a quick guide on how to do it effectively:
- Use a good light source – An LED candler is best, but even a bright flashlight can work
- Darken the room – The darker the room, the better you’ll see inside the egg
- Hold the egg correctly – Place the light against the larger end of the egg
- Work quickly – Don’t keep eggs out of the incubator for more than 30 minutes
- Mark your observations – Use a pencil (never markers, as toxins can leach through the shell) to make notes directly on the shell
What You’ll See When Candling
Day 7:
- Fertile egg: Dark spot with spider-like veins
- Infertile egg: Clear with just a shadow of the yolk (“clear egg”)
- Early death: Thin ring around the inside of the egg or cloudy contents
Day 14:
- Viable egg: Most of the egg appears dark, harder to see inside
- Dead embryo: Cloudy appearance, sometimes with a visible blood ring
- Air sac: Noticeably larger than at day 7
Common Candling Challenges
Dark-Shelled Eggs
Eggs from breeds like Marans or Welsummers have very dark shells that make candling difficult. For these eggs:
- Use the brightest light source you can find
- Candle in a completely darkened room
- You might need to wait longer (day 8-10) for first candling to see development
Shipped Eggs
If you’ve ordered hatching eggs that were shipped to you:
- Let them rest pointed-end down for 24 hours before incubating
- Be aware that air cells often get disrupted during shipping
- Expect a lower hatch rate (around 75% is typical for shipped eggs)
My Personal Candling Tips
I’ve hatched quite a few batches of chicks over the years, and here are some things I’ve learned:
-
Keep a journal – Note down observations for each egg. I number my eggs with pencil and track their development.
-
Don’t over-candle – It’s tempting to check daily, but this can negatively impact development. Stick to the recommended schedule.
-
Have patience – Sometimes development looks different than expected. If in doubt, keep incubating rather than discarding.
-
Temperature matters – Candling inevitably cools the eggs slightly. Work quickly and return eggs to the incubator promptly.
-
Use a pencil – Never use marker pens on eggs! The chemicals can penetrate the shell and harm the embryo.
What About Other Poultry Eggs?
If you’re incubating other types of poultry eggs, the candling schedule varies slightly:
- Duck eggs: Candle at day 7 and day 14-16 (they hatch around day 28)
- Quail eggs: Candle at day 5 and day 10 (they hatch around day 17-18)
- Turkey eggs: Candle at day 7 and day 14 (they hatch around day 28)
DIY Egg Candler
Don’t want to buy a commercial candler? No problem! Here’s a simple DIY option:
- Get a bright LED flashlight (at least 800 lumens)
- Cut a hole in a piece of cardboard just smaller than an egg
- Tape the flashlight behind the hole
- Place the egg over the hole in a darkened room
Many backyard chicken keepers find this works just as well as expensive commercial options!
Summary: Your Candling Timeline
For the easiest reference, here’s your candling schedule at a glance:
| Day | What to Do | What to Look For |
|---|---|---|
| 0 | Initial check | Cracks, deformities |
| 7 | First candling | Spider veins, dark spot (embryo) |
| 14 | Second candling | Larger embryo, extensive veins, movement |
| 18+ | No candling | Let the chicks position for hatching |
Remember, candling is both a science and an art. You’ll get better with practice, and soon you’ll be able to spot developing embryos with ease!
FAQ About Egg Candling
Q: Can I candle eggs more frequently than recommended?
A: While you technically can, it’s not recommended. Each time you remove eggs from the incubator, you risk temperature fluctuations that can impact development.
Q: How long can eggs be out of the incubator during candling?
A: Try to limit it to 30 minutes maximum to prevent temperature drops that could harm the embryos.
Q: Can candling harm the developing embryo?
A: When done properly, candling doesn’t harm embryos. Just avoid overheating the egg if using a bulb-type candler and don’t keep eggs out too long.
Q: How can I tell if an egg is fertile before incubating?
A: Unfortunately, you can’t reliably detect fertility before incubation begins. The blastodisc (fertile) and blastodisc (infertile) look very similar until development starts.
Q: Can I use my phone flashlight for candling?
A: While possible, most phone flashlights aren’t bright enough for effective candling, especially for darker eggs. A dedicated LED flashlight or candler works much better.
What is Egg Candling?
Candling is a simple method used to check if an egg is fertile and developing properly. It involves shining a bright light through the egg to see what’s going on inside without cracking it open. The term “candling” comes from the old-school practice of using candles, but a strong flashlight works just fine today.
Candling is most helpful for:
- Checking if eggs are fertile
- Monitoring chick development
- Removing eggs that aren’t progressing (so they don’t spoil and affect healthy eggs)
How to Candle an Egg Step-by-Step
Here’s how I do it at home, and it doesn’t require anything fancy:
- Wash your hands before and after handling eggs.
- Use a bright light source in a dark room. A strong flashlight works great!
- Place the narrow end of the egg gently against the light.
- Look for signs of development:
- Infertile egg: Clear inside, no veins or dark spots.
- Fertile egg: Dark spot (embryo) with visible red veins.
- No change by Day 14: Could mean the chick stopped developing.
I like to number each egg and jot down what I see, just like in the photo below. It makes it so much easier to track progress throughout incubation.

Pro Tip: Always return eggs to the same position in the incubator and work quickly to preserve heat and humidity levels.