Are you tired of serving dry, tough chicken tenders that nobody wants to eat? I’ve been there too! After years of experimenting in my kitchen (and plenty of disappointing results), I’ve finally cracked the code on what temperature to cook chicken tenders in the oven for that perfect balance of juicy inside and golden outside.
In this comprehensive guide, I’ll share everything I’ve learned about achieving chicken tender perfection, from the ideal temperature to cooking times and pro tips that’ll make you look like a kitchen wizard Let’s dive in!
The Magic Number: 400°F is Your Best Friend
If you’re in a hurry and just need the straight answer: 400°F (200°C) is the sweet spot for cooking chicken tenders in the oven.
Why 400°F works so well
- It hits that perfect balance between cooking speed and moisture retention
- It allows for even cooking throughout the tender
- It creates a lightly browned exterior while keeping the inside juicy
- It typically cooks tenders in just 15-20 minutes
At this temperature, your chicken tenders transform from raw to perfectly cooked in around 15-20 minutes, giving you that restaurant-quality result without the hassle.
Why Temperature Matters So Much
Temperature isn’t just a random number—it’s actually the most critical factor in determining whether your chicken tenders turn out amazing or disappointing.
The Problem with Lower Temperatures
When you cook chicken tenders at lower temperatures (like 350°F), several issues arise:
- The extended cooking time causes significant moisture loss
- You end up with dry, tough chicken that’s hard to enjoy
- The longer cooking time isn’t even efficient for meal prep
Sure, 350°F might work for casseroles or other dishes, but for chicken tenders? It’s just asking for disappointment.
The Dangers of Going Too Hot
On the flip side, cranking your oven above 400°F creates different problems:
- The outside coating (especially if breaded) can burn quickly
- You’ll often get that frustrating “overcooked yet undercooked” situation
- The window for perfect doneness becomes extremely narrow
I’ve learned this the hard way when I tried cooking at 425°F and ended up with tenders that were charred on the outside but still raw in the center. Not a good look for dinner!
Step-by-Step Guide to Perfect Oven-Baked Chicken Tenders
Now that we know 400°F is our target, let’s walk through exactly how to prepare and cook your chicken tenders for the best results.
1. Prepare Your Chicken
For store-bought frozen tenders:
- Thaw completely in the refrigerator overnight (ideally in a single layer)
- Pat dry with paper towels (wet chicken won’t crisp properly)
For homemade tenders:
- Trim chicken breast tenderloins into even strips (about 1 inch wide)
- Remove that annoying tendon (I’ll show you a trick for this below!)
- Pat dry thoroughly
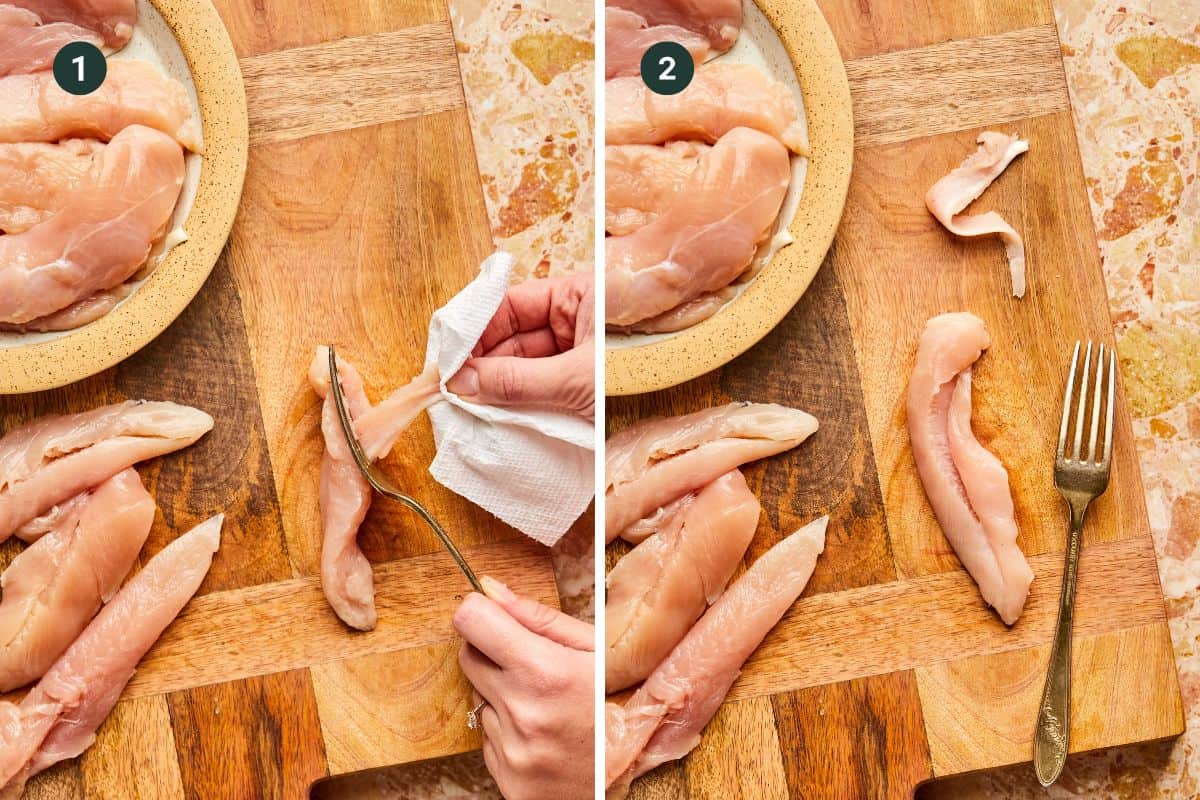
2. The Tendon Removal Hack
That tough tendon in chicken tenders can ruin the texture. Here’s my 10-second trick to remove it:
- Grip the tendon with a small piece of paper towel
- Place the tendon between the tines of a fork
- Pull the tendon up while pushing the chicken down with the fork
- Watch as the tendon pulls right out!
Yes, this might split your tender down the middle, but trust me—that’s way better than biting into a tough tendon!
3. Season or Bread Your Tenders
For basic seasoned tenders (no breading):
- Combine 2 tablespoons oil (avocado or olive oil work great)
- Add 2 tablespoons tamari or soy sauce
- Mix in 1 teaspoon garlic powder, 1 teaspoon Italian seasoning, and ¼ teaspoon black pepper
- Coat tenders evenly and let sit while the oven preheats
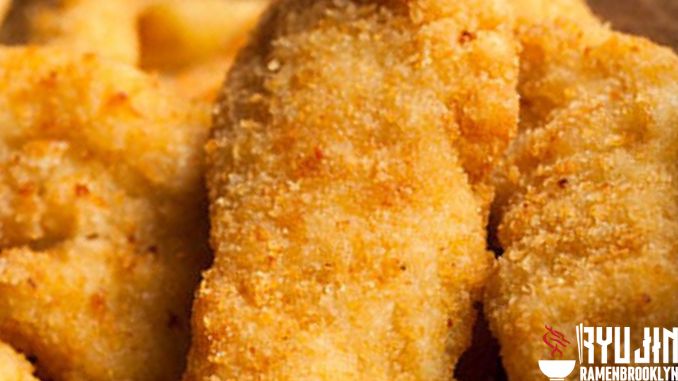
For breaded tenders:
- Set up a three-step breading station: flour, beaten eggs, breadcrumbs
- Dredge in flour first, then egg wash, then breadcrumbs
- Press the breadcrumbs firmly onto the chicken
- For extra crispiness, use panko breadcrumbs!
4. Arrange for Even Cooking
- Line a baking sheet with parchment paper or a silicone mat
- Arrange tenders in a single layer with space between each piece
- For maximum crispiness, place them on a wire rack inside the baking sheet
5. Bake at 400°F
- Place in your preheated 400°F oven
- Bake for 15-20 minutes (the exact time depends on thickness)
- Use a meat thermometer for accuracy—chicken is safe at 165°F internal temperature
6. Rest Before Serving
- Allow tenders to rest for about 5 minutes after removing from the oven
- This helps the juices redistribute and the internal temperature will rise slightly
- Serve with your favorite dipping sauces
Frequently Asked Questions
I get a ton of questions about cooking chicken tenders, so let me answer the most common ones:
Can I cook frozen chicken tenders without thawing?
Yes, you can! Just add 5-10 minutes to your cooking time and make sure to check the temperature in multiple spots. But for the very best results, thawing first is still recommended.
How do I know when my chicken tenders are done?
The only reliable way is using a meat thermometer inserted into the thickest part. Look for 165°F (74°C). Don’t rely solely on color—even fully cooked chicken can sometimes have a slightly pink tinge near the bone.
My breading always falls off! Help!
Try these fixes:
- Make sure the chicken is completely dry before breading
- Press the breading firmly onto the chicken
- Let the breaded tenders rest for 10-15 minutes before baking
- Don’t flip them unnecessarily during cooking
What’s the best way to reheat leftover chicken tenders?
For crispy results, reheat in a 400°F oven for about 5-7 minutes. Microwaving works in a pinch but will make them soggy. An air fryer at 375°F for 3-4 minutes works wonderfully too!
Pro Tips for Taking Your Chicken Tenders to the Next Level
After years of making chicken tenders for my family, I’ve picked up some tricks that make a huge difference:
1. Marinate for Extra Flavor
Even a quick 30-minute marinade can transform your tenders:
- Buttermilk creates incredibly tender chicken
- Lemon juice adds brightness
- Italian dressing is an easy flavor-packed option
2. Double-Dredge for Ultimate Crispiness
For breaded tenders with serious crunch:
- Coat in flour
- Dip in egg
- Back into flour
- Into egg again
- Finally into breadcrumbs
It’s extra work but delivers restaurant-quality crispiness!
3. Add a Final Touch
In the last 5 minutes of baking:
- Brush with BBQ sauce for a tangy finish
- Spritz with oil for enhanced browning
- Sprinkle with grated parmesan for a cheesy crust
Serving Suggestions
Chicken tenders are super versatile. Here are some of my favorite ways to serve them:
Classic Pairings:
- With mashed potatoes and steamed veggies
- Alongside a fresh garden salad
- With mac and cheese for a kid-friendly meal
Creative Options:
- Sliced over a Caesar salad
- In wraps with lettuce, tomato and ranch
- Chopped into tacos with your favorite toppings
- Over pasta with Alfredo sauce
The Bottom Line on Oven Temperatures for Chicken Tenders
After all my testing and countless chicken tender dinners, I’m confident that 400°F is truly the ideal oven temperature for chicken tenders. This temperature gives you the perfect balance of cooking speed, texture, and juiciness that makes for truly crave-worthy tenders.
Remember these key takeaways:
- 400°F is your target temperature
- Always use a meat thermometer (165°F internal temp is your goal)
- Allow space between tenders for proper air circulation
- Let them rest briefly before serving
With these tips and the right temperature, you’ll never have to suffer through dry, overcooked chicken tenders again. Your family will think you’ve suddenly developed professional chef skills overnight!
Have you tried making chicken tenders at 400°F? What’s your favorite seasoning or dipping sauce? I’d love to hear your experiences in the comments below!
Happy cooking!
Why you’ll love this recipe:
- 39g of protein.
- Only a few simple ingredients.
- Quick way to feed the family a healthy dinner.
These are the main ingredients and substitutions. See the recipe card below for the full ingredients list and instructions for this chicken tenderloin recipe.

- Chicken Tenderloins: or chicken breasts, cutlets or chicken thighs. Cooking time will be longer for chicken breasts as they’ll be much thicker.
- Soy Sauce: or coconut aminos.
- Olive Oil: vegetable oil or avocado oil.
- Spicy Brown Mustard: gives the tenders a little kick and tons of flavor.
- Add cayenne pepper or red pepper flakes for some heat.
- For something more like chicken fingers are chicken nuggets that are coated in panko breadcrumbs, try air fryer chicken patties.
- For air fryer chicken tenders, preheat air fryer to 400 degrees F. Arrange in a single layer and cook for 5-6 minutes on each side.
- Try my crispy baked chicken cutlets for a breaded version.
- For gluten-free, use coconut aminos instead of soy sauce.
- This recipe is dairy-free, as is.
Let’s make this easy chicken recipe:
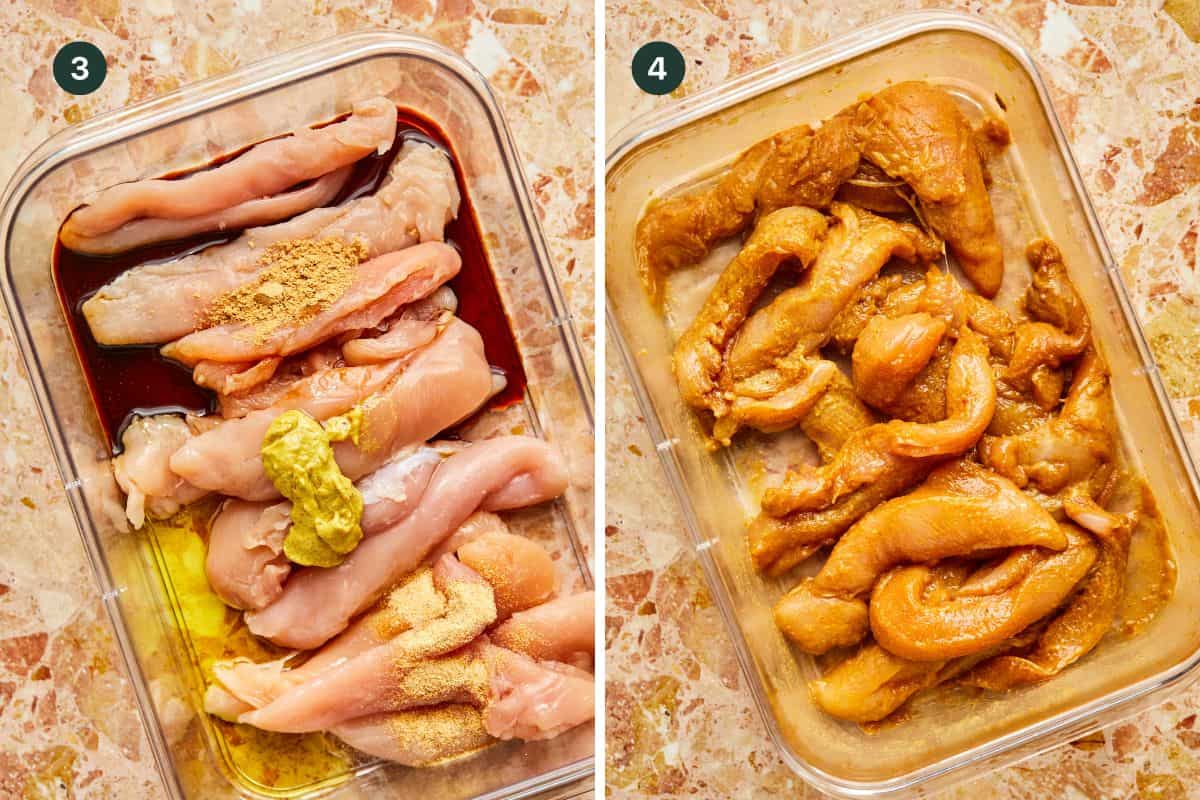
Remove the tendon from the tenderloin by grabbing it with a paper towel ( 1) and placing it between the tines of a fork and pulling down until it slides out and leaves the meat ( 2).
Place the tenderloins in a sealable airtight container and add the soy sauce, olive oil, spicy brown mustard, garlic powder and ground ginger ( 3). Put the lid on and shake so everything is evenly covered ( 4). Let set overnight OR just be sure to let it marinate while you preheat the oven.