Ever wondered what makes that sweet and sour chicken from your favorite Chinese takeout spot so irresistibly crispy and puffy? I’ve been obsessing over this for years and after countless kitchen experiments (and some epic fails!), I’m ready to share the secrets behind that magical sweet and sour chicken batter.
What Is Sweet and Sour Chicken Batter Made Of?
Sweet and sour chicken batter typically contains a blend of flour, cornstarch, eggs, water, and seasonings. But the real magic lies in the specific ingredients and techniques that create that signature golden, puffy coating that perfectly complements the tangy sauce.
Let’s break down the essential components
The Foundation Ingredients
The basic sweet and sour chicken batter consists of:
- Self-rising flour – This is actually the secret weapon many Chinese restaurants use! Unlike regular all-purpose flour, self-rising flour already contains salt and baking powder, which helps create that puffy texture.
- Cornstarch – Adds crispiness to the batter
- Eggs – Helps the batter adhere to the chicken and adds richness
- Water – Thins the batter to the right consistency
- Oil – A small amount in the batter helps prevent stickiness
- Seasonings – Salt, pepper, and sometimes garlic powder
The Magic Ratio
For the perfect batter consistency, here’s a typical ratio that works great:
| Ingredient | Amount (for 2 lbs chicken) |
|---|---|
| Self-rising flour | 2 cups |
| Cornstarch | 2/3 cup |
| Baking powder (optional) | 1/4 teaspoon |
| Salt | 1/2 teaspoon |
| Water | 1 3/4 cups |
| Egg | 2 tablespoons (beaten) |
| Oil | 2 tablespoons |
| White vinegar | 1 teaspoon |
The Science Behind the Perfect Batter
What makes this batter so special isn’t just the ingredients – it’s the chemistry behind them
-
Self-rising flour + baking powder These leavening agents create tiny air bubbles when they react with liquid and heat making the batter puff up when fried.
-
Cornstarch: This is crucial for that crispy texture! Cornstarch absorbs moisture and creates a deliciously crisp exterior when fried.
-
Vinegar: A small amount of vinegar reacts with the baking powder to create even more lift and airiness in the batter.
-
Cold water: Using cold water helps slow down the activation of the leavening agents until the chicken hits the hot oil.
How Chinese Restaurants Make That Perfect Batter
I’ve always wondered how Chinese restaurants get such a consistent, perfect coating on their sweet and sour chicken. Here’s their professional technique:
The Double-Fry Method
Most restaurants use a two-stage frying process:
- First fry (4-5 minutes at 350°F): This initial fry cooks the chicken and sets the batter.
- Rest period (about 5 minutes): Allowing the chicken to rest helps the steam escape and the crust to set.
- Second fry (3-4 minutes at 350°F): This final fry creates that gorgeous golden color and maximum crispiness.
Pro Tip from Chinese Chefs
One technique I learned from watching professional chefs: they use toothpicks or skewers to dip the chicken pieces into the batter and then into the oil. This prevents fingerprints in the batter and ensures complete coverage!
Step-by-Step Guide to Perfect Sweet and Sour Chicken Batter
Let me share my tried-and-tested process for making restaurant-quality sweet and sour chicken batter:
Step 1: Prepare the Chicken
- Cut chicken breast into bite-sized pieces (about 1-inch chunks)
- Marinate with:
- 1 tablespoon Shaoxing rice wine
- 1 teaspoon salt
- 1 egg (beaten)
- Let it marinate for at least 15 minutes or overnight in the fridge
Step 2: Make the Batter
- In a large bowl, whisk together the self-rising flour, cornstarch, baking powder, and salt
- Add water and 2 tablespoons of beaten egg (reserved from the marinade)
- Mix until no dry clumps remain
- Add oil and vinegar, mix well
- The batter should be thick enough to coat the back of a spoon but still drop off slowly
Step 3: Coat and Fry
- Heat oil to 350°F in a deep fryer or heavy pot
- Add the batter to the marinated chicken and mix well
- Using a skewer or toothpick, pick up each piece of chicken and gently place into the hot oil
- Fry in small batches for 4-5 minutes until pale golden
- Remove and drain on paper towels for 5 minutes
- Return to the oil for a second fry (3-4 minutes) until golden brown and crispy
Common Problems and How to Fix Them
We’ve all had those sweet and sour chicken disasters. Here’s how to troubleshoot:
- Batter falling off? Make sure your chicken is dry before coating and your oil is hot enough
- Too thick and doughy? Add a little more water to thin the batter
- Not crispy enough? Try adding more cornstarch and don’t skip the second fry
- Batter not puffy? Check if your self-rising flour is fresh or add a bit more baking powder
Healthier Alternatives to Traditional Batter
If you’re watching your waistline but still craving sweet and sour chicken, try these alternatives:
- Baked version: Coat chicken in the batter and bake at 425°F for 15-20 minutes
- Air fryer method: Use the same batter but air fry at 375°F for 10-12 minutes
- Lighter batter: Use whole grain flour and reduce the oil in the batter
- Egg white batter: Replace whole eggs with egg whites for a lighter coating
Sweet and Sour Sauce – The Perfect Complement
The batter is only half the equation! Here’s a quick recipe for authentic sweet and sour sauce:
Basic Sweet and Sour Sauce
- 1¼ cup water
- ¾ cup pineapple juice
- ¾ cup white vinegar
- ¾ cup ketchup
- 1¼ cup granulated sugar
- ⅛ teaspoon salt
- 3 tablespoons cornstarch (mixed with 3 tablespoons water to make slurry)
- Optional: 3-5 drops red food coloring for that classic restaurant look
Combine all ingredients except the cornstarch slurry in a saucepan. Bring to a boil, then reduce heat. While stirring, slowly add the cornstarch slurry and simmer until thickened and glossy.
Final Tips From My Kitchen to Yours
After making this countless times, here are my personal tips:
- Make the batter fresh: Don’t prepare it too far in advance as the leavening agents will lose effectiveness
- Oil temperature is crucial: Use a thermometer to maintain 350°F
- Don’t overcrowd the fryer: This lowers the oil temperature and results in soggy chicken
- Serve immediately: The batter is at its crispiest right after cooking
- For leftovers: Store the sauce separately and reheat the chicken in an oven or air fryer to maintain crispness
Frequently Asked Questions
What’s the difference between sweet and sour chicken and orange chicken batter?
Sweet and sour chicken uses a puffy batter made with self-rising flour and is typically made with chicken breast, while orange chicken uses a thinner starch-based coating and is often made with chicken thighs.
Can I use pre-made breading mix?
Yes, but it won’t have that authentic restaurant texture. The homemade version is worth the extra effort!
What can I substitute for self-rising flour?
For every cup of all-purpose flour, add 1½ teaspoons baking powder and ¼ teaspoon salt to make your own self-rising flour.
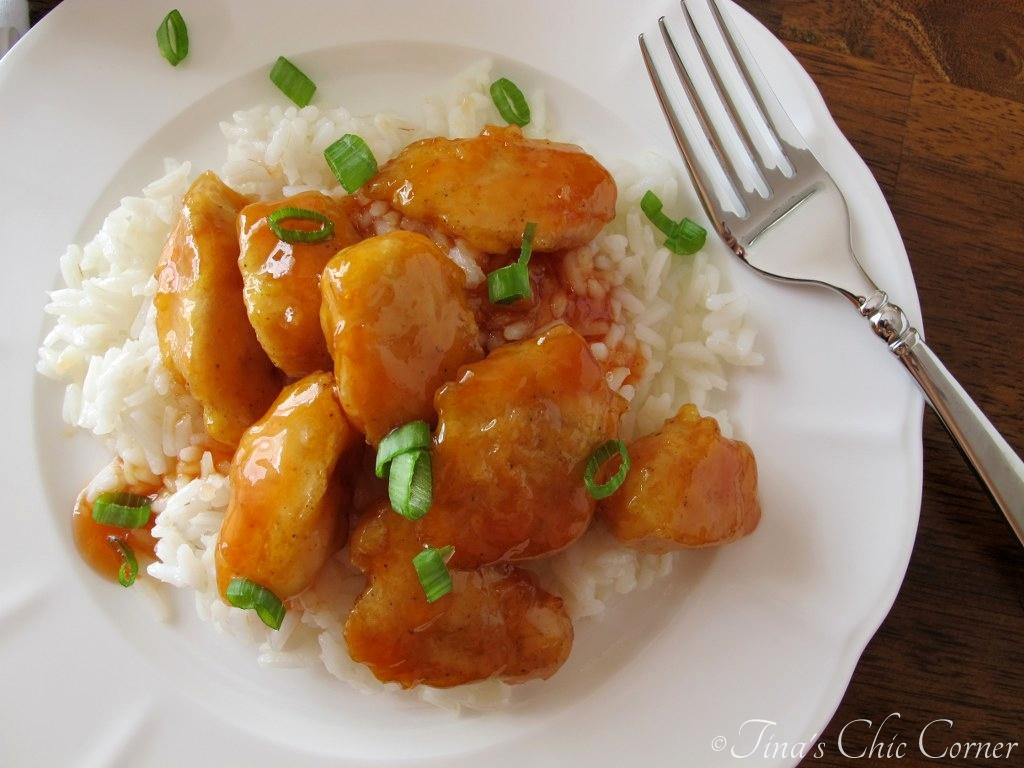
How do I keep the chicken crispy after adding sauce?
Serve the sauce on the side for dipping, or toss the chicken with the sauce right before serving.
Now you’re armed with all the secrets to create that perfect sweet and sour chicken batter at home! Trust me, once you master this, you’ll never want takeout again. Your family will be amazed at how authentic it tastes – just maybe don’t tell them how easy it actually is!
Have you tried making sweet and sour chicken at home? What’s your secret ingredient? I’d love to hear about your experiments in the comments!
Step Three: Coating the Chicken
Just a FYI. You don’t want the tempura batter too thick, and you don’t want it too runny. Somewhere in the middle is perfect. (Think pancake batter texture)
Dump all the chicken pieces into the batter, stir to coat.
Instructions on How to Make Sweet and Sour Chicken
First up is the sweet and sour sauce. Drain the canned pineapple, reserving the juice.
TIP: I pour mine into a strainer over a bowl and let it sit while I get the other ingredients together.
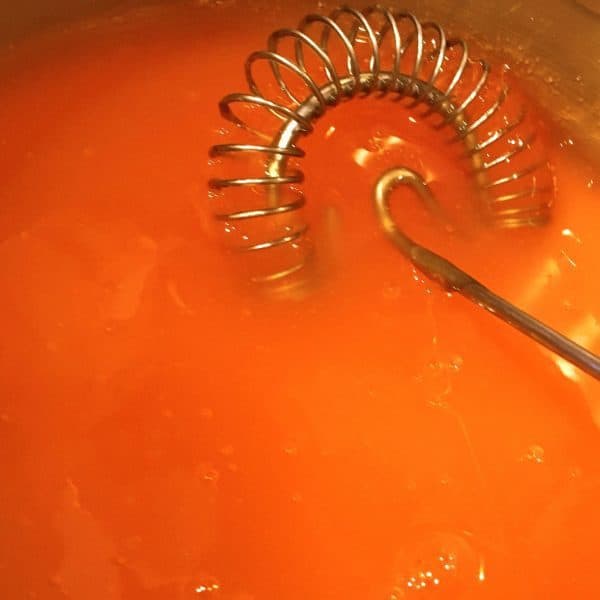
In a medium sauce pan, combine the water, sugar, vinegar (see tip below), and the reserved pineapple juice, plus orange food coloring (If you don’t have orange…red + yellow makes orange. One to two drops of each should do ya!). Heat over medium-high heat to boiling. Turn off the heat.
Combine the cornstarch and another ¼ cup water, slowly stir into the sauce pan with the other ingredients. Continue stirring until the mixture thickens.
Tip: I only add about half the vinegar called for in the recipe and taste test it. If it isn’t sour enough, I add a little more. You can always add more, but you can’t “un-sour” (My English teacher just rolled over in her grave poor thing) it once you’ve dumped the vinegar in.
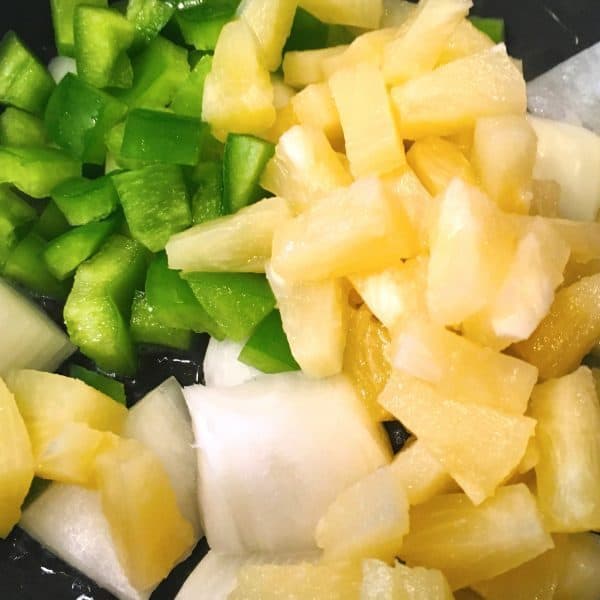
This next step is completely optional. If your family doesn’t like vegetables in their sweet and sour chicken, just skip this step, but you’ll still need that pineapple juice for the sauce.
Next, in a small skillet, sauté the veggies until slightly tender and crispy. Cool and set off to the side.