Have you ever stared at those plump chicken thighs in your fridge and thought, “Man, there’s a LOT of fat on these things”? You’re definitely not alone! I remember the first time I cooked chicken thighs – I was shocked by all the fatty bits hanging off them That led me down a culinary rabbit hole asking should I cut the fat off of chicken thighs, or leave it be?
Today, I’m gonna spill all the juicy details about chicken thigh fat – when to keep it, when to trim it, and how to do it right By the end, you’ll be a chicken thigh expert (weird flex, but okay)
The Big Fat Question: To Trim or Not to Trim?
Let’s get straight to the point – generally, you shouldn’t cut the fat off chicken thighs before cooking, especially if you’re roasting or pan-frying them. That might sound counterintuitive when you’re looking at those big globs of fat, but hear me out!
The fat on chicken thighs isn’t just some useless appendage – it’s basically a flavor factory that makes your chicken taste amazing. As the fat renders during cooking, it bastes the meat, keeping it moist and adding richness that just can’t be matched.
But I also know some of you are looking at those chicken thighs thinking, “Yeah right, I’m not eating THAT.” And that’s totally fine too! Sometimes trimming makes sense, and I’ll cover both sides of this tasty debate.
Why Chicken Thigh Fat Is Actually Your Friend
Before you grab those kitchen shears, let’s talk about what that fat is actually doing for your dinner:
- Flavor Bomb: The fat contains compounds that create that distinctive rich, savory chicken flavor we all love
- Natural Moisturizer: As the fat melts, it bastes the meat, preventing it from drying out
- Crispy Skin Maker: The fat helps the skin crisp up beautifully for that perfect texture contrast
- Schmaltz Producer: That rendered chicken fat (schmaltz) is liquid gold for cooking other dishes
When I first started cooking chicken thighs regularly, I was amazed at how much juicier and more flavorful they were than the boneless, skinless chicken breasts I’d been eating. The difference was like night and day, and it was mostly thanks to that fat content!
When Trimming Fat Makes Sense
Ok, I’m not a total fat evangelist. There are definitely times when trimming some fat is a good idea:
- Those giant flappy bits: Even as a fat enthusiast, I’ll admit those huge hanging pieces of fat don’t always fully render and can be unappetizing
- Strict dietary needs: If you’re following a very specific low-fat diet for health reasons
- Before grinding: If you’re grinding chicken thighs for something like chicken burgers
- Personal preference: Let’s be honest – some people just don’t like the texture or appearance
I’ve definitely been guilty of trimming my chicken thighs when cooking for certain friends who get squeamish about fat. No judgment here!
How to Properly Trim Chicken Thigh Fat (Without Ruining the Good Stuff)
If you’ve decided some trimming is in order, don’t just hack away randomly! There’s actually some technique involved to make sure you’re removing just the excess while preserving the good stuff.
Here’s my step-by-step process that takes about 45 seconds to a minute per thigh once you get the hang of it:
- Start with the obvious flaps: Those hanging pieces of fat are easy to spot and remove
- Check under the skin: Lift the skin edges slightly to find hidden fat strips
- Look for hidden fat pockets: On the underside, there are often pockets of fat you can remove
- Watch for the “Triangle of Fat”: This sneaky pocket (sometimes called “The Troublemaker”) runs deep and holds a surprising amount of fat
- Use the “nose dive” technique: Dig in slightly with scissors to see how deep fat pockets go
- Try “scissor skimming”: For thin layers of fat, skim scissors across the surface
I personally find kitchen shears work way better than knives for this job. They give you more control and make it easier to get into those tight spots.
Tools You’ll Need for Proper Fat Trimming
If you’re gonna trim that fat, make sure you’ve got the right tools:
- Sharp kitchen shears (my absolute favorite tool for this job)
- A sturdy cutting board (preferably with a groove to catch juices)
- Paper towels for patting things dry
- A bowl for discarded fat (it gets messy!)
I invested in a really good pair of kitchen shears a few years back, and lemme tell you – game changer! Makes trimming chicken thighs so much easier.
The Fat-Intact Method: How to Cook Chicken Thighs Without Trimming
If you’ve decided to keep the fat (high five!), here are some tips to ensure you get the most flavor without excess greasiness:
- Start with a cold pan for stovetop cooking – this helps the fat render slowly and evenly
- Leave space between thighs so air can circulate and fat can render properly
- Pour off excess rendered fat halfway through cooking if there’s too much
- Drain on a wire rack after cooking to let excess fat drip away
- Pat skin dry before cooking for maximum crispiness
My favorite method is starting skin-side down in a cold cast iron pan, then slowly bringing up the heat. The fat renders beautifully and you get the crispiest skin ever!
Frequently Asked Questions About Chicken Thigh Fat
I get asked these questions ALL the time about chicken thigh fat, so I thought I’d address them:
Will the chicken thighs be too greasy if I don’t trim the fat?
Nope! Properly cooked chicken thighs shouldn’t be excessively greasy. The fat renders during cooking, and you can drain off any excess. The rendered fat actually contributes to that juicy, delicious texture we love in thighs.
Does trimming the fat make chicken thighs healthier?
It does reduce some calories and fat content, but remember that fat isn’t inherently unhealthy. Chicken fat contains monounsaturated fats which are considered heart-healthy. Everything in moderation!
How do I know when chicken thighs are properly cooked?
The internal temperature should reach 165°F (74°C) when measured with a meat thermometer in the thickest part (avoid touching bone). The juices should run clear when pierced with a fork.
What can I do with the fat I trim off?
Don’t throw it away! Render it down to make schmaltz – liquid gold for cooking! Store it in the fridge for up to a week or freeze it for months. Use it for sautéing veggies, making crispy potatoes, or adding flavor to soups.
Can I use skinless chicken thighs to avoid dealing with fat?
Absolutely! Boneless, skinless thighs have much less fat to deal with. They won’t be quite as moist or flavorful as skin-on thighs, but they’re still tastier than chicken breasts.
The Perfect Middle Ground Approach
After years of cooking chicken thighs, I’ve settled on what I call my “middle ground approach”:
- Trim the excessive hanging fat pieces
- Keep the skin and fat that’s directly attached to the meat
- Remove any large hidden fat pockets on the underside
- Cook low and slow to render fat properly
This gives me the best of both worlds – all the flavor and moisture without the excessive fatty bits that don’t render well. Win-win!
My Favorite Fat-Friendly Chicken Thigh Recipes
Now that you’re a chicken thigh fat expert, here are some amazing recipes that work beautifully with untrimmed or lightly trimmed thighs:
- Crispy-Skin Roasted Thighs: Simple salt, pepper, and herbs at high heat (425°F)
- Braised Thighs with Vegetables: The rendered fat flavors the veggies – heaven!
- Grilled Thighs with Chimichurri: The fat helps prevent sticking and keeps them juicy
- One-Pot Chicken with Carrots & Fennel: The fat seasons the entire dish
I made the roasted thighs for a dinner party last month and my friends literally couldn’t stop talking about how juicy they were. Little did they know it was all thanks to that chicken fat I didn’t trim off!
The Bottom Line: What Should YOU Do?
So, should you cut the fat off chicken thighs? Here’s my honest take:
- For maximum flavor and moisture: Leave most of the fat intact
- For a balanced approach: Trim excessive fat flaps but keep the rest
- For strict dietary needs: Go ahead and trim thoroughly, but expect some flavor/moisture loss
- For convenience: Consider boneless, skinless thighs which need minimal trimming
At the end of the day, there’s no absolute right or wrong answer – it depends on your personal preference, dietary needs, and cooking method.
Me? I’m team “minimal trimming” all the way. Those delicious, juicy, flavor-packed thighs are worth the extra minute it takes to trim just the excessive bits!
What’s your approach to chicken thigh fat? Are you a trimmer or a leave-it-all-on cook? Drop me a comment below – I’d love to hear your thoughts and techniques!
How to trim chicken for BBQ gold
To get best results with chicken thighs, you need to trim them.
Bam Bam describes 3 levels of trimming, depending on how much effort you want to put in and how perfect you want the results to be. He calls them after different people and the *ahem* esteem given to each person.
- The Mother-in-law level is the easiest, lowest effort that results in acceptable chicken.
- Neighbors get a little more effort and finesse, and take a little bit more work.
- New Girlfriend/Boss gets the most show-off effort. This is the level that Bam Bam turns in at competitions.
Let’s examine them each in turn.
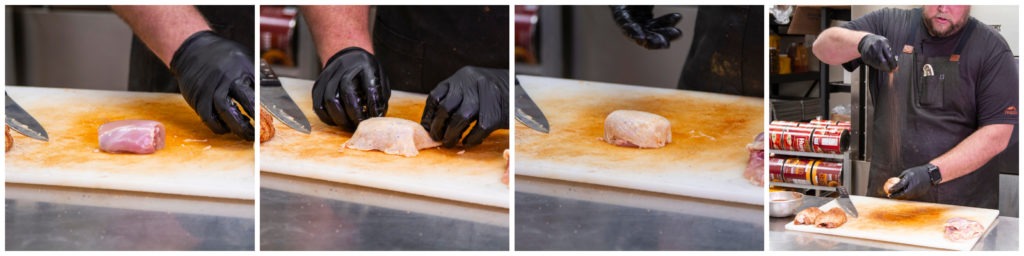
The Mother-in-law preparation is simple: apply rub to the bottom of the thigh, turn it over and apply it to the skin on the top side. Then grab the corners of the meat and skin that lay flabbily on the table. Fold the skin under the thigh, trying to leave no prints in the rub. Quickly trim any loose bits off, if you like. It’s quick, it’s easy, it won’t win any awards … but it still looks pretty nice and by tucking the skin under, you make the piece more uniform so that it cooks better.
If you want to create a more impressive chicken thigh—perhaps for a neighborhood cookout—but you don’t wave the time to apply the full competition prep to every thigh, Bam Bam recommends taking things a step or two further than for the Mother-in-law.
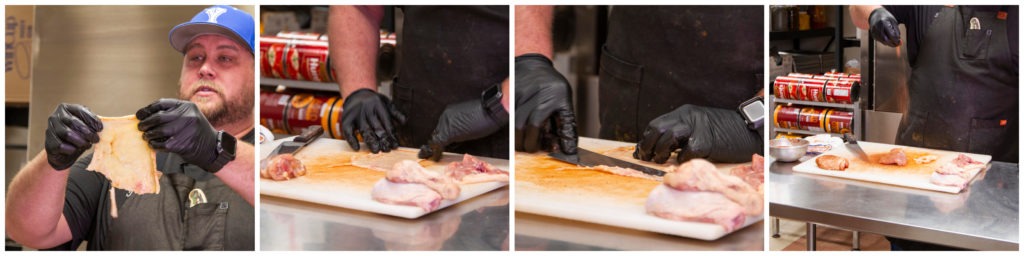
First, he says, pull the skin as far off the thigh as you can. It will stick along a seam of fat, so slice through that seam gently with a sharp knife to free the skin completely. With the skin removed, “cut anything off the meat itself that you aren’t going to eat,” he says.
Bam Bam trims off the fatty bits that cling to the meat. With the short length of this cook, he says, you won’t be rendering any blobs like that.
Once those bits have been trimmed, lay the joint out on the cutting board and trim any meat off that extends beyond the knuckle of the leg bone, squaring off the edge of the meat for a cleaner presentation.
The skin also gets a little more treatment in the Neighbor trim: Spread it out and, with your knife at a nearly flat angle, trim any high spots off of the fatty side by keeping the blade moving and letting the edge to the work so you don’t tear the skin. Cut it so that it is uniform and squared off on all sides. You don’t want to cut too much of the skin off, though. Bam Bam warns that the skin will shrink during cooking, so you want enough to be left that you can rewrap the chicken with a little bit of overlap on the bottom side.
Before rewrapping, you need to season the meat. Season both sides of the meat with a good rub.
Bam Bam uses this step as an opportunity to layer flavors by using more than one rub—one on the meat and another on the skin. “Keep it simple though,” he says. “Make sure the rubs you use work together. A lot of guys do too much fiddling with it.” If using a sweet rub, Bam Bam recommends layering it under the skin to minimize the risk of burning the sugars.
Once the meat is seasoned, wrap the thigh in skin, tuckingit together on the bottom. “Some guys use toothpicks to hold it together,” hesays. “Some guys even use meat glue”—his eyes roll and he scoffs—“but the day Ineed to use meat glue to compete, I’m done.” He simply lets the skin adhere tothe meat, knowing there will be some shrinkage.
Trim away the extra skin so that when it is re-wrapped onto the meat there is enough to cover the edible portion and overlap just a little bit. With the skin in place, season the piece lightly again, being careful to avoid smudging the rub.
This method gives you uniform, nice, even chicken with nogristly bits to interrupt your enjoyment. Certainly something you’d be proud toserve your neighbors. But there is yet one more level of chicken BBQ perfectionto achieve…
Competition trim starts like the neighbor trim by removing the skin completely from the thigh. When prepping for a competition, Bam Bam emphasizes that just because this piece of skin came from this thigh doesn’t mean it has to go back on this thigh. If a large thigh has barely enough skin to cover it and a small thigh has way too much, go ahead and trade skins around.
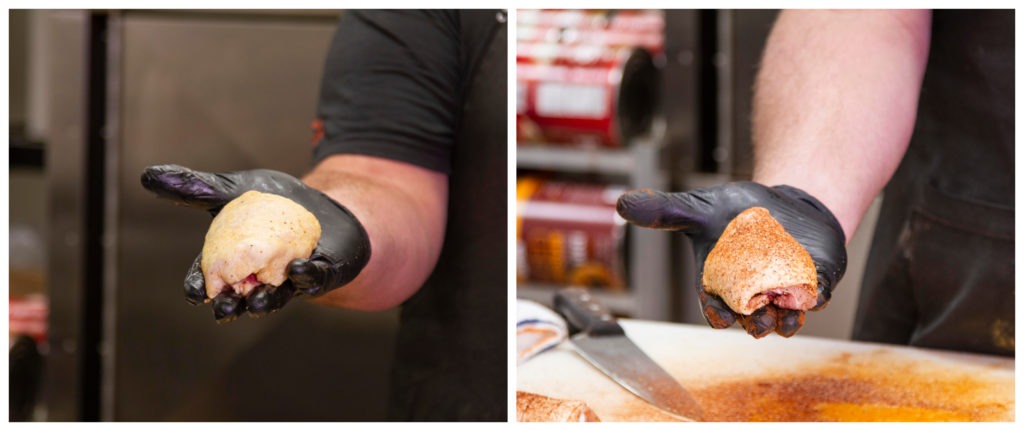
With the skins removed, Bam Bam’s next move is to “knockdown the high spots” with his knife laid almost perfectly flat against theskin. You need a very sharp knife to avoid tearing the tender skin, he says. Hepoints out that chicken skin itselfis quite translucent, letting a good deal of light through. If your skin isquite opaque then it has a lot of fat on it. Bam Bam does not recommendscraping all of that fat off, only the high spots, but he has a trick forgetting crisp, un-flabby skin that we’ll come to later.
Once the skins are taken care of, trim the meat. Remove the same fatty and gristly bits that we removed for the Neighbor cut, and square off the meat along the sides. If there are any obvious veins in the meat, trim them out with a sharp knife, and inspect the chicken for anything that could be seen as interrupting a ‘perfect’ bite.
To make a more uniform piece, and to make pieces that aresmall enough to fit six to a box for the judges, Bam Bam cuts the knuckle ofthe thigh bone off. “Find this little line of fat,” he says, and cut theknuckle off along that line. “Some guys use garden shears, me, I just…” (atthis point Bam Bam placed the knife edge where he wanted to cut the bone, andpounded the spine with his other hand, popping the knuckle clean off.)
While preparing the thighs for actual cooking, Bam Bamtalked a little bit about competitions and judging. Emphasizing the “one-bite” judging thathappens, he holds up a thigh, demonstrating that there is a meatier side of thebone and a less meaty side. “I’ll put that side facing the judges,” he says.Most people, he says, just pick it up and take a bite without turning it aroundor anything, so that first bite can be improved by positioning it correctly inthe turn-in box.
To make sure the very best chicken gets turned in, he says that he’ll cook 10–12 thighs if six are to be turned in. That way the best looking, best-done pieces can be used. But, he says, “if it’s cooked right and tastes good, you’re gonna beat 80% of the competition … taste is the biggest score” on the scorecard.
To season the pieces, Bam Bam will hold each piece in one hand while sprinkling rub with the other, moving both around to get even, light coverage. He then wraps the thighs in skin and seasons them again in the same way, being extra careful not to smudge the rub.
The result is a rectangular, compact, completely uniform piece of chicken that is going to cook evenly and present nothing but perfection on the first bite. The competition style is the most compact, the most even