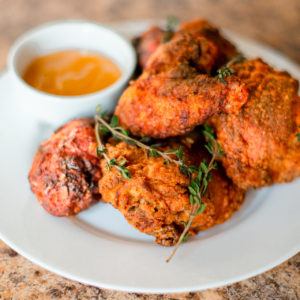
Hey there, fellow food lovers! Today I’m super excited to share my absolute favorite recipe for honey fried chicken. This dish has become a staple in my home, and once you try it, you’ll understand why! There’s something magical about the combination of crispy, seasoned chicken with that sweet honey drizzle that makes everyone at the table go “mmmmm” with that first bite.
So grab your apron and let’s get cookin’! I promise this honey fried chicken recipe is easier than you might think, and the results are seriously worth it.
Why Honey Fried Chicken Is My Go-To Dinner Option
Before we dive into the recipe, let me tell you why I’m obsessed with honey fried chicken. First off, it’s the perfect blend of sweet and savory flavors. The crispy coating provides that satisfying crunch, while the honey adds a touch of sweetness that elevates the whole dish.
Plus it’s versatile! You can serve it for a casual family dinner, at a picnic or even for guests when you want to impress without spending hours in the kitchen. My kids absolutely devour it, and even my picky mother-in-law asks for seconds!
Ingredients You’ll Need
For the Chicken:
- 2 whole chickens (about 4 pounds each), cut into 10 pieces each
- 4 cups buttermilk
- 2 tablespoons kosher salt (divided)
- 1½ tablespoons black pepper (divided)
- 1 tablespoon plus 1 teaspoon paprika (divided)
- 4 cups all-purpose flour
- 2 tablespoons garlic powder
- 2 tablespoons onion powder
- 8 cups vegetable or canola oil (for frying)
- 4 large eggs (beaten)
- 1 teaspoon dried oregano (optional)
- ¼ teaspoon cayenne pepper (adjust to taste)
For the Honey Sauce
- 1 cup honey
- 4 tablespoons soy sauce
- 4 cloves garlic, minced
- 2 tablespoons cornstarch
- ¼ cup water (to mix with cornstarch)
Equipment You’ll Need
- Large deep pot or Dutch oven
- Deep-frying thermometer
- Large mixing bowls
- Cooling rack
- Baking sheet
- Tongs
- Paper towels
- Small saucepan (for the honey sauce)
- Whisk
Step-by-Step Instructions for Perfect Honey Fried Chicken
Step 1: Marinate the Chicken
First things first, we need to get that chicken marinating! This step is super important for tender, flavorful meat
- Place all your chicken pieces in a large bowl.
- Add the buttermilk, 1 tablespoon of salt, 1 tablespoon of black pepper, and 1 teaspoon of paprika.
- Mix everything together so the chicken is well coated.
- Cover the bowl and let it marinate in the refrigerator for at least 1 hour, but honestly, the longer the better! I like to prep this in the morning and let it sit all day for dinner. You can marinate for up to 4 hours.
Step 2: Prepare the Coating
While your chicken is getting all flavorful in the fridge, let’s prepare the coating:
- In a large bowl, whisk together the flour, garlic powder, onion powder, remaining salt (¾ tablespoon), remaining black pepper (½ tablespoon), and remaining paprika (1 tablespoon).
- If you like a bit of extra flavor, add the dried oregano and cayenne pepper.
- Whisk everything together until well combined.
Step 3: Prepare the Honey Sauce
Let’s make that amazing honey sauce while we’re waiting:
- In a medium saucepan, combine the honey, minced garlic, and soy sauce over medium-high heat.
- In a small bowl, mix the cornstarch with ¼ cup of water until smooth.
- Pour the cornstarch mixture into the saucepan and stir continuously.
- Keep stirring until the sauce thickens, which should take about 1-2 minutes.
- Remove from heat and set aside.
Step 4: Heat the Oil
- Pour enough oil into your deep pot or Dutch oven to fill it about 3-4 inches deep.
- Heat the oil over medium-high heat until it reaches 350°F on your deep-frying thermometer.
- While the oil is heating, set up your cooling rack over a baking sheet nearby.
Step 5: Coat the Chicken
This is where it gets a little messy, but trust me, it’s worth it!
- Take the chicken pieces out of the buttermilk mixture, allowing excess to drip off.
- In a separate bowl, beat the eggs until smooth.
- Dredge each piece of chicken in the flour mixture, making sure it’s completely coated.
- Dip the floured chicken into the beaten eggs.
- Dredge the chicken in the flour mixture again for a second coating.
- Place the coated chicken on a plate or baking sheet until ready to fry.
Step 6: Fry the Chicken
Now comes the exciting part!
- Carefully add the chicken pieces to the hot oil, starting with legs and thighs. Don’t overcrowd the pot! Work in batches if necessary.
- Fry the legs and thighs for about 5-6 minutes per side, until they’re golden brown and crispy.
- Transfer the cooked pieces to your prepared cooling rack.
- Next, fry the wings and breast pieces for about 3-5 minutes per side.
- Transfer these pieces to the cooling rack as well.
- Use a meat thermometer to check that the internal temperature of the chicken reaches 165°F to ensure it’s fully cooked.
Step 7: Serve and Enjoy!
- Drizzle the honey sauce over the chicken just before serving, or serve it on the side for dipping.
- For a nice presentation, you can sprinkle some sliced green onions or sesame seeds on top.
- Serve immediately while still hot and crispy!
Tips for Honey Fried Chicken Success
- Don’t skip the marinating step! The buttermilk tenderizes the chicken and helps the coating stick better.
- Check your oil temperature frequently. If it’s too hot, the outside will burn before the inside cooks. If it’s too cool, the chicken will absorb too much oil and become greasy.
- Don’t overcrowd the pot when frying. This lowers the oil temperature and results in soggy chicken.
- Let the chicken rest on the cooling rack for a few minutes before serving. This helps excess oil drain off and keeps the coating crispy.
- For a spicier kick, add some red pepper flakes or hot sauce to your honey sauce.
- If you’re cooking for a crowd, you can keep the fried chicken warm in a 200°F oven while you finish frying all batches.
What to Serve with Honey Fried Chicken
I love serving my honey fried chicken with:
- Fluffy white rice or brown rice
- Crisp coleslaw
- Fresh corn on the cob
- Buttermilk biscuits
- Mac and cheese
- Collard greens or green beans
- Mashed potatoes
Storing and Reheating Leftovers
If you somehow end up with leftovers (which rarely happens in my house!), here’s how to store and reheat them:
- Let the chicken cool completely before storing.
- Place in an airtight container and refrigerate for up to 3 days.
- To reheat, place the chicken on a baking sheet in a 350°F oven for about 15 minutes, or until heated through. This helps maintain the crispiness better than microwaving.
- You can also freeze the chicken for up to 3 months. Thaw in the refrigerator overnight before reheating.
Make It Your Own!
One thing I love about this recipe is how versatile it is. Here are some ways you can customize it:
- Try different cuts of chicken – all thighs, all wings, or even chicken tenders work great!
- Add different spices to the flour mixture – try Italian seasoning, smoked paprika, or a Cajun spice blend.
- Make it gluten-free by using gluten-free flour and making sure your soy sauce is gluten-free.
- For a healthier version, you can use skinless chicken pieces and/or bake the chicken instead of frying.
Why This Recipe Works Every Time
I’ve made this honey fried chicken recipe dozens of times, and it’s always a hit. The double coating creates an extra crispy exterior that seals in the juices, resulting in moist, flavorful meat. The sweet-savory balance of the honey sauce complements the savory chicken perfectly, creating a flavor combination that’s absolutely irresistible.
Common Questions About Honey Fried Chicken
Q: Can I use a different type of oil for frying?
A: Yes! Any neutral oil with a high smoke point works well. Vegetable, canola, peanut, or sunflower oil are all good options.
Q: What if I don’t have buttermilk?
A: You can make your own by adding 1 tablespoon of lemon juice or white vinegar to 1 cup of milk. Let it sit for 5-10 minutes before using.
Q: Can I make this recipe without a deep-fry thermometer?
A: While a thermometer gives the most accurate results, you can test the oil by dropping a small piece of bread into it. If it sizzles and browns in about 60 seconds, the oil is ready.
Q: Is there a way to make this recipe less messy?
A: The coating process can be messy, but you can create a station with one hand for dry ingredients and one for wet. Also, try using tongs to handle the chicken during coating.
Q: Can I prepare the chicken ahead of time?
A: You can marinate the chicken up to a day in advance and prepare the flour mixture ahead of time, but it’s best to coat and fry the chicken just before serving for maximum crispiness.
So there you have it – my favorite honey fried chicken recipe that’s guaranteed to make you the star of dinner time! It’s crunchy, juicy, sweet, savory, and absolutely delicious. Give it a try this weekend and watch your family’s eyes light up when they taste it!

Incredible Amish Honey Fried Chicken
- 1 4 pound whole chicken, cut into pieces
- salt and pepper to taste
- ½ cup honey
- 1 tablespoon garlic powder
- 1 packet chicken bouillon granules
- 2 cups all-purpose flour
- 1 quart vegetable oil for frying
- Season chicken pieces with salt and pepper, then coat each seasoned chicken piece with honey.
- In a shallow dish or bowl, mix together the garlic powder, chicken bouillon granules and flour.
- Dredge honey coated chicken pieces in flour mixture, coating completely.
- Fill a large, heavy skillet with oil to a depth of one inch. Heat over medium-high heat.
- Fry chicken for at least 5 minutes per side, until no longer pink and juices run
More Amish Recipes With Honey
Honey Nut Swirl Coffeecake