Have you ever pulled frozen chicken tenders from your oven only to find them disappointingly soggy instead of crispy? I’ve been there too! After years of experimenting and testing different methods, I’ve finally cracked the code to making frozen chicken tenders that are deliciously crispy on the outside while staying juicy on the inside.
In this comprehensive guide, I’ll share all my secrets and proven techniques that transform those humble freezer staples into a crunchy delight your whole family will love No more sad, soggy tenders – let’s get that satisfying crunch you’ve been craving!
Understanding Why Your Frozen Tenders Get Soggy
Before diving into the solutions it helps to understand the problem. Frozen chicken tenders contain significant moisture from the freezing process. When this moisture isn’t properly managed during cooking it prevents the breading from crisping up and instead creates a soggy exterior.
The key to crispy tenders lies in
- Removing surface moisture quickly
- Promoting even browning
- Ensuring proper air circulation
Essential Steps for Perfect Crispy Chicken Tenders
1. Preheat Your Oven Properly
This might seem basic, but it’s absolutely crucial! A fully preheated oven is the foundation for crispy chicken tenders.
What to do:
- Set your oven to 400°F (200°C)
- Allow it to reach temperature completely before adding your tenders
- This high heat immediately starts evaporating moisture and triggers browning
If you skip proper preheating, your tenders will slowly steam instead of crisp up as the oven gradually warms.
2. Use a Wire Rack (Game-Changing Technique!)
This simple tool makes a huge difference in crispiness levels!
Why it works:
- Elevates tenders above the baking sheet
- Allows hot air to circulate underneath
- Prevents tenders from sitting in their own moisture
If you don’t have a wire rack, your tenders’ bottoms will sit in released moisture, resulting in a soggy underbelly even if the tops crisp up.
3. Don’t Overcrowd the Baking Sheet
I used to make this mistake all the time! When you pack too many tenders onto one tray, you’re setting yourself up for disappointment.
What happens with overcrowding:
- Lowers the oven temperature around the tenders
- Traps moisture between pieces
- Prevents proper air circulation
Leave some breathing room between each tender. If necessary, work in batches rather than cramming them all in at once.
4. The Oil Trick (My Secret Weapon!)
Even though frozen tenders come pre-coated with oil, a light additional spray can significantly enhance crispiness.
How to do it:
- Lightly spritz tenders with cooking spray or brush with a small amount of oil
- Focus on any dry-looking areas of breading
- Use vegetable, canola, or olive oil
This extra oil promotes better browning and prevents the breading from drying out and becoming tough instead of crispy.
5. Flip for Even Browning
For evenly crispy tenders, you need to flip them halfway through cooking.
Flipping technique:
- Use tongs to gently turn each tender
- Flip around the 10-minute mark
- Be careful not to tear the breading
This ensures both sides get equal exposure to heat for uniform crispiness.
Step-by-Step Cooking Method
- Preheat your oven to 400°F (200°C)
- Line a baking sheet with foil for easy cleanup
- Place a wire rack on the baking sheet
- Arrange frozen chicken tenders on the rack with space between each piece
- Lightly spray or brush tenders with cooking oil
- Cook for 15-20 minutes total, flipping halfway through
- Check that internal temperature reaches 165°F (74°C)
- For extra crispiness, broil for 1-2 minutes at the end (watch carefully!)
Pro Tips for Next-Level Crispiness
Don’t Thaw First!
Cook tenders directly from frozen. Thawing releases too much moisture and results in soggier tenders.
Try the Convection Setting
If your oven has a convection feature, use it! The fan circulates hot air more efficiently for even crispier results. Reduce cooking time by about 2 minutes when using convection.
Season Before Cooking
Add extra flavor by sprinkling seasoning over your tenders before baking:
- Garlic powder
- Paprika
- Italian seasoning
- Cajun seasoning
- Grated Parmesan
Finish with the Broiler
For an extra crispy finish, switch to the broiler setting for the last 1-2 minutes of cooking time. Watch carefully to prevent burning!
Troubleshooting Crispy Tenders
Problem: Tenders Browning Too Quickly
If your tenders are getting too brown before they’re fully cooked inside:
- Lower the oven temperature to 375°F
- Loosely tent with foil while they finish cooking
Problem: Breading Falls Off
If the breading is separating from your tenders:
- Handle them minimally
- Make sure your wire rack is clean and non-stick
- Try gently patting the breading back in place before cooking
Problem: Tenders Already Soggy from the Package
Sometimes tenders can develop frost or moisture in the package:
- Pat them dry with paper towels before cooking
- Add a bit more cooking spray to compensate
- Consider cooking at 425°F instead of 400°F
Air Fryer Alternative
Got an air fryer? It’s perfect for crispy chicken tenders!
Air fryer method:
- Preheat air fryer to 375°F (190°C)
- Lightly spray basket and tenders with oil
- Cook for 10-12 minutes, flipping halfway through
- Check for 165°F internal temperature
The air fryer often produces even crispier results than the oven due to its superior air circulation.
Serving Suggestions
Your perfectly crispy chicken tenders deserve some awesome dipping sauces! Try:
- Honey mustard
- Ranch dressing
- BBQ sauce
- Buffalo sauce
- Ketchup (a classic for a reason!)
Storing and Reheating
If you somehow have leftovers, here’s how to keep them crispy:
Storage:
- Refrigerate in an airtight container for up to 3-4 days
- Don’t stack tenders; use parchment paper between layers
Reheating for crispiness:
- Oven: 350°F for 10 minutes
- Air fryer: 325°F for 3-4 minutes
- Avoid microwaving (it’ll make them soggy)
Not All Brands Are Created Equal
I’ve noticed significant differences between brands of frozen chicken tenders. Some crisp up beautifully while others remain stubbornly soggy no matter what you do.
Consider trying different brands until you find one that consistently gives you the texture you want. Some brands are specifically formulated to be extra crispy when baked.
Final Thoughts
With these techniques, you can transform ordinary frozen chicken tenders into a crispy, satisfying meal that nobody will guess came from the freezer. The keys are proper heat, good air circulation, and a few simple tricks like the wire rack and light oil coating.
Next time you’re staring at that bag of frozen tenders, remember these tips and enjoy the crispy goodness that follows! Your family will think you’ve performed some kind of kitchen magic – no need to tell them how easy it actually was!
What’s your favorite way to serve crispy chicken tenders? Do you have any additional tips? I’d love to hear about your experiences in the comments!

Quick things to remember:
- Cooking time: Depending on the size and thickness of your chicken pieces, you may need to adjust the cooking time, so always check your chicken for doneness before diving in.
- Add oil: If the pan is dry when you flip the chicken, add a drizzle of oil, to the to ensure the bottom pieces of chicken get crispy.
What people are saying:
“WoW – Absoltely FanTAStic!!! A random search on Google led me to your site and after seeing the huge numbers of high ratings, decided to give it a shot. SO GLAD I did – crispy yet juicy and spot on flavor. With a real feel of -22 in ND, this was Exactly what I needed. Highlight of my weekend ” Gabriella
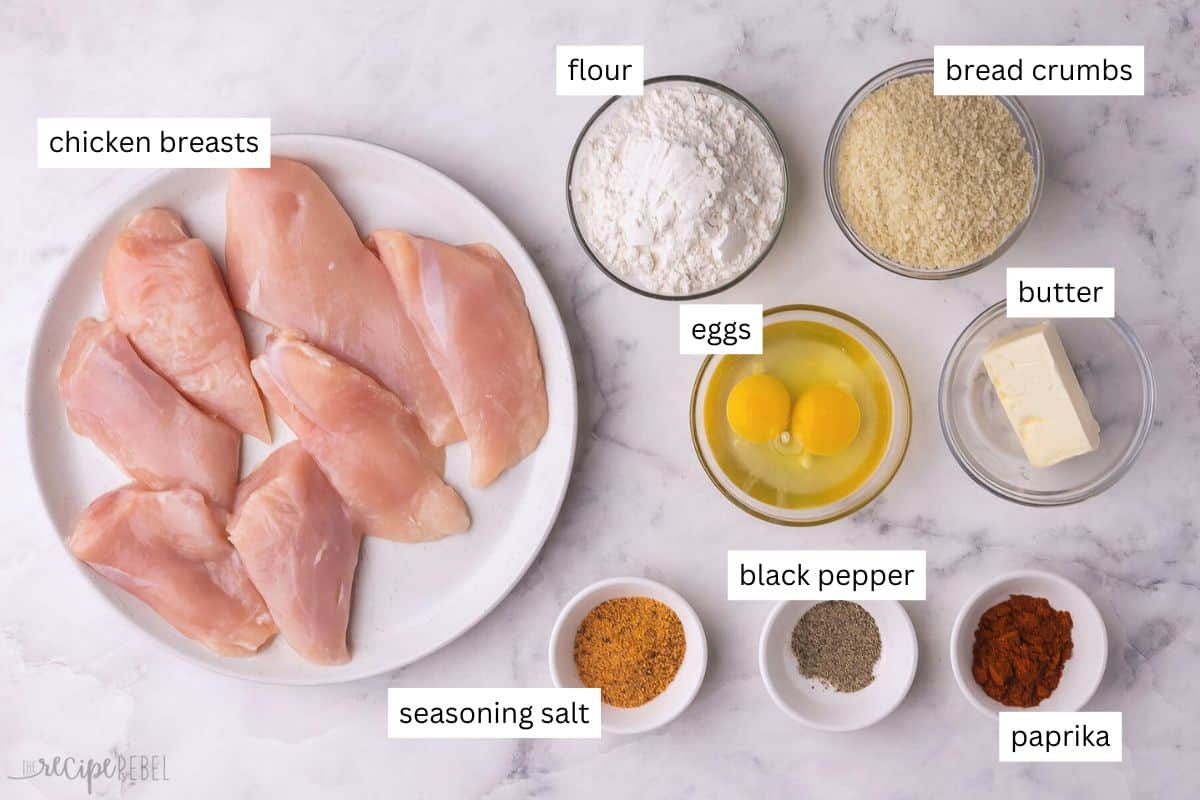
- Chicken breast: One batch of this recipe makes about 3-4 chicken breasts, or around one and a half pounds, cut into strips. One chicken breast equals about three strips, the way I cut them. You could also use tenders, thighs, or legs!
- Eggs: Coat your chicken with beaten eggs to help the coating stick more.
- Butter: Salted or unsalted butter is fine.
- Flour: All-purpose flour helps coat the chicken to produce a crispy exterior! You can swap with gluten-free flour if needed.
- Panko: Panko breadcrumbs give the chicken a crunchy, crispy coating. For a gluten-free option, you can use pork rind panko!
- Seasoned salt: This versatile seasoning goes with everything! I use Lawry’s brand, but feel free to use your favorite brand.
- Paprika: It isn’t spicy, but it adds depth of flavor, a slight sweetness, and lots of color. You could add a dash of cayenne pepper to make it spicier if you like!
How to Cook Frozen Chicken Tenders | Crispy Perfection!
FAQ
How to crisp up chicken tenders in the oven?
Lightly spray the tops with cooking spray or a little olive oil to help them crisp up in the oven. Bake: Bake for 10 minutes, then flip each tender and bake for an additional 8-10 minutes, or until golden and cooked through.Aug 18, 2025
How long do I cook frozen chicken in the oven at 400 degrees?
How to make frozen crispy chicken crispy?
Bake at 425 degrees for 15 minutes or until heated through. Alternatively, air fry frozen chicken at 375 degrees F for 15-20 minutes, depending on the size of the chicken pieces, flipping halfway through.