Hey there, kitchen warriors! Ever stared at a pack of chicken breasts and thought “Man, I wish I could turn these into juicy chicken tenders without shellin’ out extra cash at the store”? Well you’re in luck! I’m here to walk ya through how to cut chicken tenders from chicken breast like a total boss. It’s cheaper, super easy once you get the hang of it, and you’ll feel like a legit chef in no time. Plus, homemade chicken tenders? They just hit different—trust me.
We’ve all been there craving some crispy tenders for a quick dinner or a dope sandwich, but pre-cut ones can cost a pretty penny. Why not DIY it? With a few tools and some simple tricks up your sleeve, you can slice up chicken breasts into perfect tenders right in your own kitchen. I remember the first time I tried this—I was a hot mess slippin’ all over the place, but now? I got it down pat, and you will too. Let’s dive straight into the good stuff and get those chicken tenders ready for fryin’, grillin’, or whatever you’re cookin’ up!
Why Cut Your Own Chicken Tenders? The Real Deal
Before we grab that knife, let’s chat about why botherin’ to cut chicken tenders from chicken breast is worth your time First off, it saves you dough—store-bought tenders are marked up just ‘cause they’re pre-sliced Second, you control the size and shape. Want thick tenders for a hearty meal or thin strips for a stir-fry? You got it. Lastly, it’s fresh as heck. You know exactly what you’re working with—no weird preservatives or mystery cuts.
I ain’t gonna lie, the first few times might be a lil’ messy, but once you nail the technique, it’s smooth sailin’. Plus, there’s somethin’ real satisfyin’ about turnin’ a plain ol’ chicken breast into a pile of perfect chicken tenders. So, let’s gear up and get started!
Tools You’ll Need to Cut Chicken Tenders Like a Champ
You don’t need a fancy kitchen to pull this off—just some basic gear. Here’s what we’re workin’ with to cut chicken tenders from chicken breast. I’ve thrown it into a neat table so you can check it off quick.
| Tool | Why You Need It | Pro Tip |
|---|---|---|
| Sharp Chef’s Knife | For clean, safe cuts through the chicken breast. | Get a 8-10 inch one and sharpen it first! |
| Cutting Board | A stable surface to slice on. | Use plastic or wood, keep it meat-only. |
| Chicken Breast | The star of the show, boneless and skinless is best. | Pat it dry to avoid slippin’. |
| Kitchen Shears (Optional) | An easier way to cut if knives ain’t your thing. | Get detachable ones for easy cleanin’. |
| Paper Towels | To soak up moisture and keep things less slippery. | Lay ‘em under the board for extra grip. |
That’s it! Nothin’ crazy, right? I usually stick with a sharp knife ‘cause it gives me more control, but if you’re nervous about slicin’ yourself, kitchen shears are a solid backup for cuttin’ chicken tenders from chicken breast. Make sure everything’s clean before you start—raw chicken ain’t no joke when it comes to germs.
Step-by-Step: How to Cut Chicken Tenders from Chicken Breast
Alright, let’s get down to business. I’m gonna break this into clear steps so you can follow along and cut them chicken tenders from chicken breast without a hitch. Grab your gear, wash your hands real good, and let’s do this!
Step 1: Set Up Your Workspace
First things first, clear off your counter and make sure it’s squeaky clean. Wash your cutting board, knife, and hands with hot soapy water. I like to lay down some paper towels on the counter under my board to catch any drips and keep stuff from slidin’ around. Raw chicken can spread bacteria faster than gossip, so keep a trash can nearby for scraps and don’t touch nothin’ else while you’re at it.
Step 2: Prep That Chicken Breast
Take your chicken breast outta the package—boneless and skinless is the way to go for ease. Pat it dry with a paper towel ‘cause wet chicken is slipperier than a greased pig. If it’s super slimy, pop it in the freezer for about 15 minutes to firm it up. I’ve done this a bunch when my hands just couldn’t get a grip, and it works like a charm for cuttin’ chicken tenders from chicken breast.
Step 3: Position the Chicken Right
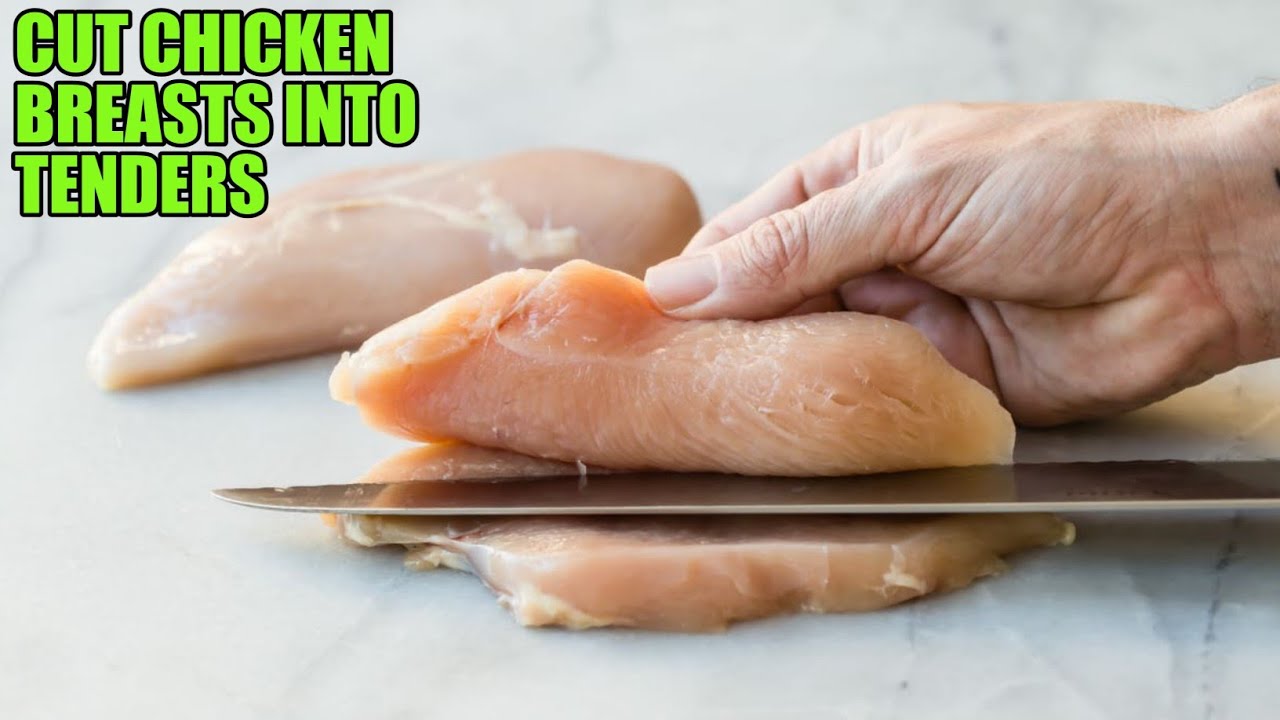
Place that chicken breast on your cutting board, smooth side down, so the bumpy side is facin’ up. Press down gently with your non-cuttin’ hand to keep it steady. Here’s the trick: tuck your fingers under and keep your knuckles up so the knife don’t nick ya. Safety first, y’all—I learned that the hard way with a lil’ cut once. Ouch!
Step 4: Spot the Grain for Tenderness
Take a sec to eyeball the chicken breast. You’ll see tiny white lines runnin’ lengthwise—that’s the grain, the muscle fibers. Here’s the golden rule: always cut against the grain. If you cut with it, your chicken tenders gonna be chewy and tough as leather. Cutting across makes ‘em tender and juicy, perfect for bitin’ into. I can’t stress this enough when you’re slicin’ chicken tenders from chicken breast.
Step 5: Make the First Horizontal Slice
Holdin’ the breast steady, grab your sharp knife and start at the thickest part. Make a horizontal cut across the breast, perpendicular to the grain, to kinda halve the thickness. Don’t slice all the way through yet—just get it evened out. This step makes the next cuts way easier. I usually go slow here ‘cause rushin’ can mess up the whole shape of my chicken tenders.
Step 6: Slice Into Vertical Strips
Now, with the breast flatter, make vertical cuts down through it, still goin’ against the grain. Aim for strips about 1 inch wide so they cook even. Use smooth, controlled strokes—don’t saw at it like you’re choppin’ wood, or you’ll get ragged edges. Angle the knife a tad if you need to separate the meat. This is where you’re really formin’ those chicken tenders from chicken breast, so take your time.
Step 7: Finish Separatin’ the Tenders
Once you’ve got your strips cut, go through and slice off any leftover connective tissue or bits hangin’ on. Check for sneaky fat or bone fragments (even in boneless cuts sometimes!) and trim ‘em off. Boom, you’ve got yourself a nice stack of chicken tenders! Rinse your knife right after and sanitize that cutting board to keep things safe.
What’s the Diff Between Chicken Tenders and Strips?
Now that you’ve mastered how to cut chicken tenders from chicken breast, let’s clear up a lil’ confusion I used to have. Are chicken tenders and chicken strips the same dang thing? Not quite! Here’s the lowdown:
- Chicken Tenders: These are specific cuts from the breast, often a small strip near a thin membrane. There’s usually just two per breast, and they’re super tender—hence the name. You can sometimes pull ‘em off without even a knife!
- Chicken Strips: This is more general. Any long cut from the chicken breast counts as a strip, includin’ tenders. You might get a dozen strips from one breast dependin’ on how ya slice it.
So, all tenders are strips, but not all strips are true tenders. When I cut chicken tenders from chicken breast, I usually aim for strips ‘cause I get more outta it, but if I’m feelin’ fancy, I’ll hunt for those real tender pieces. Taste-wise, they’re pretty close, though tenders might be a smidge softer.
Safety Tips: Don’t Mess Around with Raw Chicken
I ain’t gonna sugarcoat it—raw chicken can be a germ party if you’re not careful. When you’re cuttin’ chicken tenders from chicken breast, keep these in mind to avoid a trip to the doc:
- Stay Focused: Don’t get distracted. One wrong move with a sharp knife and you’re in trouble.
- Cut Away from Yourself: Always point that blade away from your body. Tuck them fingers under!
- Sharp Knife is Safer: A dull knife slips more. Keep it sharp for clean cuts.
- Wash Everything: Hands, knife, board—scrub ‘em down right after. Don’t let raw chicken juice touch other food.
- Don’t Wash the Chicken: I know some folks swear by rinsin’ it, but that just splashes germs everywhere. Cookin’ kills the bad stuff, so skip the sink.
I’ve had a close call or two with cross-contamination back in the day, so now I’m extra paranoid. Keep a separate cutting board just for meat if you can. Better safe than sorry!
Storin’ Your Freshly Cut Chicken Tenders
Once you’ve cut your chicken tenders from chicken breast, ya gotta store ‘em right to keep ‘em fresh and safe. Here’s how I do it:
- Fridge: Pop raw tenders into an airtight container or bag and stash ‘em in the coldest part of your fridge. Use within 1-2 days, no longer.
- Freezer: If you ain’t cookin’ soon, freeze ‘em in freezer bags for up to 2-3 months. Thaw in the fridge, not on the counter.
- Cooked Tenders: Store cooked ones in a sealed container in the fridge for 3-4 days. I don’t recommend freezin’ cooked chicken—it gets weird.
Always check the smell and look before usin’ raw chicken tenders. If it’s off, toss it. I’ve learned that the hard way after tryin’ to “save” some questionable meat. Yuck!
Gettin’ Creative with Your Chicken Tenders
Now that you’ve got a pile of chicken tenders cut from chicken breast, let’s talk about what to do with ‘em. These babies are crazy versatile, and I’ve tried a ton of ways to cook ‘em up. Here are some ideas to get ya hyped:
- Crispy Fried Tenders: Bread ‘em with flour, egg, and panko, then fry for that golden crunch. Dip in honey mustard or ranch—chef’s kiss!
- Buffalo Style: Toss cooked tenders in hot sauce and pair with blue cheese dressin’. Perfect for game night.
- Skewers: Thread ‘em on sticks with veggies, glaze with teriyaki, and grill. Looks fancy, tastes amazin’.
- Salad Toppers: Slice cooked tenders into bits and throw ‘em on a salad for extra protein. I’m obsessed with this for lunch.
- Wraps or Subs: Stuff ‘em in a tortilla or hoagie with some lettuce and mayo. Quick and fillin’!
- Pasta or Soup: Cut into small chunks and add to creamy pasta or hearty soup. It’s comfort food at its finest.
I love experimentin’ with flavors—sometimes I marinate my chicken tenders in buttermilk and spices before cookin’. It makes ‘em extra juicy and tasty. What’s your go-to way to eat ‘em? I’m always lookin’ for new ideas!
Bonus Tricks for Better Chicken Tenders
Wanna level up your game when cuttin’ chicken tenders from chicken breast? Here’s a few extra nuggets of wisdom I’ve picked up over the years:
- Marinate for Flavor: Soak ‘em in buttermilk, lemon juice, or herbs for a bit before cookin’. Adds moisture and a flavor punch.
- Breadin’ Hacks: Try mixin’ some olive oil into panko crumbs and toastin’ ‘em in the oven first. Gives a golden look without undercooked edges.
- Even Cookin’: Keep strips the same size for uniform cookin’. Nothin’ worse than half raw, half overdone tenders.
- Gluten-Free Vibes: Use almond or coconut flour for breadin’ if you’re avoidin’ gluten. Works just as good!
I’ve botched plenty of batches before figurin’ these out, so learn from my mistakes. It’s all about trial and error in the kitchen, right?
Why Cutting Against the Grain is a Game-Changer
I’ve mentioned this a bunch, but let’s hammer it home one more time. When you cut chicken tenders from chicken breast, slicin’ against the grain ain’t just a suggestion—it’s the secret to tenderness. Them little white muscle fibers run in one direction, and cuttin’ across ‘em shortens the fibers so the meat don’t get stringy. If you cut with the grain, it’s like chewin’ rubber bands. No thanks!
Next time you’re slicin’, really look for that grain. It’s subtle, but once you spot it, you’ll never unsee it. I’ve had folks rave about my tenders just ‘cause I took this step serious. Small effort, big payoff!
Wrappin’ It Up: You Got This!
There ya have it, fam—a full-on guide to how to cut chicken tenders from chicken breast without breakin’ a sweat. From grabbin’ your sharp knife to slicin’ against the grain, you’ve got all the steps to turn a basic chicken breast into a stack of juicy tenders. It’s cheaper, fresher, and honestly, kinda fun to do yourself. I still get a kick outta seein’ my neat lil’ strips ready for the pan.
So, what’re ya waitin’ for? Snag a chicken breast, set up that cutting board, and give it a shot. Even if it’s a lil’ messy at first (lord knows mine were), practice makes perfect. Drop a comment if you’ve got tricks or recipes for chicken tenders—I’m all ears! Let’s keep this kitchen convo goin’. Happy slicin’, y’all!
How to Store Chicken Strips
Leftover chicken strips should be kept in the refrigerator. Transfer them to an airtight container and store for up to four days. They taste delicious reheated in an oven or toaster oven, or enjoyed cold.
Ingredients for Chicken Strips
- Chicken: Boneless, skinless chicken breasts is the best cut of chicken for strips. They cook quickly and stay super tender and juicy with the crunchy coating. Slice the chicken in thin strips before cooking to ensure that the meat cooks evenly, and each bite is nicely coated.
- Saltines: Saltines a super crunchy when crushed and come pre-seasoned with salt. You may use panko, another kind of crushed cracker or one of these other substitutes for bread crumbs.
- Spices: Seasoning the breading adds lots of savory flavor to these chicken strips. This recipe calls for a simple, all-purpose blend of garlic salt, dried basil, paprika and pepper.
- Eggs and milk: Milk contains lactic acid, which helps to tenderize the chicken, while the egg’s thickness helps the crumbs adhere, and its high protein content browns nicely.
- Oil for frying: Like other deep-fryer recipes, make sure to use an oil with a high smoke point. Canola, safflower, peanut, corn, soybean and sunflower oils are all good choices.
How to Cut Chicken Breast Into Strips, Fingers, Fajitas, Tenders, Slices – Basic Culinary Techniques
FAQ
Are chicken tenders just cut up chicken breast?
Chicken tenders are primarily made from chicken breast meat, specifically the tenderloin part, which is a small strip of meat located just beneath the breast. The meat is typically cut into strips, breaded, and then fried or baked.
Which cooking method is best for tender poultry cuts like chicken breast?
The three ways to cook in liquid are simmering, stewing and poaching. Simmering and stewing are used for less tender cuts of meat while poaching is used for tender cuts.