Are you tired of dry, flavorless chicken breasts? I’ve been there too! After years of kitchen disasters, I’ve discovered that my trusty Dutch oven is the secret weapon for juicy, tender chicken every single time. Whether you’re meal prepping for the week or cooking a comforting dinner for your family, these Dutch oven chicken breast methods will transform your cooking game!
In this guide, I’ll share three foolproof ways to cook chicken breasts in a Dutch oven – from simple shredded chicken for meal prep to a complete one-pot dinner with vegetables and gravy. Let’s dive in!
Why Cook Chicken Breast in a Dutch Oven?
Before we get to the recipes. let’s talk about why Dutch ovens are so amazing for cooking chicken
- Even heat distribution – Cast iron retains heat beautifully, cooking your chicken evenly
- Moisture retention – The tight-fitting lid traps steam, keeping chicken juicy
- Versatility – Can go from stovetop to oven seamlessly
- Time-saving – Perfect for one-pot meals with fewer dishes to wash
- Flavor development – Allows for browning and braising in the same pot
A good Dutch oven is an investment, but it’s one that will serve you for years. I’ve had mine for over a decade, and it’s still going strong!
Method 1: Simple Shredded Chicken Breast in a Dutch Oven
This method is perfect for meal prep! You’ll get about 2½ cups of shredded chicken per pound of chicken breasts.
Ingredients:
- 4-5 pounds boneless, skinless chicken breasts
- 1 cup chicken stock (or water in a pinch)
- 1 teaspoon salt
- ½ teaspoon black pepper
- Optional seasonings of your choice
Instructions:
- Preheat your oven to 350°F (175°C).
- Pour the chicken stock into your Dutch oven.
- Arrange the chicken breasts in the Dutch oven with space between them (don’t stack them directly on top of each other).
- Season with salt, pepper, and any other seasonings you like. If you’re planning to use the chicken in different recipes, keep the seasonings minimal.
- Cover with the lid and bake for about 45-60 minutes, or until chicken reaches an internal temperature of 165°F.
- Remove from the oven and let it cool slightly before shredding.
Shredding Options:
- Use two forks to pull the chicken apart
- Use a hand mixer on low speed while the chicken is still in the Dutch oven
- Use a stand mixer with the paddle attachment
- Once cooled enough, shred with your hands for more control over texture
Pro tip: After shredding, return the chicken to the Dutch oven and stir to absorb the flavorful cooking liquid!
Method 2: Diced Chicken Breast for Easy Meal Prep
If you prefer diced chicken over shredded, this method is for you! This technique gives you perfectly cooked chunks of chicken that are ideal for salads, pasta dishes, or casseroles.
Ingredients:
- 4 pounds boneless, skinless chicken breasts
- ¾ cup chicken broth
- Salt and pepper to taste
- Seasonings of your choice (Italian, curry, poultry seasoning, etc.)
Instructions:
- Preheat oven to 350°F.
- For more even cooking, slice the chicken breasts in half horizontally to create thinner pieces.
- Arrange chicken in a single layer in your Dutch oven.
- Pour chicken broth over the chicken and season as desired.
- Cover and bake for 20 minutes.
- Remove from oven, flip chicken pieces, and rearrange any overlapping pieces.
- Bake for another 10 minutes or until internal temperature reaches 165°F.
- Allow to rest for 15 minutes before dicing.
Seasoning Ideas:
- For Italian dishes: 2 teaspoons Italian seasoning + 1 teaspoon garlic powder
- For comfort food: 2 teaspoons poultry seasoning OR 1 teaspoon each of thyme and sage
- For curry dishes: 1 tablespoon curry powder + 1 teaspoon ground ginger
- For Tex-Mex: 2 teaspoons chili powder + 1 teaspoon cumin + pinch of smoked paprika
Remember, 4 pounds of raw chicken breasts will yield approximately 4 cups of diced, cooked chicken.
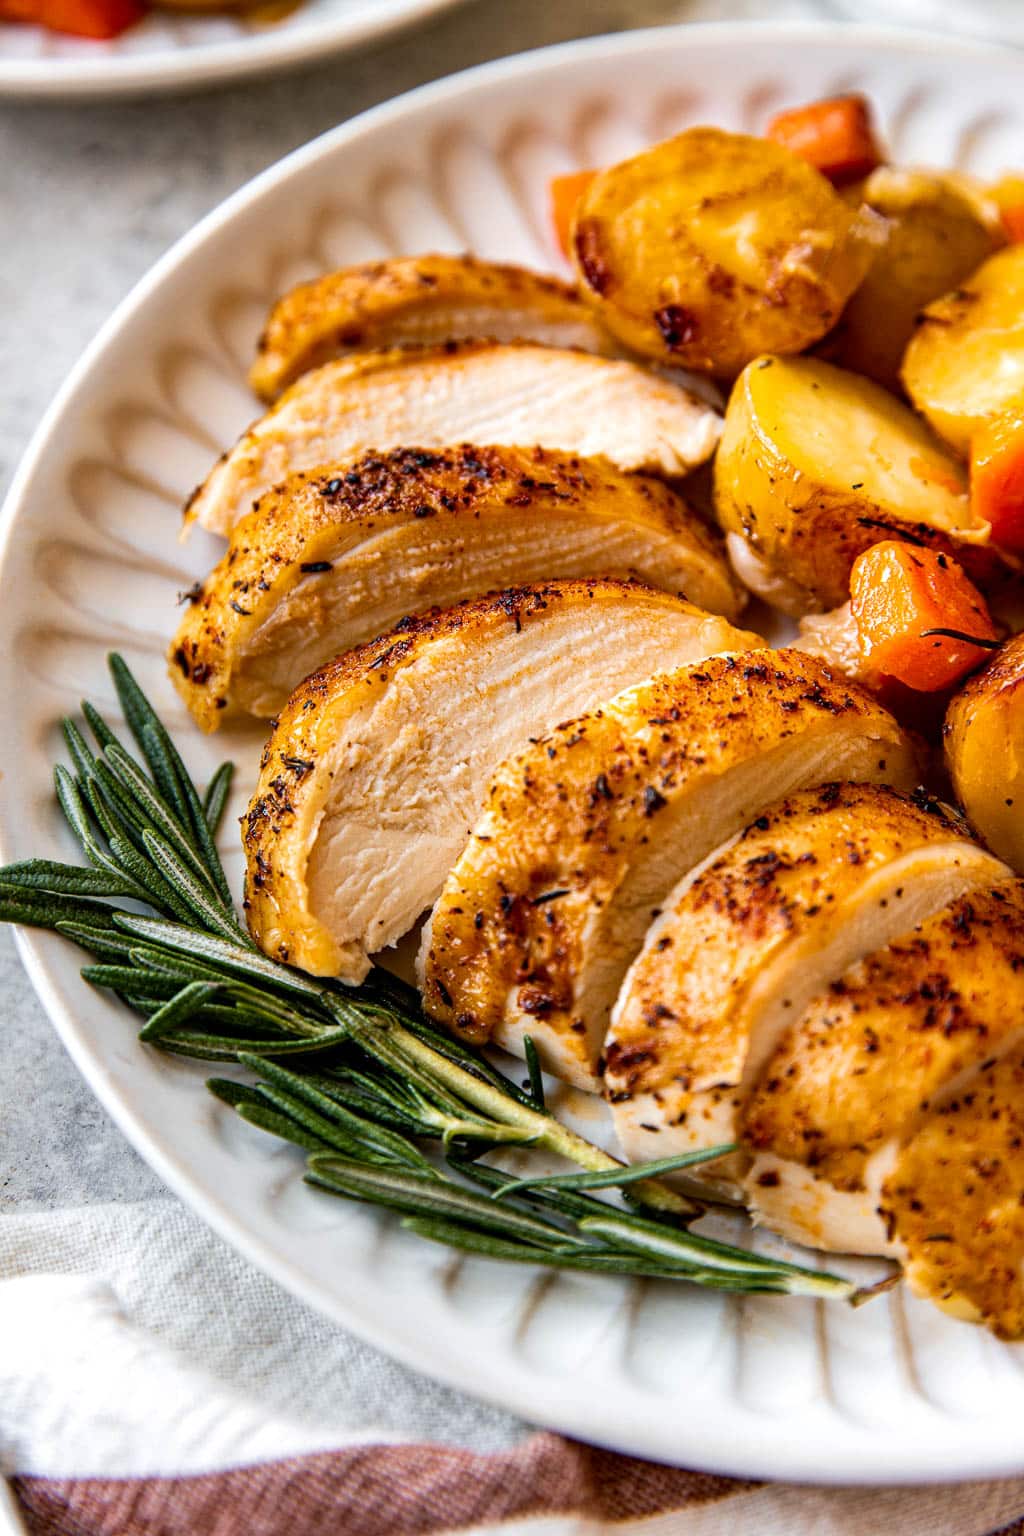
Method 3: Complete Dutch Oven Chicken Breast Dinner with Vegetables
This one-pot wonder gives you a complete meal with minimal cleanup! The chicken breasts are browned then baked with potatoes, carrots, and a delicious gravy.
Ingredients:
- 24 ounces (about 3-4) boneless skinless chicken breasts
- 12 ounces onion (about 2 medium), sliced
- 12 ounces carrots (about 3 medium), peeled and cut into ½-inch rounds
- 12 ounces baby potatoes (about 1-inch diameter)
- 3 tablespoons butter, divided
- 3 tablespoons all-purpose flour
- 1 teaspoon kosher salt (use ½ teaspoon if using table salt)
- 1½ teaspoons dried thyme
- 1 teaspoon garlic powder
- 2 cups chicken broth/stock
Instructions:
- Preheat oven to 400°F (200°C).
- Season chicken breasts with salt on both sides.
- Heat 1 tablespoon butter in your Dutch oven over medium heat.
- Add chicken and brown for 3-4 minutes per side (they won’t be fully cooked yet).
- Remove chicken to a plate and add remaining 2 tablespoons butter.
- Add sliced onions, salt, thyme, and garlic powder. Cook for 3-4 minutes until softened.
- Sprinkle flour over onions and cook for 1 minute, stirring frequently.
- Pour in chicken broth, scraping up any browned bits from bottom of pot.
- Add carrots and potatoes, bring to a boil, then reduce to a simmer for 4-5 minutes.
- Nestle browned chicken breasts into the vegetables and gravy.
- Cover and bake for 15-18 minutes, or until chicken reaches 165°F and vegetables are tender.
- Remove chicken to rest for 5 minutes before serving to prevent overcooking.
Tips for Perfect Dutch Oven Chicken Breasts
No matter which method you choose, these tips will help ensure success:
- Don’t overcook – Use a meat thermometer to check for doneness at 165°F
- Let it rest – Always let chicken rest for 5-15 minutes before cutting or shredding
- Use enough liquid – This helps keep the chicken moist
- Brown for flavor – If time allows, browning the chicken before baking adds tremendous flavor
- Make extra – Cooked chicken freezes well for up to 4 months
- Save the broth – The cooking liquid is liquid gold! Use it for soups or to reheat your chicken
Storage and Freezing Tips
Cooked chicken breast can be stored in the refrigerator for 3-4 days in an airtight container. For freezing:
- Cool completely before freezing
- Portion into meal-sized amounts (2-3 cups per freezer bag)
- Spread chicken flat in freezer bags, removing as much air as possible
- Freeze flat for easy stacking and quicker thawing
- Label with contents and date
- Frozen cooked chicken will keep for up to 4 months
To thaw, place in refrigerator overnight or use defrost setting on microwave if you’re in a hurry.
Ways to Use Your Dutch Oven Chicken
The possibilities are endless! Here are some ideas:
- Chicken salad sandwiches
- Enchiladas
- Chicken pot pie
- Pasta dishes
- Chicken soup
- Casseroles
- Tacos or burritos
- Grain bowls
- Stir into mac and cheese
- Add to salads
Why I Love This Method
I’ve been cooking chicken this way for years, and it’s honestly changed my meal prep game completely. Before discovering the Dutch oven method, I struggled with dry, boring chicken that nobody wanted to eat (including me!). Now, my family actually looks forward to my chicken dishes!
The best part is how versatile these recipes are. I can make a big batch on Sunday, then transform it into completely different meals throughout the week. And seriously, the cleanup is so minimal – just one pot!
FAQ About Cooking Chicken Breast in a Dutch Oven
Q: What size Dutch oven do I need?
A: For these recipes, a 5-7 quart Dutch oven works best. For the complete dinner recipe, aim for 7-8 quarts.
Q: Can I use bone-in chicken breasts?
A: Yes! You’ll need to increase the cooking time by about 15-20 minutes. Use a meat thermometer to confirm doneness.
Q: Don’t have a Dutch oven?
A: You can use a large pot with a tight-fitting lid for the stovetop portion, then transfer everything to a covered casserole dish for the oven.
Q: How do I prevent chicken from drying out?
A: Don’t overcook it! Use a meat thermometer and remove the chicken once it reaches 165°F. Also, letting it rest after cooking helps retain moisture.
Q: Can I add different vegetables?
A: Absolutely! Try mushrooms, sweet potatoes, parsnips, turnips, or cauliflower. Just keep in mind that some vegetables cook faster than others.
Conclusion
Cooking chicken breasts in a Dutch oven is truly a game-changer, whether you’re making basic shredded chicken for meal prep or a complete one-pot dinner. The combination of moist heat cooking and the Dutch oven’s excellent heat retention results in perfectly cooked, juicy chicken every time.
I hope you’ll try these methods and discover for yourself why Dutch oven chicken has become a staple in my kitchen. Trust me, once you try it, you’ll never want to cook chicken any other way!

What to Serve with Dutch Oven Roast Chicken
While this recipe is basically a whole meal in itself, you can never go wrong with more sides or a salad. Here are some of my favorite recipes to serve with dutch oven roast chicken:
And it’s definitely not dinner without dessert! My favorite new dessert is this Guinness Chocolate Bundt Cake and it’s a total show-stopper. Perfect for a dinner party!
My favorite part of making dutch oven roast chicken is having leftovers! They reheat really well and leftover chicken can be chopped or shredded and used in salads, wraps, etc.
Storage: Cut up the chicken into pieces. Store the leftover chicken and vegetables in an airtight container in the fridge for up to 5 days.
Reheating instructions: Pop a piece of chicken or two and some veggies in the microwave in 30-second increments, until warmed through. Or, reheat over medium heat in a small skillet or on a baking sheet in a 350-degree oven for 10-15 minutes.
If you master any one recipe, let it be this Dutch Oven Roast Chicken! It’s the perfect recipe for entertaining or for a special Sunday dinner. If you do give this recipe a try, be sure to let me know! Leave a comment with a star rating below. Be sure to subscribe to my weekly newsletter and never miss a new recipe! You can also snap a photo & tag @JENNYGOYCOCHEA on Instagram. I LOVE hearing about & seeing your SMF creations!
Step-by-Step Photos & Instructions
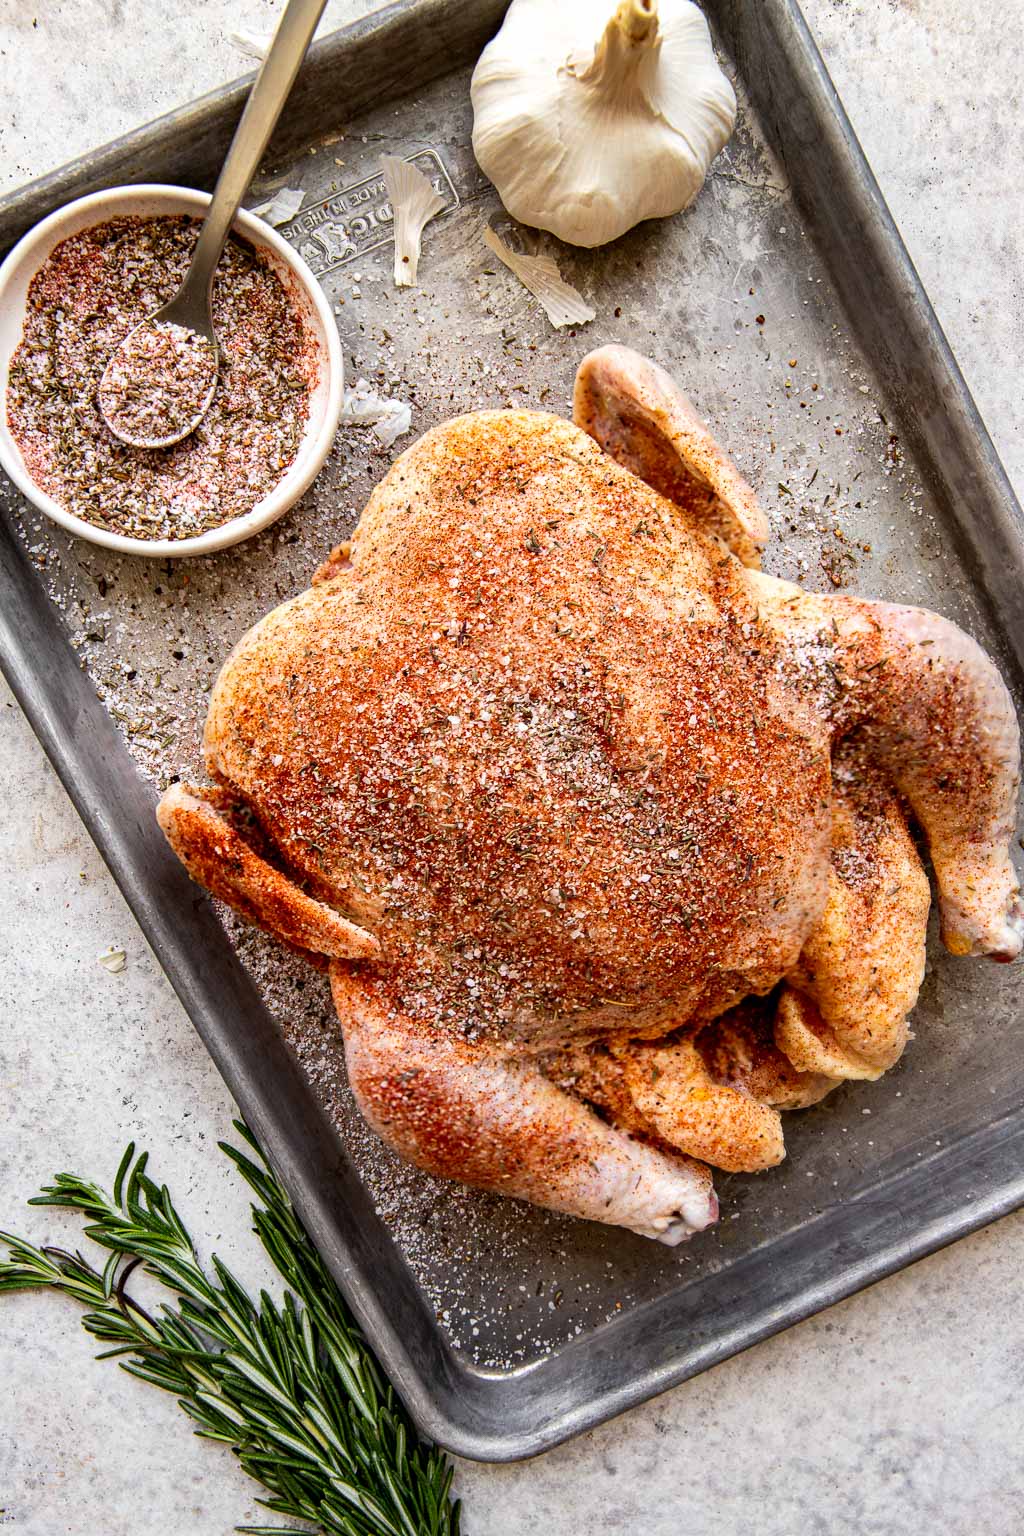
- Prep the chicken. Remove any giblets or neck pieces from the cavity of your chicken, then pat it dry all over with paper towels. Set the chicken on a rimmed baking sheet lined with parchment paper.
- Make the spice rub. In a small bowl, mix together the kosher salt, pepper, paprika, thyme, and sage. Season the chicken liberally all over, inside and out, with the seasoning mixture. Transfer the chicken on the baking sheet to the fridge uncovered for 8-24 hours.
- Preheat your dutch oven. Preheat an oven to 400 F. Place a large dutch oven with the lid in the oven to preheat for 30 minutes.
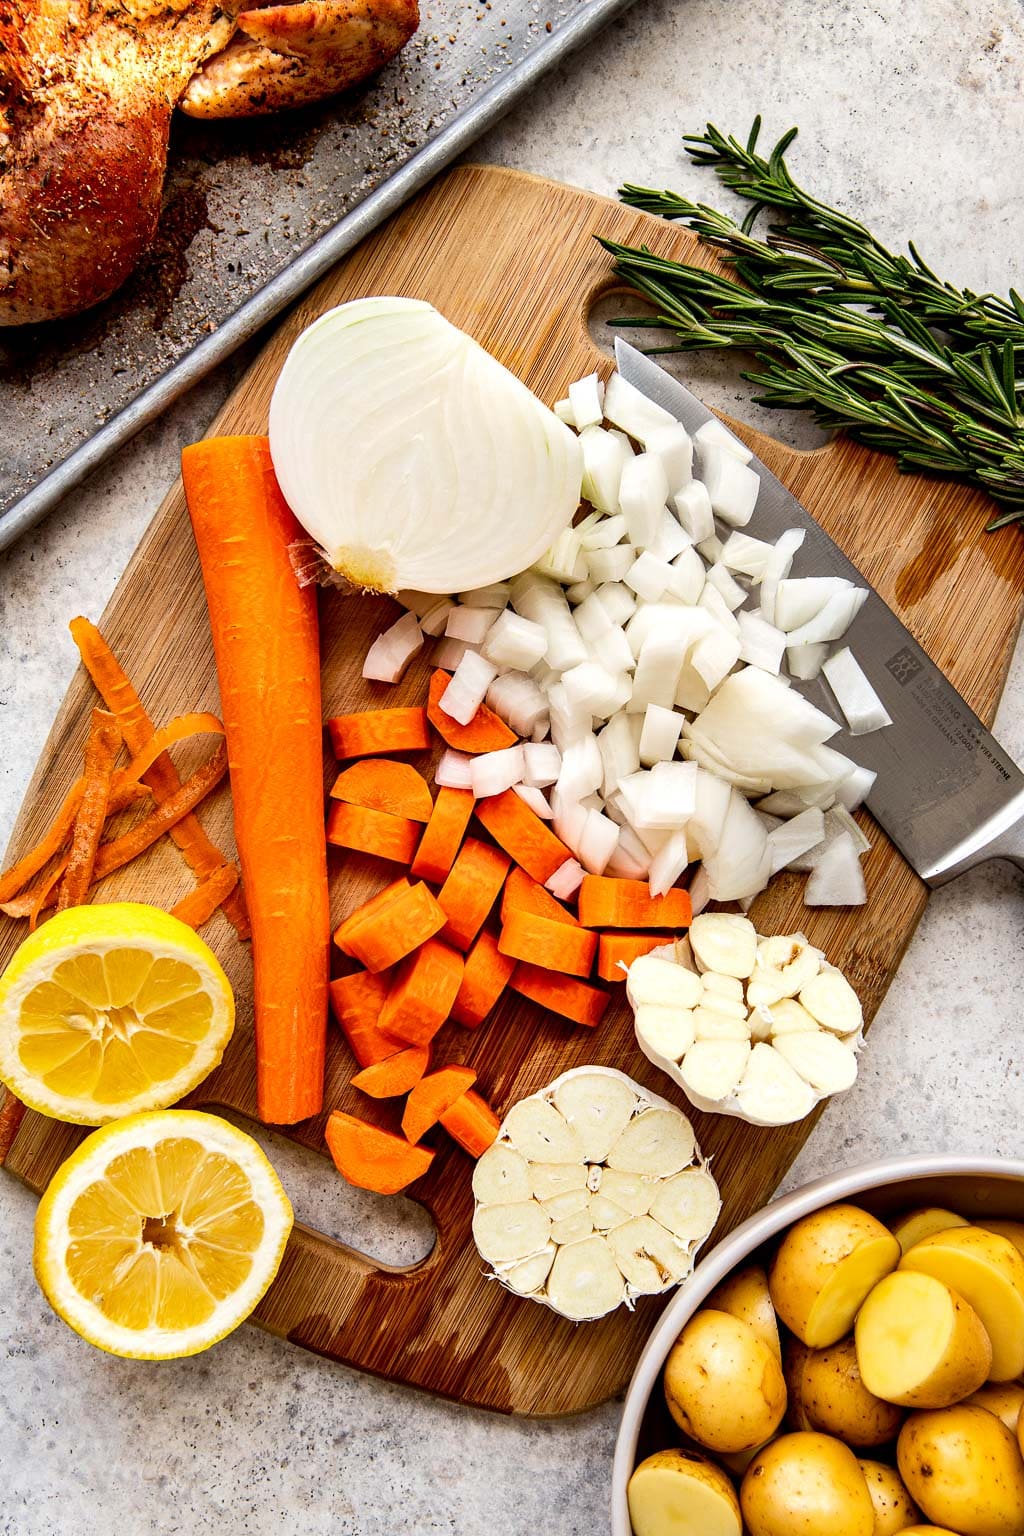
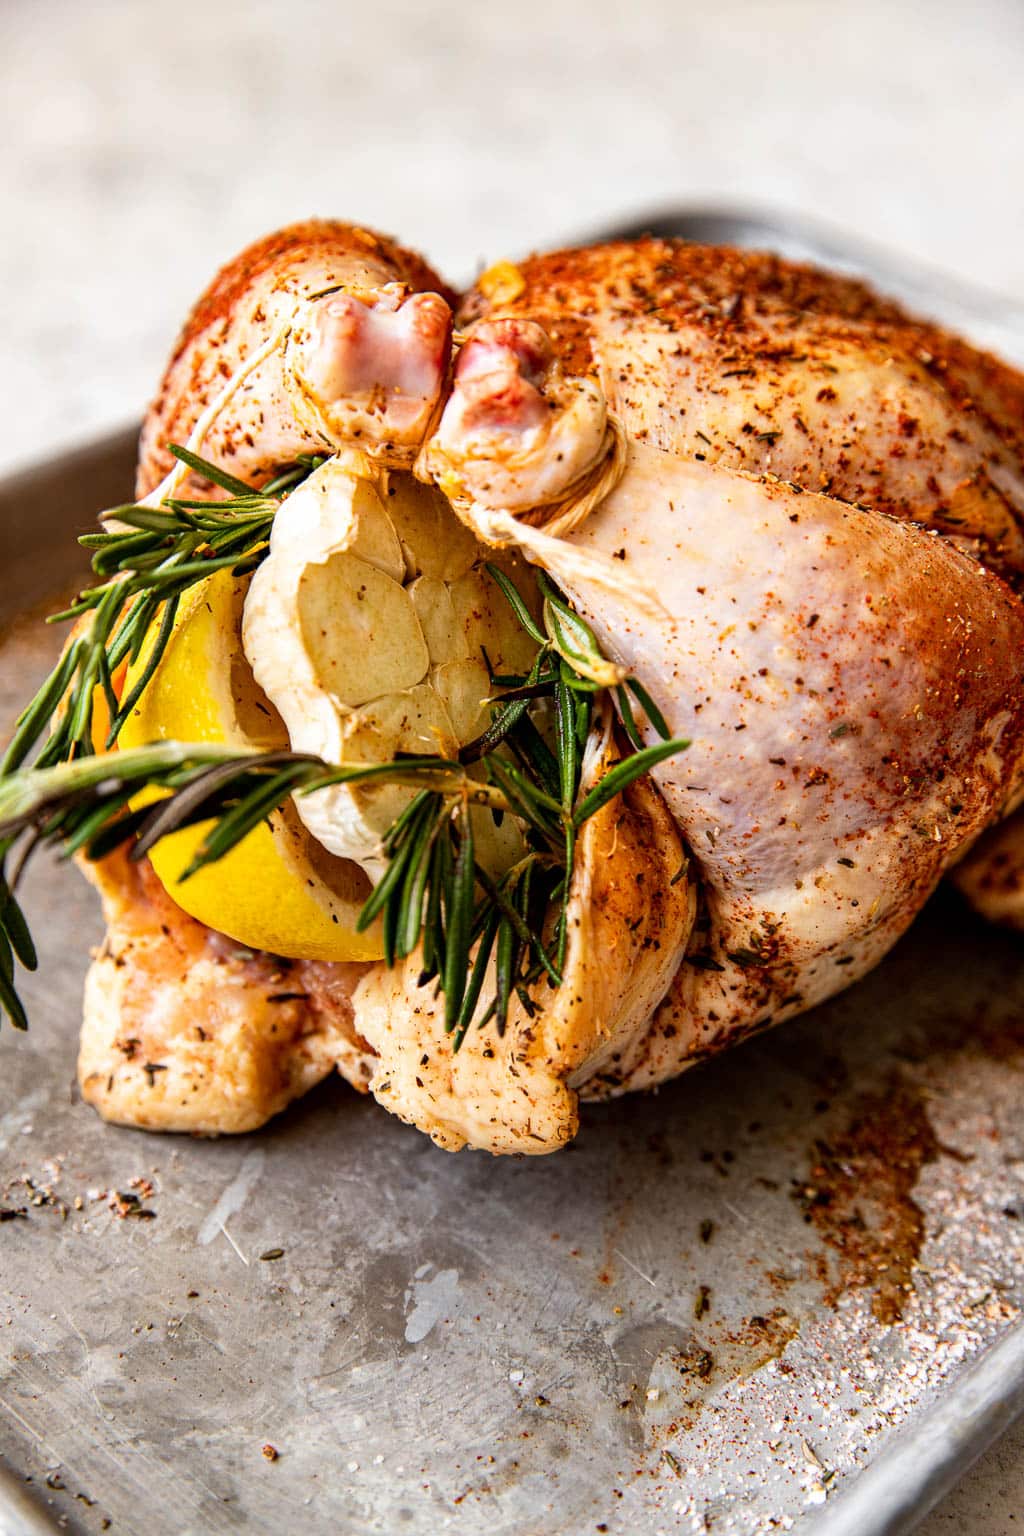
- Stuff the chicken. Remove the chicken from the fridge. Stuff the cavity with the lemon halves, garlic head, and rosemary sprigs. Truss the legs and tuck the wings behind the body.
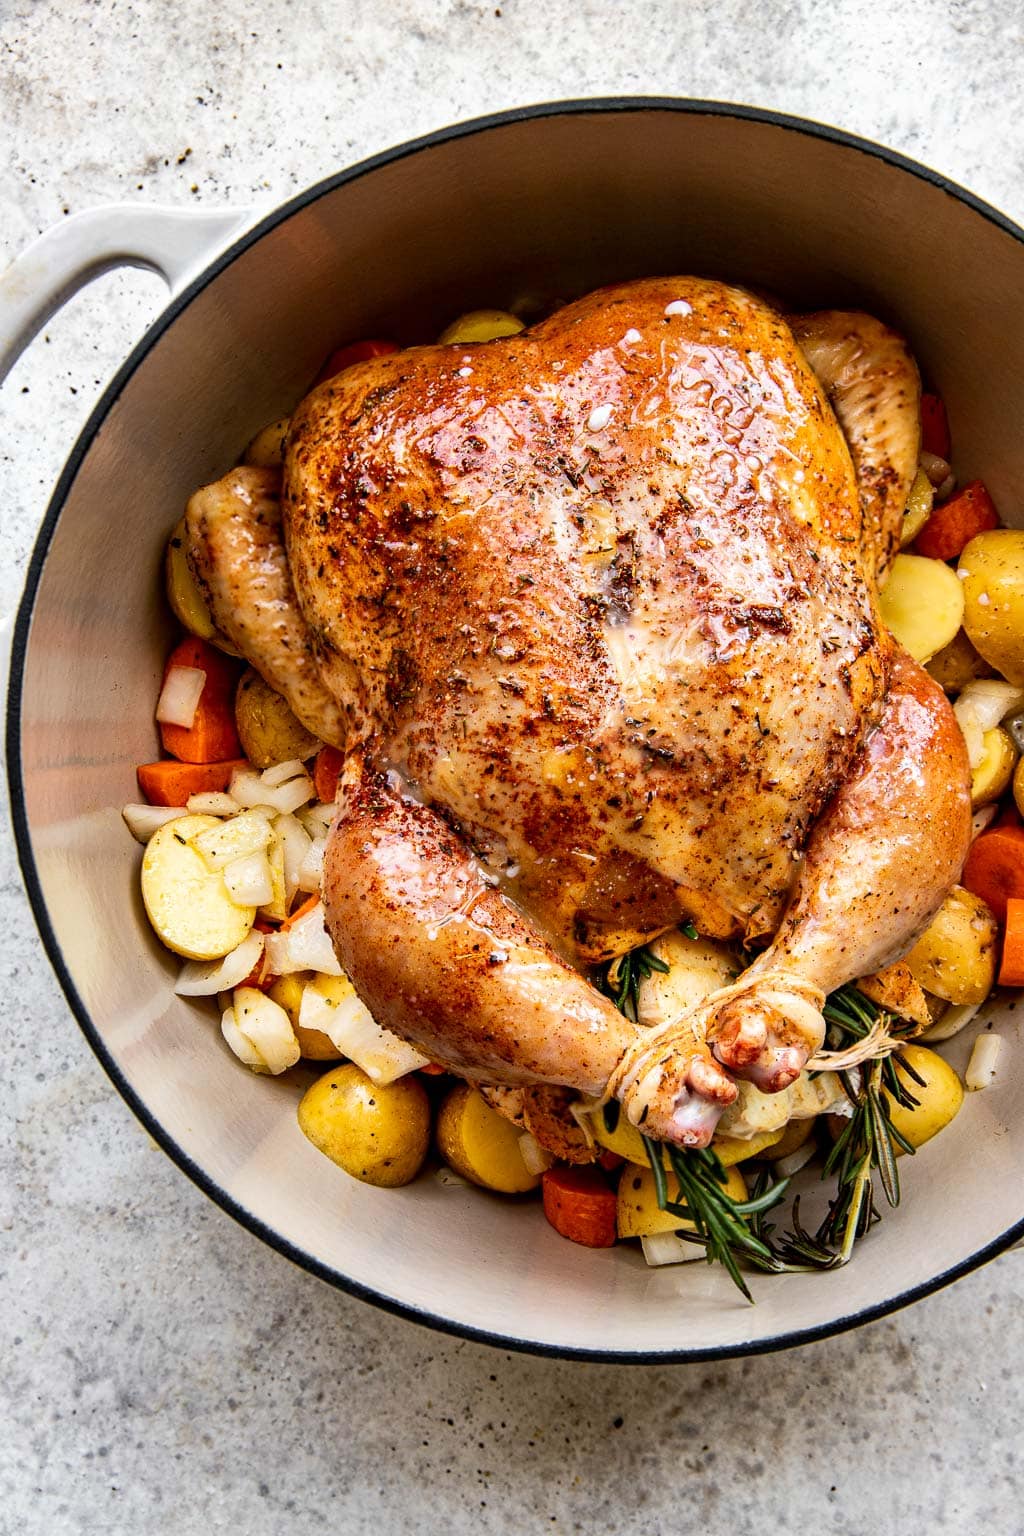
- Prep the veggies. In a mixing bowl, toss the onions, carrots, and potatoes with half of the melted butter. Season liberally with salt and pepper. Carefully remove the dutch oven from the oven and remove the lid. Spread the veggies into the bottom of the dutch oven and place the chicken on top. Brush the top of the chicken all over with the rest of the melted butter.
- Roast the chicken. Cover the dutch oven and return to the oven for 35 minutes. Uncover, increase the heat to 425 F and cook for another 30-40 minutes, until the chicken registers 165 F on an instant read thermometer. Let the chicken rest for 15 minutes before slicing and serving with the veggies.