Are you tired of dry flavorless chicken? Let me tell you a secret – bone-in chicken thighs cooked on the stove are basically impossible to mess up and they’re SUPER delicious! I’ve been cooking these babies for years and they never disappoint. The skin gets amazingly crispy while the meat stays tender and juicy. What’s not to love?
In this guide, I’ll walk you through exactly how to cook bone-in chicken thighs on the stove from start to finish. You’ll learn how to get that perfect crispy skin, how long to cook them, and some amazing flavor variations that’ll make your taste buds dance!
Why Bone-In Chicken Thighs Are the Best Choice
Before we dive into the cooking process, let’s talk about why bone-in chicken thighs are so awesome:
- Forgiving to cook: Unlike chicken breasts that dry out easily, thighs stay moist even if you overcook them a bit
- More flavor: The bone adds extra flavor during cooking
- Budget-friendly: Typically less expensive than boneless cuts
- Crispy skin: That skin gets amazingly crispy when cooked properly
- Juicy meat: Dark meat is naturally more moist and flavorful
What You’ll Need
The beauty of stovetop chicken thighs is that you don’t need much to make them delicious! Here’s what you’ll need:
- 4-5 bone-in chicken thighs
- Salt and pepper
- Seasonings (smoked paprika, garlic powder, onion powder work great)
- A large skillet (cast iron works best)
- Tongs for flipping
- Meat thermometer (optional but helpful)
- Chicken broth (optional for making a sauce)
You don’t even need oil if you’re using skin-on thighs – they’ll render their own fat!
Step-by-Step Guide to Perfect Stovetop Chicken Thighs
Step 1: Prep the Chicken
First things first, let’s get those chicken thighs ready:
- Take the chicken out of the fridge about 15-20 minutes before cooking (room temperature chicken cooks more evenly)
- Pat the chicken thighs dry with paper towels (this is SUPER important for crispy skin!)
- Season generously with salt and pepper on both sides
- Add your favorite seasonings – smoked paprika and garlic powder are my go-to options
Step 2: Heat Your Skillet
The right pan and temperature are crucial:
- Place a large skillet (preferably cast iron) over medium heat
- Let the pan heat up properly – this takes about 3-5 minutes
- Don’t add oil! The chicken skin will release its own fat
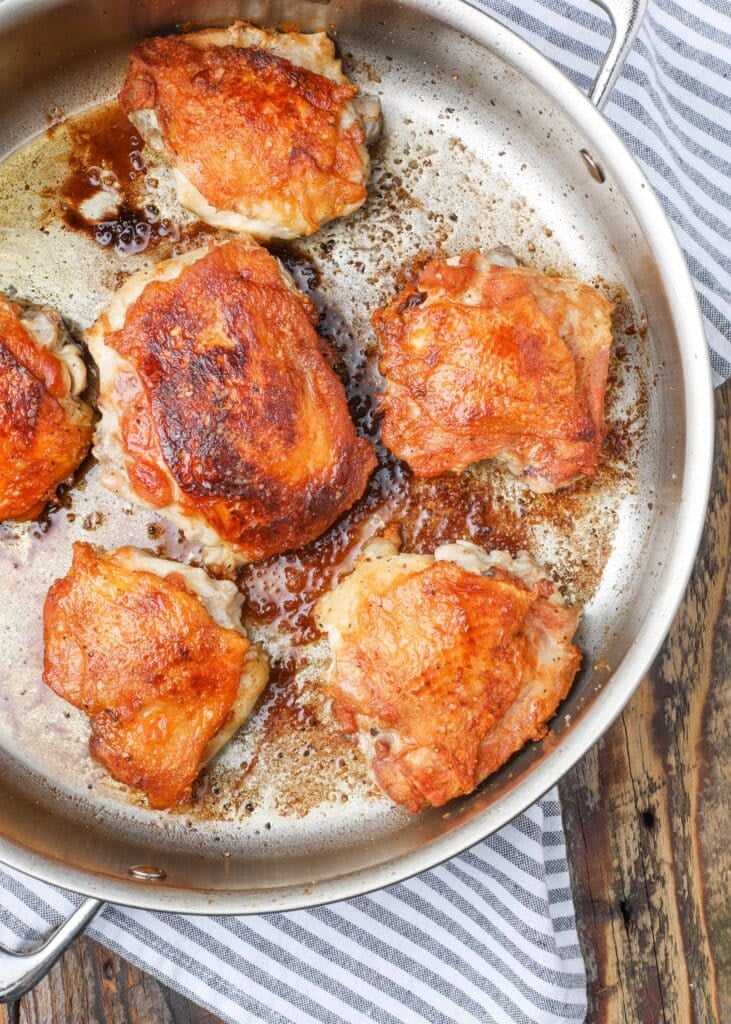
Step 3: Cook Skin-Side Down First
This is the secret to ultra-crispy skin:
- Place the chicken thighs SKIN SIDE DOWN in the hot skillet
- Don’t crowd the pan – leave a little space between pieces
- Let them cook UNDISTURBED for 10-15 minutes (resist the urge to move them!)
- The skin should be sizzling but not spattering too much – if it’s spattering like crazy, lower the heat a bit
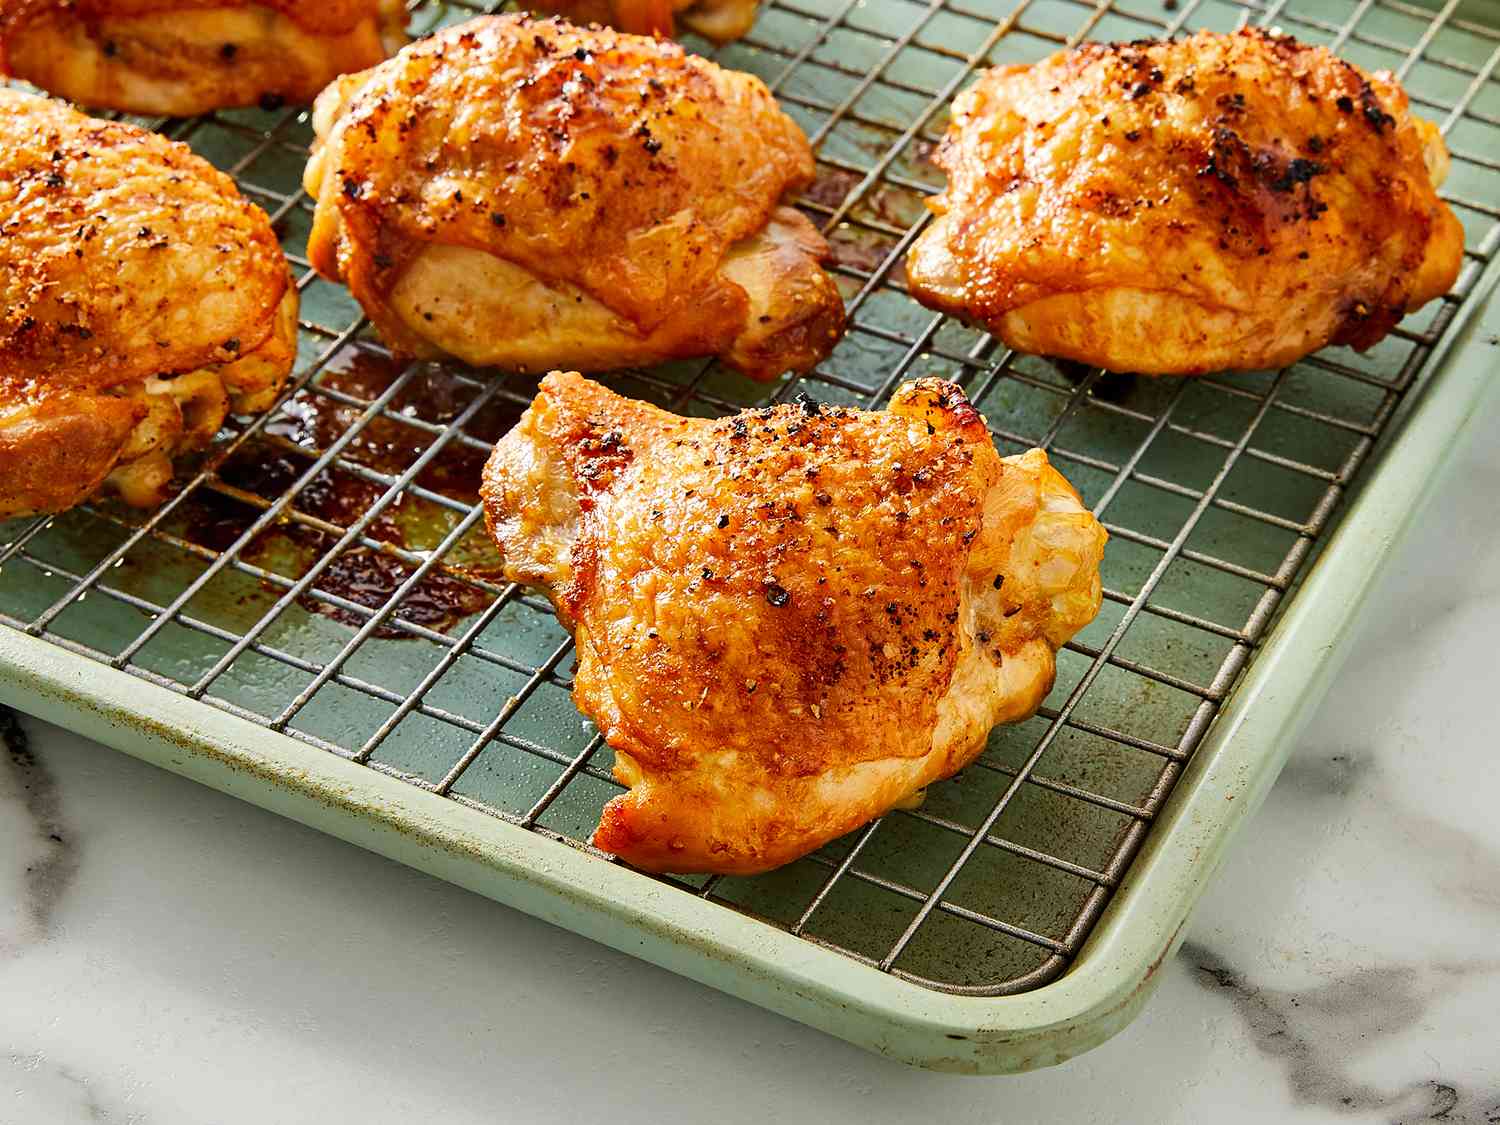
- After about 10-15 minutes, the skin should be golden brown and crispy
Step 4: Flip and Finish
Now let’s get them cooked through:
- Flip the chicken thighs over to the bone side
- Continue cooking for another 10-15 minutes until fully cooked
- If using a meat thermometer, the internal temperature should reach 165°F (74°C)
- For extra flavor, you can add about 1/2 cup of chicken broth to the pan after flipping to create a simple pan sauce
Step 5: Rest Before Serving
Don’t skip this step!
- Remove chicken from the pan and let it rest for about 5 minutes
- This allows the juices to redistribute throughout the meat
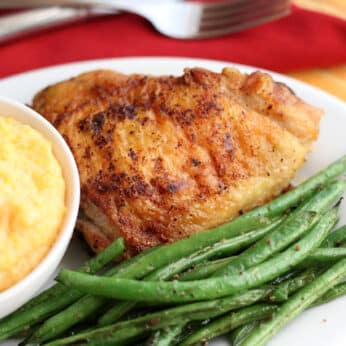
- Serve with your favorite sides and enjoy!
Troubleshooting Common Problems
Even though bone-in chicken thighs are pretty forgiving, here are some common issues and how to fix them:
Problem: Chicken Skin Isn’t Crispy
- Make sure you pat the chicken DRY before cooking
- Don’t flip too early – give it time to render fat and crisp up
- Check that your pan is hot enough before adding chicken
Problem: Chicken Is Burning
- Your heat is too high – turn it down to medium-low
- The pan might be too hot before adding chicken
Problem: Chicken Isn’t Cooked Through
- Thighs might be too large – give them more time
- Cover the pan for a few minutes to help them cook through
- Use a meat thermometer to check for doneness (165°F)
Delicious Flavor Variations
Want to switch things up? Try these amazing flavor combos:
Honey Garlic Chicken Thighs
After flipping, add 2 tablespoons honey, 4 minced garlic cloves, and 1/4 cup chicken broth to create a sticky, sweet glaze.
Lemon Herb
Season with dried thyme and rosemary before cooking, then add lemon slices to the pan when you flip the chicken.
Spicy Cajun
Use a cajun spice blend instead of basic seasonings for a kick of heat!
Coconut Curry
After flipping, add 1/2 cup coconut milk and 1 tablespoon curry powder for a creamy, flavorful sauce.
Serving Suggestions
These versatile chicken thighs pair well with so many sides:
- Creamy mashed potatoes
- Garlic rice
- Roasted vegetables
- Fresh salad
- Cauliflower rice (for a low-carb option)
The pan sauce makes an excellent gravy for potatoes or rice – don’t waste that flavor!
How to Store Leftover Chicken Thighs
If you somehow have leftovers (which rarely happens at my house!), here’s how to store them:
- Let chicken cool completely
- Store in an airtight container in the refrigerator for 3-4 days
- Reheat in a skillet with a splash of water to help retain moisture
- You can also freeze cooked chicken thighs for up to 3 months
FAQ: Everything Else You Need to Know
How long does it take to cook bone-in chicken thighs on the stove?
Total cooking time is usually 20-30 minutes – about 10-15 minutes per side, depending on the size of your chicken thighs.
Can I use boneless chicken thighs instead?
Yes! Boneless thighs cook faster – about 8-10 minutes on the first side and 5-10 minutes on the second side.
Should I remove the skin?
I strongly recommend keeping the skin on! It adds flavor and protects the meat from drying out. Plus, crispy skin is the best part!
Can I use frozen chicken thighs?
It’s best to thaw them completely first for even cooking and to get crispy skin.
What’s the best pan to use?
Cast iron is ideal because it retains heat well and creates an amazing crust on the chicken. However, any heavy-bottomed skillet will work.
Final Thoughts
Cooking bone-in chicken thighs on the stove is seriously one of the easiest and most rewarding cooking methods. The combination of crispy skin and juicy meat is unbeatable, and once you master this technique, you’ll find yourself making it again and again.
I make these at least twice a week at my house because they’re just that good and so simple! The key points to remember are: pat the chicken dry, start with skin-side down, be patient while the skin crisps up, and don’t overcrowd the pan.
Give this method a try tonight, and I promise you’ll be amazed at how something so simple can taste so incredible. Happy cooking!
Pan Fried Chicken Thighs
These pan-fried chicken thighs have become a staple in my house over the past few years. I made this chicken at least once a week for the first couple of months and I still make it at least once a month. The chicken turns out perfectly every single time.
My kids now ask for the “crispy skin chicken” every time they see me purchasing chicken. This pan-cooked chicken has been a kid and adult favorite for over ten years now.
Short answer? YES! I’ve been asked so many times, I finally made a note in the recipe card. I used to use refined (unscented) coconut oil to pan-fry chicken because it had a slightly higher smoking point, but I’ve been using olive oil for years now without any issues at all.
You’re not cooking at a high temp and you aren’t deep frying the chicken either. This is a shallow pan fry method that requires just a tablespoon of oil. You’ll be just fine with olive oil in this case.
After cooking chicken this way for a couple of years, I decided to play with an oven method for achieving the same crispy chicken thighs. I’m thrilled to tell you that this Oven Baked Crispy Chicken is pretty amazing too.
My first choice for crispy chicken thighs is the pan-fried method, but a very close second (and perfect for the busiest of days) is the crispy chicken made in the oven. I’m so happy to have two great methods now for cooking perfectly crispy chicken.
These Instant Pot Sweet Potatoes are next on my list to try with this chicken. What’s not to love about a piping hot silky smooth sweet potato that practically cooks itself?
How Long To Fry Chicken Thighs
- Pour a tablespoon of oil into a large stainless or cast-iron skillet over medium heat. (A non-stick skillet will work as well, although it isn’t required.)
- Generously sprinkle the skin side of the chicken thighs with spices and then place them in the hot skillet, skin side down. Sprinkle the other side of the thighs and then, without moving them, cook uncovered* for about 20-25 minutes.
- Let the chicken cook until the fat has rendered and the skin is deep golden brown and crisp; this could take as long as 30 minutes. If the skin is sticking to the pan, it likely isn’t finished on that side. Reduce the heat as needed if the skin starts to burn before it is evenly golden brown.
- Turn the thighs over and continue to cook for about 20 more minutes. When the meat closest to the bone is cooked through, the chicken is done.
* Please note that a splatter-screen for your skillet will help cut down on the mess on the stovetop and a small bowl with a cup of vinegar set next to the stove will greatly reduce the lingering aroma of this recipe through the rest of the night.

When I finally learned how to cook chicken on the stove, I was in heaven. Crispy chicken thighs really are possible without deep frying or standing over the stove the whole time.
With a few tips in hand, you’re going to be making some amazing chicken in no time. First, you’ll want to start with a heavy skillet.
A splatter-screen for cooking will help cut down on the mess on the stovetop.
A small bowl with a cup of vinegar set next to the stove will greatly reduce the lingering aroma of this recipe through the rest of the night.