Have you ever tried to recreate that perfect, glossy BBQ chicken you get at restaurants, only to end up with burnt, bitter sauce or dry chicken? I’ve been there too! After many trials (and some sad failures), I’ve finally mastered the art of caramelizing BBQ sauce on chicken, and I’m excited to share all my tips with you.
Caramelizing BBQ sauce transforms ordinary chicken into a sticky sweet and savory masterpiece that’ll have everyone asking for seconds. The secret lies in understanding the caramelization process, choosing the right chicken cuts, selecting the perfect sauce, and nailing the cooking technique.
Understanding the Caramelization Magic
The magic behind that beautiful glaze comes from the Maillard reaction – a chemical process between amino acids and reducing sugars that happens when heat is applied. This reaction creates hundreds of different flavor compounds, giving us those complex, rich notes we love in caramelized BBQ sauce.
Successfully caramelizing BBQ sauce isn’t just about dumping sauce on chicken. It’s about controlling the heat and timing to achieve that perfect balance of sweetness, smoke, and char without burning.
Choosing Your Chicken
The type of chicken you use will influence how well your sauce caramelizes
Whole Chicken
- Ideal for roasting or smoking
- Apply sauce during the last 20-30 minutes of cooking
- Slower cooking time allows the sauce to develop a perfect caramelized layer
Chicken Pieces (Thighs, Legs, Breasts)
- Thighs and legs retain moisture better and are more forgiving
- Chicken breasts can dry out more easily, so be vigilant
- Bone-in pieces generally stay moister and more flavorful
Wings
- Cook quickly and are perfect for caramelizing
- Build up multiple layers of sauce for that sticky glaze
- Fan favorite for good reason!
Selecting the Perfect BBQ Sauce
The sauce you choose plays a huge role in successful caramelization:
Sugar Content
Higher sugar content means faster caramelization but also increases the risk of burning. Look for sauces with a good balance of sweet and savory. I sometimes add a touch of honey or brown sugar to boost caramelization.
Acidity
Sauces with lots of vinegar may need longer cooking time as acidity can inhibit caramelization. Too much acidity can also prevent proper glazing.
Flavor Profile
Sweet and tangy sauces caramelize beautifully. For an extra special touch, try combining sauces – mixing a honey BBQ sauce with an original variant creates a perfectly balanced glaze with natural sweetness and depth of flavor.
Mastering Cooking Methods for Perfect Caramelization
Different cooking methods yield different results when caramelizing BBQ sauce:
Grilling
Grilling gives that authentic smoky flavor and creates a quick char:
- Keep grill temperature moderate (not too hot!)
- Apply sauce during the last 5-10 minutes of grilling
- Turn frequently to prevent burning
- Monitor closely as sugars can burn quickly
Oven Baking
Provides consistent, even heat for reliable results:
- Baste periodically during the last half of cooking time
- Use temperature around 325-350°F (160-175°C)
- Finish with a quick broil for extra caramelization
- Great for when weather doesn’t permit outdoor grilling
Smoking
Imparts deep smoky flavor with slow caramelization:
- The low and slow cooking process allows sauce to penetrate while caramelizing
- Avoid over-smoking as it can overpower other flavors
- Apply sauce during final stages of smoking
Air Frying
Great for smaller pieces like wings:
- Apply sauce during the last 5-7 minutes
- Monitor closely to prevent burning
- Offers crispy exterior with caramelized glaze
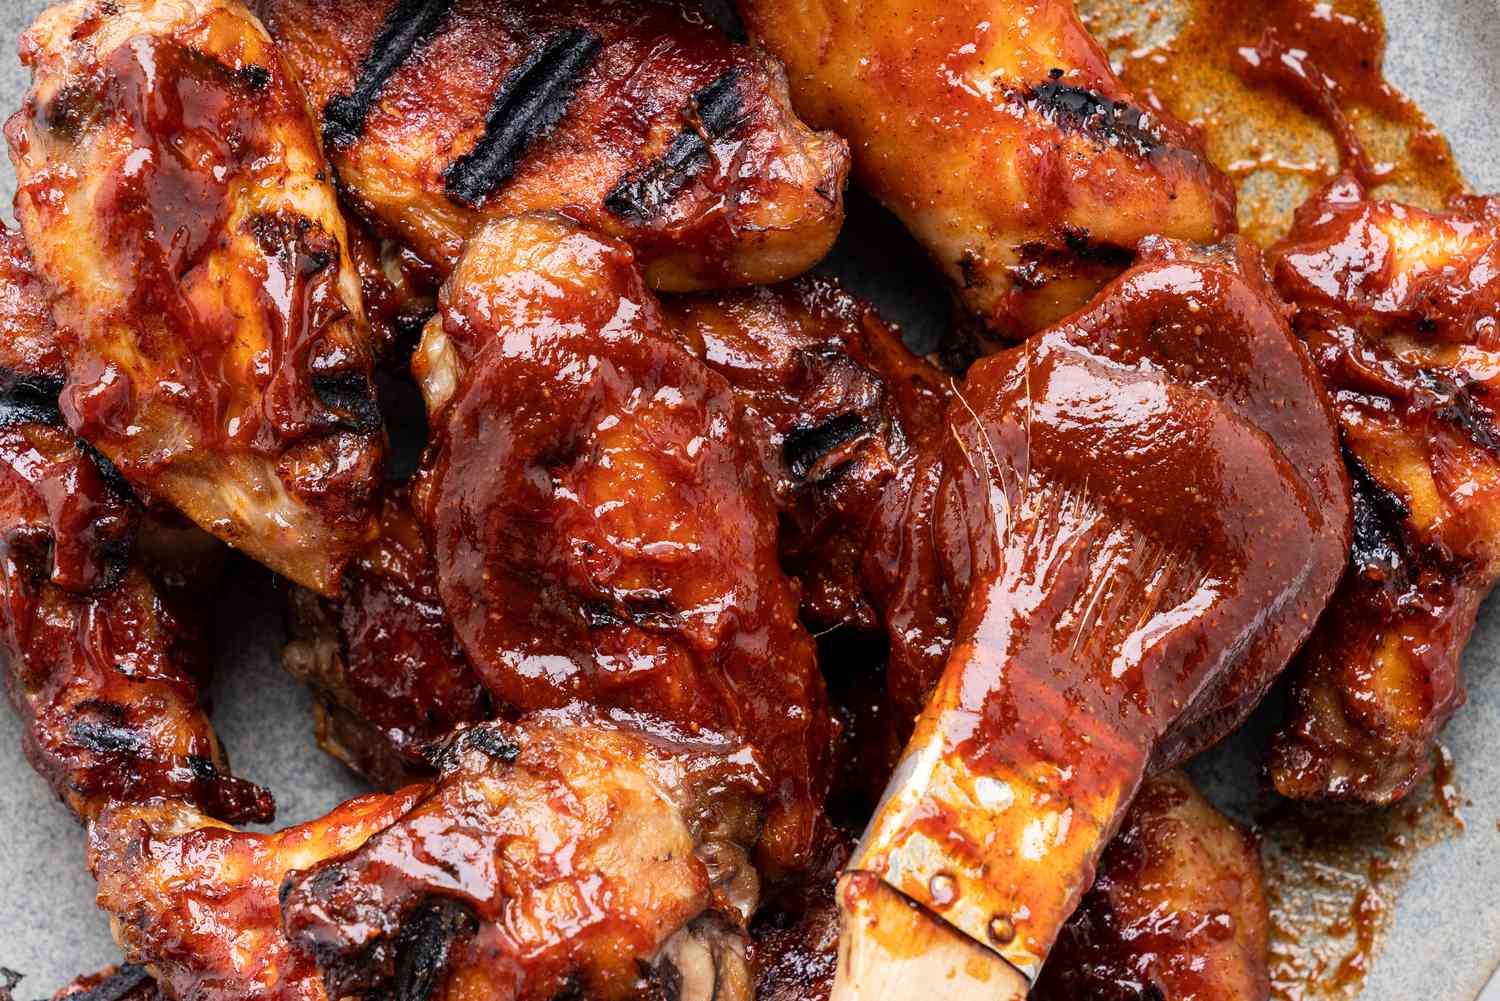
Pro Tips for Perfectly Caramelized BBQ Chicken
Here are my top tricks for achieving that restaurant-quality glaze:
Multiple Layers
Apply sauce in thin layers rather than one thick coating. Each layer should partially caramelize before adding the next. This builds depth of flavor and that sticky texture we’re after.
Timing is Everything
The biggest mistake people make is applying sauce too early! Only begin applying your BBQ sauce mixture in the last 10-15 minutes of cooking. This prevents burning while ensuring proper caramelization.
Basting Technique
Keep a small amount of sauce heated separately for basting. Brush it on with a silicone basting brush for even application. Between layers, let the sauce set slightly before applying more.
Temperature Control
Maintain moderate heat – too high will burn the sauce before it caramelizes, too low won’t achieve that perfect glaze. If you notice the sauce starting to burn, move to a cooler part of the grill or reduce oven temperature.
Rest Before Serving
Let your chicken rest for 5-10 minutes after cooking. This allows the juices to redistribute and the glaze to set perfectly.
Troubleshooting Common Problems
My BBQ Sauce Burns Before Caramelizing
- Lower the heat or move chicken to a cooler part of the grill
- Apply sauce later in the cooking process
- Use a sauce with less sugar content
My Glaze Isn’t Thick Enough
- Use multiple thin layers rather than one thick layer
- Make sure your sauce has adequate sugar content
- Consider reducing your sauce slightly before applying
My Chicken Is Dry
- Use bone-in, skin-on pieces when possible
- Marinate chicken before cooking
- Don’t overcook – use a meat thermometer to reach 165°F (74°C)
- Rest chicken after cooking
Frequently Asked Questions
What’s the best type of BBQ sauce for caramelizing?
Sauces with balanced sweetness and tang, and medium sugar content work best. Avoid overly acidic or watery sauces.
How often should I apply the BBQ sauce?
Apply in thin layers every 5-7 minutes during the last 20-30 minutes of cooking.
Can I use store-bought BBQ sauce?
Absolutely! Store-bought sauces work perfectly fine. Just be mindful of their sugar content and adjust cooking times accordingly.
Is it better to use bone-in or boneless chicken?
Bone-in chicken generally stays moister and more flavorful, making it better for caramelizing.
Can I caramelize BBQ sauce on chicken in a skillet?
Yes! Sear the chicken first, then brush with BBQ sauce during the last few minutes of cooking.
Perfect Sides for Your Caramelized BBQ Chicken
Pair your sticky-sweet masterpiece with these classic sides:
- Creamy coleslaw
- Corn on the cob
- Potato salad
- Baked beans
- Mac and cheese
The contrast between the sweet, sticky chicken and these sides creates a perfect balance of flavors and textures.
Final Thoughts
Mastering the art of caramelizing BBQ sauce on chicken takes a bit of practice, but the results are so worth it! The key takeaways are: apply sauce late in the cooking process, use moderate heat, layer your sauce, and be patient.
Next time you’re craving that perfect BBQ chicken, try these techniques and watch as your family and friends are impressed by your caramelizing skills. The sticky fingers and empty plates will be worth it!
Remember, BBQ is as much about the journey as the destination – so have fun experimenting with different sauces and cooking methods until you find your perfect combination. I’d love to hear how your caramelized BBQ chicken turns out!
INDOOR VS OUTDOOR COOKING
While grilling outdoors adds that authentic smoky flavor, don’t let bad weather stop you from enjoying perfect BBQ chicken! Our recipe works beautifully whether you’re grilling outdoors or cooking in your oven. The combination of American Garden BBQ sauces ensures you’ll get that authentic BBQ taste regardless of your cooking method.
MASTERING THE GLAZING TECHNIQUE
Here’s where many home cooks go wrong – applying BBQ sauce too early can lead to burning and bitter flavors. The key is to build your glaze gradually during the final stages of cooking. Start with a well-seasoned chicken), and only begin applying your BBQ sauce mixture in the last 10-15 minutes of cooking. This technique ensures a perfectly caramelized exterior without any burnt spots.