Are you sitting there with a big pot of homemade chicken broth wondering exactly how long you need to process it in your pressure canner? I’ve been there too! Making your own chicken broth is not only economical but also gives you control over the ingredients and flavor. But once you’ve made a large batch knowing the correct processing time is crucial for safe food preservation.
In this article, I’ll walk you through everything you need to know about pressure canning chicken broth, including the exact processing times, safety considerations, and some helpful tips I’ve learned along the way
The Quick Answer: Pressure Canning Times for Chicken Broth
For those who want the straightforward answer right away:
- Pint jars: Process for 20 minutes
- Quart jars: Process for 25 minutes
But these times are only part of the equation! You must use the correct pressure setting based on your elevation and follow proper canning procedures for safety.
Why Pressure Canning is Required for Chicken Broth
Before we dive deeper into the process, it’s important to understand why pressure canning is absolutely necessary for chicken broth:
- Chicken broth is a low-acid food (pH higher than 4.6)
- Low-acid foods must reach temperatures higher than boiling water (212°F/100°C) to kill harmful bacteria, particularly botulism spores
- Only a pressure canner can reach the necessary 240°F (115°C) temperature needed for safe preservation
Water bath canning is NOT safe for chicken broth under any circumstances!
Preparing Your Chicken Broth for Canning
Before we get to the actual canning process, let’s briefly cover how to prepare your broth:
- Make your chicken broth using whole chicken, bones, or carcasses
- Strain the broth through a colander or cheesecloth to remove bones and solids
- Cool and refrigerate for at least 12 hours to allow fat to rise to the surface
- Skim off fat (optional but recommended for long-term storage)
- Reheat broth to a full boil before filling jars
A Note About Fat in Chicken Broth
There’s some debate about whether you must remove fat before canning chicken broth. Here’s what I’ve learned:
- If you plan to use the broth within 6 months, leaving some fat is generally fine
- For longer storage (6+ months), skimming fat is recommended to prevent it from going rancid
- Either way, always wipe jar rims with vinegar (not just water) to remove any grease that could prevent a proper seal
Equipment Needed for Pressure Canning Chicken Broth
Before starting the canning process, gather these supplies:
- Pressure canner (NOT an Instant Pot or regular pressure cooker)
- Canning jars (pints or quarts)
- New two-part canning lids and rings
- Jar lifter
- Canning funnel
- Clean towels
- White vinegar (for cleaning jar rims)
- Ladle
Step-by-Step Guide to Pressure Canning Chicken Broth
Now let’s get to the actual process:
1. Prepare Your Canner and Jars
- Read your pressure canner’s instruction manual
- Add the recommended amount of water to your canner
- Place the rack in the bottom of the canner
- Begin heating the water (not to a boil yet)
- Wash jars in hot, soapy water or run through dishwasher
- Keep jars hot until ready to fill (I place mine in a sink of hot water)
2. Heat Your Broth
- Bring your prepared chicken broth to a full rolling boil
3. Fill Jars and Process
- Remove one hot jar from the water, place funnel on top
- Ladle hot broth into the jar, leaving 1 inch of headspace
- Remove air bubbles with a bubble remover tool or plastic knife
- Wipe the rim with a cloth dipped in white vinegar to remove any grease
- Place a new lid on the jar and secure with a ring to fingertip-tight
- Place jar in the pressure canner
- Repeat until canner is filled or you run out of broth
4. Process at the Correct Time and Pressure
This is where the main question of “how long” comes in:
- Close and lock the pressure canner lid
- Allow the canner to vent steam for 10 minutes
- Place weight on vent or close petcock
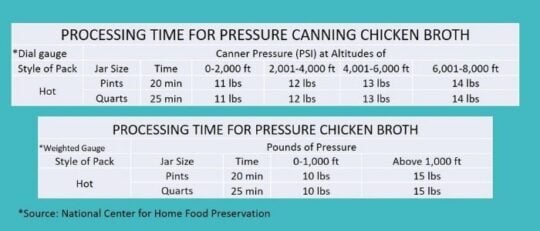
- Allow pressure to build to the correct level for your elevation:
- For weighted gauge canners: 10 pounds pressure (0-1,000 ft) or 15 pounds pressure (above 1,000 ft)
- For dial gauge canners: 11 pounds (0-2,000 ft), 12 pounds (2,001-4,000 ft), 13 pounds (4,001-6,000 ft), 14 pounds (6,001-8,000 ft), or 15 pounds (8,001-10,000 ft)
- Start timing when the correct pressure is reached:
- Process pints for 20 minutes
- Process quarts for 25 minutes
- Maintain correct pressure throughout processing time by adjusting heat
5. Cool Down and Remove Jars
- When processing time is complete, turn off heat
- Allow canner to depressurize naturally (do NOT force cool)
- When pressure gauge reads zero, wait an additional 10 minutes
- Remove weight or open petcock, then carefully remove lid (away from your face)
- Let jars sit in open canner for 5-10 minutes
- Remove jars with jar lifter and place on a towel-covered surface
- Leave undisturbed for 12-24 hours
- Check seals, remove rings, label, and store
Common Questions About Canning Chicken Broth
Can I add salt to my broth before canning?
Yes! You can add 1 teaspoon of canning salt per quart or 1/2 teaspoon per pint if desired. This is completely optional and for flavor only.
How long will my canned chicken broth last?
Properly processed and stored canned chicken broth should maintain good quality for 12-18 months, although it remains safe to consume beyond that time if the seal remains intact and there are no signs of spoilage.
Can I can chicken broth in the Instant Pot?
No! Despite what some blogs might suggest, Instant Pots and other electric pressure cookers have NOT been tested for canning and do not maintain the consistent pressure needed for safe canning. Always use a proper pressure canner.
What’s the difference between chicken stock and chicken broth?
While many people (including me) use these terms interchangeably, technically:
- Chicken stock is made primarily from bones and has a richer, darker color
- Chicken broth is made from meatier parts and has a lighter color and flavor
However, both are canned using the exact same process and times.
Troubleshooting Common Issues
My jars didn’t seal properly
If you find unsealed jars after cooling:
- Refrigerate and use within a few days, or
- Reprocess with new lids within 24 hours, or
- Freeze the broth instead (leave headspace for expansion)
My broth looks cloudy
Some cloudiness is normal in home-canned broth due to minerals and proteins. However, if accompanied by an off smell when opened or other signs of spoilage, discard it.
There’s fat floating on top of my canned broth
This is normal if you didn’t skim all the fat. The broth is still safe to consume as long as the jar sealed properly. You can remove the fat before using or leave it for flavor.
Final Thoughts
Pressure canning homemade chicken broth is a fantastic way to preserve the goodness of your kitchen efforts. When properly processed—20 minutes for pints and 25 minutes for quarts at the correct pressure for your elevation—you’ll have delicious, ready-to-use broth available whenever you need it.
I’ve found that having homemade canned broth on my pantry shelves not only saves money (have you seen the price of organic broth lately?!) but also makes weeknight cooking so much easier. There’s nothing like opening a jar of homemade chicken broth to quickly make soup, cook rice, or add flavor to sauces.
Remember: Always follow current, tested canning guidelines from reputable sources like the National Center for Home Food Preservation or your pressure canner manufacturer’s instructions for the safest results.
How to Pressure Can Broth or Stock

- Take your cooled broth or stock and skim off any fat (if desired).
- Pour broth into a large stockpot and bring to a boil.
- Meanwhile, start heating up your pressure canner and place jars in a sink full of very hot water.
- Have your other supplies ready for the next step.
- Taking one jar at a time, dump out the hot water, place the funnel into the jar, and, using a ladle, pour boiling broth into your hot jars.
- Leave one-inch head-space in your jar.
- Check each rim with your finger to be sure there are no knicks or chips. Then dip a towel into vinegar and wipe the rims of your jars to remove any residue.
- Seal each jar with lid, tightening bands to fingertip tight.
- Place jars, one at a time, into the pressure canner. Seal pressure canner following the manufacturer’s instructions and allow it to come to a full boil.
- Let the pressure canner release a steady stream of steam for 10 minutes before weighting or adding your rocker/jiggler.
- Place the rocker or weighted gauge onto the pressure canner and process at 10 pounds of pressure for a weighted gauge or 11 pounds of pressure for a dial gauge (adjust pressure for your elevation!).
- Once the dial gauge reaches pressure, process pint jars for 20 minutes and quart jars for 25 minutes.
- Turn off heat and allow pressure to come down to zero pressure naturally.
- Let jars sit for 10 more minutes inside the pressure canner, then remove the lid to your pressure canner and transfer jars onto a towel in a draft-free location. Allow them to sit, undisturbed overnight before labeling and moving to the pantry for long-term storage.

Did you try this tutorial? We’d love for you to give us a star rating in the recipe card below, then share your beautiful canned broth with us on social media by tagging us at @homesteadingfamily!
Why I Love Pressure Canning Broth
Pressure canning bone broth at home is a great way to ensure you have quick and easy ingredients on hand that are both healthy and very inexpensive to make.
With a family my size, having canned convenience meals or freeze dried convenience meals on the shelf can save dinnertime!
When it comes to broth, I typically make a minimum of two gallons at a time, which, for some families, is too much broth to use up before it goes bad.
This is where canning comes in so handy. You can easily pressure can bone broth to have it on the shelf for pennies, instead of paying nearly $8 for some brands of organic, free-range chicken broth.
If you don’t have time to can, try making homemade chicken bouillon out of your broth.

To can your own broth you’ll need a few supplies on hand:
- Canning jars – whatever size jar you prefer. I use quart-size jars because of our large family. But if you want to can some in pint-size jars to use for smaller portions, that’s great.
- Two-part sealing lids – to ensure a proper seal, be sure your sealing lids are new and not previously used.
- Funnel – I recommend using a stainless steel funnel like this.
- Vinegar – this is to clean the rim of the jar before placing the canning lids on to the jar.
- Clean towel – use a lint-free towel, if possible. A paper towel will also work here.
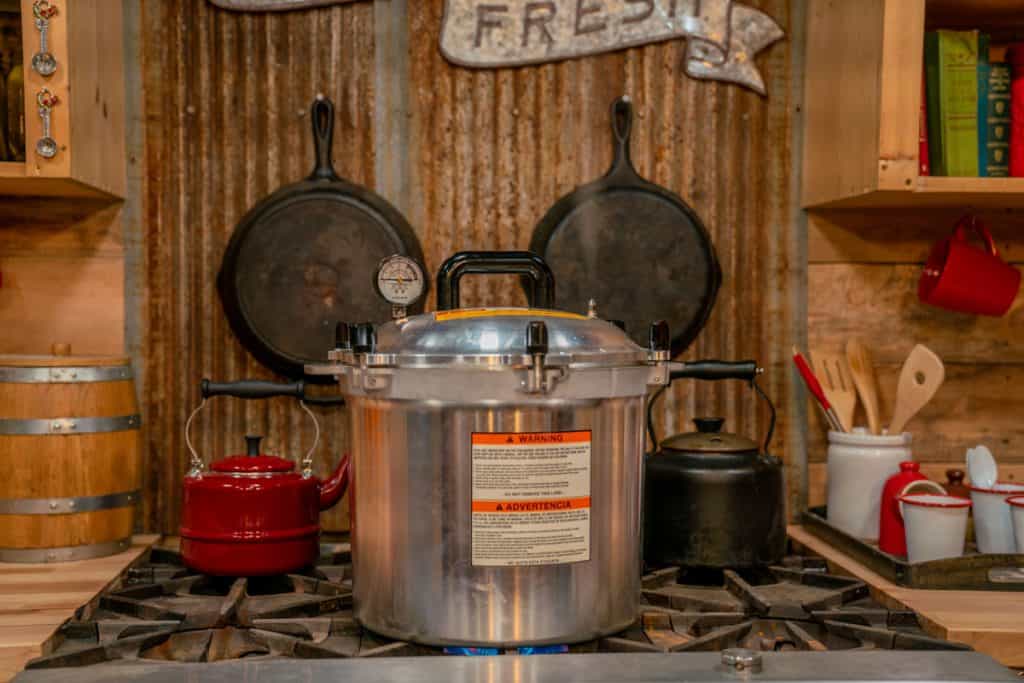
- Pressure canner – this is the All-American Canner that I have, love and recommend.
- Jar lifter – this is my favorite jar lifter. A jar lifter is not necessary, but we recommend one because we don’t want you to burn your hands!

This isn’t a recipe for broth but a “how-to” tutorial. The only ingredient needed is your previously prepared broth.
If you’re looking for a delicious and healthy homemade broth recipe, here’s our super immune-boosting chicken broth.
- I recommend chilling your broth for at least 12 hours or more to allow all the fat to rise to the surface of your broth. This isn’t a necessary step but will allow you to skim off any fat if desired. I like to skim off fat to use in cooking or leave it in for added flavor.
- There is some debate on whether you need to skim the fat off your broth before canning. My general rule of thumb is if you’re going to use the broth within six months of canning, you can leave the fat.
- If you’re not going to use your broth within six months, skim the fat so that it doesn’t have the potential to go rancid.
- Some people say you must skim the fat off your broth to ensure a proper seal, however, I have successfully canned broth with the fat many times. The choice is up to you! This is why we ALWAYS wipe the rim of the jar with vinegar which de-greases the rim of the lid so that the jar can seal completely. Using only water will not accomplish this!
- In the video above, I mention using water, but I have updated my methods to only use vinegar now. Don’t skip this important step of cleaning the rims with vinegar or you may in fact have jars that don’t seal properly.
- Read the manufacturer’s instructions for your specific pressure canner. Different pressure canners require different pounds of pressure for the same elevation. For more information on pressure canners and pounds of pressure visit the National Center for Home Food Preservation.