Are you tired of guessing how long to cook chicken legs in the oven at 425°F? I totally get it! As a home cook who’s made this dish countless times, I’ve perfected the timing to give you juicy, tender drumsticks with that irresistibly crispy skin everyone loves.
In this comprehensive guide, we’ll cover everything you need to know about baking chicken legs at 425°F, from preparation to serving. I’m sharing all my tips and tricks so you can nail this family-favorite dish every single time!
The Perfect Cooking Time for Chicken Legs at 425°F
Let’s get straight to the answer you’re looking for: Chicken legs typically need 35-45 minutes in an oven preheated to 425°F to cook perfectly.
But wait – there’s more to it than just setting a timer! Several factors affect exactly how long your chicken legs will need:
- Size matters: Larger drumsticks need more time (closer to 45 minutes) while smaller ones might be done in 35 minutes
- Bone-in vs boneless: Bone-in chicken legs (which is most common) take longer than boneless
- Starting temperature: Room temperature chicken cooks more evenly than cold chicken straight from the fridge
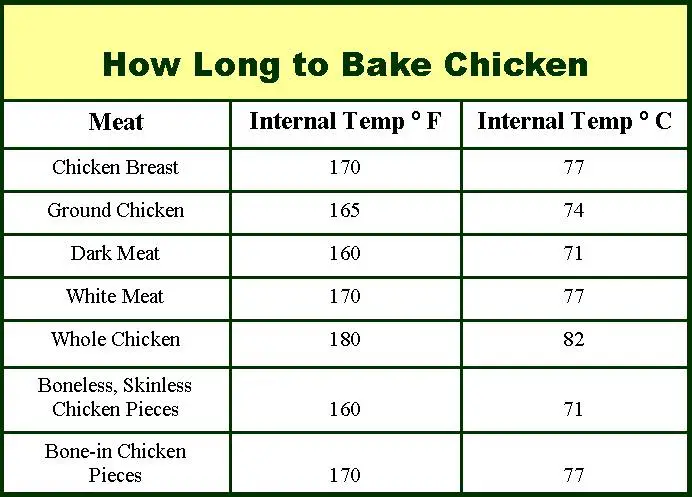
The absolute most important thing? Your chicken legs need to reach an internal temperature of 165°F to be safe to eat. This is non-negotiable! Invest in a good meat thermometer if you don’t already have one.
Why 425°F is the Magic Temperature
You might be wondering why 425°F specifically? I’ve experimented with various temperatures over the years, and 425°F hits that sweet spot for chicken legs:
- Hot enough to crisp up the skin beautifully
- Perfect for rendering fat from the skin
- Creates that gorgeous golden-brown color
- Cooks the meat through before the outside burns
Lower temperatures (like 350°F) take too long and often result in rubbery skin, while higher temps can burn the outside before the inside is fully cooked.
Step-by-Step Guide to Perfect Oven-Baked Chicken Legs
Let’s break down exactly how to make perfect chicken legs at 425°F:
What You’ll Need:
- 6-8 chicken legs/drumsticks
- 2 tablespoons olive oil
- Seasonings (I’ll share my favorite blend below!)
- Baking sheet
- Parchment paper or aluminum foil
- Meat thermometer
My Go-To Seasoning Blend:
- 1 teaspoon paprika (smoked paprika gives even better flavor!)
- 3/4 teaspoon freshly cracked black pepper
- 3/4 teaspoon garlic powder
- 1/4 teaspoon salt (or more to taste)
- Optional: pinch of turmeric, dried herbs like thyme or rosemary
Instructions:
-
Preheat your oven to 425°F. This is crucial – don’t put the chicken in until the oven reaches full temperature!
-
Prep the chicken legs. Pat them completely dry with paper towels. This step is SUPER important for crispy skin! Wet chicken = steamed chicken = soggy skin.
-
Season generously. Mix your spices in a small bowl, then rub them all over the chicken legs. Don’t be shy here – really get that seasoning on every surface.
-
Add oil. Drizzle olive oil over the seasoned chicken legs and rub it in. The oil helps the skin crisp up beautifully.
-
Arrange on baking sheet. Line a baking sheet with parchment paper or foil (for easier cleanup), and place the chicken legs on it with some space between each piece. Don’t crowd them!
-
Bake at 425°F for 35-45 minutes. The exact time depends on the size of your chicken legs. Smaller ones might be done closer to 35 minutes, while larger ones could take the full 45.
-
Check for doneness. Use your meat thermometer to check that the internal temperature reaches 165°F in the thickest part (without touching bone).
-
BONUS STEP: Broil for crispiness. This is my secret trick! Once the chicken legs are fully cooked, switch your oven to broil and give them 2-3 minutes under the broiler to get extra-crispy skin. Watch carefully so they don’t burn!
-
Rest before serving. Let the chicken legs rest for about 5 minutes before serving. This helps the juices redistribute throughout the meat.
Troubleshooting Common Issues
Even the best cooks run into problems sometimes! Here are solutions to common chicken leg cooking issues:
Problem: Skin isn’t crispy enough
Solution: Make sure you’ve patted the chicken completely dry before seasoning. Also, try that broiling trick I mentioned above!
Problem: Chicken is dry
Solution: You probably overcooked it. Next time, check the temperature earlier and remember that smaller legs cook faster.
Problem: Chicken isn’t fully cooked
Solution: Always use a meat thermometer to confirm doneness. If the outside is getting too brown before the inside is done, cover loosely with foil for the rest of the cooking time.
Problem: Seasoning doesn’t stick
Solution: Pat the chicken dry first, then lightly oil it before adding seasonings.
Delicious Variations to Try
Once you’ve mastered the basic recipe, try these tasty variations:
- BBQ style: Brush with your favorite BBQ sauce during the last 5 minutes of cooking
- Lemon-herb: Add lemon zest and fresh herbs like thyme and rosemary to your spice mix
- Spicy: Add cayenne pepper or hot paprika to your seasoning blend
- Asian-inspired: Use soy sauce, ginger, garlic, and a touch of honey
What to Serve with Oven-Baked Chicken Legs
These chicken legs pair beautifully with so many side dishes:
- Mashed potatoes or mashed cauliflower
- Roasted vegetables (you can even cook them on the same pan!)
- Simple green salad
- Mac and cheese
- Rice or quinoa
- Glazed carrots
Storing and Reheating Leftovers
Got leftovers? Lucky you! Here’s how to store and reheat them:
- Storage: Keep in an airtight container in the refrigerator for 3-4 days.
- Reheating: For best results, reheat in a 350°F oven for about 10-15 minutes until warmed through. Microwaving works in a pinch but will make the skin soggy.
FAQs About Cooking Chicken Legs at 425°F
Can I use frozen chicken legs?
No, you should completely thaw chicken legs before baking. Frozen chicken cooks unevenly and can be unsafe.
Do I need to flip the chicken legs during cooking?
It’s not absolutely necessary, but flipping them halfway through (around 20 minutes) can help them cook more evenly.
Can I use this same method for other chicken parts?
Yes, but cooking times will vary. Thighs are similar (35-45 minutes), wings cook faster (25-30 minutes), and breasts typically need less time but can dry out more easily.
My chicken legs are different sizes. What should I do?
Start checking the smaller ones for doneness earlier. You can remove them as they reach 165°F and let the larger ones continue cooking.
Can I cook vegetables on the same pan?
Absolutely! Just make sure they’re cut into similar-sized pieces so they cook evenly. Root vegetables like potatoes and carrots work particularly well.
Final Thoughts
Cooking chicken legs at 425°F is simple once you know the right timing and techniques. Remember that the 35-45 minute range is a guideline, and the most reliable method is always checking the internal temperature with a meat thermometer.
The beauty of this recipe is how versatile it is – you can change up the seasonings to match any cuisine or flavor profile you’re in the mood for. Plus, it’s budget-friendly and always a hit with both kids and adults!
What’s your favorite seasoning combo for chicken legs? Drop a comment below – I’d love to hear how your chicken legs turn out using this method!
There you have it – a complete guide to perfectly cooked chicken legs at 425°F! With these tips and techniques, you’ll never have to wonder about timing again. Enjoy your deliciously crispy, juicy chicken legs!
How long to bake chicken drumsticks in the oven?
You want them to hit an internal temperature of 180 degrees. About 30 minutes at 400 degrees. And then hit it with that little bit in the broiler. That is usually about perfect.
Our Favorite Side Dishes for Baked Chicken:
Personally, you can’t go wrong serving this with any kind of potato dish–baked, roasted, mashed, or any other way you can cook them. If you’re not a potato person, they’re also great with a side of mac and cheese. The coloring on these rubbed and baked drumsticks looks beautiful when paired with a green veggie like broccoli, asparagus, or green beans. You can steam them or, even easier, just roast them in your oven right alongside the chicken.
- Aluminum foil. If you don’t have a pan dedicated to roasting try using a baking sheet with foil to enhance the browning from the oven.
- Cover your drumsticks with foil if you find that your chicken tends to be more dry than you would like. Just be sure to uncover them when you broil!
- Brush your drumsticks with additional oil or drippings right before you broil them for extra crispiness.
- Your chicken is cooked through if the juices run clear and it isn’t at all pink in the center. If you use a meat thermometer you need it at 165 degrees.
Soooo pretty! And don’t you DARE tell anyone they need to use a fork and knife and eat it properly. My kids used to call these the “handle” parts because they grabbed the meat by the handle and went to town on that drummie. That, my friends, is how to properly eat a chicken drumstick. And probably why kids love them. They taste delicious and are fun to eat!