Are you wondering how to get perfectly tender, fall-off-the-bone chicken legs using your Instant Pot? You’re in the right place! Cooking bone-in chicken legs in an Instant Pot is one of the easiest ways to prepare a delicious meal that your whole family will love. I’ve been experimenting with different methods and timings, and I’m excited to share what I’ve learned with you.
Quick Answer: Cooking Times for Bone-In Chicken Legs
For those in a hurry here’s the short answer
- Fresh chicken legs: 10-15 minutes on high pressure
- Frozen chicken legs: 15-20 minutes on high pressure
- Natural pressure release: 5 minutes (essential for juicy results!)
But there’s much more to creating the perfect Instant Pot chicken legs than just the cooking time. Let’s dive into the details!
Choosing the Right Chicken Legs
Before you start cooking, it’s important to select the right chicken legs:
- Opt for medium-sized legs, around 1 to 1½ pounds each
- Make sure the legs are similar in size for even cooking
- Look for plump, moist chicken legs without any off-odors
- Consider organic or free-range chicken for better flavor
Larger legs might need longer cooking times, while smaller ones could dry out if overcooked I usually buy a pack of similar-sized legs to ensure they all finish cooking at the same time.
Preparation Steps
A little prep work goes a long way in making your chicken legs taste amazing:
- Rinse and pat dry the chicken legs with paper towels
- Trim excess fat and skin (but leave most of the skin on for moisture and flavor)
- Season generously both inside and out
- Open up the chicken at the thicker part to allow seasonings to penetrate
For maximum flavor, I like to massage my seasonings into the meat A simple but effective seasoning blend includes
- 1 tsp kosher salt
- 1 tsp black pepper
- 1 tsp garlic powder
- 1 tsp smoked paprika
- ½ tsp ground cumin
Step-by-Step Cooking Process
Now let’s go through the cooking process from start to finish:
Step 1: Searing (Optional but Recommended)
Using the Sauté function on your Instant Pot to brown the chicken legs first adds amazing flavor:
- Press the Sauté button and add 2 tbsp olive oil
- Once hot, add chicken legs and brown for 2-3 minutes per side
- Remove legs temporarily once browned
This step is technically optional, but I never skip it! The flavor difference is night and day.
Step 2: Adding Liquid and Aromatics
Next, it’s time to add the cooking liquid and flavor boosters:
- Pour 1 cup of liquid into the pot (chicken broth works best)
- Add aromatics like diced onions, garlic, and herbs
- Place a trivet or steamer basket in the pot
- Arrange chicken legs on the trivet (this “pot-in-pot” method ensures even cooking)
The trivet is super important! It keeps the chicken from sitting directly in the liquid and getting soggy.
Step 3: Pressure Cooking
Now for the main event – pressure cooking:
- Close and lock the Instant Pot lid, making sure the valve is set to “sealing”
- Select Manual/Pressure Cook and set to High pressure
- Set the timer:
- 10-15 minutes for fresh chicken legs
- 15-20 minutes for frozen chicken legs
- Wait for the pressure to build (this takes about 10 minutes)
Remember, the Instant Pot needs time to come to pressure before the cooking time starts counting down. Don’t panic if it seems to be taking forever!
Step 4: Natural Pressure Release
This step is crucial for juicy chicken:
- When cooking time is complete, allow for 5 minutes of natural pressure release
- After 5 minutes, carefully turn the valve to “venting” to release remaining pressure
- Wait until the pressure pin drops before opening the lid
I’ve found that skipping the natural release results in tougher, less juicy meat. Those 5 minutes make all the difference!
Step 5: Check for Doneness
Safety first:
- Use a meat thermometer to verify the internal temperature has reached 165°F
- If undercooked, return to the pot and cook for 2-3 more minutes
- If properly cooked, remove from the pot and let rest for a few minutes
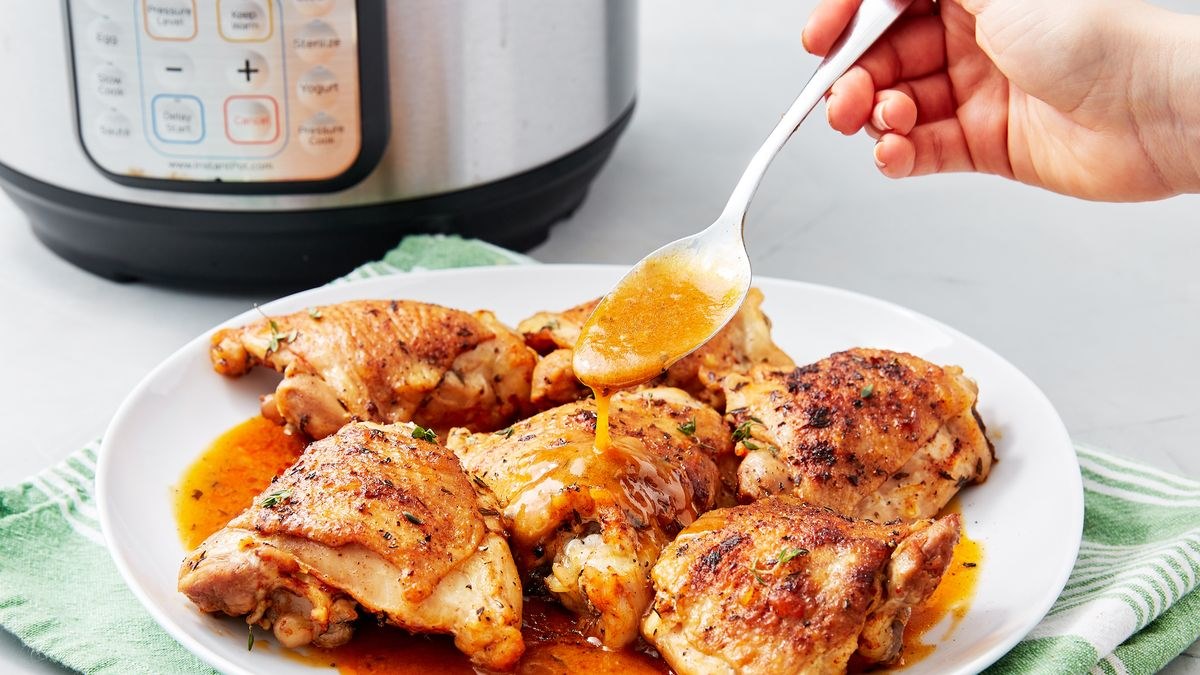
Step 6: Optional Finishing Touches
For crispy skin (since the Instant Pot gives you tender meat but soft skin):
- Transfer cooked chicken legs to a baking sheet
- Brush with a little oil or sauce
- Broil for 2-3 minutes until skin crisps up
- Watch carefully to prevent burning
Troubleshooting Common Issues
Even experienced cooks sometimes run into problems. Here’s how to fix the most common issues:
Chicken Not Cooked Through
If your chicken legs aren’t fully cooked:
- Return them to the Instant Pot
- Add a bit more liquid if needed
- Cook for an additional 2-3 minutes on high pressure
- Check temperature again after cooking
Overcooked or Dry Chicken
To prevent or fix dry chicken:
- Reduce cooking time by 1-2 minutes next time
- Ensure you’re using the natural release method
- Make sure there’s enough liquid in the pot
- Consider brining the chicken legs beforehand
Bland Flavor
If your chicken lacks flavor:
- Increase seasonings (chicken in the Instant Pot can handle more seasoning than you think)
- Try marinating the chicken legs for 30 minutes to overnight before cooking
- Add more aromatics to the cooking liquid
- Finish with a flavorful sauce after cooking
Delicious Sauce Ideas
Transform your chicken legs with these easy sauce options:
- BBQ: Mix your favorite BBQ sauce with a bit of honey and brush on before broiling
- Buffalo: Combine hot sauce with melted butter for a classic wing flavor
- Teriyaki: Mix soy sauce, brown sugar, ginger, and garlic
- Ranch: Use ranch seasoning in your rub for a crowd-pleasing flavor
- Gravy: Use the cooking liquid to make a quick gravy by adding cornstarch
Creative Recipe Variations
Here are a few of my favorite Instant Pot chicken leg recipes:
Honey Garlic Chicken Legs
- Marinate legs in honey, soy sauce, minced garlic, and olive oil
- Cook as directed above
- Brush with more honey-soy mixture before broiling
Lemon Herb Chicken Legs
- Season with lemon zest, thyme, rosemary, and garlic
- Cook with lemon slices in the Instant Pot
- Finish with fresh herbs and a squeeze of lemon juice
BBQ Chicken Legs
- Use your favorite BBQ rub as seasoning
- Add BBQ sauce to the cooking liquid
- Brush with more sauce before broiling
One-Pot Meal Ideas
Make dinner even easier by cooking vegetables with your chicken legs:
- Add potatoes cut in half on top of the chicken legs (they cook in about the same time)
- Include carrots, onions, or other root vegetables for a complete meal
- Remember to keep vegetables large enough so they don’t overcook
Storing and Reheating Leftovers
If you have leftover chicken legs:
- Refrigerate: Store in an airtight container for up to 3 days
- Freeze: Freeze for up to 2-3 months in freezer bags
- Reheat: Warm in the oven at 350°F for 10-15 minutes
- Crisp again: If desired, broil briefly to re-crisp the skin
Final Tips for Perfect Instant Pot Chicken Legs
After making countless batches of Instant Pot chicken legs, here are my top tips:
- Don’t skip the natural release – it’s essential for juicy meat
- Use a trivet or steamer basket to keep the chicken elevated
- Season more heavily than you would for other cooking methods
- Consider the broiler finish for crispy skin
- Verify doneness with a thermometer rather than just timing
- Let the chicken rest for a few minutes before serving
- Make extra – they’re even better the next day!
Cooking bone-in chicken legs in your Instant Pot is a game-changer for busy weeknights or when you want a hassle-free meal. With just 10-15 minutes of pressure cooking time (plus about 15 minutes for pressure building and release), you can have juicy, fall-off-the-bone chicken that tastes like it’s been cooking all day.
FAQs
Can I stack chicken legs in my Instant Pot?
Yes, but try not to overcrowd. If stacking, increase cooking time by 1-2 minutes and make sure they’re arranged so steam can circulate.
Do I need to use a trivet when cooking chicken legs?
It’s highly recommended to use a trivet or steamer basket to elevate the chicken legs above the liquid, preventing them from becoming soggy and ensuring even cooking.
How much liquid should I add to the Instant Pot?
You need at least 1 cup of liquid for the Instant Pot to properly build pressure. Chicken broth provides the best flavor.
Can I cook frozen chicken legs without thawing?
Absolutely! Just increase the cooking time to 15-20 minutes on high pressure. The Instant Pot will take longer to come to pressure with frozen meat.
How can I make the skin crispy?
The Instant Pot doesn’t crisp skin, but you can transfer the cooked legs to a baking sheet and broil for 2-3 minutes after pressure cooking.
GET COOKIN’ WITH US
- Choosing a selection results in a full page refresh.
- Press the space key then arrow keys to make a selection.
Main Menu (6/3 LAUNCH)
Course: Dinner
Difficulty: Medium
Prep Time: 5 min
Cook Time: 70 min
Total Time: 1-2 hours
Cooking Technique: Pressure Cook, Sauté
Cuisine: American, American
Yield: 4 Servings
- 1 tbsp packed brown sugar
- 1 tbsp chili powder
- 1 tbsp smoked paprika
- 1 tsp freshly chopped thyme
- 1 whole small chicken 3 lbs to 4 lbs
- kosher salt
- freshly ground black pepper
- 1 tbsp extra-virgin olive oil
- 2/3 cup low-sodium chicken broth
- 2 tbsp freshly chopped parsley
We’re not being dramatic with the name the chicken quite literally falls off the bone. It’s not the prettiest bird we’ve ever made, but it’s one of the best.
- In a small bowl, whisk together brown sugar, chili powder, paprika, and thyme.
- Pat chicken dry with paper towels, then season generously with salt and pepper. Rub the brown sugar mixture all over chicken.
- Set Instant Pot to Sauté. Once heated, add oil, then chicken, breastside down.
- Sear chicken until skin is crispy, 3 to 4 minutes. Use very large tongs to flip chicken, then pour broth into the bottom of the Instant Pot.
- Secure lid and set to Pressure Cook on High for 25 Minutes.
- Allow Instant Pot to depressurize naturally, then remove lid and take out chicken. Let rest for 10 minutes before slicing.
- Garnish with parsley and serve warm.
Team Delish is a passionate collective of food enthusiasts, home cooks, and creatives who work tirelessly to bring readers the recipes, stories, and videos they crave. With over 34 million social fans and more than 2 billion video views worldwide, Delish has become a global go-to for food content. The magic happens in the Delish Kitchen Studios in NYC, where the team collaborates with renowned chefs and celebrity guests to produce stunning multimedia content for platforms like Delish.com, YouTube, TikTok, Instagram, Pinterest, and more. At Delish, the focus is always on the audience. The talented team not only dreams up viral recipes, clever hacks, and seasonal favorites but also fosters a community with educational and entertaining content. Delish has something for everyone—from mastering sourdough to whipping up a Sloppy Joe Meatball Bake.