Hey there, kitchen warriors! If you’re wonderin’ how long to bake panko chicken breast to get that golden, crispy goodness without dryin’ it out, you’ve come to the right spot. I’m straight-up obsessed with this recipe ‘cause it’s a game-changer for quick, healthy dinners that still feel indulgent. Here’s the quick scoop bake your panko-crusted chicken breast at 400°F for 15-25 minutes or at 425°F for 15-22 minutes, dependin’ on how thick your chicken is Always aim for an internal temp of 165°F to make sure it’s cooked through. But stick with me, ‘cause I’ve got all the deets to make sure your chicken turns out crunchtastic every darn time!
We’re gonna dive deep into everything you need to know—exact times, step-by-step prep, tips to avoid soggy disasters (yep, I’ve been there), and even some fun twists to keep things fresh Whether you’re a newbie or a seasoned home cook, I’ve got your back. Let’s get cookin’!
How Long Should You Bake Panko Chicken Breast? Breakin’ It Down
Let’s cut to the chase and talk timing. The bake time for panko chicken breast depends on two big things your oven temp and the thickness of your chicken. I’ve messed this up before by not payin’ attention, so learn from my oopsies and nail it on the first try.
Here’s a handy lil’ table to keep things clear:
| Oven Temperature | Thickness | Baking Time | Internal Temp |
|---|---|---|---|
| 400°F (205°C) | Thin (½ inch) | 15-18 minutes | 165°F (74°C) |
| 400°F (205°C) | Thick (1 inch+) | 22-25 minutes | 165°F (74°C) |
| 425°F (218°C) | Thin (½ inch) | 15-18 minutes | 165°F (74°C) |
| 425°F (218°C) | Thick (1 inch+) | 20-22 minutes | 165°F (74°C) |
- Why the range? Thicker pieces take longer to cook through, and ovens can be a bit finicky sometimes. A meat thermometer is your best bud here—don’t guess, check!
- Higher heat = quicker cook: Crankin’ it to 425°F gets you that extra crispy crust faster, but watch it close so it don’t burn.
- Flip it! Halfway through, flip your chicken to get even browning on both sides. Trust me, it makes a diff.
I usually go with 400°F for a more controlled cook, especially if I’m multitaskin’ in the kitchen. But if I’m in a rush, 425°F is my go-to. Just don’t forget to preheat that oven—startin’ cold messes with the timing and crispiness big time.
Why Panko Chicken Breast is the Bomb
Before we get into the nitty-gritty, lemme rave about why panko breadcrumbs are where it’s at. Unlike regular breadcrumbs, panko is lighter and flakier, givin’ you that unreal crunch without needin’ to deep-fry. It’s like gettin’ all the fried chicken vibes but without the grease splatters and extra calories. Plus, it’s super easy to work with, and you can jazz it up with whatever spices you got in your pantry.
Bakin’ panko chicken breast is:
- Healthier: Way less oil than fryin’, so it’s kinder to your waistline.
- Quicker: No messin’ with hot oil or cleanin’ up a fryer.
- Versatile: Use it in salads, sandwiches, or just dip it in some sauce for a snack.
- Family-friendly: Kids love the crunch, and us grown-ups appreciate the simplicity.
I’ve been makin’ this for weeknight dinners forever, and it’s always a hit. Now, let’s talk about how to do it right.
Step-by-Step: Baking Panko Chicken Breast Like a Pro
If you’re new to this, don’t sweat it. I’m gonna walk ya through the process step by step. Once you get the hang of it, its gonna be second nature. Here’s how I do it at my house, and it works like a charm every time.
What You’ll Need
- Boneless, skinless chicken breasts (1.5-2 lbs, about 2-3 pieces)
- 1 cup panko breadcrumbs
- 1-2 eggs (for the wash)
- ½ cup all-purpose flour (or gluten-free if needed)
- ½ cup grated Parmesan (optional, but adds a dope flavor)
- Seasonings: salt, pepper, garlic powder, maybe a pinch of paprika or cayenne if you’re feelin’ spicy
- A drizzle of olive oil or melted butter (for extra crisp)
- Tools: shallow bowls, baking sheet, wire rack (if ya got one), meat mallet, and a meat thermometer
Step 1: Prep Your Chicken
Start by slicin’ your chicken breasts in half lengthwise to make thinner cutlets. This helps ‘em cook faster and more evenly. Then, grab a meat mallet or even a rollin’ pin and pound ‘em to about ½ inch thick. I always cover mine with plastic wrap while poundin’ to keep chicken juice from flyin’ everywhere—learned that the hard way!
Season lightly with salt and pepper. This lil’ step adds flavor right into the meat.
Step 2: Set Up Your Breading Station
Get three shallow bowls or plates ready:
- Bowl 1: Flour mixed with a pinch of salt and pepper.
- Bowl 2: Whisked egg(s) with a splash of water or oil to make a wash.
- Bowl 3: Panko breadcrumbs mixed with Parmesan and any seasonings you’re usin’. Garlic powder and paprika are my faves.
Pro tip: Toastin’ the panko in a pan with a tiny bit of olive oil beforehand makes it extra crunchy. Just heat it over medium for 4-5 minutes till golden, stirrin’ so it don’t burn, then let it cool. This ain’t mandatory, but it’s a game-changer if you got the time.
Step 3: Bread That Chicken
Dip each piece of chicken into the flour first (shakes off excess), then the egg wash (let it drip a bit), and finally press it into the panko mix. Really push it in there so the crumbs stick good. You want a nice, even coat on both sides for max crunch.
Step 4: Bake It Up
Preheat your oven to 400°F or 425°F, dependin’ on your vibe. Place the breaded chicken on a lightly greased baking sheet. Don’t line it with parchment or foil—direct contact with the pan gets it crispier. If you got a wire rack, set it on the sheet and put the chicken on top for air to circulate all around.
Bake for 15-18 minutes for thin pieces, or 20-25 for thicker ones, flippin’ halfway through. Check the internal temp with a thermometer—it’s gotta hit 165°F to be safe. If it ain’t there yet, give it a couple more minutes.
Step 5: Rest and Serve
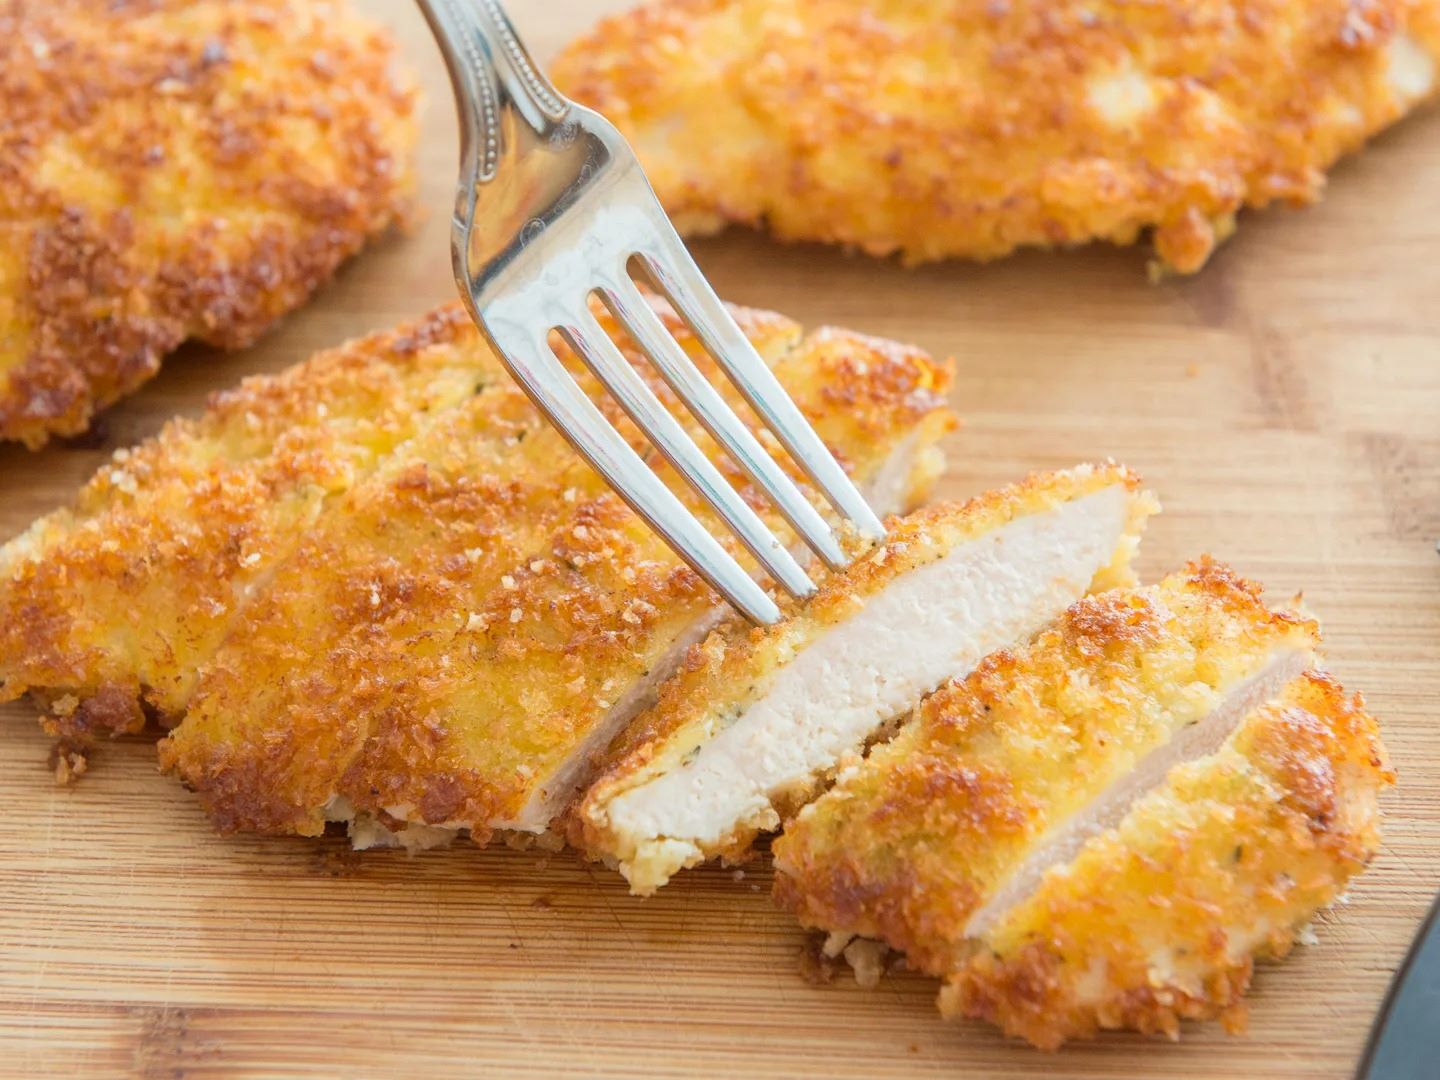
Once it’s done, pull it out and let it rest on a wire rack for 5 minutes. Don’t leave it on the pan, or the bottom gets soggy—been there, hated that. Restin’ keeps the juices in so it stays tender. Then slice it up and dig in!
I love servin’ mine with a simple salad or some roasted veggies. Dip it in honey mustard or ranch if you’re feelin’ saucy. Yum!
Tips for the Crispiest Panko Chicken Breast Ever
I’ve burned a few batches and ended up with sad, soggy chicken before figurin’ out these tricks. Here’s how to make sure yours turns out perfect:
- Toast the panko first: Like I mentioned, a quick toast in a pan with oil amps up the crunch. Don’t skip this if you want restaurant-level texture.
- Space ‘em out: Don’t crowd the baking sheet. Leave room between pieces so hot air can get all around. Crowdin’ leads to steamin’ instead of crispin’.
- No cover-ups: Skip parchment or foil. Direct pan contact browns the bottom better.
- Drizzle for extra crisp: A tiny drizzle of olive oil or melted butter on top before bakin’ helps the panko get golden and crispy.
- Wire rack magic: If you got one, use it. It lets air flow under the chicken, so no soggy bottoms.
- Don’t overcook: Keep an eye on that thermometer. Over 165°F, and it starts gettin’ dry. Ain’t nobody got time for tough chicken.
- Rest it right: Cool on a rack, not the pan, to keep that crunch intact while it sets.
Follow these, and you’ll have folks beggin’ for seconds. I’ve had my fam literally fight over the last piece—true story!
Fun Twists to Switch Up Your Panko Chicken Game
Once you master the basic method, you can get wild with flavors. Here are some ideas I’ve tried that turned out amazin’:
- Cheesy Kick: Mix grated Parmesan or even cheddar into the panko for a melty, cheesy crust. It’s next-level good.
- Spicy Vibes: Add cayenne or chili powder to the breadcrumb mix for a lil’ heat. Pair it with a cool dip like ranch to balance it out.
- Buffalo Style: After bakin’, toss the chicken in some hot sauce or buffalo wing sauce. Serve with celery sticks for that pub feel.
- Herb It Up: Throw dried herbs like thyme, oregano, or Italian seasoning into the panko for a fancy twist. Smells divine while it bakes.
- Chicken Fingers: Cut the breasts into strips before breadin’ for kid-friendly fingers. Bake time drops a bit—check at 12-15 minutes.
I’m always experimentin’ with new combos. Last week, I mixed some garlic powder and lemon zest into the crumbs, and it was straight fire. What’s your fave way to spice it up?
Common Questions About Bakin’ Panko Chicken Breast
I’ve gotten tons of questions from friends and fam about this recipe, so let’s tackle the big ones. If you’re stuck, hopefully this helps ya out.
Can I Bake Panko Chicken From Frozen?
Yup, you sure can! Just add a few extra minutes to the bake time—think 23-25 minutes total at 400°F. Make sure it still hits 165°F inside. I’ve done this on lazy days when I forgot to thaw, and it still comes out decent, though fresh is always crispier.
How Do I Keep It Crispy After Bakin’?
Don’t cover it or stick it in the microwave—that’s a one-way ticket to soggy town. Let it rest on a wire rack for 5 minutes before cuttin’. If you’re storin’ leftovers, reheat in the oven at 375°F for a few minutes to bring back the crunch. I’ve tried microwavin’ once, and it was a total fail. Never again!
How Long Does Baked Panko Chicken Last?
In the fridge, it’ll keep for 3-4 days in an airtight container. You can eat it cold (great on salads) or reheat as I just said. You can also freeze it for up to 3 months right after cookin’ and coolin’. Thaw in the fridge overnight before warmin’ up. I freeze extras all the time for quick meals later.
What If My Chicken Ain’t Crispy?
If it’s comin’ out soft, you mighta skipped toastin’ the panko or crowded the pan. Also, make sure your oven’s preheated hot. Next time, toast the crumbs, space ‘em out, and maybe crank the heat to 425°F for that extra snap. I’ve had this happen when I rushed, so slow down and follow the steps.
Can I Use Somethin’ Besides Chicken Breast?
Totally! Chicken thighs work too, though they might take a tad longer ‘cause they’re juicier. You could even try pork cutlets or firm tofu for a veggie twist—just adjust the cook time. I’ve done thighs before, and they’re super tender, just not as lean.
Pairin’ Your Panko Chicken With Sides and Sauces
This chicken is like a blank canvas, so what you serve with it can make or break the meal. I’m all about balance—somethin’ light to offset the richness of the crust. Here’s what I usually whip up:
- Simple Salad: Toss some greens like arugula or spinach with olive oil and lemon juice. Top the chicken with it for a fresh bite.
- Roasted Veggies: Broccoli, carrots, or zucchini roasted with a lil’ garlic and oil. Keeps the meal healthy and colorful.
- Potatoes: Whether mashed, fried, or baked wedges, spuds are a classic match. I’m a sucker for garlic mashed with this.
- Dippin’ Sauces: Honey mustard, creamy ranch, or a spicy aioli. I’ve even done a quick mix of mayo and hot sauce for a kick.
Last weekend, I paired mine with a watermelon salad (weird, I know), and the sweet-salty combo was outta this world. What do you like to serve yours with?
Why Bakin’ Panko Chicken is My Go-To Dinner
I keep comin’ back to this recipe ‘cause it’s just so dang easy and reliable. On busy nights, I can prep it ahead—bread the chicken and pop it in the fridge till I’m ready to bake. It’s also a crowd-pleaser; whether I’m cookin’ for just me and my partner or a whole gang, everyone’s happy. Plus, leftovers are gold for lunch the next day. I’ve tossed ‘em into wraps, salads, or just eaten ‘em cold straight from the fridge (don’t judge).
It’s also a healthier pick than fryin’, which means I don’t feel guilty indulgin’ in that crispy texture. I’ve probably made this a hundred times, tweakin’ it each go, and I ain’t bored yet. There’s somethin’ satisfyin’ about pullin’ a perfectly golden tray outta the oven, knowin’ dinner’s gonna be a hit.
Final Thoughts: Get Bakin’ and Make It Yours!
So, to wrap it up, how long to bake panko chicken breast? Anywhere from 15 to 25 minutes at 400-425°F, dependin’ on thickness, till it hits 165°F inside. But it ain’t just about the clock—it’s about gettin’ that crispy, juicy magic just right with the tricks I’ve shared. From toastin’ your panko to flippin’ midway, these lil’ steps make all the difference.
I encourage ya to play around with this. Add your fave spices, try different dips, or switch up the sides. Cookin’ is all about makin’ it personal, and I wanna hear how you make this dish your own. Drop me a comment with your twists or if you got questions—I’m all ears!
Till next time, keep rockin’ that kitchen, and let’s make some seriously tasty grub together. Catch ya later!
How to Season & Tenderize Proteins with a Fork
Maximize flavor and tenderize proteins with this little trick.
- Sheet pan – easy to lay the chicken pieces on and pop right into the oven; no need to wash any pots or pans!
For more kitchen and equipment and tool smarts, visit our Essential Kitchen Cookware and Tools
Get more helpful cooking tips and resources by signing up for our newsletter below. We send out weekly emails that will help you improve in the kitchen and live a healthier life, so join our community today and start cooking smarter!


Prepping & Cooking Smarts
- Want to cook this in the air fryer for an extra crispy crust? Just prepare the recipe as written and cook the panko crusted chicken tenders in the air fryer at 400F for 6 to 8 minutes. Air fry them in a single layer, so do this in batches if needed.
- This shake ‘n bake recipe is so easy, you can make more at one time in the oven without taking extra time out to do so. Once baked, the “fried” chicken can be frozen and then reheated for a delicious after-school snack or added to salads or wraps.
- Always remember to tenderize protein for tender, juicy results. Watch our video below on how to tenderize meat.