Ever stared down at some chicken legs on your grill and wondered, “How long should these babies cook?” You’re not alone! Getting that perfect balance of juicy meat and crispy skin can feel like a culinary tightrope walk. Too little time and you’re serving up salmonella surprise. Too long and you’ve got chicken jerky!
I’ve been there too many times, which is why I’m sharing everything I’ve learned about nailing the perfect grilled chicken legs every single time. Let’s dive into the sizzling details!
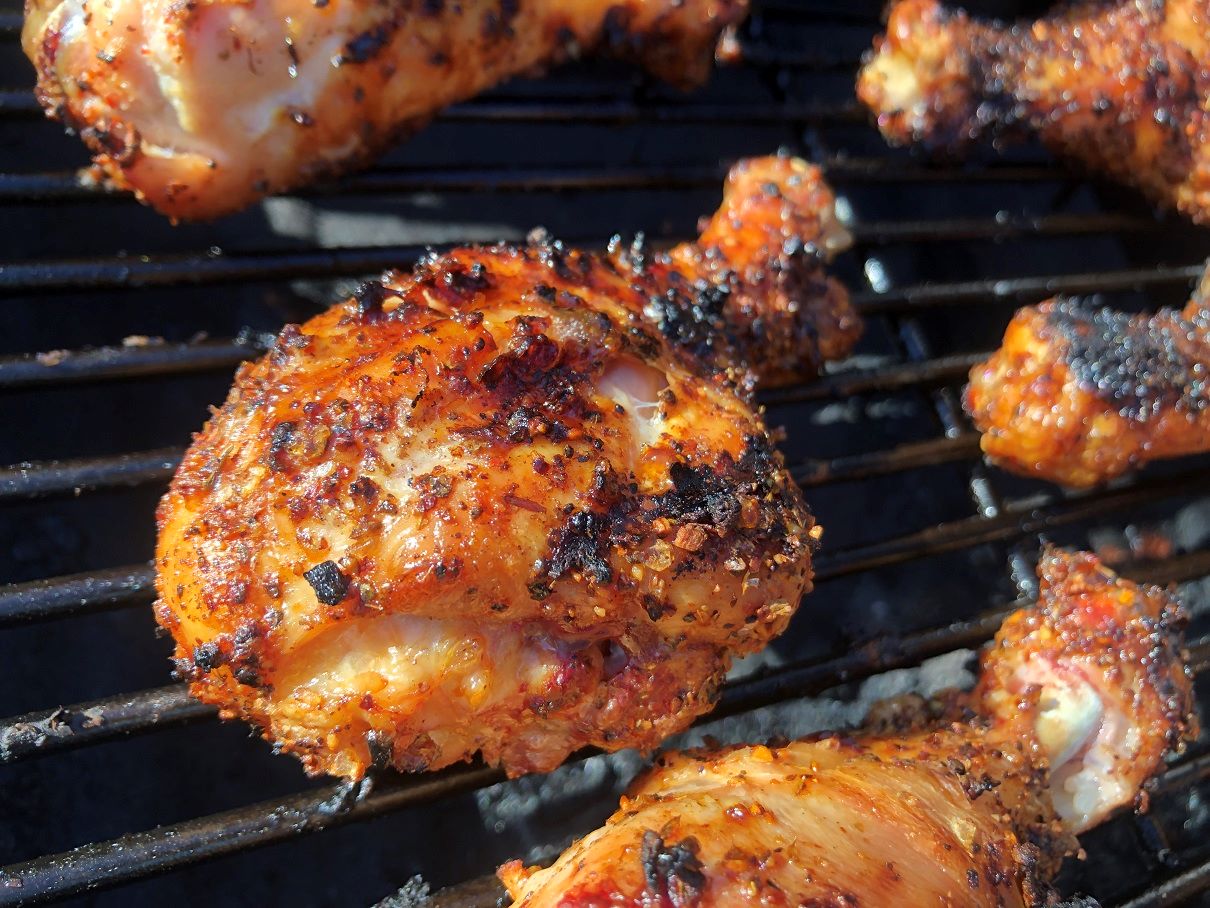
The Perfect Grilling Time for Chicken Legs
When it comes to grilling chicken legs, timing is crucial but also depends on several factors. Here’s the quick answer:
For medium heat (350-400°F)
- Average cooking time: 30-40 minutes total
- Flip every: 7-10 minutes for even cooking
- Target internal temperature: 165°F minimum (though 185°F produces even more tender results)
But that’s just scratching the surface. Let’s break it down further based on different factors:
Cooking Times by Weight
| Weight of Chicken Legs | Cooking Temperature | Cooking Time (per side) |
|---|---|---|
| 8-10 ounces | 375-400°F | 6-8 minutes |
| 10-12 ounces | 375-400°F | 8-10 minutes |
| 12-14 ounces | 375-400°F | 10-12 minutes |
Cooking Times by Grill Temperature
| Grill Temperature (°F) | Total Cooking Time (Minutes) |
|---|---|
| 325 | 40-45 |
| 350 | 30-35 |
| 375 | 25-30 |
| 400 | 20-25 |
Remember, these times are guidelines. Your best friend for perfect chicken legs is always gonna be a reliable meat thermometer!
Prepping Your Chicken Legs for Grilling Success
Before we even talk about putting those legs on the grill, let’s get them ready for their hot date with the flames.
Marinade Magic
Marinating your chicken legs isn’t just about flavor—it’s about juiciness too! Here’s a simple but reliable dry rub you can use
- Salt and pepper
- Garlic powder
- Paprika
- Optional: Add any dried herbs you like
For a more complex flavor profile, try marinating overnight. The minimum marinade time should be 30 minutes, but longer is definitely better.
Pre-Grill Tips
-
Room temperature rest: Always let your chicken legs sit out for about 15 minutes before grilling. Cold meat straight from the fridge cooks unevenly.
-
Pat dry Use paper towels to remove excess moisture. This promotes better browning and prevents steaming
-
Score the skin: Making small cuts in the skin allows seasoning to penetrate deeper and helps the fat render for extra crispy skin.
The Step-by-Step Grilling Process
Alright, let’s get those legs on the grill! Here’s my foolproof method:
Step 1: Preheat Your Grill
Always begin by preheating your grill to medium-high heat (375-400°F). This higher heat is crucial for even cooking and for developing that beautiful char on the outside.
Step 2: Oil Those Grates
Nothing ruins perfect chicken faster than having it stick to the grill! Use a paper towel dipped in vegetable oil to lightly coat your grill grates.
Step 3: Direct Heat First
Place the chicken legs on the grill with the skin side down and immediately close the lid. This initial direct heat helps create that crispy skin everyone loves.
Step 4: Flip and Move to Indirect Heat
After about 6-8 minutes, flip those legs and move them to an area with indirect heat. This prevents burning while allowing the chicken to cook through evenly.
Step 5: Continue Cooking and Flipping
Keep flipping the legs every 7-10 minutes until they reach the proper internal temperature. Resist the urge to flip too frequently—this disrupts the cooking process.
Step 6: Temperature Check
Use your meat thermometer to check for doneness. The USDA says 165°F is safe, but many chefs (including me!) prefer around 185°F for leg meat, as it makes it more tender and the meat literally falls off the bone.
Step 7: Rest Before Serving
After reaching the desired temp, take those beautiful legs off the grill and let them rest for 5-10 minutes. This crucial step allows the juices to redistribute throughout the meat.
Charcoal vs. Gas: Which Grill is Better for Chicken Legs?
Both have their pros and cons:
Charcoal Grill:
- More smoky, authentic BBQ flavor
- Harder to control temperature
- Requires more skill to manage
Gas Grill:
- Consistent, predictable heat
- Easier temperature control
- Less distinctive smokiness
- Better for beginners
I personally switch between both depending on my mood and how much time I have. If I’m going for that classic BBQ flavor, I’ll fire up the charcoal. If I’m in a hurry or cooking on a weeknight, gas is my go-to.
Common Mistakes to Avoid
Learn from my fails so you don’t have to make these mistakes yourself:
-
Skipping the marinade: Don’t rush this step! It makes a huge difference in flavor and juiciness.
-
Cooking over high heat only: This leads to chicken that’s burned outside and raw inside. Use the two-zone method!
-
Not preheating the grill: Always preheat for at least 10-15 minutes before cooking.
-
Flipping too often: Every time you flip, you lose heat and interrupt the cooking process.
-
Overcooking or undercooking: Use that meat thermometer! It’s your most valuable tool.
-
Skipping the rest period: Not letting your chicken rest is like running a marathon and not cooling down—you’ll regret it!
7 Mouthwatering Chicken Leg Recipes to Try
Once you’ve mastered the basic timing, it’s time to get creative! Here are some amazing recipes to try:
-
Chili Chicken Drumsticks with Mint and Peanuts: These sophisticated “lollipops” use a special “frenching” technique that makes them look super fancy.
-
Chicken Drumsticks with Cumin and Lentils: A protein powerhouse that pairs perfectly with rice or potatoes.
-
Sticky Honey Chicken Drumsticks: The sweet honey balances beautifully with umami from miso and soy sauce.
-
Mediterranean Chicken Drumsticks: Aromatic herbs and zesty citrus make this a refreshing option.
-
Chicken Legs with Plums and Bok Choy: An adventurous one-pan dish with Chinese five spice.
-
Grilled Chicken Chimichurri: If you’re Team Cilantro like me, you’ll love this vibrant sauce (and yes, I always double the garlic!).
-
Ginger-Glazed Drumsticks: The secret ingredient? Ginger ale! Works great with chicken or turkey legs.
FAQs About Grilling Chicken Legs
Q: Can I grill frozen chicken legs?
A: You technically can, but I really don’t recommend it. They’ll cook unevenly and take much longer. Always thaw completely in the refrigerator for best results.
Q: How do I know when my chicken legs are fully cooked without a thermometer?
A: Cut into the thickest part near the bone—the juices should run clear, not pink. But seriously, invest in a meat thermometer!
Q: Is it safe to eat pink chicken near the bone?
A: A slight pinkish hue near the bone doesn’t necessarily mean it’s undercooked. This is due to the myoglobin in the bone marrow. As long as the internal temperature hits 165°F, you’re good to go.
Q: How long do grilled chicken legs last in the fridge?
A: Store them in an airtight container for 3-4 days max.
Why Choose Pasture-Raised Chicken
If you really wanna take your grilled chicken legs to the next level, consider the quality of your meat. Pasture-raised chickens that are allowed to roam freely and eat a natural diet produce meat that’s more flavorful and nutritious.
Conventionally-raised chickens often live in cramped quarters with minimal space to move, resulting in less tasty meat. Plus, regenerative farming practices are better for the environment and animal welfare.
Final Thoughts
Grilling chicken legs isn’t rocket science, but it does require attention to detail and a bit of practice. The key takeaways:
- Preheat your grill to 350-400°F
- Season generously and marinate when possible
- Start with direct heat, then move to indirect
- Flip every 7-10 minutes
- Cook for 30-40 minutes total
- Use a meat thermometer to check for doneness (165°F minimum, 185°F for extra tenderness)
- Let them rest before serving
Follow these steps, and I promise you’ll be the grilling hero at your next BBQ. Your friends and family will be begging for your chicken leg secrets!
Now fire up that grill and get cooking! And remember, practice makes perfect—even if you mess up the first time, each grilling session is a chance to improve your technique.
Happy grilling, folks!
White Meat vs Dark Meat
The color of the meat is determined by the amount of myoglobin in the muscles. Now if you aren’t a scientist, like me, here is a quick definition of what that is. Myoglobin is a pigmented protein that stores oxygen in muscle cells which is used for activity like walking, running, or flying.
The muscles that are used regularly for activity will have a higher amount of myoglobin than muscles that are rarely used. Therefore, since they don’t fly very often and are walking constantly, chickens legs are considered dark meat. You may not notice the difference in color when the meat is raw. However, once you cook it you will notice the darker color that is indicative of dark meat.
What I Love About Dark Meat
- More flavorful than white meat.
- Extremely tender and juicy.
- Packed with nutrients white meat doesn’t have.
How Do You Cook A Chicken Drumstick?
Preparing a drumstick is as simple as any other cut of chicken. Here is how you do it:
- Heat your grill to 400°F.
- Marinate or season the drumstick like you would any other piece of chicken. My favorite ways are our BBQ Rub or All-Purpose Marinade.
- Next, pour the charcoal on both sides of your grill leaving the middle open. Place your drumsticks in the middle of the grill so they aren’t over direct heat.
- Cook using indirect heat for 18-20 minutes, flip and let cook for an additional 18-20 minutes or until the internal temperature reaches 165°F.
It’s that simple. The cooking time can vary depending on how big your drumsticks are so just make sure to check the internal temperature before eating.