Are you staring at that whole chicken in your fridge, wondering exactly how long it’ll take to transform it into a golden-brown masterpiece at 400 degrees? I’ve been there! After years of Sunday dinners and countless chickens later, I’m sharing everything you need to know about roasting chicken at this perfect temperature.
Whether you’re planning a family dinner or meal prepping for the week ahead, understanding the right cooking time is crucial for that juicy, tender chicken with crispy skin we all crave. Let’s dive into the details!
Why 400 Degrees is the Magic Number for Roasting Chicken
When I first started cooking whole chickens, I experimented with different temperatures But 400°F quickly became my go-to for several important reasons
- Quicker cooking time – The high heat rapidly penetrates to the center, reducing overall roasting time
- Beautiful browning – You get that Instagram-worthy golden-brown, crispy skin
- Moisture retention – The high heat quickly seals the outside, keeping those delicious juices inside
- Enhanced flavors – The Maillard reaction (that browning process) happens faster at higher temperatures, intensifying flavors
- Food safety – The 400°F heat effectively kills harmful bacteria
In my experience 400°F hits that sweet spot where you get both crispy skin AND juicy meat without waiting all day for dinner to be ready!
So, How Long Does It Take to Roast a Chicken at 400 Degrees?
The short answer: A whole chicken takes approximately 60-80 minutes to roast at 400°F, depending on size.
But the complete picture depends on several factors. Here’s a handy reference table I’ve put together based on my countless chicken-roasting adventures:
| Chicken Type/Cut | Weight | Approximate Roasting Time at 400°F |
|---|---|---|
| Whole chicken (small) | 3-4 lbs | 60-70 minutes |
| Whole chicken (medium) | 4-5 lbs | 70-80 minutes |
| Bone-in chicken pieces | varies | 45-55 minutes |
| Boneless chicken breasts | 6-8 oz each | 25-35 minutes |
| Cornish game hens | 18-24 oz each | 50-60 minutes |
Remember, these are guidelines! The most reliable way to determine if your chicken is perfectly done is to use a meat thermometer. The internal temperature should reach 165°F in the thickest part of the thigh (not touching bone).
Step-by-Step Guide to Roasting the Perfect Chicken at 400°F
Here’s my foolproof method for roasting a whole chicken that comes out perfect every time:
-
Prep the chicken – Remove from packaging, take out giblets (if included), and pat completely dry with paper towels
-
Season generously – This is where the magic happens! At minimum, use salt and pepper, but don’t be afraid to get creative with herbs and spices
-
Let it come to room temperature – I always let my chicken sit out for 30-60 minutes before cooking (this helps it cook more evenly)
-
Preheat your oven to 400°F with the rack in the lower third position
-
Prepare your roasting vessel – I like to create a bed of sliced onions in the bottom of my roasting pan or baking dish. This elevates the chicken slightly and adds flavor to the drippings
-
Position the chicken breast-side up – Tuck the wing tips under to prevent burning
-
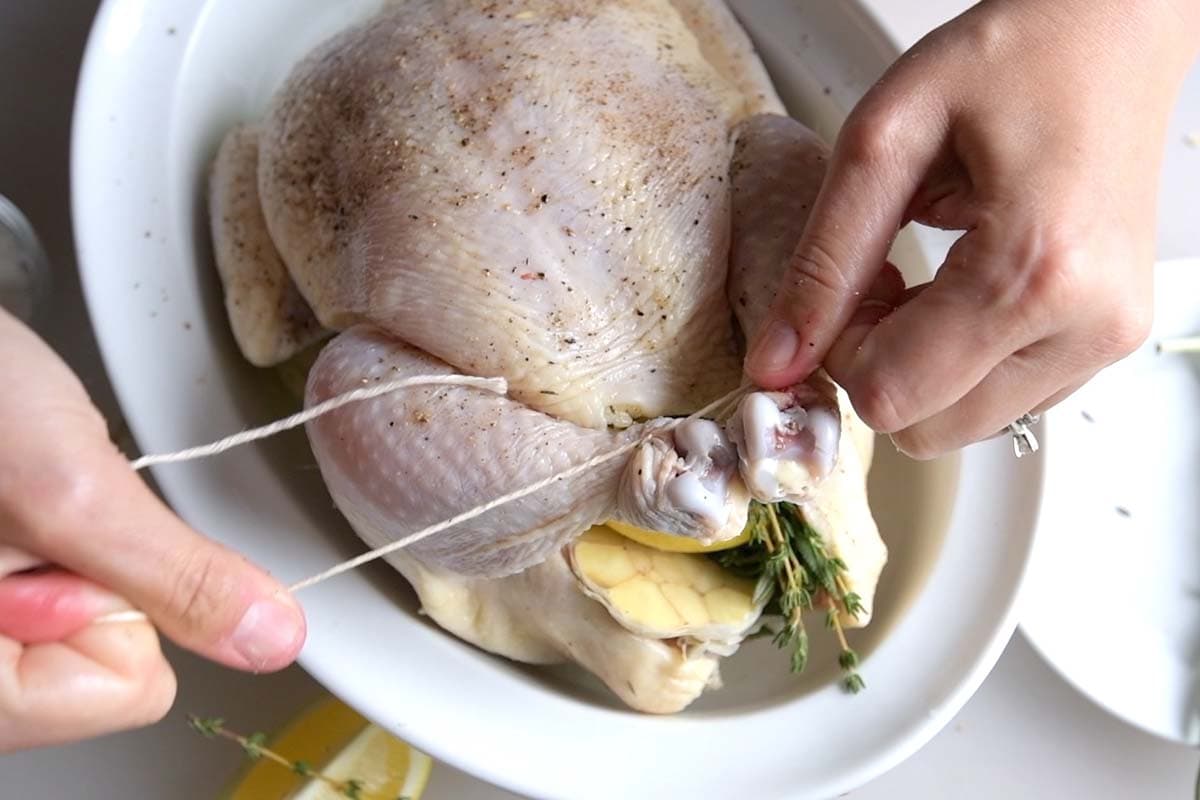
Add aromatics – Stuff the cavity with lemon halves, garlic cloves, and fresh herbs like rosemary or thyme (optional but highly recommended!)
-
Truss if desired – Tying the legs together with kitchen twine makes for a prettier presentation, but isn’t strictly necessary
-
Add liquid – Pour about 1/4 cup water in the bottom of the pan (this prevents drippings from burning)
-
Roast for 60-80 minutes, basting with the pan juices every 20 minutes or so
-
Check for doneness – The chicken is done when a meat thermometer inserted into the thickest part of the thigh (without touching bone) reads 165°F
-
Rest before carving – Let your chicken rest for 15 minutes before carving (this keeps it juicy!)
Pro Tips for Roasting Chicken Success
After making this dish nearly every Sunday for years, I’ve learned a few tricks:
-
Dry skin = crispy skin – The more thoroughly you pat your chicken dry, the crispier the skin will be
-
Loosen the skin – Gently separate the skin from the meat and add seasonings underneath for maximum flavor
-
Don’t skip the resting period – Those 15 minutes of resting time make a HUGE difference in juiciness
-
Spatchcock for speed – If you’re in a hurry, consider spatchcocking (removing the backbone and flattening) your chicken to reduce cooking time by about 15-20 minutes
-
Use the drippings – Those golden drippings make amazing gravy or can be spooned over potatoes
Common Roasting Problems (And How to Fix Them)
We’ve all had chicken disasters! Here are solutions to common problems:
Problem: Chicken is browning too quickly but isn’t cooked through
Solution: Tent loosely with aluminum foil to slow down browning while allowing cooking to continue
Problem: Chicken is dry and overcooked
Solution: Unfortunately, you can’t fix overcooked chicken. Next time, use a meat thermometer and remove the chicken when it hits 165°F
Problem: Chicken skin isn’t crispy
Solution: Make sure to thoroughly pat the chicken dry before roasting, and consider brushing with a little oil before cooking
Problem: Chicken is undercooked near the bone
Solution: Return to the oven and continue cooking, checking temperature every 5-10 minutes
FAQs About Roasting Chicken at 400 Degrees
Over the years, friends and family have asked me tons of questions about roasting chicken. Here are the most common ones:
Can I roast a frozen chicken at 400°F?
It’s not recommended for both safety and quality reasons. Always thaw your chicken completely in the refrigerator (this usually takes 1-2 days).
Should I brine my chicken before roasting?
While not necessary, brining can make your chicken extra juicy. A simple brine of salt, sugar, and water for 4-6 hours works wonders.
Do I need to baste the chicken while it cooks?
Basting isn’t strictly necessary, but I find it helps with browning and adds flavor. I usually baste every 20 minutes or so.
Should I stuff my chicken before roasting?
I prefer adding aromatics (lemon, garlic, herbs) rather than traditional stuffing. If you do stuff your chicken, add about 15 minutes to the cooking time and ensure the stuffing reaches 165°F.
What’s the best pan for roasting chicken?
Any oven-safe pan works! I’ve used roasting pans, cast iron skillets, and even rimmed baking sheets. The key is not to crowd the chicken.
Perfect Side Dishes for Your Roast Chicken
When I make a roast chicken dinner, I love serving it with:
- Crispy roasted potatoes (toss with olive oil, salt, and rosemary)
- Garlic green beans
- Simple green salad with lemon vinaigrette
- Crusty bread for soaking up those amazing juices
- A nice glass of Chardonnay or Pinot Noir
What to Do With Leftover Roast Chicken
One of the best things about roasting a whole chicken is the leftovers! Here are my favorite ways to use them:
- Chicken salad sandwiches
- Quick chicken soup (using the carcass for stock)
- Chicken enchiladas
- Chicken and rice casserole
- Chicken Caesar salad
The Bottom Line
Roasting a chicken at 400 degrees takes approximately 60-80 minutes for a whole chicken weighing 3-5 pounds. Remember that the exact time depends on the size of your bird and your specific oven.
The most important thing to remember is that temperature, not time, is the true indicator of doneness. Always use a meat thermometer and cook your chicken until it reaches 165°F in the thickest part of the thigh.
With these tips and guidelines, you’re well on your way to creating a restaurant-quality roast chicken right in your own kitchen. Happy roasting!
What’s your favorite seasoning blend for roast chicken? Share your tips in the comments below!

How to Make Roasted Chicken Like a Pro
Roasted chicken is one of the best recipes to have in your back pocket. It’s easy, relatively hands-off, and can be used in a variety of ways. Here are some tips to help you get the best results from your roast chicken.
Tip 1: You don’t need a special pan for this recipe. Any oven-safe pan will work, including a roasting pan (with or without a rack), a large cast iron pan, a rimmed baking sheet, or a large baking dish.
Tip 2: Season generously and skip the butter and oil. For the most flavorful, juicy chicken with crispy skin, be generous with the salt and pepper. Pat the chicken dry all over with a paper towel, then season it inside the cavity and all over the skin. You don’t need to use butter or oil for this recipe. The chicken will render its own fat, which you can use to baste it as it roasts. We talk a lot about basting in our roasted turkey recipe, and it is the key to the golden-brown skin you see in our photos.
Tip 3: Add aromatics. To infuse your chicken with even more flavor, stuff the cavity with aromatics like lemon wedges, garlic, and fresh herbs (thyme and rosemary are classic). As the chicken roasts, these ingredients will steam inside and help keep the meat incredibly juicy. You can also tie the legs together with a bit of butcher’s twine to keep the chicken tidy, though this isn’t required.
Tip 4: Roast the chicken on a bed of onions. Place the chicken, breast-side up, on a bed of sliced onions. The onions will help keep the chicken elevated, while also steaming the meat from below and flavoring the pan juices. Pour a little water or chicken broth into the pan to keep the onions from scorching. This also creates a base for your gravy.
Tip 5: Find the right temperature. The best oven temperature for roasting chicken depends on what you’re looking for:
- For crispy, golden-brown skin and firm, juicy meat, roast the chicken at 425°F (218°C) for 45 minutes to 1 ½ hours.
- For softer, fall-off-the-bone meat and soft skin, roast at a lower temperature of 325°F (162°C) for 1 ½ to 2 hours.