Ever stared at a whole chicken wondering how to cook it quickly without drying it out? I’ve been there! Pressure cooking is a game-changer for busy weeknights when you want a delicious meal without spending hours in the kitchen. Today, I’m sharing everything I’ve learned about pressure cooking whole chickens – from timing to tips for the juiciest results.
The Magic Formula: 6 Minutes Per Pound
The most important thing to know when pressure cooking a whole chicken is the timing. Based on my experience and expert recommendations, the standard formula is 6 minutes per pound of chicken when using high pressure. This formula works for most pressure cookers, including Instant Pot, Ninja Foodi, Cosori, or Power Pressure Cooker XL.
Here’s a quick reference guide based on chicken weight:
- Under 3 pounds: Cook for 18 minutes
- 3-4 pounds: Cook for 24 minutes
- 4-5 pounds: Cook for 30 minutes
- 5-6 pounds: Cook for 36 minutes
However, I personally like to add a few extra minutes to these times for better results. For example, Barbara at Pressure Cooking Today recommends 32 minutes for a 5-pound chicken rather than the strict 30 minutes the formula would suggest.
Why Pressure Cook a Whole Chicken?
Before diving deeper into the how-to, let me tell you why I love this method:
- Way faster than oven roasting
- Creates incredibly moist and tender meat
- The high-pressure environment helps seasonings penetrate deeper
- One-pot cooking means less cleanup
- Makes incredible broth at the same time
Essential Ingredients for Amazing Pressure Cooker Chicken
For a basic but delicious whole chicken, you’ll need:
- 1 whole chicken (4-5 pounds is ideal)
- 1/4 to 1/2 cup garlic butter (store-bought or homemade)
- 1 tablespoon salt
- 2 teaspoons pepper
- 1 teaspoon paprika
- 1 small onion, quartered
- 1 cup chicken broth
Step-by-Step: How to Pressure Cook a Whole Chicken
Preparation
-
Thaw completely – Never cook a frozen chicken in the pressure cooker! It won’t cook evenly and could create food safety issues.
-
Season generously – Rub garlic butter underneath the chicken skin. Mix salt, pepper, and paprika in a small bowl and season the chicken all over.
-
Prepare the pot – Add quartered onion and chicken broth to the pressure cooker pot The liquid is essential for creating steam!
Cooking Process
-
Position properly – Place a trivet in the pot, then carefully place the chicken on top. Make sure the chicken doesn’t interfere with closing the lid.
-
Set cooking time – Lock the lid and set to High Pressure for your calculated time (remember about 6 minutes per pound, plus a bit extra for good measure)
-
Natural release – When cooking time ends allow for natural pressure release for at least 10 minutes. This is crucial for juicy meat! Then finish with a quick release of any remaining pressure.
-
Check for doneness – Use a meat thermometer to check that the internal temperature reaches at least 165°F in the thickest part of the thigh (180°F is even better for tender dark meat). If it’s not quite there, lock the lid and cook for a few more minutes.
The Secret to Crispy Skin
Let’s be honest – the one downside to pressure cooking chicken is the skin. It won’t get crispy in the moist environment of a pressure cooker. But I’ve got two solutions:
-
Broiler method: After pressure cooking, transfer the chicken to a baking sheet and place under the broiler for 3-5 minutes until golden and crisp.
-
Air fryer lid: If you have an Instant Pot Duo Crisp or a compatible air fryer lid, use it to crisp up the skin after pressure cooking.
Frequently Asked Questions
Can I use a frozen chicken?
No! This is super important. Always thaw your chicken completely before pressure cooking. Frozen chicken won’t cook evenly and might not reach safe temperatures in the center.
What kind of liquid should I use?
Chicken broth gives the best flavor, but you can also use water, wine, or even apple juice for different flavor profiles. Just don’t skip the liquid – it’s necessary for the pressure cooker to work!
Do I need a trivet?
Yes, a trivet is recommended. It keeps the chicken from sticking to the bottom of the pot and allows for more even cooking. If you don’t have a trivet, you can create a makeshift one with rolled-up aluminum foil or a bed of chunky vegetables.
What size pressure cooker do I need?
For a standard 5-pound chicken, you’ll need at least a 6-quart pressure cooker. Larger chickens may require an 8-quart model.
Can I stuff my chicken before pressure cooking?
Nope! It’s not recommended to stuff a chicken before pressure cooking. The stuffing may not reach safe temperatures, which could lead to foodborne illness. Cook your stuffing separately.
What should I do with the leftover broth?
Don’t throw it away! The broth that’s left in the pot after cooking is liquid gold. Strain it and use it for:
- Making gravy to serve with the chicken
- As a base for soup
- Cooking rice or other grains
- Freezing for future recipes
Troubleshooting: Common Issues
My chicken isn’t fully cooked after the recommended time
If your chicken hasn’t reached 165°F after the cooking time, simply reseal your pressure cooker and cook for additional 3-5 minutes, then check again.
The meat seems dry
This usually happens if you’ve skipped the natural release step. Always allow for at least 10 minutes of natural pressure release to keep the meat juicy.
The skin is pale and soft
This is normal for pressure cooking. If you want crispy skin, use the broiler method or air fryer lid as mentioned above.
Perfect Pairings for Your Pressure Cooker Chicken
Make it a complete meal with these sides (many of which can also be made in a pressure cooker):
- Creamy mashed potatoes
- Steamed green beans
- Simple green salad
- Rice pilaf
- Roasted vegetables
My Final Tips for Pressure Cooker Chicken Success
After making countless pressure cooker chickens, here are my top tips:
- Don’t rush the natural release – This resting period is essential for juicy meat
- Season aggressively – Pressure cooking intensifies flavors, but salt and seasonings are still important
- Save the broth – It’s packed with flavor and great for making gravy or soup
- Let the chicken rest for 5-10 minutes after removing from the pot before carving
- Experiment with herbs and spices – Try lemon, garlic, rosemary, thyme, or your favorite spice blends
Conclusion: Enjoy Your Perfectly Cooked Chicken
Pressure cooking a whole chicken is truly one of the best time-saving kitchen hacks I’ve discovered. With the right timing (6 minutes per pound plus a bit extra), proper natural release, and these tips for success, you’ll have a juicy, flavorful chicken ready in a fraction of the time it would take in the oven.
Have you tried pressure cooking a whole chicken? What’s your favorite seasoning combination? I’d love to hear your experiences in the comments!
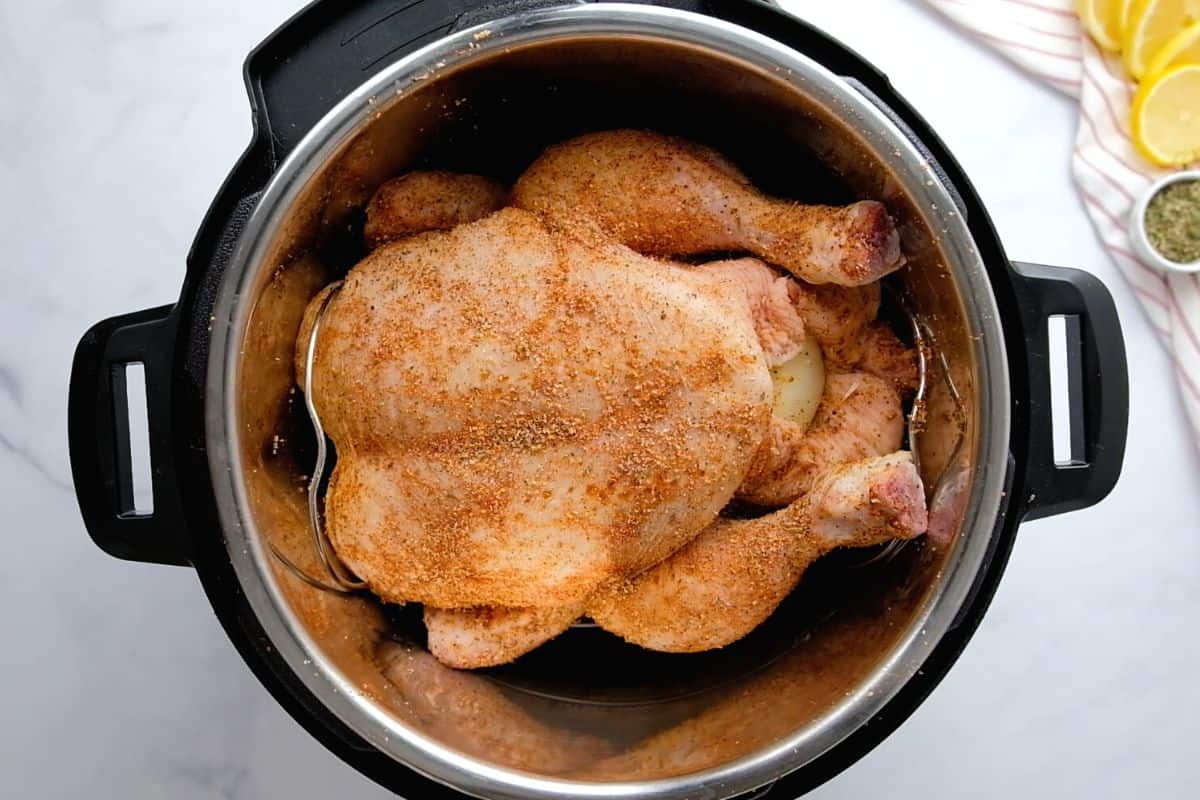
Step 2 – Make Seasoning Mix and Prep the Chicken
In a small bowl, stir together the salt, pepper, smoked paprika, oregano, thyme, garlic powder, and onion powder. Set the seasoning mixture aside.
Dry the bird well with paper towels. Again, if you haven’t already, be sure to remove the giblet packet if your bird has one.
Spread the seasoning mixture all over the chicken, under the skin, and inside the cavity. Stuff the cavity with the lemon and the onion.
Step 1 – Prep and Measure Ingredients
First, measure out everything that you will need:
- 1 lemon
- 1 medium onion
- 2 teaspoons salt
- 1 teaspoon ground black pepper
- 1 1/2 teaspoons smoked paprika
- 1/2 teaspoon dried oregano
- 1/2 teaspoon dried thyme
- 1 teaspoon garlic powder
- 1/2 teaspoon onion powder
- 1 whole chicken, giblet/offal packet removed
- 1 cup low-sodium chicken stock
- 1/2 tablespoon canola oil (optional)
Cut the lemon in half, and remove any visible seeds. Cut the onion in half and remove the skin.