Ever tried grilling chicken only to end up with pieces that are charred on the outside but still raw near the bone? Yeah, been there done that. It’s frustrating! After ruining several backyard barbecues, I discovered the secret technique professional grill masters use parboiling chicken before it hits the grill.
This game-changing method has completely transformed my grilling game, and I’m excited to share exactly how long you should parboil different cuts of chicken to achieve juicy, perfectly cooked results every time
What is Parboiling and Why Should You Do It?
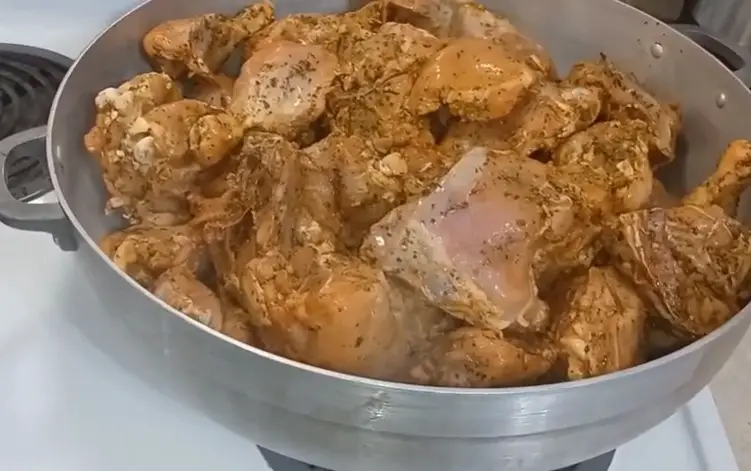
Parboiling is simply the process of partially cooking food in boiling water before finishing it with another cooking method—in this case, grilling. It’s not the same as fully boiling your chicken, which would leave you with rubbery, flavorless meat.
Here’s why parboiling chicken before grilling is a smart move:
- Ensures even cooking: Particularly important for bone-in pieces that cook unevenly on the grill
- Locks in moisture: Helps your chicken stay juicy instead of drying out
- Reduces grilling time: Cuts down the time chicken spends on the grill, lowering the risk of burning
- Makes grilling easier: Especially when cooking for a crowd
- Improves food safety: Reduces the risk of undercooked chicken near the bone
How Long to Parboil Chicken: Timing Guide by Cut
The parboiling time varies significantly depending on which part of the chicken you’re preparing Here’s a comprehensive guide
| Chicken Cut | Parboiling Time |
|---|---|
| Bone-in chicken breasts | 10-15 minutes |
| Boneless chicken breasts | 5-8 minutes |
| Chicken thighs (bone-in) | 15-20 minutes |
| Chicken legs/drumsticks | 20-25 minutes |
| Chicken wings | 5-7 minutes |
| Whole cut-up chicken | 15-20 minutes |
| Whole chicken | 30-40 minutes |
| Boneless strips/cutlets | 4-5 minutes |
Remember, you’re aiming for the chicken to be about 60-70% cooked—still slightly pink in the center, as you’ll finish cooking it on the grill.
Factors That Affect Parboiling Time
Several factors can influence how long you need to parboil your chicken:
- Size of the chicken pieces: Larger pieces naturally take longer
- Starting temperature: Frozen chicken will need additional time (though it’s best to thaw first)
- Altitude: At higher elevations, water boils at a lower temperature, so you may need to extend the cooking time
- Desired doneness before grilling: Some prefer chicken closer to 50% cooked, others 70%
- Age and quality of the chicken: Farm-fresh chicken may cook differently than store-bought
Step-by-Step Parboiling Process
Let me walk you through the exact process I use to parboil chicken before grilling:
What You’ll Need:
- Raw chicken (your preferred cut)
- Large stockpot or deep saucepan
- Water or chicken broth
- Salt
- Optional flavor boosters (bay leaves, peppercorns, onion slices, garlic cloves, fresh herbs)
- Tongs or slotted spoon
- Kitchen thermometer
Step 1: Prep the Chicken
Start by trimming excess fat and patting the chicken dry with paper towels. This helps the seasonings stick better later.
Step 2: Prepare Your Boiling Liquid
Fill a large pot with enough water or broth to completely cover the chicken. For extra flavor, I always add:
- 4 teaspoons garlic powder
- 1 1/2 teaspoons onion powder
- A generous pinch of salt
This creates a flavor bath that infuses into the meat while parboiling.
Step 3: Bring to a Boil
Bring the liquid to a full boil over high heat, then reduce slightly to maintain a gentle rolling boil.
Step 4: Add the Chicken
Carefully lower the chicken pieces into the pot. Don’t overcrowd—work in batches if needed. The water temperature will drop, so wait until it returns to a simmer.
Step 5: Parboil According to Cut
Follow the timing chart above based on your chicken cut. Keep an eye on the clock!
Step 6: Remove and Rest
Use tongs to transfer the chicken to a plate. Let it rest for 5-10 minutes before grilling. This allows the juices to redistribute and the surface to dry slightly for better browning.
Flavor-Boosting Tips for Parboiling
Want to take your chicken to the next level? Try these flavor-enhancing tricks:
- Use broth instead of water: Creates instantly more flavorful chicken
- Add aromatics: Toss in bay leaves, whole peppercorns, sliced onions, crushed garlic, or fresh herbs
- Try citrus: Add lemon slices for brightness
- Experiment with spices: A pinch of chili flakes or whole spices like star anise can create interesting flavor profiles
- Add smoke-flavored sauce: Some recipes call for adding a teaspoon of liquid smoke to the boiling liquid
How to Grill After Parboiling
Now that your chicken is parboiled, here’s how to finish it on the grill:
- Preheat your grill to medium-high heat (around 375-400°F)
- Season or sauce the chicken: This is the time to add your favorite BBQ sauce, rub, or marinade
- Oil the grates to prevent sticking
- Place chicken on the grill: Start with skin-side down if applicable
- Grill times after parboiling:
- Chicken breasts: 3-5 minutes per side
- Thighs and drumsticks: 5-7 minutes per side
- Wings: 4-6 minutes total, turning occasionally
- Baste frequently with sauce during grilling if using BBQ sauce
- Check temperature: Chicken is safe when it reaches an internal temperature of 165°F
A Tried and True BBQ Chicken Recipe
Here’s my favorite BBQ chicken recipe that uses the parboiling method, adapted from the Gooseberry Patch Grilling and Campfire Cooking Cookbook:
Ingredients:
- 3 pounds chicken or 6 chicken breasts
- 4 teaspoons garlic powder (divided)
- 1-1/2 teaspoons onion powder (divided)
- 2 cups ketchup
- 1 to 2 cups packed brown sugar (divided)
- 1/2 teaspoon dry mustard
- 1/2 teaspoon chili powder
- 1 teaspoon smoke-flavored cooking sauce
Instructions:
- Place chicken in a large stockpot and cover with water. Add 3 teaspoons garlic powder and 1 teaspoon onion powder.
- Bring to a boil, then reduce heat, cover, and cook for about 15 minutes.
- Meanwhile, in a saucepan over medium heat, mix together ketchup, 1 cup brown sugar, mustard, chili powder, and the remaining garlic and onion powders.
- Add more brown sugar to taste. Simmer about 15 minutes, then add smoke-flavored sauce and cook another few minutes.
- Place parboiled chicken on an oiled grill grate over medium-high heat.
- Grill for 20-40 minutes (depending on chicken size), turning and basting often with sauce, until chicken juices run clear.
- Use a meat thermometer to ensure chicken reaches 165°F.
Common Parboiling Mistakes to Avoid
Even with this simple technique, there are some pitfalls to watch for:
- Overboiling: Cooking too long during parboiling will result in dry, rubbery chicken after grilling
- Using plain water: Not adding salt or seasonings to your boiling liquid is a missed opportunity for flavor
- Skipping the rest period: Not letting chicken rest between parboiling and grilling affects texture
- Grilling with too high heat: Even parboiled chicken can burn if your grill is too hot
- Adding sugary sauces too early: Sugar burns quickly, so add sweet BBQ sauces in the final minutes of grilling
Final Thoughts
Parboiling chicken before grilling is one of those simple techniques that makes a huge difference in your results. It might seem like an extra step, but the payoff in juiciness, even cooking, and reduced grilling stress is absolutely worth it.
I’ve converted many skeptical friends to this method after they’ve tasted the difference. Give it a try at your next barbecue—I promise your guests will be asking for your grilling secrets!
Remember: different cuts need different parboiling times, so keep this guide handy. The perfect grilled chicken is just a parboil away!
FAQs About Parboiling Chicken
Can I parboil chicken the day before grilling?
Yes! You can parboil chicken, refrigerate it overnight, and grill it the next day. This is great for party prep.
Does parboiling make chicken less flavorful?
Not if done correctly. Adding seasonings to your parboiling liquid actually infuses flavor into the meat.
Can I use this method for frozen chicken?
Ideally, you should thaw chicken first. If using frozen, add about 5-10 minutes to the parboiling time.
Is parboiling necessary for all chicken cuts?
It’s most beneficial for bone-in cuts and whole chickens. Small, boneless pieces like tenders can usually go straight to the grill.
What’s the difference between parboiling and brining?
Parboiling partially cooks the chicken, while brining just soaks it in a salt solution to add moisture without cooking it.
Five rules to perfect grilling:
#1 Start hot: Heat your gas grill to high or build a “three Mississippi” fire in a charcoal grill. For the latter, simply hold your hand about four inches above the grate. Start counting “one Mississippi, two Mississippi…” and by “three Mississippi,” the intense heat should force you to snatch your hand away. Place your chicken legs or thighs directly over the high heat for a few minutes on each side, searing them, and when they are ready to release, move them to the indirect heat– see rule #2.
#2 Finish warm: If you’re using a gas grill, turn half (or even just one) of your burners on high and leave the other ones off. Start by placing your chicken legs or thighs directly over the high heat (see the first rule) for a few minutes on each side to sear them, then move them to the indirect heat, close the lid and cook them medium-low and fairly slow until they’re done- I keep my grill at about 350, whereas I am sure others go lower than that. I don’t want my chicken to take an hour or more to cook, so I use a medium-low heat. If you prefer a charcoal grill, you can achieve the same effect by stacking on all your charcoal on one side of the grill.
#3 Keep it clean: Scrub the hot grate thoroughly with a stiff wire brush. This dislodges any debris and minimizes sticking. If you don’t have a grill brush, use a crumpled ball of aluminum foil and hold it with tongs. We use this grill brush.
#4 Keep it oiled: Roll several paper towels into a small ball, dip it into melted coconut oil or olive oil, and using tongs, rub it over the bars of the grill grate. Oiling the grill helps prevent sticking, and it helps you get great grill marks. Please turn the burners down all the way before doing this and watch out for potential flares.
#5 Hold the Sauce: If you’re coating your chicken legs/thighs in BBQ sauce, don’t start basting until the chicken is mostly cooked and has about 10-12 minutes left on the grill. When sauces are applied too early, they dry out and burn because of the high sugar content (be careful with teriyaki sauces, they’re loaded with sugar and will burn very quickly), coating your meat in a blackened, charred sticky nightmare. I can speak from experience that blackened chary chicken isn’t tasty. Sorry Real Food Step Dad.
The rule of thumb for a brine is 1 Tablespoon of salt (and equal parts sugar if you desire– however I use only 1 teaspoon of sugar per cup of water) to each cup (8-ounces) of water. Never brine boneless/skinless cuts of meat for more than 2 hours or else they’ll be overly salty AND rubbery. Repeat after me: “Rubber chickens are for magicians, not dinner”. Good. Now that you have that down, we can continue.
For my bone in and skin on chicken I brine for 3 hours max. I could go longer, but I never seem to remember to get the brine started in time. If you don’t feel brave enough to try brining simply salt the parboiling water pretty liberally. Taste it before you add in the raw chicken. It should taste like the ocean, but not a salt lick. You want the chicken to get some flavor from parboiling since partially cooking meats in boiling water can sometimes remove flavor and you want to infuse flavor. Err on the side of a little too much salt than not enough. But if you pucker wildly and scare your children because you sucked your cheeks inside out, you may wanna pour out some of that salty water and add in some fresh water. Crazy faces means too much salt.
I normally only BBQ a few pieces of chicken at a time so I hastily took some very basic photos. They don’t capture just how lip-smacking tasty the chicken was in person, but sometimes ya gotta get a quick photo and you just can’t worry about a perfectly staged plate of food. I hope you’ll forgive me. I even got a few corners nice and charred… just for old times sake.