Ever stood over a hot pan spatula in hand, wondering if your chicken cutlets are done yet? I know I have! Getting that perfect golden-brown crust while keeping the inside juicy can feel like a culinary tightrope walk. Today I’m gonna break down everything you need to know about frying chicken cutlets to perfection.
The Quick Answer: 3-5 Minutes Per Side
For those who just need the basic info you should fry chicken cutlets for 3-5 minutes per side at a temperature of about 325-350°F (163-177°C), This timing creates that mouthwatering combination of crispy exterior and juicy interior we all crave,
But as with most cooking techniques, there’s more to it than just a simple timeframe. Let’s dive deeper into the art of creating the perfect fried chicken cutlet!
Factors That Affect Frying Time
Several things can influence how long your chicken cutlets need to cook
- Thickness of the cutlet: Thicker pieces naturally need more time
- Oil temperature: Too hot and they’ll burn before cooking through; too cool and they’ll absorb excess oil
- Type of cutlet: Breast meat cooks faster than thigh cutlets
- Breading thickness: Thicker breading = longer cooking time
Setting Up for Success
Before you even think about frying, proper prep work makes all the difference:
1. Tenderize and Even Out the Thickness
To ensure even cooking, pound your chicken cutlets to about ¼ inch thickness. This step does double duty – it tenderizes the meat while ensuring it cooks at the same rate throughout. I like placing the chicken between plastic wrap to avoid a messy splatter situation!
2. Season Thoroughly
Don’t skimp on seasoning! I always season my chicken BEFORE breading for maximum flavor penetration. Salt, pepper, garlic powder, paprika – whatever flavors make you happy.
3. Create a Proper Breading Station
A well-organized breading station makes the process so much cleaner and more efficient:
- First dish: Seasoned flour
- Second dish: Beaten eggs (sometimes I add a splash of milk)
- Third dish: Breadcrumbs (Panko gives extra crispiness!)
4. Let the Breaded Cutlets Rest
This is a pro tip many folks miss! After breading, let the cutlets sit for about 10 minutes. This helps the breading adhere better and prevents it from falling off during cooking.
The Frying Process: Timing Is Everything
Now for the main event – the actual frying! Here’s how to get it right:
Choosing the Right Oil
Select an oil with a high smoke point. Good options include:
- Vegetable oil
- Canola oil
- Peanut oil
- Avocado oil (my personal favorite)
Avoid olive oil for frying as it has a lower smoke point and can burn.
Getting the Temperature Right
The ideal oil temperature is between 325-350°F (163-177°C). Too hot, and your breading burns before the chicken cooks; too cool, and your cutlets absorb too much oil and become soggy.
Don’t have a thermometer? No problem! Try the wooden spoon trick: dip the handle of a wooden spoon into the heated oil – if bubbles form around it, the oil is ready.
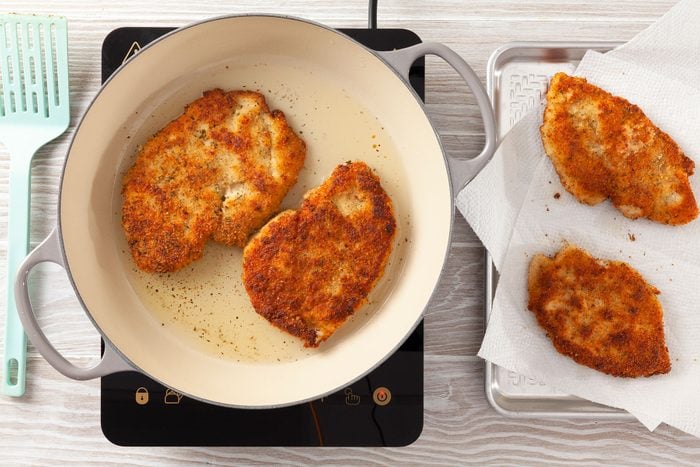
The Actual Frying Time
Now for the star of our show:
- Carefully place your breaded cutlets in the hot oil
- Cook for 3-5 minutes on the first side until golden brown
- Flip carefully with tongs
- Cook for 3-5 minutes on the second side
- Total cooking time: 6-10 minutes
How to Know When They’re Done
There are a few reliable ways to check for doneness:
- Internal temperature: The safest method is using a meat thermometer. Chicken is done when it reaches 165°F (74°C).
- Visual cues: Look for a deep golden-brown color on both sides.
- Juice test: Pierce the cutlet with a fork – the juices should run clear, not pink.
- Firmness: Properly cooked chicken feels firm when pressed, not soft or squishy.
Common Mistakes to Avoid
Trust me, I’ve made all these mistakes so you don’t have to!
- Overcrowding the pan: This lowers the oil temperature and leads to soggy cutlets. Fry in batches instead.
- Constantly flipping: Resist the urge! One flip is usually enough.
- Not draining properly: Place fried cutlets on a wire rack with paper towels underneath to catch excess oil.
- Inconsistent cutlet thickness: Uneven thickness means uneven cooking.
- Adding cutlets to oil that’s not hot enough: This results in greasy, soggy chicken.
Alternative Cooking Methods
Not everyone wants to deep fry their cutlets. Here are some alternatives:
Air Fryer Method
- Prepare cutlets as you would for pan frying
- Spray both sides with oil
- Air fry at 400°F (200°C) for 12-15 minutes, flipping halfway through
Baking Method
- Preheat oven to 400°F (200°C)
- Place breaded cutlets on a parchment-lined baking sheet
- Bake for 12-15 minutes per side until golden and cooked through
While these methods are healthier, nothing quite matches the crispy perfection of a properly fried cutlet!
Recipe: The Best Crispy Chicken Cutlets
Let me share my go-to recipe that never fails to impress:
Ingredients:
- 4 chicken cutlets
- 3 cups panko breadcrumbs
- 1½ cups all-purpose flour
- 2 eggs, beaten
- 1 tsp salt (plus extra for finishing)
- 1 tsp black pepper
- ¾-1 cup avocado oil (or half avocado, half olive oil)
Directions:
- Set up your breading station with three separate bowls for flour, beaten eggs, and panko.
- Season the chicken and each bowl with salt and pepper.
- Bread each cutlet by first coating in flour, then egg, then panko. Press the breadcrumbs firmly onto the chicken.
- Let the breaded cutlets rest for 10 minutes (this step is key!).
- Heat oil in a cast iron skillet until it’s about ¼-½ inch deep.
- Test oil temperature with the wooden spoon trick.
- Cook two cutlets at a time, 4-5 minutes per side until golden brown.
- Remove to a paper towel-lined baking sheet and sprinkle with a bit more salt while hot.
- Serve immediately for maximum crispiness!
Serving Suggestions
Wondering what to pair with your perfectly fried cutlets? Here are some ideas:
- Classic mashed potatoes and corn on the cob
- Tangy coleslaw for a refreshing contrast
- Fresh garden salad with vinaigrette
- Pasta with marinara sauce (chicken parm, anyone?)
- On a sandwich with mayo, lettuce, and tomato
Storing and Reheating Leftovers
Got leftovers? Lucky you! Store them in an airtight container in the refrigerator for up to 3 days.
To reheat without losing the crispy texture:
- Preheat oven to 350°F (175°C)
- Place cutlets on a wire rack over a baking sheet
- Heat for 10-15 minutes until warmed through
Avoid microwaving if possible – it makes the breading soggy!
FAQs About Frying Chicken Cutlets
Q: Can I use bone-in chicken pieces instead of cutlets?
A: Yes, but they’ll need longer cooking times and won’t cook as evenly.
Q: Why does my breading keep falling off?
A: Make sure to thoroughly dry the chicken before dredging in flour, and press the breadcrumbs firmly. Letting the breaded cutlets rest before frying also helps.
Q: Can I reuse the oil for frying other batches?
A: Yes, you can strain it through a fine-mesh sieve and store it for another use, but don’t reuse it more than once or twice.
Q: How do I prevent my kitchen from smelling like fried food?
A: Open windows if possible, run your hood vent, and simmer vinegar with water on the stove after cooking to neutralize odors.
Final Thoughts
Perfecting the art of frying chicken cutlets is all about timing, temperature, and technique. The 3-5 minute guideline per side works well for most situations, but always trust your eyes and a meat thermometer over a strict timeframe.
With a little practice, you’ll be turning out restaurant-quality chicken cutlets that will make your family and friends think you’ve been hiding professional culinary training!
Remember, cooking is as much about the journey as the destination – so have fun with it and don’t be afraid to adjust based on your own kitchen experience. Happy frying!
Why anyone can cook chicken cutlets at home:
- You can buy thinly sliced chicken breasts at the store, so that you don’t have to pound out your own chicken breasts.
- Use store bought Panko bread crumbs.
- There are minimal ingredients to this recipe.
- The cutlets cook very quickly thanks to the thinness of the chicken.
- The method is simple and straight forward with just a few easy steps.
- Thinly Sliced Chicken Breasts
- Panko Bread Crumbs (can use gluten free here as well)
- Flour (can also use gluten free all purpose flour)
- Eggs
- Salt and Pepper
- High quality oil: I like to use avocado oil, or a mix of avocado oil and olive oil. The avocado oil can cook at a higher temp so it keeps the olive oil from burning.
There is truly nothing better than a fresh cutlet straight from the pan. I simply shallow fry the cutlets on each side for 4-5 minutes until golden brown and chicken has been cooked through. From there, I remove the crispy cutlets to a paper towel lined baking sheet to let excess oil drain and sprinkle with salt and pepper. Serve as you wish from there!
You can of course also cook these cutlets in the air fryer as well, but nothing compares to the real deal pan fried cutlet. BUT if you want to air fry the cutlets, follow all instructions up until the frying point and spray with oil on both sides. Air fry for 6-8 minutes until golden, flipping once.