Are you tired of dry, flavorless chicken wings that just don’t hit the spot? I’ve been there too. After years of experimenting with different cooking methods, I’ve discovered that brining is the secret weapon for creating irresistibly juicy chicken wings that’ll have everyone asking for your recipe. But the big question remains: how long can you brine chicken wings without ruining them?
In this comprehensive guide, I’ll share everything I’ve learned about brining times techniques, and tips to help you achieve wing perfection every time. Let’s dive in!
The Perfect Brining Window: Finding Your Sweet Spot
For perfectly juicy and flavorful chicken wings, you should brine them for a minimum of 2 hours and a maximum of 4 hours. This is the sweet spot that most culinary experts agree on.
Going shorter than 2 hours means you won’t get the full benefits of brining, while exceeding 4 hours risks creating overly salty or mushy wings with compromised texture. Nobody wants that!
However some grilling enthusiasts suggest these alternative timeframes depending on your specific needs
- Basic Saltwater Brine: 1 to 2 hours for average wing sizes
- Enhanced Flavor Brine: 2 to 4 hours for deeper flavor penetration
- Longer Soaks: 4 to 12 hours may work for larger wings or more intense flavor profiles
Just remember: never exceed 12 hours of brining time for chicken wings, as this will definitely result in overly salty, spongy meat that’s practically inedible.
Why Brining Works: The Science Behind Juicy Wings
Before we dive deeper into timing, let’s understand why brining is so effective. This isn’t just culinary folklore – there’s actual science behind it!
Brining accomplishes two main goals:
1. Improved Moisture Retention
The salt in the brine causes a really cool chemical reaction – it denatures the muscle proteins in the chicken, allowing them to hold onto more water during cooking. This means your wings stay juicy even when subjected to high heat.
2. Enhanced Flavor Penetration
A brine isn’t just salt water – it’s a flavor delivery system! The salt helps other flavors from herbs, spices, and aromatics penetrate deep into the meat, creating wings that are flavorful through and through, not just on the surface.
As one culinary expert explains: “Salt helps to tenderize meat in two ways. First, soaking meat in a saltwater solution helps the meat to absorb water. Second, the salt breaks down muscle fibers, resulting in more tender meat that is easier to cut and chew.”
Factors That Affect Brining Time
While the 2-4 hour window works for most situations, several factors can influence the optimal brining time for your chicken wings:
Wing Size
Smaller wings brine faster than larger ones. If you’re working with particularly tiny wings, you might want to stay closer to the 2-hour mark.
Brine Concentration
A stronger salt solution works faster. If your brine is particularly salty, reduce the brining time slightly.
Temperature
Always brine in the refrigerator (40°F or below). Never attempt to brine at room temperature, as this creates a breeding ground for harmful bacteria.
Desired Flavor Intensity
For a stronger flavor profile, lean toward the longer end of the brining spectrum. For milder flavor, stick to shorter times.
Types of Brining Methods
There are two main approaches to brining chicken wings:
Wet Brining
This is the traditional method involving submerging wings in a saltwater solution. Here’s a basic process:
- Dissolve 1 cup of kosher salt in 1 gallon of water
- Add optional ingredients like sugar, herbs, and spices
- Submerge wings completely in the solution
- Refrigerate for 2-4 hours
- Rinse thoroughly and pat dry before cooking
Dry Brining
This alternative method uses salt without the liquid component:
- Season wings with about 1 tablespoon of kosher salt per pound
- Add your favorite spices for extra flavor
- Place on a rack in the fridge uncovered for 1-3 hours
- No rinsing needed – just cook as desired
Dry brining tends to create wings with a firmer texture and crispier skin, which some people prefer. It’s also less messy and requires less prep time!
Crafting the Perfect Brine: Ingredients to Try
The foundation of any good brine is salt and water, but the magic happens when you add complementary flavors. Here are some popular additions to elevate your brine:
- Salt: Kosher salt is preferred for its purity and consistent grain size. Avoid iodized salt, which can impart a metallic taste.
- Sugar: Brown sugar, white sugar, or honey can balance saltiness and help with browning.
- Aromatics: Garlic, onions, herbs (thyme, rosemary, oregano), spices (black peppercorns, red pepper flakes), and citrus zest.
- Acid: White wine vinegar can further tenderize the meat.
- Heat: Red pepper flakes or hot sauce for spicy wings.
A popular basic brine recipe includes:
- 1/3 cup table salt (or 1/2 cup kosher salt)
- 1/3 cup granulated sugar
- 6 cups cold water
- 2 tablespoons white pepper
- 2 tablespoons freshly ground black pepper
- 1/4 cup white wine vinegar
- 1/4 cup red pepper flakes (optional, for heat)
Step-by-Step Brining Procedure
Follow these steps for perfect brined wings every time:
- Dissolve the salt and sugar in water, stirring until completely dissolved
- Add aromatics to the brine solution
- Submerge the wings completely (use a plate or weight to keep them down if needed)
- Refrigerate for 2-4 hours
- Rinse thoroughly under cold water to remove excess salt
- Pat dry with paper towels (crucial for achieving crispy skin!)
- Season as desired and cook using your preferred method
Cooking Brined Chicken Wings: Best Methods
Once your wings have been properly brined, you have several excellent cooking options:
Grilling
For perfect grilled wings:
- Preheat your grill to medium-high (375°F to 400°F)
- Grill for 20-30 minutes, turning occasionally
- Ensure wings reach an internal temperature of 165°F
- Let rest for 5 minutes before serving
Baking
For oven-baked wings:
- Preheat oven to 400°F
- Bake for 30-40 minutes, flipping halfway through
- Wings should reach 165°F internally
Frying
For the crispiest wings:
- Heat oil to 350°F
- Fry for 8-10 minutes until golden brown
- Drain on paper towels before serving
Common Brining Mistakes to Avoid
Even experienced cooks make these brining blunders. Here’s what to watch out for:
1. Brining Too Long
Exceeding 4 hours (or 12 hours maximum) will result in excessively salty, mushy wings.
2. Not Rinsing After Wet Brining
Always rinse wings thoroughly after wet brining to remove excess salt from the surface.
3. Not Patting Dry
Moisture on the surface prevents browning and crisping. Always pat wings dry with paper towels after brining.
4. Reusing Brine
Never reuse brine! It contains harmful bacteria from raw chicken and should be discarded immediately.
5. Brining at Room Temperature
Always brine in the refrigerator to prevent bacterial growth.
FAQ: Your Brining Questions Answered
Can I use different salt types for brining?
While kosher salt is preferred, sea salt can also work well. Avoid iodized table salt as it can impart a metallic flavor. Remember to adjust quantities based on salt density – different salts have varying weights by volume.
What if I accidentally brine my wings too long?
If you’ve gone beyond 4 hours, rinse the wings extremely thoroughly under cold water and consider soaking them in fresh water for 30 minutes to draw out excess salt.
Can I brine frozen chicken wings?
It’s possible but not ideal. Frozen wings absorb less brine because ice crystals prevent proper penetration. For best results, thaw wings completely before brining.
Do brined wings cook differently?
Yes! Brined wings often cook faster due to their higher moisture content. Monitor internal temperature closely to avoid overcooking.
Can I add hot sauce to my brine?
Absolutely! Adding hot sauce to your brine infuses heat throughout the wings. Just account for the salt content in the hot sauce when calculating your brine’s salt level.
How do I properly dispose of used brine?
Dispose of brine in a sealed bag in your garbage. Never pour it down the drain, as it can harm plumbing and the environment.
Final Thoughts
Brining is a game-changer for chicken wings, transforming them from ordinary to extraordinary with minimal effort. The key is respecting the timing – stick within that 2-4 hour sweet spot for consistently amazing results.
Remember, brining is as much art as science. Don’t be afraid to experiment with different flavors and techniques to find your perfect wing formula. Once you master the brining process, you’ll never want to eat unbrined wings again!
What’s your favorite brining recipe or technique? I’d love to hear about your wing adventures in the comments below!

What’s the Difference between a Wet Brine and a Dry Brine?
In a wet brine, the salt is distributed around the meat in water (that the meat is submerged in). In a dry brine, its just salt and aromatics, no moisture is added, and its packed directly on the meat.
The salt works in the same way, by breaking down muscle protein in the meat (making it more tender and allowing it to hold on to moisture).
The type of brine you choose depends on personal choice. Both will infuse moisture, tenderness and flavor. Wet brines tend to bring more moisture, while dry brines bring more flavor (but they can also make the skin quite tough).
Should I Rinse the Wings after Brining?
This is a matter of some debate – my vote is to say no. Leaving them unrinsed definitely will keep the flavor in the wings high.
However, if youre more sensitive to salt, you may prefer rinsing the wings afterward as an option. At this point, there should be plenty of flavor infusing the meat itself, so you definitely wont be taking all the flavor away.
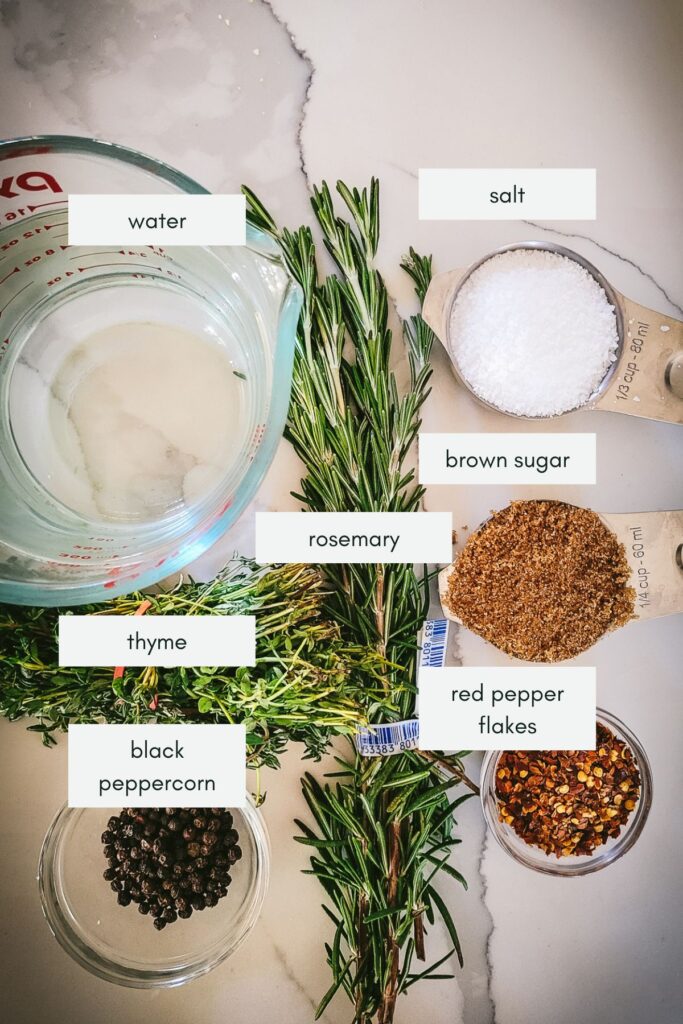
This list of ingredients is likely one you already have in your pantry (hint: its mostly water, although you may want to stock up on some salt).
- Water: dissolves the salt and the sugar, and ensure that the flavor gets into every nook and cranny of those wings.
- Kosher Salt: key for moisture and flavor (and tender texture). Definitely stick to Kosher for this recipe – if you use table salt youll be using too much!
- Brown Sugar: provides balance for the salty flavor
- Red Pepper Flakes: this is really for flavor – you wont get much of a kick out of it
- Rosemary: Amazing flavor, goes so well with chicken
- Thyme: see above
- Hot Sauce: this is optional, and definitely brings the spice