Ever stared at a freshly harvested chicken and thought, “Now what?” I’ve been there! Plucking chickens used to be my least favorite part of raising backyard poultry until I learned the proper techniques. Whether you’re a homesteader small-scale farmer, or just curious about processing your own meat, knowing how to properly pluck a chicken is an essential skill that can save you time money, and frustration.
In this comprehensive guide, I’ll walk you through everything you need to know about plucking chickens – from proper scalding techniques to mechanical pluckers and hand-plucking methods. Let’s dive in!
Why Proper Plucking Matters
Before we get into the nitty-gritty, let’s talk about why proper plucking is so important:
- Quality meat presentation – Nobody wants to find pin feathers in their roast chicken!
- Efficient processing – Good techniques save you significant time and effort
- Reduced carcass damage – Proper methods minimize broken wings and legs
- Better final product – A well-plucked bird looks more appetizing and professional
Before You Start Plucking
There are two critical steps that happen before the actual plucking begins
1. Harvesting the Bird
The way you harvest your chicken directly impacts how easily it will pluck:
- Do NOT chop the head off! This “sets” the feathers and makes plucking much harder
- Use a killing cone or suspend the bird upside down with twine
- Cut the neck artery with a very sharp knife
- Allow blood to drain for a few minutes
This humane method causes the least stress to the bird and results in better quality meat.
2. Proper Scalding – The MOST Critical Step!
If there’s one thing I’ve learned from years of processing chickens, it’s that proper scalding is absolutely essential for easy plucking. As one chicken processor put it after a frustrating morning of poorly plucked birds:
“After a particularly frustrating morning of poorly plucked birds, I suddenly had a bird that plucked perfectly! As I puzzled over what had gone right, I decided there was more to this plucking story. I started to notice some patterns… it became crystal clear that the difference between an easy-to-pluck bird and a nightmare is ALL about the scalding!”
Here’s how to properly scald your chickens:
- Water temperature: 130-170°F (145°F is often ideal)
- Scalding time: 30 seconds to 2 minutes
- Test readiness: Try pulling wing feathers – when they come out easily, you’re ready
- Watch for signs: If skin tears, water is too hot or scald time too long
- Use a thermometer: Don’t guess the temperature!
After your bird is properly scalded, you’re ready for the actual plucking.
Three Ways to Pluck a Chicken
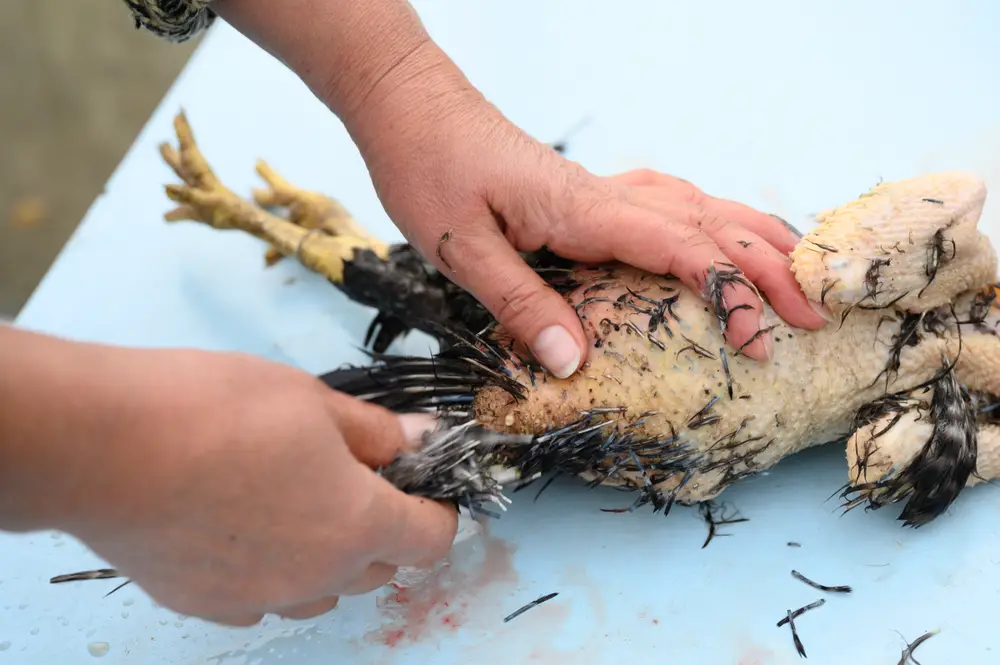
1. Hand Plucking
This is the traditional method that requires no special equipment:
- Position: Hang the bird upside down to give both hands access
- Direction: Start from tail and work up toward back, breast, and head
- Technique: Pull in the direction feathers grow to avoid tearing skin
- Time required: 5-20 minutes depending on skill and bird size
- Pro tip: Use plucked feathers to grip and remove stubborn pin feathers
2. Mechanical Pluckers
These machines can dramatically speed up your processing:
Tabletop Pluckers
- Cost around $200
- Hold bird by legs and roll across plucking fingers
- Takes practice but can pluck a bird in about a minute
Tub-Style Pluckers (like the Whizbang Plucker)
- More expensive ($1,500+)
- Process 2-3 birds at once
- Complete plucking in 15-30 seconds
- Great for larger volumes (10-30 chickens)
If using a mechanical plucker, follow these important guidelines:
- Keep it short and sweet – 15-20 seconds is usually enough with proper scalding
- Pluck more than one bird at a time – This reduces violent tumbling and damage
- Add water while plucking – Spray water into the plucker to lubricate and flush away feathers
- Pluck ’em warm – Process immediately after scalding
- Be gentle – Many birds are damaged before even entering the plucker
- Don’t over-pluck – It’s not worth breaking wings/legs for a few stubborn feathers
3. Combination Approach
Many backyard processors (including myself) prefer this method:
- Use a mechanical plucker first to remove the bulk of feathers
- Finish with hand plucking for stubborn areas and pin feathers
- Get the benefits of speed and precision
Step-by-Step Plucking Process
Here’s my complete process for perfectly plucked chickens every time:
- Harvest the bird humanely using a cone or suspension method
- Heat water to 145°F in a large pot or dedicated scalder
- Scald the bird for 30-60 seconds, testing wing feathers for readiness
- Begin plucking immediately while bird is still warm
- If using a mechanical plucker:
- Add 2-3 birds at once for best results
- Add water spray during plucking
- Run for 15-30 seconds maximum
- Check progress frequently
- Hand-pluck remaining feathers rather than continuing machine plucking
- Pay special attention to wings, thighs, and tail areas
- Use plucked feathers to grip and remove stubborn pin feathers
- Give a final rinse to remove any down and remaining feathers
Common Problems and Solutions
| Problem | Cause | Solution |
|---|---|---|
| Feathers won’t come out | Insufficient scalding | Increase water temperature or scalding time |
| Skin tearing | Water too hot or scalded too long | Reduce temperature or time |
| Broken wings/legs | Over-plucking or single bird in plucker | Pluck multiple birds, reduce time |
| Pin feathers remain | Incomplete plucking | Hand-pluck remaining feathers |
After Plucking: Next Steps
Once your bird is plucked, you’ll want to:
- Eviscerate the bird (remove internal organs)
- Cool immediately in ice water to reach 40°F within 2 hours
- Check quality – Cold water makes stubborn pin feathers easier to remove
- Package and freeze – Protect from freezer burn and consume within a year
My Personal Plucking Equipment List
If you’re serious about processing your own birds, here’s what I recommend having on hand:
- Electric plucker (tub-style for multiple birds)
- Two hoses with splitter and spray nozzle
- Propane cooker to heat water bath
- Scalding pot with thermometer
- Killing cones or strong twine
- Work table with cutting board
- Cold water barrel for cooling
- Sharp knives and scissors
- Freezing supplies (vacuum sealer is ideal)
Final Thoughts
Learning to properly pluck a chicken is one of those skills that gets easier with practice. The first few birds might be challenging, but once you get the scalding temperature and timing right, you’ll be amazed at how quickly and cleanly the feathers come off.
Remember these key points:
- Proper scalding is everything
- Don’t over-pluck in mechanical pluckers
- Process birds while they’re warm
- Add water during mechanical plucking
- Pluck multiple birds at once
Do you have any special plucking tricks that work for you? I’d love to hear about them in the comments below!
FAQ About Chicken Plucking
Can you pluck a chicken without boiling it?
Yes, you can dry pluck, but it’s much more difficult. If you must, dip in 145°F water for about 45-60 seconds until feathers pull out with a tug.
How long should I scald a chicken?
Between 30-60 seconds in 130-170°F water. Check by testing if wing feathers come out easily.
How are commercial chickens plucked today?
Commercial operations use automated systems that scald birds in hot water baths, then use large “pickers” with hundreds of rubber fingers that rotate to remove feathers.
Is it better to hand pluck or use a machine?
For small numbers (1-5 birds), hand plucking works fine. For larger batches, a mechanical plucker saves tremendous time and effort.
How to Pluck a Chicken
Plucking the fowls is more easily carried cut if the operation takes place immediately the bird is dead, and whilst the body is still warm.
It is frequently objected, by reason of the muscular action which is observed in a bird immediately after death, that it must be suffering pain. But upon this point the best veterinary authorities in the country, including the late Sir George Brown, of the Board of Agriculture, have assured me that it is impossible for the bird to have any sense of feeling after the brain is severed from the rest of the body.
Hence we need have no qualms of conscience upon that score. If, however, it is impossible to pluck the birds as soon as they are dead, then they should be allowed to become quite cold before the work is carried out, for it is found that the flesh of a bird is much more liable to tear when it is half cold than when either warm or entirely cold.
The chief points in plucking are :
First, that it shall be done immediately the bird is killed;
Second, that the operator shall draw the feathers the reverse way to that in which they lie, with a sharp pull, yet not sufficient to tear the skin;
Third, that the process shall be carried out as expeditiously as possible.
The reason why feathers are left on near the head is simply to cover up the broken part of the neck, and also that the bird presents a rather better appearance than if plucked completely up to the throat.