Are you tired of paying premium prices for store-bought jerky? Ever wondered if you could make your own chicken jerky at home? Well, you’re in luck! I’ve been experimenting with homemade jerky for years, and chicken jerky has become my absolute favorite. It’s leaner than beef, takes less time to marinate, and is often cheaper too!
In this comprehensive guide I’ll walk you through everything you need to know about making delicious chicken jerky at home. From selecting the right cut to proper storage techniques, I’ve got you covered. Let’s dive in!
Why Make Chicken Jerky?
Before we get into the nitty-gritty, let’s talk about why chicken jerky is worth your time:
- It’s typically more affordable than beef
- Contains less fat, making it a healthier option
- Takes less time to marinate and dehydrate
- Offers a different flavor profile that many prefer
- Makes great use of extra chicken you might have in your freezer
- Perfect protein-packed snack for hiking, road trips, or everyday munching
My family absolutely loves it – even our dog tries to sneak some when no one’s looking!
What Cut of Chicken Is Best for Jerky?
Chicken breast is hands-down the best choice for making jerky. Here’s why:
- It’s the leanest part of the chicken
- The large, uniform size makes slicing easier
- Low fat content extends shelf life (fat spoils quicker)
- The mild flavor takes on marinades beautifully
While you can technically use any chicken part, including deboned thighs and legs, breasts will give you the most consistent results with the least amount of prep work.
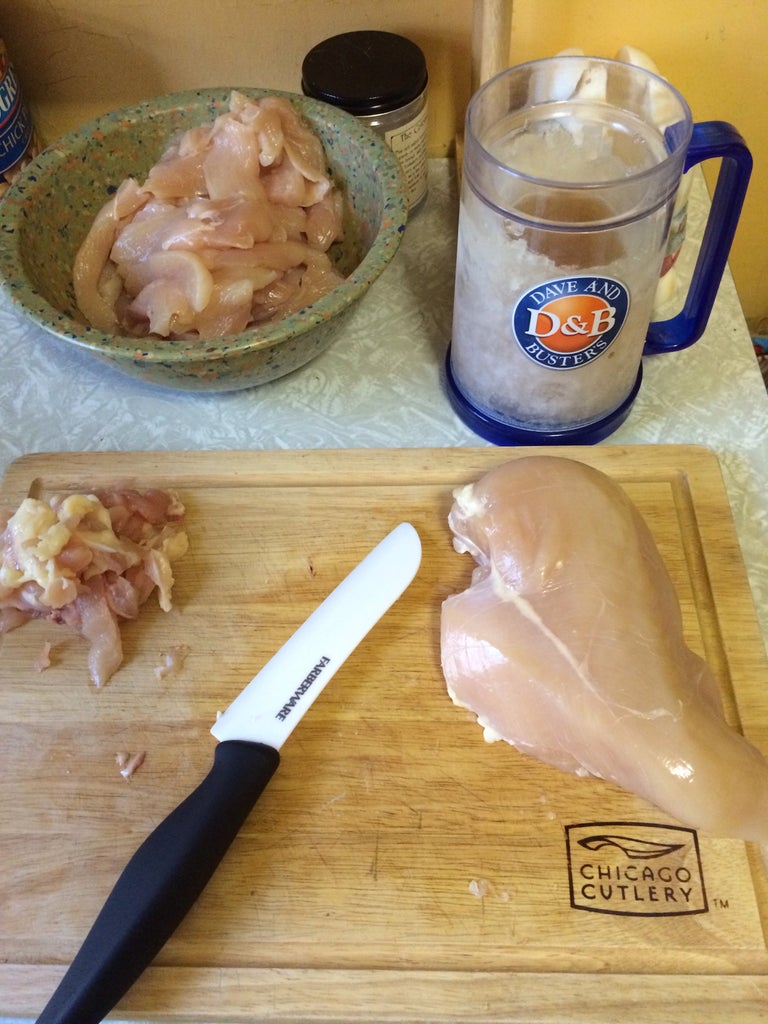
Essential Equipment for Making Chicken Jerky
You don’t need fancy equipment to make great chicken jerky but these items will help
- Sharp knife – Seriously, this makes ALL the difference when slicing
- Cutting board – Plastic is preferred for raw meat (easier to sanitize)
- Ziplock bags or container for marinating
- Dehydrator, oven, or smoker – For drying the meat
- Colander – For straining excess marinade
- Measuring cups and spoons – For consistent marinades
The Step-by-Step Process
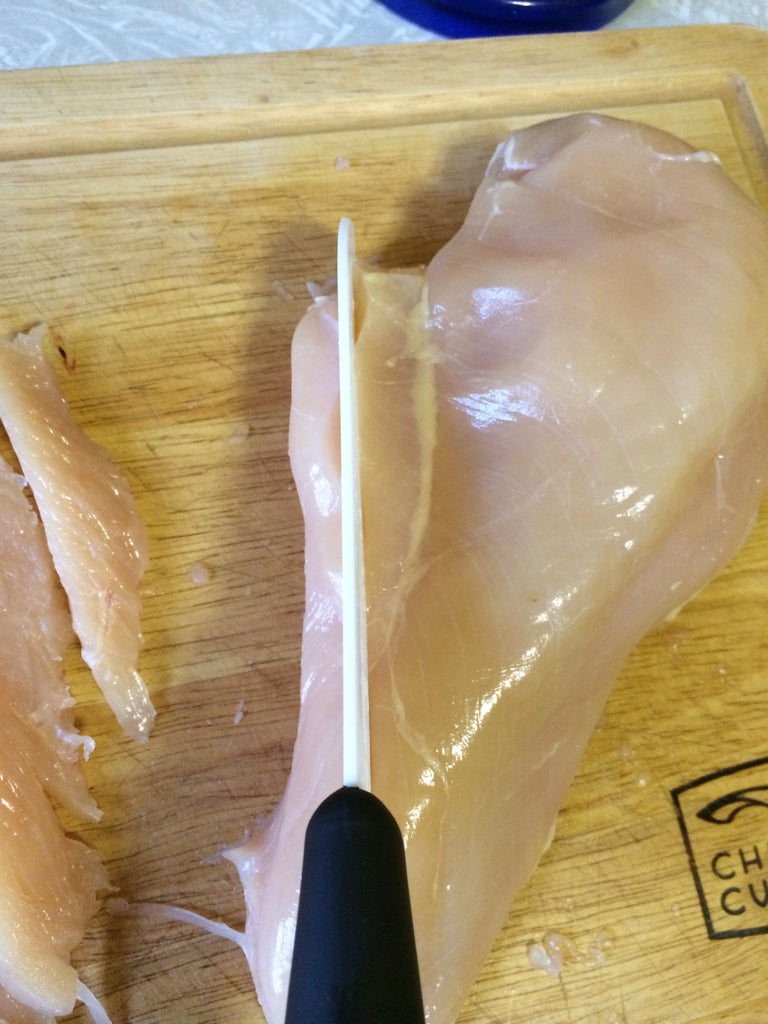
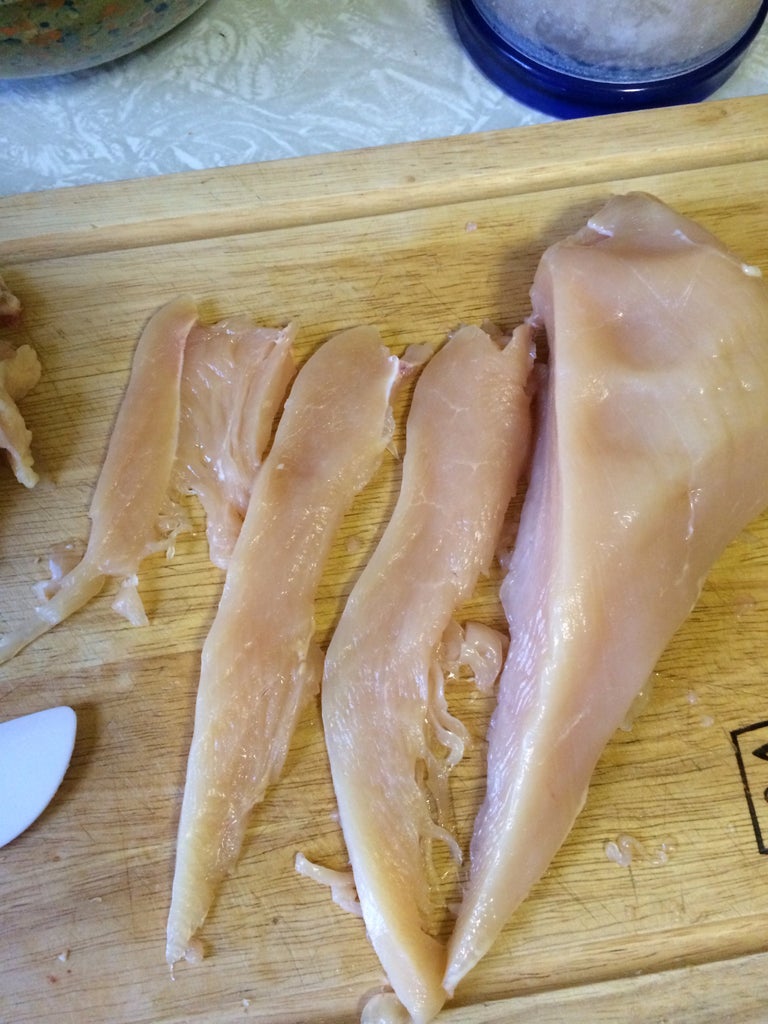
1. Prepping the Chicken
The first step is critical – proper preparation of your chicken:
-
Partially freeze the chicken – This is my favorite trick! Wrap your chicken breasts in plastic wrap and place in the freezer for about 30-60 minutes. This firms up the meat, making it much easier to slice uniformly.
-
Trim all visible fat – Fat goes rancid quickly and shortens the shelf life of your jerky.
-
Slice properly – Using your sharp knife, slice the chicken into strips about 1/8″ to 1/4″ thick. Consistency is key! Slicing with the grain results in chewier jerky, while slicing against the grain creates easier-to-bite pieces.
-
Uniform thickness – Make sure all your pieces are the same thickness to ensure they dry at the same rate.
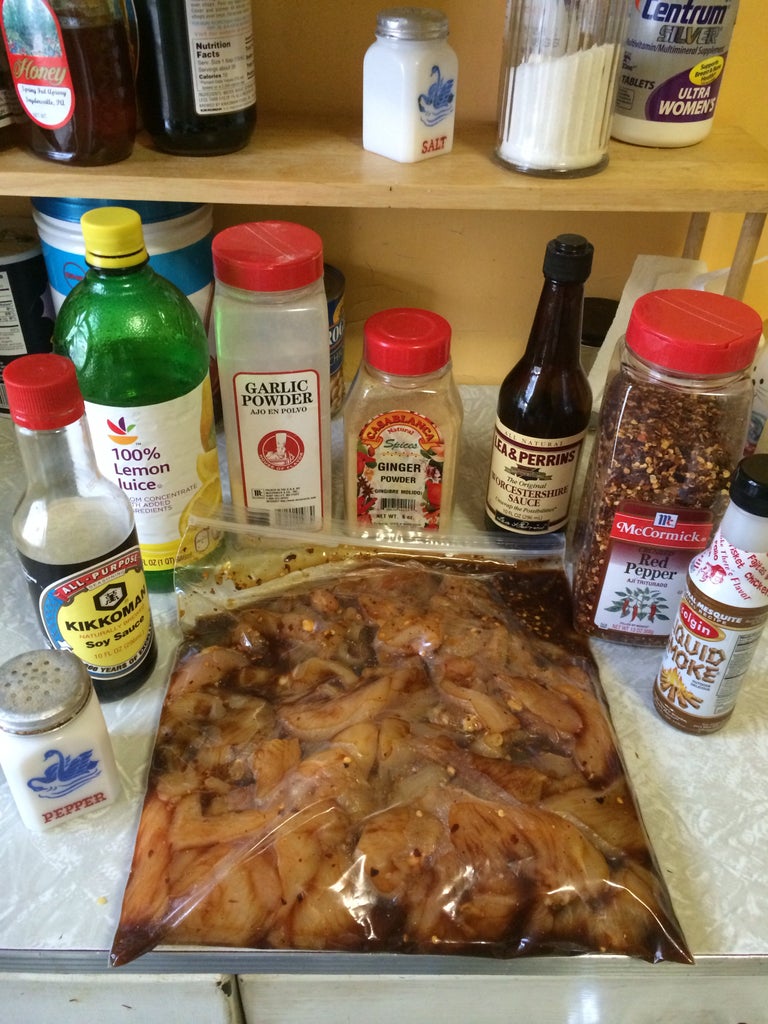
2. Marinating Your Chicken
Here’s where the magic happens! A good marinade infuses your chicken with flavor while helping preserve it. Here’s a basic recipe I love:
Basic Chicken Jerky Marinade:
- 1 cup soy sauce
- 1/2 cup apple cider vinegar
- 1 tablespoon garlic powder
- 1 tablespoon onion salt
- 1/4 teaspoon curing salt (optional but recommended for safety)
- 1 teaspoon black pepper
- 3 tablespoons Worcestershire sauce
Alternative Honey-Chili Marinade:
- 1/3 cup soy sauce
- 1/3 cup Worcestershire sauce
- 1/4 cup honey
- 2 tablespoons chili garlic sauce
- 1 tablespoon liquid smoke (optional)
- 1/4 teaspoon curing salt (optional)
Marinating Instructions:
- Mix all marinade ingredients in a bowl
- Place sliced chicken in a ziplock bag
- Pour marinade over chicken
- Remove excess air from the bag and seal
- Massage the bag to ensure all pieces are coated
- Refrigerate for 6-24 hours (chicken needs less time than beef)
- Flip the bag occasionally to ensure even marinating
3. Drying Your Chicken Jerky
You have several options for drying your chicken jerky:
Using a Dehydrator (Preferred Method)
- Strain excess marinade in a colander
- Pat pieces dry with paper towels (optional, speeds up drying)
- Arrange chicken strips on dehydrator trays with space between each piece
- Set temperature to highest setting (usually 165°F)
- Dehydrate for 4-6 hours
Using an Oven
- Line bottom of oven with foil to catch drippings
- Place chicken on wire racks
- Set oven to 200°F
- Prop oven door slightly open with wooden spoon
- Use a small fan to circulate air (optional)
- Dry for 4-6 hours
Using a Smoker
- Preheat smoker to 200°F
- Arrange chicken on smoker racks
- Smoke for 4-6 hours
- No need for liquid smoke in the marinade when using this method!
Food Safety Considerations
This is SUPER important when making chicken jerky! Poultry has different safety concerns than beef, so take these precautions:
-
Use curing salt – While optional for beef jerky, it’s strongly recommended for chicken jerky to prevent bacterial growth. Just 1/4 teaspoon per pound of meat is sufficient.
-
Reach proper temperature – Ensure your chicken reaches an internal temperature of 165°F to kill harmful bacteria.
-
Pre or post-heat treatment – If your dehydrator doesn’t reach 165°F, you can either:
- Pre-heat: Place raw marinated strips in a 300°F oven for 10 minutes before dehydrating
- Post-heat: After dehydrating, place jerky in a 300°F oven for 10 minutes
I HIGHLY recommend the heat treatment step for chicken jerky. It won’t affect the quality but ensures safety.
How to Tell When Your Chicken Jerky Is Done
Around the 4-hour mark, start checking your jerky. Here are two tests to determine if it’s ready:
The Bend Test
- Remove a piece and let it cool for 5 minutes
- Bend it in half
- It should bend and crack but not break in half
- If it bends without cracking, it needs more time
The Rip Test
- Take a piece and try to tear it lengthwise
- If it tears and you see white fibers, it’s done
- If you don’t see fibers and only raw-looking meat, it needs more time
Storage Tips
Proper storage is crucial for maintaining quality and safety:
- Allow jerky to cool completely before storing
- Store in airtight containers or vacuum-sealed bags
- Keep in a cool, dark place
- For best results, store in the refrigerator
- Chicken jerky typically lasts:
- 1-2 weeks at room temperature
- 3-4 months refrigerated
- 6+ months frozen
Common Problems and Solutions
| Problem | Possible Cause | Solution |
|---|---|---|
| Too dry/brittle | Over-dehydrated | Reduce drying time; pieces should be pliable |
| Too moist/spoils quickly | Under-dehydrated | Increase drying time; perform bend/rip test |
| White spots appear | Salt coming to surface | Normal and safe; can wipe off if desired |
| Mold appears | Too much moisture left | Discard and ensure proper drying next time |
| Uneven drying | Inconsistent slice thickness | Slice more carefully; partial freezing helps |
Pro Tips From My Kitchen to Yours
After making countless batches of chicken jerky, here are my top tips:
- Use hickory or applewood liquid smoke for amazing flavor
- Support local beekeepers by using local honey in your marinade
- The post-dehydration oven step is critical for chicken jerky safety
- Try pre-freezing your chicken for 30 minutes before slicing – game changer!
- Partially dried jerky can be marinated again for extra flavor
- Save the bones to make chicken broth – waste nothing!
- Don’t sample the jerky until it’s fully dried to avoid potential foodborne illness
Final Thoughts
Making your own chicken jerky is not just economical, it’s also incredibly satisfying. Once you master the basic technique, you can experiment with countless flavor combinations – spicy, sweet, smoky, or whatever your heart desires!
Remember, the key to great chicken jerky is consistent slicing, proper marination, thorough drying, and food safety awareness. Follow these guidelines, and you’ll be enjoying delicious homemade chicken jerky in no time.
Happy jerky-making!

Step 2: Trim Your Chicken
Step 1: Equipment Needed
How To Make Chicken Jerky – Start To Finish
FAQ
How do you make chicken jerky?
To make poultry jerky safely it must be pre-treated with heat in the oven at 200 °F for at least 10min. – this is due to the risk of chicken and turkey being contaminated with certain bacteria such as salmonella and campylobacter.
Can you use beef jerky for chicken?
I used my father’s beef jerky recipe, tweaking it some for chicken. What you need: Simply add all the ingredients in a large bowl, and toss the chicken strips in. Stir to coat all the pieces, and allow to marinate in the refrigerator for 12-15 hours.
How to season chicken jerky?
To season the chicken jerky, one can use a variety of spices such as black pepper, ginger, onion powder, smoked paprika, and chili garlic sauce. For a smoky taste, a few drops of liquid smoke can be added. These spices and flavorings should be adjusted to taste.
Do you have to cook chicken before making jerky?
You must fully cook the chicken as the dehydrator will not kill the bad bacteria in chicken.
How long can homemade chicken jerky last?
Commercially packaged jerky can be kept 12 months; home-dried jerky can be stored 1 to 2 months.Nov 3, 2016
How do you dehydrate chicken at home?
Spread pressure-cooked chicken mixture on nonstick sheets or baking paper/parchment paper. Begin dehydrating at 63°C (145°F) for four hours. Then break up and spread out on the trays further. Dehydrate for approximately four more hours until dry.