Hey there, kitchen warriors! If you’ve ever stood over a hot pan, tongs in hand, wondering, “Is this dang chicken cutlet done yet?”—you ain’t alone. I’ve been there, sweating it out, worried I’m either gonna serve raw chicken or turn it into a dry hockey puck. Frying chicken cutlets to that perfect crispy, juicy balance is an art, but it’s one we can all master with a few tricks up our sleeve. So, let’s dive right in and answer the big question upfront: how do you know when a chicken cutlet is done frying?
The most reliable way is to check the internal temperature—aim for 165°F (74°C) at the thickest part. No thermometer? Look for a golden-brown crust, clear juices when pierced, and a firm, springy feel when you press it. These clues together will save your dinner. But there’s more to it than just a quick check, so stick with me as we break down everything you need to nail this every time.
Why Knowing When a Chicken Cutlet Is Done Matters
Before we get into the nitty-gritty, let’s chat about why this even matters. Undercooked chicken? That’s a one-way ticket to food poisoning town, and nobody’s got time for that Overcooked, and you’re chewing on something drier than a desert rock Getting it just right means you’ve got a cutlet that’s safe to eat, crispy on the outside, and juicy as heck inside. It’s the difference between a meal folks rave about and one they politely choke down. So, let’s make sure we’re cooking with confidence!
The Foolproof Methods to Check If Your Chicken Cutlet Is Done
I’ve burned and undercooked my fair share of cutlets over the years, but these methods have become my go-to saviors. Here’s how to tell if your chicken is ready to come outta that sizzling oil.
1. The Internal Temperature Test: Your Best Bet
If you want zero guesswork, grab a meat thermometer. This lil’ tool is a game-changer Here’s the deal
- Target Temp: The magic number is 165°F (74°C). That’s the USDA-approved safe temp for chicken.
- How to Check: Stick the thermometer into the thickest part of the cutlet. Don’t let it touch the pan bottom, or you’ll get a wonky reading.
- Why It Works: This ain’t just me talkin’—it’s science. At 165°F, harmful bacteria are toast, and the meat’s still juicy if you don’t go much higher.
- Pro Tip: Pull it out a couple degrees early (like 160°F) cuz it’ll keep cooking a bit from residual heat. Let it rest a few minutes, and it’ll hit the mark.
I remember the first time I used a thermometer—felt like I was cheating! But dang, it took all the stress outta frying. If you don’t got one yet, trust me, it’s worth the few bucks.
2. Visual Cues: Trust Your Eyes (Kinda)
No thermometer? No prob. You can still eyeball it, though this method’s a tad less precise. Here’s what to look for:
- Golden Brown Crust: The breading should be a deep, even golden brown. If it’s pale, keep frying. If it’s black, well, you’ve gone too far, pal.
- No Pink Inside: Cut into the thickest part. If it’s white and opaque all through, you’re good. Any pink? Back in the pan it goes.
- Clear Juices: Poke it with a fork or knife. If the juices run clear, it’s likely done. Pink or reddish juices mean it needs more time.
I’ve relied on this plenty when I’m in a rush, but I gotta warn ya—sometimes the outside looks perfect while the inside’s still raw. Pair this with another check if you’re unsure.
3. The Touch Test: Feel the Firmness
This one’s for the seasoned cooks—or those who wanna feel like a pro. It takes practice, but it’s handy.
- How to Do It: Press the cutlet gently with your finger or a spatula. If it feels firm and bounces back a bit, it’s cooked. Soft and squishy? Underdone. Hard as a brick? Overdone, sorry.
- Compare It: Some folks say a cooked cutlet feels like the base of your thumb when you press it. Raw feels like the soft part of your palm. Give it a try!
- Heads Up: This is super subjective. I’ve messed it up plenty before I got the hang of it. Use it with visual cues to be safe.
This method’s cool when you’re flipping cutlets like a boss, but don’t bet the farm on it alone.
Tools You Need to Fry Chicken Cutlets Right
Having the right gear makes checking doneness a breeze. Here’s what I keep in my kitchen for frying success:
- Meat Thermometer: Digital ones are cheap and quick. Must-have for peace of mind.
- Deep-Fry Thermometer: Clip it to your pan to keep oil between 325-375°F (163-190°C). Too low, and it’s greasy; too high, and it burns.
- Tongs: Flip and pull cutlets without splashing hot oil everywhere. Safety first!
- Wire Rack: Set fried cutlets here to drain oil. Keeps ‘em crispy, not soggy.
- Heavy Pan or Skillet: A cast iron or Dutch oven holds heat steady, so your oil temp don’t drop.
I used to fry without half this stuff, and lemme tell ya, it was a mess. Invest in a couple of these, and you’ll thank me later.
Step-by-Step: Frying Chicken Cutlets to Perfection
Let’s walk through the process, cuz knowing when it’s done starts with doing it right from the get-go. Here’s how I fry ‘em up:
- Prep the Chicken: Pound those breasts to an even thickness—about ½ inch. Uneven cuts cook uneven, and that’s a headache.
- Season It: Sprinkle salt, pepper, maybe some garlic powder. Flavor starts here.
- Bread ‘Em: Set up three bowls—flour, beaten eggs, breadcrumbs (Panko’s my jam for extra crunch). Dip in that order, pressing crumbs on tight.
- Heat the Oil: Use a high smoke point oil like canola or avocado. Get it to 325-350°F. Test with a wooden spoon handle—if bubbles form around it, you’re ready.
- Fry in Batches: Don’t crowd the pan. Two cutlets at a time, 3-5 minutes per side till golden.
- Check Doneness: Use one of the methods above—temp, look, or touch. Rest ‘em on a rack for a couple minutes after.
This ain’t rocket science, but skipping steps can mess ya up. I’ve crowded the pan before, and the oil temp dropped so bad, my cutlets were soggy as heck.
Common Mistakes and How to Fix ‘Em
Even with the best intentions, stuff goes wrong. Here’s what I’ve learned from my kitchen disasters—and how to avoid ‘em.
- Burnt Outside, Raw Inside: Oil’s too hot. Turn down the heat a notch and fry a bit longer. Check temp at 325-350°F. If it’s browning too fast, pull it off briefly to let the inside catch up.
- Greasy Cutlets: Oil’s too cold, or you’ve overcrowded. Heat it proper before adding chicken, and fry in small batches. Let that oil sizzle!
- Breading Falls Off: Didn’t stick right. Pat chicken dry first, and press crumbs on hard. Let it sit 10 minutes after breading to set.
- Dry as a Bone: Overcooked it. Don’t go past 165°F internal temp. Brining beforehand—salt, water, a lil’ sugar—helps lock in juice too.
I’ve made every one of these goofs. First time I fried cutlets, the breading slid off like a bad toupee. Laughable now, but frustrating then. Learn from my flubs!
Tips to Keep That Crunch and Juice Locked In
Getting it done is one thing, but keeping it tasty is another. Here’s what works for me:
- Rest It Right: After frying, let cutlets sit on a wire rack, not a plate. Stacking traps steam and kills the crunch.
- Don’t Cover ‘Em: Covering traps moisture. If you gotta keep ‘em warm, pop the rack in a 200°F oven, door cracked.
- Oil Depth: Shallow fry with ¼-½ inch of oil. Too much, and it’s a greasy mess; too little, and it don’t crisp even.
- Season Post-Fry: Sprinkle a pinch of salt right after frying while it’s hot. Boosts flavor big time.
I’ve found that resting on a rack is non-negotiable. Tried paper towels once, and the bottom got all mushy. Never again.
Serving Up Your Perfectly Fried Chicken Cutlets
Now that you’ve got ‘em cooked just right, let’s talk serving. These babies are versatile as heck. Here’s some ideas I love:
- Classic Combo: Pair with mashed taters and gravy. Comfort food at its finest.
- Sandwich Style: Slap it on a bun with lettuce, mayo, and a pickle. Instant winner.
- Chicken Parm: Top with marinara and melted mozzarella, serve over pasta. Feels fancy, tastes amazing.
- Salad Topper: Slice it up and toss over greens for a protein punch. Keeps it light.
- Zesty Twist: Drizzle with a lemon butter sauce—melted butter, lemon juice, a bit of garlic. Brightens it right up.
I’m partial to the sandwich route. Something ‘bout that crispy bite with soft bread just hits different. What’s your fave way to eat ‘em?
A Lil’ Science Behind the Sizzle
Wanna know why these tricks work? Let’s geek out for a sec. When you fry, the hot oil triggers the Maillard reaction—that’s the fancy term for browning that gives you flavor and color. The heat zaps moisture from the surface, making it crispy, while the inside stays tender if you don’t overdo it. Oil’s gotta be hot enough to sear quick, or the chicken soaks it up like a sponge. That’s why temp control is everything. Ain’t no magic, just physics, but it sure feels magical when you bite into that perfect cutlet.
Why Chicken Cutlets Are Worth the Effort
Let’s be real—frying cutlets takes a bit of work. Hot oil, splatters, the whole shebang. But man, when you get it right, it’s pure gold. They’re quick to cook compared to whole pieces, super versatile for meals, and a crowd-pleaser every time. I whip these up weekly, whether it’s for a quick dinner or to impress friends. Plus, leftovers—if you got any—taste awesome cold straight from the fridge. Trust me, once you nail the doneness, you’ll be hooked.
Troubleshooting Deeper: When Things Go Really Wrong
Sometimes, even with all the checks, stuff still don’t turn out. Let’s dig into some weirder issues I’ve faced and how to fix ‘em.
- Uneven Cooking: If one side’s done and the other ain’t, your pan might be tilted or heat’s uneven. Rotate the cutlets or switch to a better pan. Cast iron’s my go-to for steady heat.
- Oil Smoking Like Crazy: You’ve overheated it past its smoke point. Dump it, start fresh with a high smoke point oil like canola, and watch the temp closer.
- Cutlet Falls Apart: Mighta pounded too hard or didn’t bread even. Handle gentler next time, and make sure breading’s stuck good before frying.
- Tastes Bland: Forgot to season early. Always salt and pepper before breading, and maybe toss some spices in the crumbs for extra oomph.
I had a cutlet disintegrate on me once—looked like shredded confetti in the pan. Learned my lesson to not over-pummel the poor thing. Keep at it; every mistake teaches ya somethin’.
Experimenting with Flavors for Fun
Once you’ve got the doneness down, play around with flavors. I’ve tried a bunch, and here’s what’s worked:
- Spicy Kick: Mix cayenne or hot sauce into the egg wash. Gives it a sneaky heat.
- Cheesy Crust: Add grated Parmesan to the breadcrumbs. Crispy and savory, oh yeah.
- Herby Vibes: Toss dried thyme or oregano in the seasoning. Smells amazing while frying.
- Sweet Touch: A pinch of sugar in a brine before breading balances the salt. Sounds odd, but it’s killer.
I went nuts with cayenne once and nearly set my mouth on fire. Dial it back if you ain’t into spice, but experimenting’s half the fun of cooking.
Wrapping It Up: Fry Fearless, My Friend
So, there ya have it—everything I’ve picked up over years of frying chicken cutlets, from knowing when they’re done to dodging the usual pitfalls. Stick to that 165°F internal temp as your north star, back it up with visual and touch checks, and keep that oil hot but not smokin’. With a lil’ practice, you’ll be dishing out cutlets that are crispy, juicy, and downright drool-worthy.
Got a frying tip or disaster story of your own? Drop it below—I’m all ears. And hey, if this helped ya out, share it with a buddy who’s still guessing at the stove. Let’s get everyone frying like champs! Now, go heat up that pan and make some magic happen. You got this!
Why anyone can cook chicken cutlets at home:
- You can buy thinly sliced chicken breasts at the store, so that you don’t have to pound out your own chicken breasts.
- Use store bought Panko bread crumbs.
- There are minimal ingredients to this recipe.
- The cutlets cook very quickly thanks to the thinness of the chicken.
- The method is simple and straight forward with just a few easy steps.
- Thinly Sliced Chicken Breasts
- Panko Bread Crumbs (can use gluten free here as well)
- Flour (can also use gluten free all purpose flour)
- Eggs
- Salt and Pepper
- High quality oil: I like to use avocado oil, or a mix of avocado oil and olive oil. The avocado oil can cook at a higher temp so it keeps the olive oil from burning.
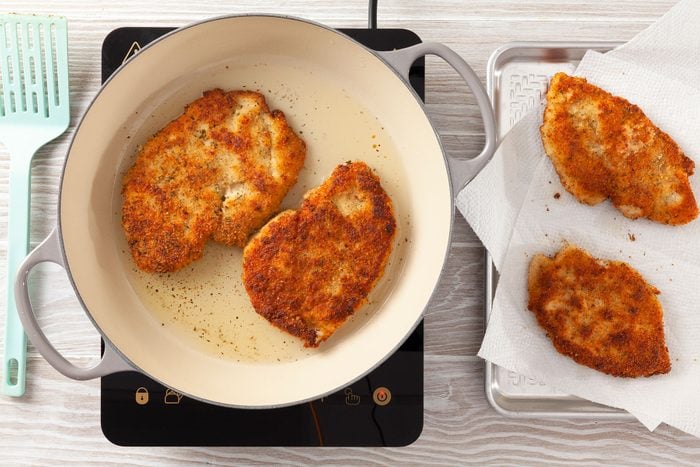
There is truly nothing better than a fresh cutlet straight from the pan. I simply shallow fry the cutlets on each side for 4-5 minutes until golden brown and chicken has been cooked through. From there, I remove the crispy cutlets to a paper towel lined baking sheet to let excess oil drain and sprinkle with salt and pepper. Serve as you wish from there!
You can of course also cook these cutlets in the air fryer as well, but nothing compares to the real deal pan fried cutlet. BUT if you want to air fry the cutlets, follow all instructions up until the frying point and spray with oil on both sides. Air fry for 6-8 minutes until golden, flipping once.
Nonna Pia’s Delicious Chicken Cutlets!
FAQ
How do you know if fried chicken is cooked?
Simply place your fried chicken on a wire cooling rack to cool! Place some paper towels below and wait for the extra fat to drip down on them. Not only will you detect when your chicken is thoroughly cooked, but you will also be able to prevent some of the more typical blunders that lead to a poorly fried dish.
How do I know if my chicken is cooked?
In general, there are a few methods we may employ to ensure that our chicken is thoroughly cooked and ready to eat. You can use a meat thermometer or one of the more time-consuming and labor-intensive methods. Examine the juices, for example, or the color of your food.
What happens if you fry chicken at a low temperature?
If we fry the meat at too low a temperature, the chicken will become leaden. And, of course, there is no crust! Another factor that contributes to no-crust fried chicken is paper towels. To be more specific, we use them to wipe the extra fat from our freshly cooked poultry!
What temperature should fried chicken be?
This useful instrument will make it simple to determine fried chicken’s temperature. All you have to do is put it in the bird and wait for the results! As you may be aware, the ideal temperature for frying chicken is 165 degrees Fahrenheit, 75 degrees Celsius, or more.
What color should chicken be when frying?
The chicken you’re frying should be a rich golden brown color. At the same time, it’s crispy. This is why, when frying, it is usually advisable to turn it over now and then and not to cook for more than fifteen minutes. Otherwise, you’ll end up with a sliver of coal in your frying pan!
Why do cutlets break when fried?
First, heat can cause the fat in cutlets to liquefy and form droplets that fall off the meat. Second, sudden changes in temperature can also cause cutlets to burst or crack during frying. Finally, because cutlets are so delicate and sensitive to heat, even a small mistake can lead to them shattering or breaking into pieces.
How do I know when chicken cutlets are done?
How long should I fry my chicken cutlets?
How can I tell if fried chicken is done?
To tell if fried chicken is done, check for an internal temperature of 165°F using a meat thermometer, ensure it’s golden brown and firm to the touch with clear juices when cut, and note that smaller pieces cook faster than larger ones. You can also test by gently prodding the thickest part of the meat; it should be firm with a slight bounce back, not soft and squishy.
Is it okay if fried chicken is a little pink?
Yes, it’s okay for fried chicken to be a little pink, especially in dark meat like thighs and legs, because pinkness is not a reliable indicator of doneness. The chicken is safe if its internal temperature reaches a minimum of 165°F (74°C). Pink color can be caused by myoglobin (an oxygen-carrying protein), hemoglobin, or pigment from the bone marrow, and these can remain after cooking. To ensure safety, always use a meat thermometer to check the thickest part of the chicken; don’t rely on color alone.