Ever tried to fry chicken only to end up with pieces that are burnt on the outside but still raw inside? Or maybe your chicken turns out soggy instead of crispy? Don’t worry – I’ve been there too! After years of experimenting and learning from top chefs I’m here to share all my secrets on how to fry raw chicken perfectly every time.
Frying chicken is an art that takes practice, but with the right techniques, you’ll be making restaurant-quality fried chicken in your own kitchen. Let’s dive into everything you need to know about transforming raw chicken into a crispy, juicy delight!
Choosing the Right Chicken Parts
Before you even heat up the oil selecting the right chicken pieces is crucial
- Chicken Drumsticks and Thighs – These dark meat cuts are naturally juicy and flavorful. The bone-in structure helps retain moisture during cooking, making them ideal for frying.
- Chicken Breasts – Leaner than dark meat but still fry up nicely. Choose smaller breasts or butterfly them to ensure even cooking and prevent dryness.
- Chicken Wings – Offer a good balance of crispy skin and tender meat, making them a popular choice for frying.
- Chicken Tenders – All-white meat strips that get golden and crispy when fried. Great for picky eaters!
Preparing the Chicken for Frying
The Brining Secret
The best fried chicken starts with a good brine! Brining helps your chicken stay juicy and adds flavor throughout
Milk Brine Option:
- Place chicken in a container with whole milk (about 4 cups)
- Add 1/4 cup salt, 8 cloves of garlic, 2 tbsp black peppercorns, and 3 bay leaves
- Pierce chicken with a knife to allow the brine to penetrate deeper
- Brine for 2-3 hours or overnight for best results
The lactic acid in dairy breaks down proteins and collagen in the chicken, which makes the meat more tender when cooked. If you don’t have milk, a saltwater brine is still better than nothing!
Quick Salt Brine Alternative:
- Dissolve salt in water
- Soak chicken pieces for several hours
- Pat dry before dredging
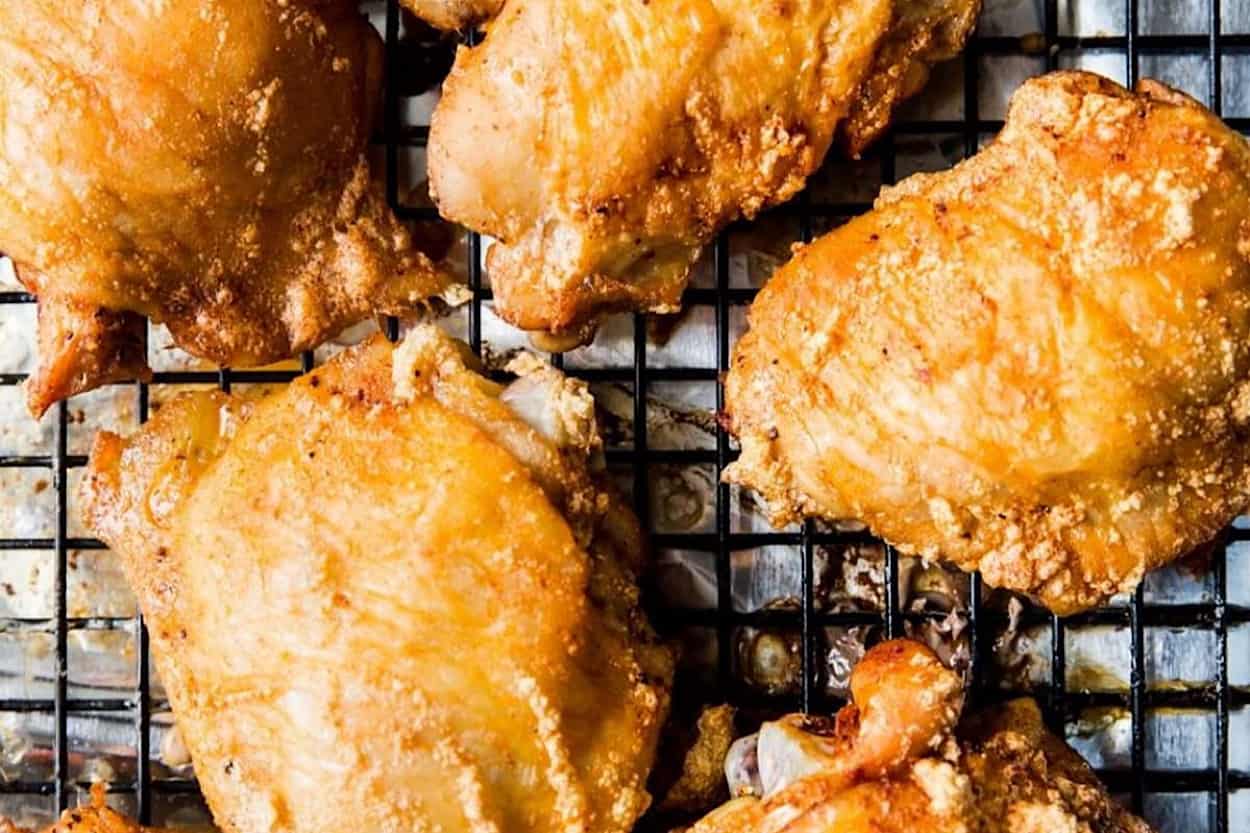
Pat Dry – The Most Important Step!
After brining, thoroughly pat the chicken dry with paper towels. This step is SUPER important! Excess moisture will create steam during frying, resulting in soggy skin instead of that crispy exterior we all crave.
Seasoning Your Chicken
Season your chicken well before coating it. You can use:
- Simple salt and pepper
- Custom spice blend with paprika, garlic powder, onion powder, cayenne, etc.
- Pre-made seasoning mixes
The Perfect Coating Secret
The coating you use makes a huge difference in your fried chicken results. Here are some amazing options:
Basic Flour Dredge
The simplest coating is just seasoned flour. This gives a light, crispy crust.
The Ultimate Coating Mix (My Secret Recipe!)
For truly amazing fried chicken, try this coating mix:
- 2 cups all-purpose flour
- 2 cups cornstarch
- 1 tbsp kosher salt
- 1/2 tbsp white pepper
- 1 tbsp black pepper
- 1 tbsp garlic powder
- 1 tbsp onion powder
- 1/2 tbsp cayenne pepper
- 1 tbsp baking powder
Why does this work so well? The cornstarch makes the coating crispier and gives it that beautiful golden-brown color by preventing gluten development. The baking powder creates tiny air bubbles when it reacts with the oil, helping form an extra-crispy crust!
Craggily Bits Technique
Want those extra crunchy bits that make restaurant fried chicken so amazing? Here’s how:
- Spoon a few tablespoons of your brine into the seasoning mix
- Rub them together with your hands to create small clumps
- These craggily bits will stick to the chicken and create the perfect texture!
Wet Batter Method
For an even thicker crust:
- Take 1 cup of your seasoning mix
- Combine with 1 cup cold water in a separate bowl
- Mix until smooth
- Dip chicken in wet batter first, then into dry seasoning mix
Choosing the Right Frying Oil
The oil you use significantly impacts the end result. Look for oils with high smoke points (above 375°F):
- Vegetable oil – Versatile and affordable
- Peanut oil – Known for its neutral flavor and high smoke point, many top chefs prefer this
- Canola oil – A healthy alternative with a high smoke point
- Avocado oil – Has a high smoke point and rich flavor
- Shortening or lard – Traditional options that add flavor
Avoid olive oil and butter as their smoke points are too low for proper frying.
The Frying Process: Step-by-Step
Now, let’s get to the actual frying:
-
Heat the oil – Fill a large, heavy-bottomed pot or Dutch oven with about 2-3 inches of oil. Heat to 350-375°F using a deep fry or candy thermometer for accuracy.
-
Fry in batches – Avoid overcrowding the pan, which drops oil temperature. Fry chicken in manageable batches.
-
Maintain temperature – Keep oil between 325-350°F during frying. If it drops below 325°F, remove some chicken and let the oil heat back up.
-
Fry until golden – Fry for about 5-8 minutes per side, flipping halfway through, until golden brown and cooked through.
-
Check doneness – Use a meat thermometer to ensure chicken reaches an internal temperature of 165°F.
-
Drain properly – Let fried chicken drain on paper towels or a wire rack set over a baking sheet.
Time Guide for Different Cuts
Different chicken cuts require different cooking times:
- Bone-in breasts, thighs, drumsticks: 12-15 minutes total
- Boneless chicken breasts or tenders: 8-10 minutes total
- Wings: 8-10 minutes total
Pro Tips for Fried Chicken Success
-
Don’t overcrowd the pan – This drops the oil temperature and leads to soggy chicken.
-
Use a heavy-bottomed pot like a Dutch oven that retains heat well.
-
Use an infrared thermometer to easily check oil temperature during heating and frying.
-
Double-fry for extra crunch – Fry chicken halfway at 300°F for 4-5 minutes, let rest for 5-10 minutes, then fry again at 375°F until crispy and fully cooked.
-
Let it rest – Allow fried chicken to rest for a few minutes before serving. This helps redistribute juices for more tender, flavorful chicken.
-
Keep warm properly – Keep batches warm in a 225°F oven on a wire rack set over a baking sheet.
Troubleshooting Fried Chicken Problems
Chicken burning on outside but raw inside?
- Your oil is too hot. Lower the temperature to 325-350°F.
- Use a meat thermometer to check for doneness (165°F internal temp).
Coating falling off during frying?
- Make sure chicken is patted completely dry before coating.
- Let coated chicken rest for a few minutes before frying to help coating adhere.
Chicken not crispy enough?
- Oil may not be hot enough. Maintain 325-350°F.
- Try adding more cornstarch to your flour mixture.
- Consider the double-fry method mentioned above.
Reheating Leftover Fried Chicken
Got leftovers? Here’s how to keep them crispy:
- Oven or toaster oven: Reheat at 350°F for 10-15 minutes
- Air fryer: 370°F for a few minutes, flipping halfway
- Pan fry: Use 1-2 Tbsp oil over medium-high heat
- Microwave: Use in 30-second intervals (least desirable method)
Final Thoughts
Frying raw chicken isn’t complicated once you understand the process. The keys are proper brining, thorough drying, the right coating mixture, and careful temperature control during frying.
With these techniques, you’ll be making crispy, juicy fried chicken that rivals any restaurant! Remember, practice makes perfect – so don’t be discouraged if your first attempt isn’t flawless. With each batch, you’ll learn new techniques and refine your skills.
Now go get that oil heating and start frying! Your tastebuds will thank you!
What’s your favorite fried chicken seasoning? I’d love to hear about your experiences in the comments below!
How long to fry chicken
Whether you are whipping up a comforting batch of buttermilk fried chicken with slaw or Asian inspired chicken dippers flavours with Chinese 5 Spice seasoning, chicken is one of the greatest ingredients to deep fry to crispy perfection.
With classic fried chicken, you will need to ensure the skin develops a deep golden brown crust. If you are using a cooking thermometer, insert it into the thickest part of the chicken. It should register 165°. This usually equates to around 10 minutes for wings and 12 minutes for breasts, thighs and legs.
For the best tasting fried chicken with a beautifully even golden crumb, turn your chicken pieces with tongs (being careful not to splash yourself with hot oil) every 1 – 2 minutes. Be sure to maintain a consistent temperature to ensure the meat is cooked throughout.
How to fry food
There are several different ways to fry food, and each of the methods depends on the type of result you want to achieve.
- Sautéing refers to frying food quickly in a relatively small amount of oil or fat, and is commonly used to cook thinner cuts of meat and tender vegetables such as green beans, mushrooms and asparagus.
- Shallow frying refers to cooking food partly submerged in hot oil – usually in a frying pan – being careful not to overfill the pan. This method is commonly used to lightly brown specific ingredients such as eggs, scallops, fish fillets and sausages and pan fried pork steaks.
- Deep frying refers to cooking food totally submerged in hot oil or fat, usually in a deep saucepan or a deep fat fryer. Common foods that are deep fried include Southern fried chicken,
Most of the time, fried food will develop a crunchy or crispy outer texture. This is because when food is added to hot oil, its surface dehydrates and forms a crust that inhibits further oil absorption. Heat is conducted to the inside of the food, where any proteins in meat or starches are broken down to a soft and tender texture, which is why frying produces the same result across food groups, giving a distinct mouthfeel to foods such as French fries, fried chicken and fried halloumi.
Deep Fry Wings At Home With Confidence
FAQ
Can you fry raw chicken?
Yes, you fry raw chicken to make dishes like fried chicken, but you must ensure it is cooked to a safe internal temperature of 165°F (74°C) to kill bacteria. Achieve this by controlling the oil temperature, not overcrowding the pan, and using a meat thermometer to check for doneness.
How long should you pan fry raw chicken for?
Chicken breasts take approximately 9-14 minutes to pan-fry: 5-7 minutes on the first side and then 4-7 minutes on the opposite side. This depends on the thickness of your chicken breasts, with thinner chicken taking around 10 minutes to cook and thicker chicken taking up to 14.
How long does raw chicken take in the fryer?
Roll each oiled chicken breast in the seasoning and put in your air fryer basket. Cook at 180C for 18-20 mins, turning after 10 mins. To check it is cooked, pierce the chicken with a knife at the thickest part to see if the juices run clear. Or insert a temperature thermometer and it should read 70C.
When frying chicken, do you dip in egg or flour first?
When frying chicken, you should dip it in flour first, then egg, then a final coating of flour or breadcrumbs. This traditional “F.E.B.” (Flour-Egg-Breadcrumbs) method ensures the breading adheres to the chicken, as the initial flour layer creates a dry surface for the wet egg to stick to. After the egg wash, the breadcrumbs or final flour layer will cling evenly, resulting in a crispy coating without falling off during frying.