As a dog owner who’s always looking for healthier treat options, I’ve discovered that freeze-dried chicken treats are absolutely fantastic for our furry friends. My pups go crazy for the crunchy texture and intense flavor, plus I love knowing exactly what’s in their snacks. While commercial freeze-dried treats can be expensive, making them at home is surprisingly doable and much more affordable!
In this guide, I’ll walk you through everything you need to know about creating delicious freeze-dried chicken treats that your dogs will absolutely love.
What Is Freeze Drying and Why It’s Great for Dog Treats
Freeze drying (also called lyophilization) is a special dehydration process that works by
- Freezing the food first
- Reducing pressure
- Adding heat to make frozen water sublimate directly from solid to gas
This process creates a dry, porous structure that maintains most of the original
- Shape
- Nutrients
- Color
- Taste
- Texture
Compared to traditional drying or baking methods, freeze drying better preserves heat-sensitive nutrients like vitamins, minerals, and antioxidants. The resulting treats have an irresistible light crunchy texture that most dogs absolutely adore.
Benefits of Homemade Freeze-Dried Chicken Treats
There are several compelling reasons to make your own freeze-dried treats:
- Cost Savings: Commercial freeze-dried treats can be surprisingly expensive. DIY versions cost a fraction of the price.
- Control Over Ingredients: You decide exactly what goes into the treats, avoiding preservatives and artificial additives.
- Superior Nutrition: Homemade treats made from quality ingredients are much healthier than most commercial options with fillers.
- Customization: You can tailor flavors, shapes, and sizes to your dog’s specific preferences.
- Extended Shelf Life: Properly freeze-dried treats can be stored for months without refrigeration in an airtight container.
Two Methods for Freeze Drying Chicken at Home
Method 1: Using a Freeze-Drying Machine
If you have access to a freeze-drying machine, this is the optimal method:
Ingredients:
- Fresh chicken breasts
Equipment:
- Food freeze-drying machine
- Sharp knife
- Cutting board
- Vacuum sealing bags
Steps:
- Preparation: Wash fresh chicken breasts thoroughly and pat dry to control moisture.
- Cutting: Cut the chicken breasts into uniform pieces or cubes for even drying.
- Freeze-Drying: Place the chicken pieces in the freeze-drying machine. The machine will create a low-temperature, low-pressure environment where water slowly sublimates.
- Storage: Once fully dried, place the chicken in vacuum-sealed packaging to maintain freshness.
The freeze-drying machine method produces the highest quality results because it’s specifically designed for this process. The treats retain maximum nutrition and have the perfect crunchy texture.
Method 2: DIY Freezer Method
Don’t have a freeze-dryer? No problem! You can approximate the process using your home freezer:
Ingredients:
- Chicken breasts
- Optional: light cooking oil or nonstick spray
Equipment:
- Baking sheet
- Parchment paper or silicone mat
- Sharp knife
- Cutting board
- Airtight container
Steps:
- Prepare the chicken: Rinse chicken breasts and pat dry. Trim off any excess fat.
- Cook the chicken: Lightly coat with oil (optional) and bake at 400°F for 10-15 minutes until fully cooked. Let cool completely.
- Slice thinly: Cut cooked chicken into thin, uniform strips or small cubes (no more than 1/4″ thick) for even drying.
- Arrange on baking sheet: Line a sheet with parchment paper and arrange chicken pieces in a single layer without touching.
- Initial freezing: Place the baking sheet in your freezer overnight until pieces are completely frozen.
- Extended freeze-drying: Transfer frozen chicken to an airtight container and return to freezer for 1-2 weeks. Your freezer’s dry air will gradually dehydrate the chicken.
- Check for dryness: After 1-2 weeks, test a piece – it should be hardened and dried throughout. If not, continue freezing for another week.
- Storage: Once fully dried, store in an airtight container in a cool, dry place.
While this DIY method doesn’t create “true” freeze-dried treats, it produces similar results that dogs still love!
Troubleshooting Your Homemade Freeze-Dried Treats
Sometimes things don’t go perfectly on your first try. Here are solutions to common issues:
Chicken pieces aren’t fully dehydrated:
- Slice chicken thinner (under 1/4″ thick)
- Allow more time in the freezer (2-3 weeks)
- Check periodically until hardened throughout
Treats are too hard/crunchy:
- Try slightly thicker chicken slices next time
- Don’t dehydrate quite as long
Freezer burn appears:
- Use truly airtight containers rather than bags
- Check periodically and discard any pieces with obvious freezer burn
Bad smells develop:
- Discard any pieces that smell off or look discolored
- Ensure chicken is fully cooked before freezing
- Use proper storage containers
Mold appears during storage:
- Only store fully dehydrated pieces
- Use moisture-proof containers
- Continue drying longer if you notice any mold
Treats seem bland:
- Add dog-safe seasonings like dried broth powder or a tiny bit of garlic powder
- Try more flavorful meats like turkey or beef liver
Creative Recipe Ideas for Freeze-Dried Dog Treats
Once you’ve mastered basic chicken treats, get creative with these variations:
Sweet Potato Chicken Chews
- 1 sweet potato
- 1 cup cooked chicken pieces
- Slice sweet potato 1/4″ thick, simmer 5-10 minutes until slightly soft
- Mix with chicken pieces and freeze-dry together
Chicken & Banana Bites
- 1 ripe banana, mashed
- 1 cup cooked chicken, finely chopped
- Mix together, form into small discs, and freeze-dry
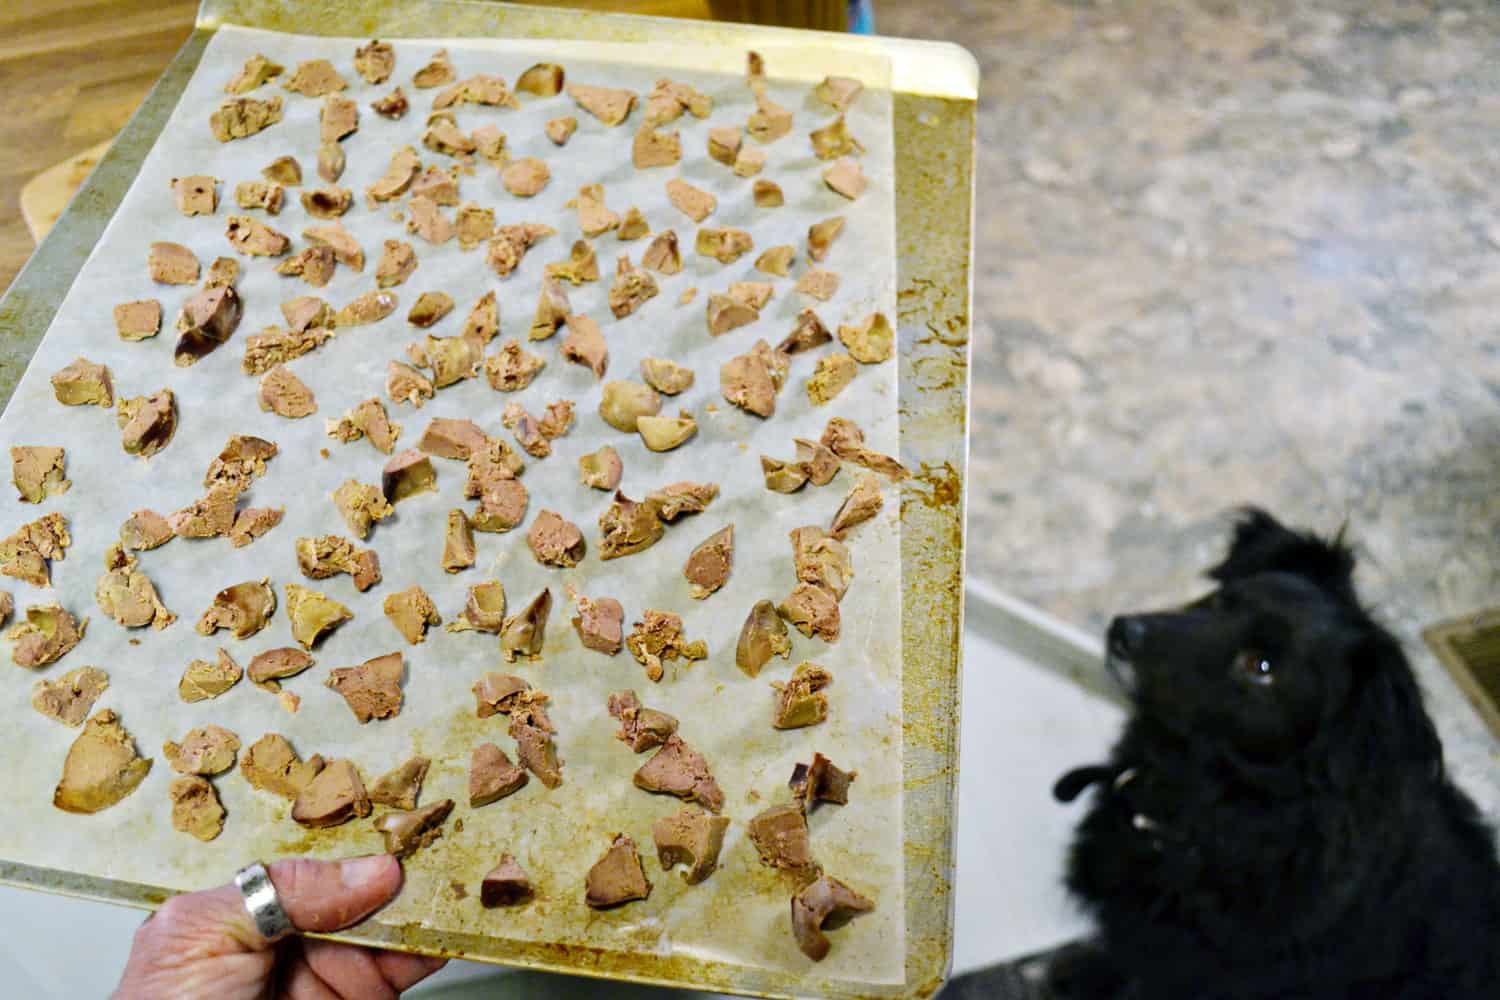
Chicken Liver Nuggets
- 1/2 lb chicken liver
- 1/2 lb chicken breast
- 1 egg
- Puree liver, mix with chopped chicken and egg
- Form into small nuggets and freeze-dry
Feeding Guidelines for Freeze-Dried Chicken Treats
While freeze-dried chicken treats are healthy, they should still be given in moderation:
- Treat Portion: Follow the 10% rule – treats shouldn’t exceed 10% of your dog’s daily caloric intake
- Rehydration: For meal replacement, always rehydrate freeze-dried food with water or broth
- Dry Treats: A few dry nuggets as treats are fine, but moisture is needed for proper digestion of larger quantities
- Storage: Keep treats in an airtight container in a cool, dry place
- Shelf Life: Properly dried and stored treats last 2-3 months
FAQs About Freeze-Dried Chicken Dog Treats
Is freeze-dried raw chicken safe for dogs?
Yes, freeze-dried raw chicken is safe as treats. However, if feeding as a meal, you should rehydrate it first. While a few nuggets fed dry as treats are fine, moisture is necessary for proper digestion of larger amounts.
How do you freeze dry meat for dogs without a machine?
For a different approach without a machine, you can blend meats with water to make a paste, freeze in silicone ice cube trays overnight, then pop out the cubes and freeze-dry them in your freezer for 1-2 weeks.
Is it safe to freeze-dry raw chicken?
You can freeze-dry either raw or cooked meat. However, it’s important to understand that although freeze-drying allows you to store meat at room temperature, freeze-dried raw meat still contains the same bacteria as fresh raw meat. Many pet owners prefer to cook the chicken first for safety.
How long do homemade freeze-dried dog treats last?
Properly freeze-dried and stored in airtight containers, homemade treats typically last 2-3 months at room temperature.
Final Tips for Perfect Freeze-Dried Dog Treats
Before you start your freeze-drying adventure, keep these tips in mind:
- Start with simple, single-ingredient recipes before trying complex combinations
- Cut all ingredients evenly to ensure proper dehydration throughout
- Always inspect treats during the drying process and discard any with off colors or odors
- Allow adequate drying time – patience produces better results!
- Store treats in individual portions to avoid constantly reopening your storage container
- Break larger treats into bite-sized pieces for small dogs or puppies
Making your own freeze-dried chicken treats is a wonderful way to provide healthy, delicious snacks for your dog while saving money. The initial learning curve is well worth it when you see how excited your pup gets for these homemade goodies!
Have you tried making freeze-dried treats for your dog? I’d love to hear about your experiences in the comments below!
Why make freeze-dried dog treats at home?
We are well aware that dogs own us, not the other way around. So why not spoil your furry boss with treats that scream “you’re the best”? Store-bought freeze-dried treats are convenient but can burn a hole in your wallet. By making them at home, you:
- Control the ingredients. No mystery fillers or questionable additives. Just good stuff your pup deserves.
- Save money. Sure, there’s an upfront cost for a freeze-dryer (or dehydrator), but long-term? Your wallet will thank you.
- Customize for your dog’s needs. Have a picky eater? Allergies? You’re the chef; you call the shots.
Making treats can also be a fun bonding experience. Who doesn’t want to feel like a contestant on a dog-themed version of MasterChef?
Step-by-step guide to making freeze-dried dog treats
- Wash and prep your ingredients. Dice meats, slice veggies, and chop fruits into treat-sized pieces.
- Balance the flavors. A mix of protein and produce works best. Think chicken and sweet potato, or fish and carrot.
- Place your prepped ingredients on the trays of your freeze-dryer.
- Start the machine and let it work its magic. Freeze-drying can take up to 24 hours, so patience is key.
- Once done, store the treats in an airtight container or vacuum-sealed bag.
Freeze-dried goodies can last up to a year if stored properly in a cool, dry place. But let’s be honest—they’ll probably be gone in a week.