Are you tired of your chickens being cooped up all day with nowhere to stretch their wings? Or maybe you’re worried about predators attacking your precious flock when they free-range? Building a chicken run might be exactly what you need!
I’ve built several chicken runs over the years, and while it might seem daunting at first I promise it’s a project that even novice DIYers can tackle with the right guidance. In this comprehensive guide I’ll walk you through everything you need to know about constructing a safe, sturdy, and spacious chicken run that will keep your feathered friends happy and protected.
Why Your Chickens Need a Run
Before we dive into the nitty-gritty of construction, let’s talk about why a chicken run is so important
- Safety from predators: Foxes, raccoons, hawks, and even neighborhood dogs can pose serious threats to your chickens
- Protection from the elements: A covered run keeps your birds dry during rain and provides shade in hot weather
- Controlled environment: Prevents your chickens from destroying your garden or landscaping
- Peace of mind: You can leave for work or go on vacation knowing your flock is secure
One chicken keeper I know used to let her flock free-range while she was away. Unfortunately, the predators in her area quickly realized when she wasn’t home and took advantage of the free buffet. A secure run would have prevented this heartbreaking situation.
Planning Your Chicken Run
Location and Size
First things first – you need to decide where to put your chicken run and how big it should be.
Size Requirements:
- Allow at least 10 square feet per chicken
- For 10 chickens, you’d need a minimum of 100 square feet (10′ x 10′)
- Always go bigger than you think you need – chicken math is real, and your flock will probably grow!
Location Considerations:
- In warm climates: Position your run where it gets plenty of shade
- In cold climates: Build where there’s full sun exposure
- Make sure one side connects directly to your chicken coop
- Consider ease of access for cleaning and maintenance
- Ensure the ground drains well to prevent muddy conditions
Materials Needed
Here’s what you’ll need to gather before starting construction:
For the Frame:
- Fence posts (4×4s work well)
- 2×4 lumber for supports
- Wood screws and nails
- Concrete (optional for securing posts)
For the Enclosure:
- Hardware cloth (½-inch or 1-inch welded wire is best)
- Chicken wire (for the upper portions or roof)
- U-shaped staples or fencing staples
- Zip ties (always handy)
For the Roof (if covered):
- Trusses (pre-made or DIY)
- Corrugated metal roofing or clear plastic panels
- Roofing screws with rubber gaskets
For the Door:
- Pre-made screen door or lumber to build one
- Hinges
- Door latch with safety release
- Spring for self-closing mechanism
Tools:
- Post-hole digger or shovel
- Drill/driver
- Hammer
- Staple gun
- Level
- Measuring tape
- Saw
Step-by-Step Construction Guide
Step 1: Set Your Posts
- Mark the perimeter of your run with stakes and string
- Dig holes for your fence posts about 12 inches deep (or 2 feet in areas with frost)
- Space posts 6-8 feet apart around the perimeter
- Add 2 inches of gravel at the bottom of each hole for drainage
- Set posts in holes, checking that they’re level and the same height
- Fill holes with soil or concrete if you want extra stability
Pro tip: If you live in an area with frost heave, brush the bottom 30 inches of posts with oil-based exterior varnish to minimize movement during freeze/thaw cycles.
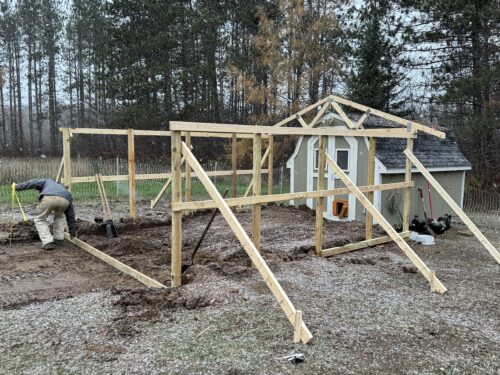
Step 2: Build the Frame
- Attach 2×4 boards horizontally across the top of the posts to create a frame
- Add cross-bracing in the corners for extra stability
- If your run is more than 10 feet wide, add support posts in the middle
- Install additional horizontal supports midway up the posts
My neighbor tried to skip the cross-bracing in the corners, and his run started to wobble after just a few months. Don’t make the same mistake – those diagonal supports make a huge difference!
Step 3: Install the Fencing
This is where predator-proofing becomes crucial:
- Dig a 4-inch trench around the perimeter of your run
- Place hardware cloth around the outside of the posts, extending it into the trench
- Staple the fencing to the posts every 6 inches
- Fill the trench back in to prevent digging predators
- For upper portions, you can use chicken wire to save on costs
- Cover the top of the run with fencing or netting to keep out aerial predators
Important: Many beginners make the mistake of using only chicken wire for their runs. While cheaper, chicken wire won’t keep out determined predators like raccoons who can tear through it. Hardware cloth is much stronger and worth the investment.
Step 4: Add a Roof (Optional but Recommended)
A covered run offers many benefits:
- Keeps the run dry instead of muddy
- Prevents snow accumulation in winter
- Protects feed from getting rained on
- Keeps eggs clean
- Creates better dust bathing areas
To add a roof:
- Install trusses across the top of your run (either pre-made or built yourself)
- Secure them with hurricane ties
- Add stringers 2 feet apart across the trusses
- Attach corrugated metal roofing with rubber gasket screws
- Finish with a ridgecap on top
Step 5: Install a Gate
- Frame an opening for your gate
- Build or purchase a door that fits the opening
- Replace any flimsy screen material with hardware cloth
- Attach the door with hinges
- Add a latch that can be operated from both sides
- Consider a spring for automatic closing
Safety tip: Make sure your latch has a safety release so you can’t accidentally get locked inside!
Bonus Features to Consider
Once you’ve built the basic structure, consider these optional additions:
Divided Areas
Creating separate sections in your run allows you to:
- Introduce new birds gradually
- Separate broody hens with chicks
- Isolate sick or injured birds
- Keep different flocks apart during breeding
Roosting Bars
Adding some horizontal perches in the run gives your chickens:
- Places to get off the cold ground in winter
- Spots to rest and socialize
- Higher vantage points to feel safe
Electricity
If you live in a cold climate, having power in your run is a game-changer:
- Allows for heated water bowls in winter
- Provides lighting during shorter winter days
- Powers small fans for summer ventilation
Common Mistakes to Avoid
I’ve made plenty of mistakes building chicken runs over the years, so learn from my errors:
- Making it too small: Chickens need space to prevent fighting and stress
- Using weak materials: Skimping on quality will cost you more in the long run
- Forgetting about drainage: A muddy run leads to unhealthy birds
- Not burying the fence: Predators will dig under if you don’t bury your fencing
- Neglecting the roof: An uncovered run becomes a mess in bad weather
Final Thoughts
Building a chicken run takes some effort, but the peace of mind and benefits for your flock are absolutely worth it. My chickens are so much happier now that they have a secure outdoor space where they can scratch, dust bathe, and enjoy fresh air without me worrying about predators.
Remember, you don’t have to build the perfect run right away. Start with the basics – a secure perimeter and predator-proofing – and you can always add improvements over time. The most important thing is creating a safe space where your chickens can enjoy being chickens!
Have you built a chicken run before? What features did you include that your chickens particularly enjoy? I’d love to hear about your experiences in the comments below!
FAQ About Building a Chicken Run
Q: Do I really need to cover the top of my run?
A: While not absolutely necessary, covering the top prevents aerial predators like hawks from attacking your chickens and keeps wild birds (which can carry diseases) from entering.
Q: Is it cheaper to buy a pre-made chicken run?
A: Pre-made runs are generally more expensive and lower quality than DIY versions. Most pre-made runs need significant modifications and are often too small for proper chicken happiness.
Q: How long does it take to build a chicken run?
A: A basic run can be completed in a weekend with help, though more elaborate designs might take several weekends.
Q: Can I use an existing structure like a dog kennel?
A: Dog kennels can be modified with smaller gauge wire and a roof to work as chicken runs, but ensure the openings are small enough to keep predators out.
Q: What kind of flooring should I use in my run?
A: Natural ground works best, possibly covered with straw, sand, wood chips, or dried leaves. Avoid concrete, as chickens need to scratch and dust bathe.
Now that you’re armed with all this information, you’re ready to start building a fantastic chicken run that will keep your flock safe and happy for years to come!
Step-by-Step Guide to Making a Chicken Run
Ready to learn how to build a chicken run? Giving your chickens an enclosed area where they can run around outdoors while feeling safe from predators makes them feel secure and happy. Here are five steps on how to construct a chicken run—including photos and a special guide.
Extra tips and tricks
- Although keeping your chickens inside a chicken run instead of letting them roam around freely can greatly decrease the number of safety risks, you should also consider adding extra safety measures depending on the type of predators in your area. This could be a layer of hardware cloth, which can be useful against raccoons and foxes.
- Even if your area is relatively safe, keep your chickens inside the chicken coop overnight.
- Make sure to double- and triple-check your plan and measurements so you don’t accidentally end up with an oddly shaped structure due to rushing the planning phase.
- Don’t forget about enrichment! Chickens love playing, so consider adding some fun elements to your chicken run. A chicken swing or a treat ball are just some of the many ways to bring some fun into the lives of your birds.
- If you have a coop, you’re probably already well aware of the need to place roosting bars inside your chicken coop; however, you can also place some outside as well in your chicken run!
- Make sure to keep chicken feed out of your chicken run; although some feeders that conceal the feed might be safe, keeping the feed inside your coop can help prevent unwanted rodents gain interest in your flock’s roaming space.