Are you lookin’ to build a cozy home for your feathered friends? An A-frame chicken coop might be just what you need! I’ve spent years researching and building different chicken housing options, and I can tell you that A-frame designs are some of the most practical and beginner-friendly options out there.
In this article, I’ll share 17 awesome A-frame chicken coop blueprints that you can use to create the perfect home for your chickens. Whether you’re a seasoned builder or a complete newbie, there’s something here for everyone!
Why Choose an A-Frame Chicken Coop?
Before diving into the blueprints let’s talk about why A-frame coops are so popular
- Easy to Build: The simple triangular design requires minimal carpentry skills
- Cost-Effective: Can be built using recycled or inexpensive materials
- Portable: Many designs include wheels for easy movement
- Space-Efficient: Perfect for small backyards or limited space
- Predator Protection: Proper designs keep your chickens safe
- Weather Resistant: The sloped sides naturally shed rain and snow
Top A-Frame Chicken Coop Blueprints
1. The Classic Wheeled Chicken Tractor
This popular design features wheels on one end so you can easily move it around your yard. The A-frame structure stands about 7 feet tall and 7 feet wide, making it spacious enough for 6-8 chickens.
Key Features:
- Built-in nesting boxes with exterior access
- Roosting bars inside the upper portion
- Secure nighttime enclosure
- Wire mesh run underneath
- Estimated cost: $550-650
- Build time: 20 hours
Moving this coop regularly allows your chickens to enjoy fresh grass and insects while naturally fertilizing your lawn!
2. Green Willow Homestead’s A-Frame Tractor
This professionally designed blueprint is one of the most detailed and well-thought-out plans available. It’s designed for maximum protection against predators while still providing all the benefits of free-range chickens.
Key Features:
- White corrugated steel roof reflects sun to keep hens cool
- Special pulley system for ramp operation
- Exterior access to nesting boxes
- Solid-rubber tires for easy movement
- Three size options (Mini, Medium, Mega)
- Detailed 45-page PDF with step-by-step instructions
As a 5’4″ person, I can tell you that this design is truly easy to move and turn by yourself! The creators have tested it in areas with major predator pressure (eagles, coyotes, etc.) and haven’t lost a single hen in 7 years.
3. Recycled Swing Set Conversion
Got an old swing set the kids have outgrown? Don’t throw it away! This blueprint shows you how to transform it into a spacious A-frame chicken coop.
Key Features:
- Uses existing frame structure
- Lofted nesting area
- Multiple access hatches
- Room for up to 15 chickens
- Great way to upcycle
The sturdy metal frame provides excellent support, and the height allows for comfortable human access when cleaning or collecting eggs.
4. Compact Budget-Friendly A-Frame
This small A-frame design costs under $200 to build and can house 2-4 chickens comfortably. It’s perfect for beginners or those with limited space.
Key Features:
- Simple design requires basic tools
- Nesting boxes in the ends
- Easy access doors on both sides
- Lightweight for easy repositioning
- Can be built in a weekend
5. The Chicken Sled
This larger enclosed A-frame chicken coop is designed to be sturdy enough to withstand strong winds yet still light enough to move. Two people can pull it with heavy-duty straps, or it can be towed by a vehicle.
Key Features:
- Hardware cloth flooring for security and easy cleaning
- Spacious interior
- Window shutters for ventilation
- Can be elevated for added predator protection
- Ideal for areas with significant predator concerns
6. Weather-Proof Tractor
This design focuses on keeping your chickens dry and comfortable in all weather conditions. The modified roof doesn’t open up, preventing water from seeping into the house during rain.
Key Features:
- Weatherproof roof design
- Wheels for mobility
- Secure hatch on nesting loft
- Partial loft with full roofing
- Good protection from elements
7. External Nesting Box Design
This clever design expands the usable area by creating external nesting boxes. The loft is completely enclosed for predator protection but has multiple access points for humans.
Key Features:
- Separate external nesting boxes
- Multiple access points
- Walk-in entrance for feeding
- Fully enclosed secure sleeping area
- Wheels for easy transport
8. Automated Door A-Frame
This design incorporates an automated door system that opens and closes on a timer. Perfect for those early mornings when you don’t want to get up at dawn!
Key Features:
- Electronic door opener
- Timer-controlled access
- Enclosed chicken run
- No need to close up manually at night
- Works well with Chicken Guard Extreme openers
9. Simple Loft Design
This relatively simple A-frame has three frames paneled with plywood boards for the enclosed upper portion. One standout feature is the nesting box designed as a pull-out drawer.
Key Features:
- Pull-out drawer nesting box for easy egg collection
- Secure hatch for nighttime safety
- Side panel that props open for cleaning
- Basic but highly functional design
10. Pasteur Shelter for Larger Flocks
If you have more chickens, this wider A-frame design provides plenty of space. It has a full roof and an open layout for free running indoors.
Key Features:
- Wider than standard A-frames
- Elevated section for nesting
- Roosting bars across the frame
- Large entrance for human access
- Perfect for Plymouth Rock, Ameraucana, or Ancona breeds
11. Rustic Recycled Materials Coop
For a more rustic approach, this blueprint shows how to use reclaimed lumber and old wood for cladding. It’s environmentally friendly and budget-conscious.
Key Features:
- Uses recycled building materials
- Small doors on both ends
- Rustic aesthetic
- Nearly zero-cost if using reclaimed materials
- Chicken wire enclosure
12. Minimalist Nesting Design
This minimalist-looking chicken coop has neat features and a great color contrast. It’s highly functional with wheels at the back for easy movement.
Key Features:
- Spacious run area
- Cozy loft with designated nesting boxes
- Multiple access points
- Easy to clean, collect eggs, and feed
- Attractive modern design
13. Easy-to-Clean Carry Design
This layout combines both cleaning ease and portability with handles on each end and side panels that open.
Key Features:
- Both side panels open for cleaning and egg collection
- Handles for easy transport
- Lower hatch for free-ranging
- Good ventilation design
- Practical and functional
14. Single Side Door Design
For areas with fewer predator concerns, this more open layout provides excellent ventilation. The nesting area is accessible via a removable panel.
Key Features:
- Partial loft design
- Removable floor panel for easy cleaning
- Open chicken wire enclosure
- Optional door for nesting area
- Maximum airflow
15. Winter-Ready A-Frame
This design can be modified for cold climates with some simple additions like mylar reflective insulation and clear polycarbonate sheets.
Key Features:
- Can be winterized for temperatures below 20°F
- Options for adding insulation
- Can accommodate a chicken heating mat
- Adaptable for seasonal changes
- Keeps hens comfortable year-round
16. Basic Open Tractor
For the ultimate in simplicity, this basic open design uses minimal materials and is extremely lightweight for easy transport.
Key Features:
- Minimalist handles on each end
- Shaded area with corrugated metal
- Single access point
- Ultra-lightweight design
- Quick and easy to build
17. A-Frame with Outdoor Attached Run
This design combines the A-frame structure with an attached outdoor run, giving your chickens more protected space to roam.
Key Features:
- A-frame sleeping area
- Attached wire run
- Chicken wire covering the ground for predator protection
- Safe outdoor space during the day
- Best of both worlds design
Pros and Cons of A-Frame Chicken Coops
Pros:
- Easy and quick to build
- Cheap to construct
- Simple to move (especially with wheels)
- Easy to clean by relocating daily
- Good use of vertical space
- Natural water shedding from sloped sides
Cons:
- Limited roosting bar placement in smaller designs
- Nesting box space can be challenging
- Ventilation needs careful planning
- May not be as predator-proof as fixed coops
- Risk of injuring chickens when moving
Building Tips for Your A-Frame Coop
- Read plans thoroughly before starting construction
- Use treated wood that is resistant to rotting and cracking
- Consider local weather when choosing materials
- Add predator protection under the coop if needed
- Include proper ventilation but avoid drafts
- Make sure access doors are secure against nighttime predators
- Check clearance when moving to avoid injuring chickens
FAQs About A-Frame Chicken Coops
How many chickens can an A-frame coop house?
Depending on the size, anywhere from 2-20 chickens. The mini designs typically fit 4-6 hens, while larger ones can accommodate 15-20.
Do I need building permits for an A-frame chicken coop?
Generally no – one advantage of mobile structures like A-frame chicken tractors is they don’t typically require permits, making them great for areas with strict building codes.
What tools do I need to build an A-frame chicken coop?
Basic tools include: circular saw, miter saw, jigsaw, drill, stapler, tin snips, pliers, screwdrivers, sockets, wrenches, paintbrush, square, tape measure, and pencil.
How do I protect my chickens from predators in an A-frame coop?
Use hardware cloth instead of chicken wire for better protection, ensure all openings can be securely closed at night, and move the coop regularly to confuse predators.
Can A-frame coops be used in winter?
Yes, but you’ll need to winterize them in very cold climates. Options include adding insulation, enclosing open areas with polycarbonate sheets, adding deep bedding, and possibly using safe heating options.
Conclusion
A-frame chicken coops are fantastic options for backyard flocks, combining ease of construction with practicality. I’ve built several over the years, and they’ve always served my chickens well!
The blueprints I’ve shared range from super simple weekend projects to more elaborate designs. Choose the one that best fits your skills, budget, and the needs of your flock.
Remember, the best coop is one that keeps your chickens safe, comfortable, and happy while making egg collection and maintenance easy for you. Happy building!
Have you built an A-frame chicken coop? Share your experiences in the comments below!

To Build the Base of the A-Frame Chicken Coop
Cut a 45 degree corner off of each end of the 10 foot 2x8s. These are your skids.
Attach the pressure treated 64″ 2x8s to the skid, creating a large box. Place one at one end, close to the cut angle.
Place the other at 7’8″ – this (front) end will have more “skid” overhang. This is necessary.
Attach the pressure treated 64″ 1×8 at an angle on the forward end. This is a “skid plate” that will lay vegetation over as you slide the coop. Simply align it with the edge of the skid.
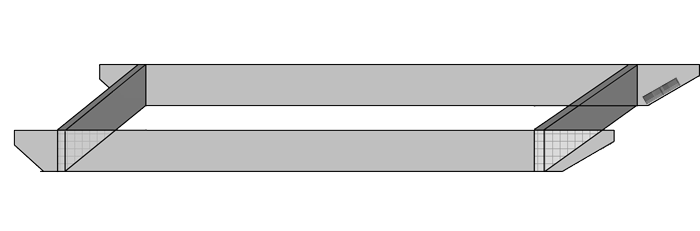

Attach the U-bolts above the “skid plate” with the U on the inside. You will need to drill the holes for these.

Next we’re going to frame the supports for the floor.
Attach the 64″ 2x4s, evenly spaced between the ends of the frame (Noted as blue in the diagram below.) They will be lined up with the top edge of the frame, so that the bottom of the board is above the ground.
Once they are attached, you will measure and cut 8 pieces of 2×4 to serve as connections between them. These will be approximately 21 3/4 inches, however I don’t pre-cut these, simply because of variations and imperfections in the wood.
I measure each space and cut a board to fit them. (Noted as green in the diagram below.) The boards should be staggered so that you can easily attach them with screws in the ends.


Now that the frame of the base is completed, you will cover the floor with the 1 inch hardware cloth. Attach the metal mesh across the width of the frame using the poultry net staples. These are “U” shaped nails.
I find them easiest to attach by holding them with my multi-tool while I hammer them in.
You want the raw (cut) edges of the hardware cloth to completely cover, or slightly wrap over the top of the frame. This will prevent your chickens from cutting their feet on sharp metal.

Overlap the mesh slightly on the joists.

The bottom portion is now completed.
Place the A-frame on top of the base and attach with screws. At this point the frame of your coop is complete, and you can finish it any way you like. Below I have diagrams showing how I completed mine.

This end of the coop is the end with the perches. I purchased a pre-made louvered vent from the hardware store and framed it in with pieces of 2×4. This vent allows airflow, but doesn’t let rain come in where the chickens are sleeping.
Then I framed a chicken door below that vent. These were done with scraps of 2×4 left from the project.
Once the frames were competed, I cut pieces of 3/4″ plywood to close the openings and finish off the ends.
I then built a door from the plywood, (about 16×18 inches) framed it with 1×3″ pieces and attached it with hinges. I made a door latch (swivel wood) and built a little ramp.
This end was finished.

TIP: When you finish out the ends of your structure, any board that is placed vertically to meet the roof/sides – must be cut at the very sharp 60 degrees off square angle.
Any board that connects horizontally to the roof/sides will be cut at the milder 30 degrees off square angle.

On the other end, I cut a horizontal 2×4 to sit flush with the end, dividing the end in half. The top portion, I covered with 1/2 inch hardware cloth, attaching it with the poultry net staples. I covered the bottom edge of the hardware cloth with a piece of 2×3 that was a scrap from another project.

The bottom half is a large door.
The door is big enough that I can climb inside the coop if necessary – you never know! This is also the end where the nesting boxes will be and how I will collect eggs. The hinges are at the bottom.
The door is 4 feet wide, and trimmed with 1x3s. Trim looks nice on these doors but it isn’t a decoration. It reinforces the doors and helps prevent the door from warping in the weather.
I attached a “leg” for support that is also hinged. It will support the door if I need to lay it open for any reason, and keep the hinges from getting stressed.
The latch is a wood swivel, just like on the other door. It is simply a piece of 2×4 that swivels on a screw. Turn it to latch or lock the door. It’s a frugal way of making a latch, basically for free from scraps.
This Chicken Coop is Self-Cleaning
This coop has a floor made of 1 inch square hardware cloth. That allows all of the chicken droppings to simply fall out to the ground.
To clean it…just move the coop! You’ll leave all the chicken manure behind.
So that means there’s no straw or wood shavings needed, and will save you money in the long run.
I have had many people asking me about how I made the “A Frame Chicken Sled.” In this article, I am sharing the basic plans for the frame, and then I explain how I finished it out.
Once you have built your frame, you can roof and finish it any way you like. You will see some things to make note of in the instructions.
Now before you get started with these plans, please read through them completely.
Generally when I am building something, I have the plans in my head and just build it. This time I was very meticulous, and took very detailed notes so that I could share the plans with all of you.
DISCLAIMER: Blueprints are not my specialty, I am not a professional carpenter, engineer, etc. I will do my best to make these as clear as possible.
- 22 – 2×4″x8′ boards (studs)
- 2 – 2×8″x10′ – pressure treated boards
- 2 – 2×8″x6′ – pressure treated boards
- 1 – 1×6″x6′ – pressure treated board
- 3 – 1×3″x8′ boards for trimming doors
- 3/4″ poultry net staples
- 3″ exterior screws, I prefer the screws that use the hex bits (not Phillips head.) Much less risk of stripping.
- 1 inch hardware cloth, 2 rolls
- 2 – 1.75-in W x 3.98-in L x 5/16-in Dia. Stainless Steel U-Bolt
- 6 – 2×4 @ 64″ (top end cut at 60 degrees off square, bottom end cut at 30 degrees off square) – these are your verticals for the wall
- 8 – 2×4 @ 92″ – these are your horizontals for the wall
- 1 – 2×4 @ 64″ (both ends cut at 30 degrees off square) – this is the base board for one end
- 1 – 2×4 @ 32″ (both ends cut at 30 degrees off square) – this is the window bottom for one end
- 4 – 2×4 @ 46.25″ (both ends cut at 30 degrees off square) – these are your perches
- FOR THE BASE
- 2 – 2×8 @10 foot pressure treated – 45 degree corner cut (see diagram below)
- 2 – 2×8 @ 64″ pressure treated
- 1 – 1×8 @ 64 ” pressure treated decking board
- 3 – 2×4 @ 64″
- 8 – 2×4 @ approximately 21 3/4 ” – do not cut these ahead of time – see the notes in the instructions
- Drills (I used both a regular drill and an impact drill)
- Hammer
- Multi-tool
- Miter Saw
- Framing Wizard
Before you get started, know that the top angle of the rafters wood is a sharp 60 degrees off of square. That means that the angle of wood itself is only 30 degrees.
Cutting that angle is going to be a pain, unless your miter saw can cut such sharp angles. What you will most likely need to do, is mark the angle with your square, then cut it with a circular saw.
All of the boards are attached with the exterior screws, and I always try to put 2 screws in at each connection point.
Once you have your rafters cut, then you can simply attach the side support boards with the screws, creating the walls.
I find that laying this out on a flat surface makes it a breeze. My carport is really my work shop.
One vertical is placed at each end, and one in the center.
The cross boards are spaced evenly, right at 21 1/3 inches.

NOTE: I made the length of this structure 92 inches because I was going to roof it with corrugated roofing panels. Those panels require an overlap.
If you are going to sheath it in plywood and cover with shingles, you can make this the full 96 inches (8 feet) long.
If you wish to do that, you will need to adjust the length of all the parts from 7’8″ {92″} to 8 feet.)

Attach the two sections together, matching the sharper angles at the top.
At one end, attach the 64 inch board at the bottom. This will be attached on the inside of the verticals.


Next, attach the 4 – 46.25″ 2x4s as perches. These are attached as you see in the diagram below, on the end that has the 64″ bottom board.

The first is placed 8 inches from the end, and the rest at 16 inch intervals. This gives the chickens plenty of room in between them, without crowding. One end is left without perches, because that is where they will jump up to roost.
Attach the 32 inch 2×4 on the same end as the perches. Unlike the bottom board, this is attached flush with the verticals. This will be the bottom of a window for ventilation. (I inserted a pre-made vent, as shown later.)
Here we moved the A-frame out of the way so we could start on the base. We temporarily attached a piece of wood at the bottom and center of one end for stability while we moved it. This is why you are seeing 90 degree angles on those boards.
The end closest to the camera is the end we will build a large door for egg/nest access later.
