Hey there! I’ve been raising brine shrimp for my aquarium fish for years now and I know firsthand how tricky it can be to separate those tiny shrimp from their eggs. Today, I’m gonna share all my tried-and-true methods to make this process way easier for you.
Why Should You Separate Brine Shrimp from Eggs?
Before we dive in, let me quickly explain why this separation stuff matters
• Unhatched eggs can cause intestinal blockages in small fish
• Better population control in your tank
• Improved water quality
• Higher survival rate for your brine shrimp
• More efficient feeding for your fish
Essential Supplies You’ll Need
• Bright light source (flashlight or desk lamp)
• Fine mesh net (around 100-150 microns)
• Container of saltwater
• Collection bowl
• Simple air pump (optional but recommended)
Method 1: The Light Trick (My Favorite!)
This is honestly the easiest method I’ve found. It uses the fact that brine shrimp are attracted to light (fancy word: positive phototaxis).
- Get your container with brine shrimp and eggs ready
- Turn off all room lights
- Shine a bright light at the bottom corner of your container
- Wait 10-15 minutes (I usually check my phone during this time )
- The shrimp will swim toward the light while eggs stay put
- Carefully siphon or net the concentrated shrimp
Pro tip I’ve found that green or blue lights work super well for attracting the shrimp!
Method 2: The Gravity Method
This one’s pretty straightforward:
- Stop aeration in your hatching container
- Wait 5 minutes
- Empty shells float to top
- Live shrimp sink to bottom
- Siphon the middle layer where the live shrimp are
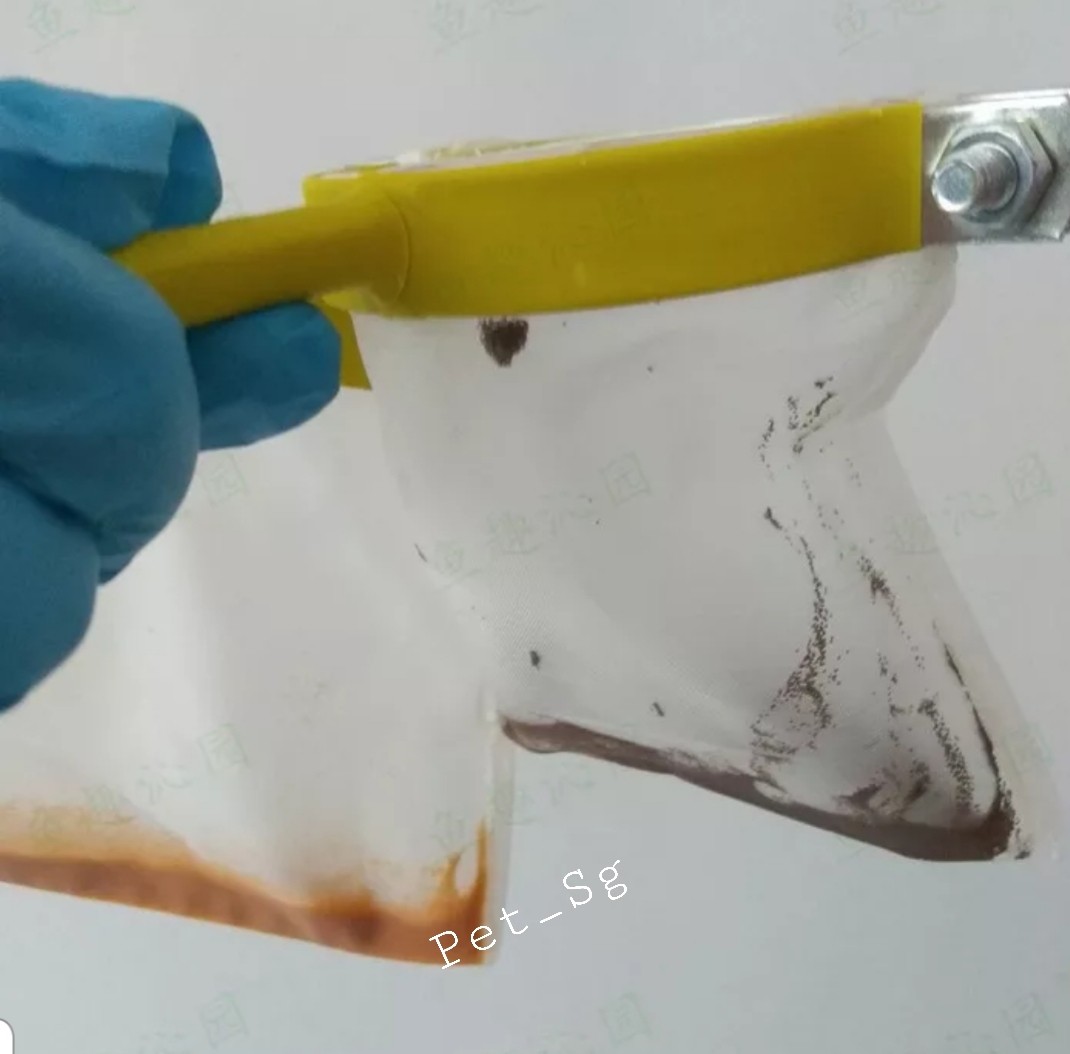
Method 3: The Filtration Technique
I use this when I’m in a hurry:
- Pour mixture through fine mesh net
- Rinse gently with clean saltwater
- Collect separated shrimp
- Return unhatched eggs to hatchery
Tips for Better Results
Here’s what I’ve learned from my mistakes:
• Keep water temperature between 80-82°F (26-28°C)
• Maintain proper salinity (around 1.018-1.020)
• Don’t rush the separation process
• Be gentle when handling the shrimp
• Clean your equipment after each use
Common Problems and Solutions
Sometimes things don’t go as planned. Here’s what to do:
Problem: Shrimp Not Moving Toward Light
Solution: Check water temperature and salinity. Maybe try a brighter light source.
Problem: Too Many Eggs Mixed with Shrimp
Solution: Repeat separation process or try combining methods.
Problem: High Mortality After Separation
Solution: Work faster and ensure proper water parameters.
Storage Tips
If you’ve separated more than you need:
• Keep separated shrimp in clean saltwater
• Store in fridge for up to 24 hours
• Provide gentle aeration
• Use ASAP for best nutritional value
Final Thoughts
Listen, separating brine shrimp from eggs isn’t rocket science, but it does take a bit of practice. I messed up plenty of times when I first started! Just remember to be patient and gentle with these little creatures.
Don’t get discouraged if your first attempt isn’t perfect – we’ve all been there! Keep at it, and you’ll be a pro in no time. If you’re having trouble, drop me a comment below, and I’ll try to help out!
Now go forth and separate those shrimp like a boss! ✨
P.S. Don’t forget to share this article if you found it helpful! Your fellow aquarium enthusiasts will thank you!
Instructions for Hatching Brine Shrimp
In the page below you will find the Webs most complete and simple-to-follow brine shrimp hatching instructions for hatching eggs in a conventional cone-shaped container (Imhoff cone or inverted bottle), or using a Hatchery Dish!
Before we begin, you need to start with viable, properly stored eggs. All brine shrimp eggs need to be stored as follows:
- in a tightly sealed container;
- free from moisture; and
- in a cool environment at or below 40°F. (Refrigeration is ideal for short term storage, i.e., less than three to four weeks. For longer term storage, eggs are best kept at or below freezing.)
We recommend that upon receiving your eggs, divide them into an amount that will be consumed within three to four weeks and store this amount in a tightly sealed container in the refrigerator; the remainder should be stored, also in a tightly sealed container, in the freezer. Keep in mind that freezing can lower metabolic activity and delay hatch-out. We suggest removing egg from the freezer one day in advance of using it to allow the embryos to acclimate.
The above storage guidelines apply to all brine shrimp eggs, whether in opened or unopened tins.
THE E-Z answer for seahorse and jellyfish exhibits, larval crustaceans, reef and coral tanks, zebrafish research and more.
Follow these guidelines for the best results when using conical hatching containers such as our 2-Liter standing cone, an Imhoff cone, or an inverted soda bottle:
- Salinity: When preparing your hatching solution, a 25 parts per thousand (ppt) salt solution is ideal under most conditions. This equates to around 1.018 specific gravity as measured with a hydrometer. If you lack a hydrometer, this salinity can be achieved by dissolving approximately 1 and 2/3 tablespoons of salt in one quart (roughly, one liter) of water. Be sure to use non iodized salt.
- pH: Proper pH can be important in hatching brine shrimp. A starting pH of 8.0 or higher is recommended. In areas where the water pH is below 7, Epson salt or magnesium sulfate can be added at the rate of 1/2 teaspoon per quart of hatching solution.
- Temperature: Optimum water temperature for a 24-hour complete hatch is 80-82°F (26-28°C). Lower temperatures will result in a longer hatching time and inefficient hatches. Do not exceed 86° (30°C). Do not place an immersion heater directly into your hatching container! An immersion bath is a preferred method to maintain constant hatching temperatures. Alternatively, an incandescent bulb placed above the hatching cone can provide sufficient heat in the right environment.
- Light: Illumination is necessary to trigger the hatching mechanism within the embryo during the first few hours of incubation. Maintaining a light source during the entire incubation period is recommended to obtain optimum hatch results and, as mentioned above, for temperature control.
- Aeration: Constant aeration is necessary to keep cysts in suspension and to provide sufficient oxygen levels for the cysts to hatch. A minimum of 3 parts per million dissolved oxygen during the incubation is recommended. Strong aeration should not damage or hurt the brine shrimp cysts or nauplii. A [rigid air tube] is ideal to direct air to the bottom of the cone and to prevent unhatched eggs from settling. We do not recommend an airstone.
- Stocking Density: 1 gram per liter or quart or approximately 1/2 level teaspoon of cysts per quart (or liter) is recommended for optimum hatching percentages. A higher stocking density will result in a lower hatch percentage and difficulty separating hatched nauplii from unhatched egg and shell.
- Hatching Cone: Flat-bottom hatching vessels should be avoided. Cone or “V” bottomed containers are best to insure that the cysts remain in suspension during hatching. Be sure to thoroughly wash the hatching cone with a light chlorine solution, rinse, and allow to air-dry between uses. Avoid soap. Soap will leave a slight residue which will foam from aeration during hatching and leave cysts stranded above the water level.
- Incubation Period: Generally, the optimum incubation time is 24 hours. Egg which has been properly stored for more than 2-3 months may require additional incubation time — up to 30-36 hours. Oftentimes, eggs will hatch in as few as 18 hours. If a smaller size nauplii (Instar I) is desired, a harvest time of 18 hours is recommended after which Instar I (first stage) nauplii can be collected before metamorphosis into Instar II.
Brine shrimp egg is sometimes very buoyant. In order to maximize the hatching percentage, it is sometimes helpful to swirl the water inside the hatching container with your finger once or twice at intervals in the first 4 to 6 hours of incubation in order to knock down eggs that have been stranded on the side of the container above the water-line. After about 6 hours, the eggs are usually well-hydrated and will stay in the water column.
The following steps will achieve optimum brine shrimp hatch rates.
- Set Up: Place hatching cone or similarly shaped vessel in well-lit area. Cone should be semi-translucent for ease of harvesting and light transmission.
- Add Water: Fill cone with water and adjust salinity to 25 ppt (parts per thousand). Optimum hatching temperature is 82°F (28°C).
- Add Cysts: Add cysts at the rate of 1 gram per liter.
- Aerate: Provide adequate aeration to keep cysts in suspension.
- Hatch: Depending upon water temperature, cysts should hatch in approximately 18-36 hours.
- Harvest: After hatching brine shrimp, turn off or remove aeration and wait several minutes for the shells and and baby brine shrimp (or nauplii) to separate. Newly hatched nauplii will settle to the bottom of the cone or move towards a light source; the shells will float to the surface. Once separated, the nauplii can be siphoned from the bottom with a length of air tubing or gently drained through the bottom of the cone through a valve, if so equipped.
- Rinse: The warm incubation temperatures and metabolites from the hatching medium create ideal conditions for a bacteria bloom. Rinsing of the baby brine shrimp in a fine mesh net or sieve using clean fresh or salt water is important before feeding them to your fish.
- Clean Equipment: Tanks and brine shrimp hatching equipment should be cleaned and disinfected routinely.
Flat-bottom hatching vessels should be avoided. Cone or “V” bottomed containers are best to insure that the cysts remain in suspension during hatching. Be sure to thoroughly wash the hatching cone with a light chlorine solution, rinse, and allow to air-dry between uses. Avoid soap. Soap will leave a slight residue which will foam from aeration during hatching and leave cysts stranded above the water level.
Generally, the optimum incubation time is 24 hours. Egg which has been properly stored for more than 2-3 months may require additional incubation time — up to 30-36 hours. Oftentimes, eggs will hatch in as few as 18 hours. If a smaller size nauplii (Instar I) is desired, a harvest time of 18 hours is recommended after which Instar I (first stage) nauplii can be collected before metamorphosis into Instar II.
Easy way to separate baby brine shrimp
FAQ
Can fish eat unhatched brine shrimp eggs?
The unhatched eggs or eggshells can impact the intestine tract of small fish. Feeding the can cause a blockage in the fish resulting in their death. growth stage of molts. As brine shrimp grow, they shed their outer shell and grow larger.
How to separate brine shrimp from eggs reddit?
So if your eggs sink, I would shine a light at the upper water layers of water in the hatchery (flashlight or focused rreading light in an otherwise dark room), wait until most of the brine shrimp are close to the surface, then get rid of the eggs by just opening the valve for a bit.
How to filter out brine shrimp?
A sieve with 80 mesh rating should let the baby brine shrimps through and filter out the unhatched eggs. Then use a 200 rating if you want to drain the water.