Hey there, fellow seafood lovers! I’ve been cooking shrimp for years, and lemme tell you – getting that perfect tender, juicy shrimp can be tricky if you don’t know the right timing. Today, I’m gonna break down everything you need to know about baking shrimp at 400°F.
Quick Answer
For perfectly cooked shrimp at 400°F:
- Medium shrimp: 6-8 minutes
- Large/jumbo shrimp: 8-10 minutes
The Perfect Timing Breakdown
Listen I’ve messed up plenty of shrimp in my day but here’s what I’ve learned – timing is EVERYTHING! Here’s my foolproof guide
Size Matters!
- Small/Medium (41-50 per pound): 6-8 minutes
- Large (31-35 per pound): 8-9 minutes
- Jumbo (16-20 per pound): 9-10 minutes
How to Tell When They’re Done
Ya know your shrimp are ready when
- Color changes from gray to pink
- Meat becomes opaque white
- They curl into a loose “C” shape
- Internal temp hits 145°F
Pro Tip Don’t wait for them to curl into a tight “O” shape – that means they’re overcooked!
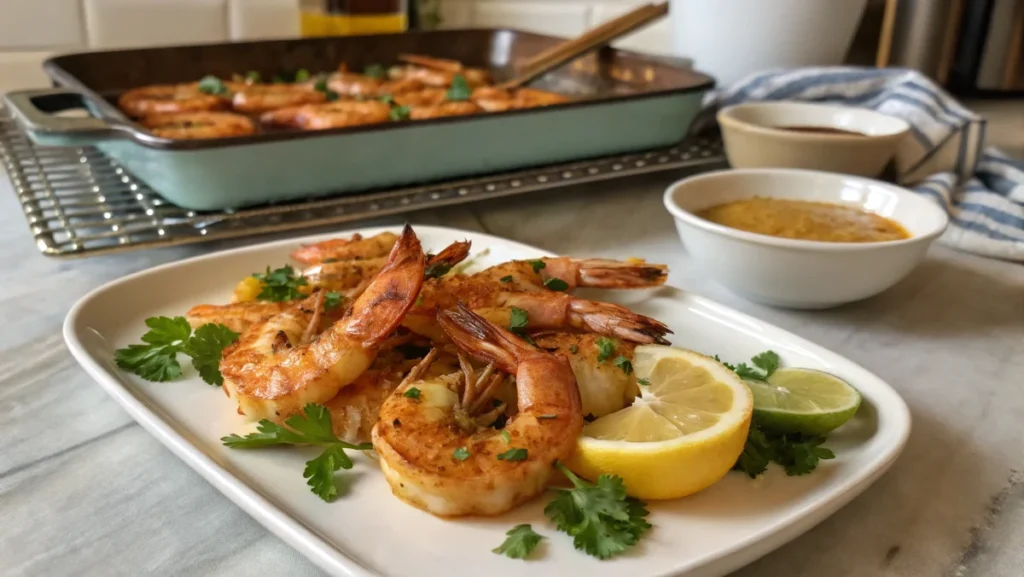
My Go-To Sheet Pan Garlic Butter Shrimp Recipe
Here’s a super easy recipe that never fails to impress:
Ingredients:
- 1½ pounds medium shrimp, peeled and deveined
- ½ cup unsalted butter, melted
- 4 cloves garlic, minced
- 1 tablespoon fresh lemon juice
- ½ teaspoon Italian seasoning
- Salt and pepper to taste
- 2 tablespoons fresh parsley
Instructions:
- Preheat oven to 400°F
- Mix melted butter, garlic, lemon juice, and seasonings
- Place shrimp on baking sheet in single layer
- Pour butter mixture over shrimp
- Bake 8-10 minutes
- Garnish with parsley
Common Mistakes (Trust Me, I’ve Made ‘Em All!)
-
Overcrowding the Pan
- Give those little guys some space!
- Use a second sheet pan if needed
-
Forgetting to Pat Dry
- Wet shrimp = steamed shrimp
- Always pat ’em dry with paper towels
-
Not Preheating
- Your oven NEEDS to be hot
- Wait for that preheat beep!
Tips for the Best Results
-
Prep Matters
- Thaw completely if frozen
- Remove shells (unless recipe says otherwise)
- Take out that vein (you know the one!)
-
Seasoning Game
- Don’t be shy with seasonings
- Salt right before cooking
- Garlic is your friend!
-
Sheet Pan Success
- Line with foil for easy cleanup
- Light oil coating prevents sticking
- Single layer is crucial
Storage Tips
Made too much? No worries!
- Fridge: 3-4 days in airtight container
- Freezer: Up to 3 months (but fresh is best!)
- Reheat: Gentle microwave or quick oven warm-up
Final Thoughts
Look, cooking shrimp ain’t rocket science, but it does need attention. The 400°F sweet spot makes it pretty foolproof – just remember to watch that time! Start with 8 minutes and adjust from there based on your shrimp size.
Would you like me to explain or break down any part of this guide in more detail? I’m always happy to help fellow shrimp enthusiasts get the perfect cook!
Things You’ll Need
- Paring knife
- Kitchen scissors
- Sink
- Colander
- Paper towels
StepsMethod
- 1 Thaw the shrimp in the refrigerator for a day. Take frozen shrimp out of your freezer a day before you need to cook it. When it is ready to be cooked, it will feel soft and bendable rather than solid and frozen.[1]
- You can also thaw frozen shrimp by placing them in a colander and rinse them with cold water for about 5 minutes.
- Frozen shrimp often comes peeled and deveined. For this variety, skip to the cooking process after thawing. Fresh shrimp may have the head, legs, and tail still on, so you will need to do a little extra work.
-
 2 Tear off the shrimp’s head by pulling and twisting it. Place your fingers near the shrimp’s head, about ⅔ of the way along its body. Position the shrimp so the tail points towards your palm. Use your other fingers to pinch the head, then twist it to the side and pull down to pop it off.[2]
- You can also cut the head off with a sharp knife. Cut right behind the point where the head attaches to the body.
- If you want to prepare the shrimp with the head, go to the back part of the shrimp.[3]
- Take mini kitchen shears and cut along the spine of the shrimp. Leave the tail part.[4]
- Then peel the shrimp without disconnecting the head. Cut off the long antennas.[5]
Advertisement
- 3 Pull the legs off of the shrimp. The legs are the tiny appendages dangling from the shrimp’s underside. They are easy to spot and remove. Simply grab onto the legs and tug them away from the body.[6]
- Removing the legs and head first makes the shell easier to remove.
- 4 Crack and peel the underside of the shell with your thumbs. Place your thumbs where the legs were. Use your other fingers to hold onto the shrimp as you pull your thumbs in opposite directions. The shell should crack down the middle, allowing you to gently peel it off like you would with an egg.[7]
- You can also use a pair of kitchen shears to cut into the shell on the shrimp’s top side. The shell is a little harder there, but after you cut it you can easily peel it off.
- 5 Use a paring knife to carefully cut out the vein. The vein is the black line running all the way down the shrimps back. It is typically very noticeable after you remove the shell. Carefully make a small incision all the way along the meat next to the vein. You can then slide the tip of your knife under the vein and lift the whole thing out.[8]
- The vein is actually the shrimps digestive tract. It sounds gross and is unpleasant to look at, but at worst it makes cooked shrimp slightly gritty. Eating it won’t harm you.
- 6 Pull the tail off of the shrimp. Pinch the shrimp’s tail. Keep a firm grip on the body with your other hand as you pull the tail away from it. It should slide off, revealing a juicy swath of tail meat.[9]
- You can also slice the tail off with a knife. Make the cut right above where the tail ends. You lose a little meat when you do this, but that’s okay.
- Another option is to leave the tail on. Many restaurants do this for presentation purposes. Just remember to remove the tail before eating the shrimp!
- 7 Rinse the shrimp off under running water. If you cleaned the shrimp carefully, all of the unpleasant parts are now gone. To make sure, run cold water in your sink. Use it to wash off any shell, leg, or vein fragments still clinging to the meat.[10]
- Another option is to fill your sink with cold water. Drop the shrimp in, then swish it around for a few minutes to knock off any debris.
- 8 Pat the shrimp dry with a paper towel. You should remove any moisture on the shrimp before cooking it. Dry shrimp will bake more evenly than wet shrimp. If you have a lot of shrimp to clean, you can throw the peeled shrimp in a colander to begin the drying process as you continue working. Advertisement
Method
FAST RECIPE How to Cook Oven Roasted Shrimp | Black Tiger Shrimp | Prawns
FAQ
How long should shrimp be in the oven?
How long to grill shrimp in foil at 400 degrees?
To bake this easy grilled shrimp recipe, do so for the same amount of time and the same temperature as you would the BBQ. So, 400 degrees for 14-18 minutes.May 29, 2020
How long do you cook raw shrimp for?

Raw shrimp typically cooks in 2-5 minutes, depending on the cooking method and shrimp size.
How long to bake shrimp at 420?
- Preheat oven to 425°F and line a baking sheet with parchment paper.
- Devein the shrimp, remove the tail and completely pat dry.
- Add shrimp to the baking sheet. Drizzle with olive oil and lightly season with salt and pepper to taste.
- Baked at 425°F for 7-9 minutes or until pink.
- Enjoy.