Hey there fellow shrimp lovers! I’ve been keeping shrimp for over 10 years now, and let me tell you – proper acclimation is super important for keeping your little guys happy and healthy. In this guide, I’ll break down exactly how long you should acclimate shrimp and share some pro tips I’ve learned along the way.
Quick Answer
For most shrimp, you’ll want to acclimate them for 1-3 hours minimum. However, the exact time depends on your acclimation method:
- Drip method: 2-4 hours (recommended)
- Float method: 1-2 hours
- Cup method: 1-1.5 hours
Why Proper Acclimation Time Matters
Listen, I know you’re excited to get your new shrimp into their tank – but rushing the acclimation process is one of the biggest mistakes I see new shrimp keepers make. These little guys are super sensitive to changes in water parameters, and sudden shifts can literally kill them
Best Acclimation Methods and Timing
1. Drip Method (Recommended)
This is my go-to method because it’s the gentlest on the shrimp. Here’s what you’ll need:
- Drip acclimation kit or airline tubing
- Container for shrimp
- Net
- About 2-4 hours of time
Steps:
- Set up drip system (1-2 drops per second)
- Let container volume double (about 1 hour)
- Increase to 2-3 drops per second
- Continue until volume is 4x original (2-3 more hours)
2. Float Method
This is quicker but riskier Only use for hardy shrimp species.
Time needed 1-2 hours
- Float bag 15-20 minutes for temperature
- Add tank water every 5-10 minutes
- Continue for about an hour
3. Cup Method
A decent compromise between speed and safety.
Time needed: 1-1.5 hours
- Add 10% tank water every 2 minutes
- Continue until bucket is 2/3 tank water
Pro Tips from My Experience
-
Don’t Rush It!
I know waiting several hours seems like overkill, but trust me – I’ve lost entire batches of expensive shrimp by trying to speed things up. -
Watch for Signs of Stress
If your shrimp start swimming frantically during acclimation:
- Slow down the drip rate
- Dim the lights
- Give them something to hold onto (like moss)
- Test Your Parameters
Before starting acclimation, check:
- Temperature
- pH
- GH/KH
- Ammonia levels
- Nitrates
Special Circumstances
Online Orders
For shrimp that have been shipped:
- Add 30-60 extra minutes to acclimation time
- Keep lights dimmed longer
- Use drip method exclusively
Different Species
Some species need longer acclimation:
- Crystal Red Shrimp: 3-4 hours
- Taiwan Bee Shrimp: 3-4 hours
- Cherry Shrimp: 2-3 hours
Common Mistakes to Avoid
We’ve all been there – here are some oopsies I’ve made so you don’t have to:
❌ Dumping shrimp directly into tank
❌ Rushing acclimation because you’re excited
❌ Not checking water parameters first
❌ Using bright lights during acclimation
❌ Forgetting to remove dead shrimp before acclimating
After Acclimation Care
Once your shrimp are in their new home:
- Don’t feed for 24 hours
- Keep lights dim for a day
- Monitor behavior closely
- Check water parameters daily for first week
When to Extend Acclimation Time
Sometimes you’ll need to acclimate longer than usual:
- Big difference in TDS levels
- Significant pH variance
- Shipping stress
- Sensitive species
- Very young shrimp
Final Thoughts
Remember, successful shrimp keeping is all about patience. I know it’s tempting to rush things, but taking the extra time during acclimation will give your shrimp the best chance at a long, happy life in your tank.
Got questions about acclimating your specific type of shrimp? Drop a comment below – I’d love to help out fellow shrimp enthusiasts!
FAQs
Q: Can I acclimate multiple species together?
A: Nope! Always acclimate different species separately.
Q: What if I need to leave during acclimation?
A: Better to wait until you have a full block of time. Interrupted acclimation can stress shrimp.
Q: Is longer acclimation always better?
A: Not necessarily. Follow recommended times – too long can also stress shrimp.
Q: Can I reuse acclimation water?
A: Never! Always use fresh tank water for each batch.
Remember, happy shrimp = happy tank! Take your time with acclimation, and your shrimp will thank you with lots of babies and active behavior.
Did this guide help you out? Share your shrimp acclimation experiences in the comments!

Step Ensure your tank is ready
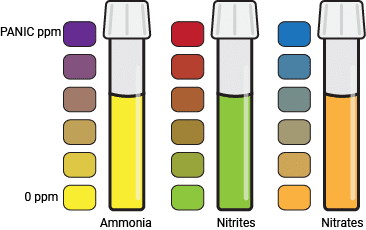
If you are putting your new shrimp into a freshly cycled tank, it is important to verify that it is actually cycled. This means ammonia and nitrites consistently at 0 ppm and nitrates below 20 ppm for at least a few days, which generally won’t happen for 3-8 weeks after initial setup. If cycling is not done properly, then ammonia levels may shoot up and kill your shrimp. No one wants that.

Plan your day
The acclimation process takes a few hours so it is important to be prepared. That means having all the equipment necessary for proper drip acclimation along with 3-4 hours to pick up and acclimate the shrimp without being rushed. This is not to say you can’t do anything else during that time, but it is recommended you check your acclimation setup every 30-60 mins to ensure water isn’t overflowing.
Depending on how you are buying your shrimp, the process may vary slightly:
Picking up shrimp in-stores: It is important to figure out how to make the trip from the store to your tank as stress-free as possible. The key is to avoid:
- Significant temperature change
- If buying them on a very cold or warm day, then the small amount of water in their bag may change temperature rapidly during your trip home. To avoid this, put the bag in a cooler, Styrofoam box, or other insulated package. Adding ice or a heating pad may seem like a good idea, but they could cause excessive temperature changes as well so it is best to avoid using them.
- Excessive movement
- Just as we do not enjoy earthquakes, your shrimp do not enjoy being sloshed around in the bag when coming home from the store. Don’t be Darla!
- To prevent excessive movement, bring a clean piece of cloth (something that doesn’t leach chemicals into the water) or moss with you to place in with the shrimp. This gives them something to hold onto and reduces their stress levels. Also, avoid having too much air in the bag. More air means more room for the water to move around. If the trip home is less than an hour, then an inch or so of space at the top is all that is required to ensure they have enough oxygen. Lastly, keep the bag somewhere that it won’t roll or shift during the journey home, whether that is in your lap (if you’re not driving) or in a container that won’t slide around.
Ordering online: This is the easiest option that requires little planning, as most online sellers already take the precautions mentioned above to avoid stressing your shrimp. All you need to do is be around for delivery so the package doesn’t sit outside and get too hot or cold, depending on where you live. This concern can be avoided if the seller uses insulated packaging for shipping, which most do.
Once your shrimp arrive safely, it is time to acclimate!