Hey there, fellow seafood lovers! I’ve spent countless hours in the kitchen perfecting my breaded shrimp technique, and I’m excited to share everything I know about prepping these delicious crustaceans ahead of time. The short answer? Yes, you absolutely can bread shrimp ahead of time! Let me walk you through the ins and outs of this time-saving technique.
Why Would You Want to Bread Shrimp Ahead?
Listen, I get it – we’re all busy! Here’s why prepping your breaded shrimp in advance is a game-changer:
- Saves precious time during dinner prep
- Perfect for party planning
- Allows flavors to develop better
- Lets you fry up fresh batches as needed
- Makes entertaining way less stressful
The Ultimate Make-Ahead Breading Timeline
Here’s what you need to know about timing:
- 24 hours max: For refrigerated breaded raw shrimp
- 2-3 months: If properly stored in the freezer
- 4 hours: Ideal window if breading at room temperature
- 2 hours minimum: For buttermilk soaking (up to overnight)
My Foolproof Breading Method
Step 1: Prep Your Shrimp
- Clean and devein shrimp thoroughly
- Leave tails on for easier handling
- Pat completely dry with paper towels
- Season lightly with salt to draw out moisture
Step 2: Set Up Your Breading Station
You’ll need:
- Station 1: Seasoned flour
- Station 2: Egg wash (eggs + buttermilk)
- Station 3: Breadcrumbs (I prefer panko for extra crunch!)
Step 3: The Breading Process
- Dredge in flour
- Dip in egg wash
- Coat with breadcrumbs
- Press coating firmly onto shrimp
- Place on parchment-lined baking sheet
Pro Tips for Perfect Make-Ahead Breaded Shrimp
I’ve learned these tricks the hard way, so you don’t have to:
- Double bread for extra crunch: Do the whole process twice!
- Use buttermilk in your egg wash – trust me, it makes a difference
- Don’t skip the drying step – moisture is your enemy
- Season each layer – not just the breadcrumbs
- Freeze individually before bagging together
Storage Tips
For Refrigeration:
- Place in single layer
- Cover with plastic wrap
- Use within 24 hours
- Keep at 40°F or below
For Freezing:
- Flash freeze on baking sheet
- Transfer to freezer bags
- Remove as much air as possible
- Label with date
- Store up to 3 months
Cooking Your Make-Ahead Breaded Shrimp
Traditional Frying Method:
- Heat oil to 350-375°F
- Fry in batches (don’t overcrowd!)
- Cook 2-3 minutes until golden
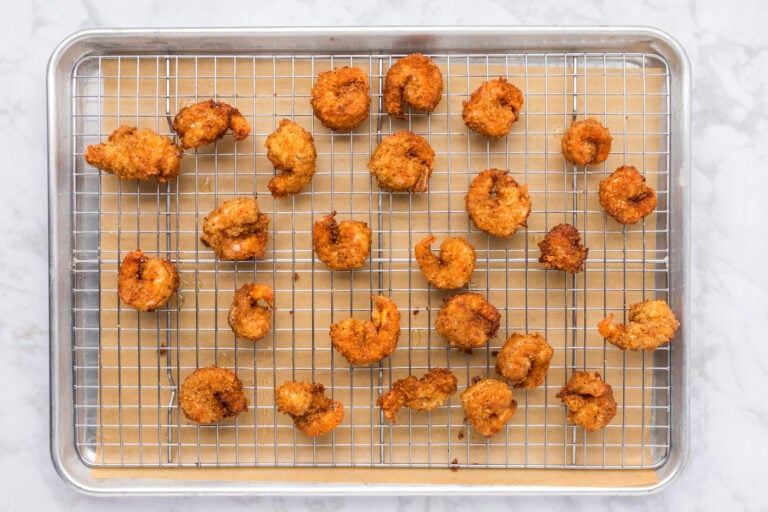
- Drain on wire rack
Air Fryer Method:
- Preheat to 400°F
- Spray with cooking oil
- Cook 5-6 minutes
- Flip halfway through
Common Problems & Solutions
| Problem | Solution |
|---|---|
| Breading falls off | Press coating firmly, chill before frying |
| Soggy results | Ensure oil is hot enough, don’t overcrowd |
| Tough shrimp | Don’t overcook – 2-3 minutes max |
| Uneven coating | Use standard breading procedure |
Best Types of Shrimp to Use
I always recommend
- 16-20 count (jumbo) shrimp
- Gulf or Pacific sourced
- Fresh-frozen over “fresh”
- Shell-off, deveined
- Tail-on for easier handling
Final Words of Wisdom
Look, I’ve made every mistake in the book when it comes to breading shrimp. The key is really in the prep work – take your time, keep things dry, and don’t rush the process. Your future self will thank you when dinner time rolls around!
Remember, while you can totally bread shrimp ahead of time, don’t push it past 24 hours in the fridge. If you need longer storage, go with the freezer method. And whatever you do, don’t thaw those frozen breaded shrimp before cooking – they go straight from freezer to fryer!
Now get out there and start breading! Your perfectly crispy, delicious shrimp await. Got questions? Drop ’em in the comments – I’m always happy to help fellow shrimp enthusiasts!
What kind of Oil is best for frying Shrimp?
When it comes to deep fried shrimp, the oil you use is crucial. Canola oil is highly recommended because of its high smoke point and neutral flavor. The high smoke point allows the oil to get hot enough to fry the shrimp to a crispy golden brown perfection without burning, while the neutral flavor doesnt interfere with the taste of the shrimp.
Furthermore, canola oil contains heart-healthy omega-3 fatty acids and is low in saturated fat, making it a healthier choice compared to other frying oils. However, other oils like peanut oil or vegetable oil can also be used if you dont have canola oil on hand.
How to Make Southern Fried Shrimp – Overview
You can find the full recipe details, including ingredient amounts and the full instructions in the recipe card at the bottom of this post, but first, heres a quick overview of how to make this homemade Southern fried shrimp recipe from scratch!
Start by preheating your oven and preparing two separate mixtures for batter and breading. Dip shrimp in the breading, batter, and then coat shrimp in the breading again before theyre placed on a baking sheet to chill in the refrigerator. This step is important to coat the shrimp so the breading doesnt fall off.
While the shrimp chill, heat your oil in a pot or deep fryer. Youll also need to set up a baking sheet with a wire rack in the oven to keep the finished crispy fried shrimp warm while frying the others.
Fry shrimp in batches, taking about 3-4 minutes per side. Using a metal strainer, remove the shrimp from the hot oil and place them in the oven to stay warm while you finish frying the remaining shrimp.
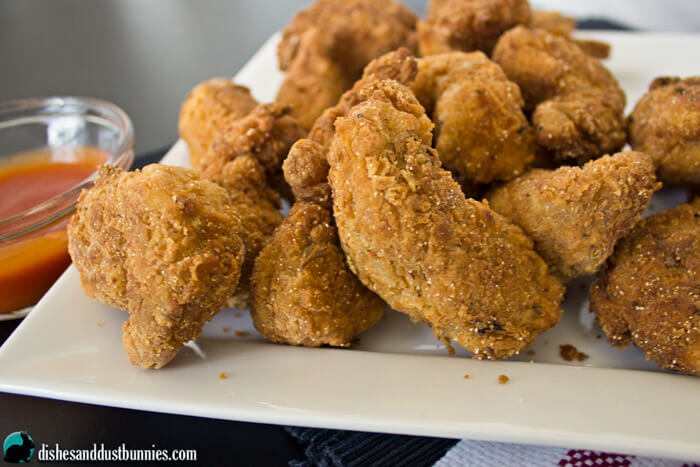
Finally, serve the crispy, golden shrimp with your favorite dipping sauce. Whether its a tangy cocktail sauce, tartar sauce or a spicy buffalo, the choice is yours. Enjoy!
For best results and a wonderfully crispy coating, its best to deep fry these shrimp in canola oil according to the instructions in the recipe card at the bottom of this post.
If youd prefer, you could prepare these using other methods such as in an air fryer or baked in the oven. Below I share with you how to do it!
Baking Instructions: If youre looking to cut back on oil but still crave that crispy texture, baking is a fantastic option. Preheat your oven to 400°F (200°C), line a tray with parchment paper, arrange the battered shrimp on a baking sheet topped with a wire rack, spray the tops with a little cooking spray, then bake until golden brown (around 15-20 minutes). Remember to flip them halfway through for an even cook! The result? Deliciously crispy shrimp without the guilt of frying.
Air Fryer Instructions: Set the temperature to 375°F (190°C) and cook the shrimp for about 10-15 minutes, flipping them halfway through. Be sure to use cooking spray or brush the shrimp with a little oil before air frying to achieve that beautiful golden color.
Best Fried Shrimp I Ever Made
FAQ
Can shrimp be breaded ahead of time?
Yes, you can. Layout your breaded shrimp on a sheet pan or flat pan and place it in the freezer. Once the breaded food has completely frozen, place it into ziplock bags until you’re ready to fry.
How long can breaded shrimp stay in the fridge?
Cooked shrimp lasts for 3 to 4 days in the refrigerator.
When reheating leftover shrimp, it’s best to use a low temperature to avoid the rubbery texture shrimp can get when overcooked.
How far in advance can you prep shrimp?
Both are great options! Frozen shrimp can go straight into your freezer and stay there for up to 18 months, making it a convenient choice. Fresh or already thawed shrimp will last for one to three days stored in your fridge.
How to get breading to stay on shrimp?
How To Get Your Breading To Stick To Your Shrimp. Patting your shrimp dry before coating them in breading is as simple as laying the crustaceans out on a flat surface and dabbing them with a paper towel on both sides. If the package they come in is extra wet, you may want to drain them first.Oct 15, 2023