Have you ever spent time preparing what should be a delicious chicken breast dinner, only to end up with meat that feels like you’re chewing on rubber? Trust me, I’ve been there too many times After ruining countless family dinners with tough chicken, I finally decided to figure out what was going wrong.
As it turns out, achieving tender, juicy chicken breasts isn’t rocket science – it just requires understanding a few key principles. In this article, I’ll share everything I’ve learned about why chicken breasts get tough and how to fix this common kitchen frustration once and for all.
The Top Reasons Your Chicken Breasts Are Tough
1. Overcooking: The Number One Culprit
If there’s one thing that ruins chicken breasts more than anything else, it’s overcooking. Chicken breast is an incredibly lean cut of meat with very little fat, which means it dries out quickly when exposed to heat for too long.
The proteins in chicken muscle fibers contract when heated, and if they contract too much, they squeeze out all the moisture that makes chicken juicy Once that moisture is gone, you’re left with dry, tough meat that nobody wants to eat
I remember trying to be “extra safe” with my chicken by cooking it well beyond the recommended temperature. Big mistake! All I did was guarantee tough chicken every single time.
2. Cooking at Too High Heat
Another common mistake I used to make was cranking up the heat to cook chicken faster. High heat causes the outside of the chicken to seize up quickly while the inside remains undercooked. This results in uneven cooking and that dreaded tough texture.
When you cook chicken at too high a temperature:
- The outer layer becomes overcooked and dry
- The proteins contract too quickly and too much
- The chicken cooks unevenly from outside to inside
3. Uneven Thickness
Have you noticed how chicken breasts have that teardrop shape – thick on one end and thin on the other? This natural shape creates a cooking challenge since the thin part will cook much faster than the thick part.
If you don’t address this uneven thickness, you’ll end up with overcooked thin parts (tough and dry) while trying to get the thicker parts properly cooked.
4. Poor Quality Chicken
Not all chicken is created equal. Some commercial chicken breasts, especially those pumped with water and other solutions, tend to shrink dramatically during cooking and often result in a tougher texture.
I’ve noticed a big difference when I switched to air-chilled or organic chicken. The texture improvement was immediately noticeable!
5. The Woody Breast Syndrome
Something I’ve encountered more frequently in recent years is what’s called “woody breast syndrome.” This is a quality issue that affects some modern chickens, especially larger birds that have been bred to grow quickly.
The condition causes chicken breast meat to be unusually hard and tough with a wooden-like texture, regardless of how you cook it. Unfortunately, you can’t always identify this before cooking, but it’s becoming more common in commercially raised chickens.
How to Fix Tough Chicken Breasts: My Tried-and-True Methods
Now for the good stuff! Here’s what actually works to ensure tender, juicy chicken breasts every time:
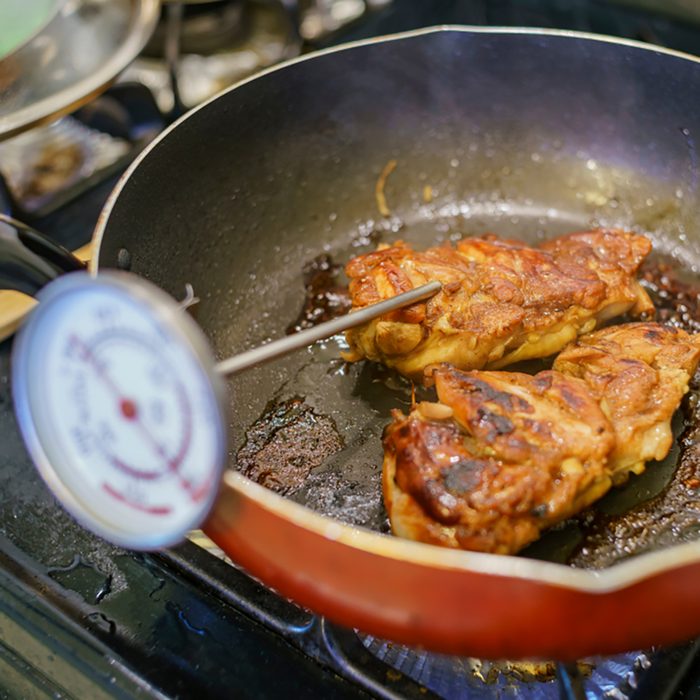
1. Use a Meat Thermometer (Seriously, Just Do It)
I resisted buying a meat thermometer for years, thinking I could judge doneness by eye. What a mistake! Since I started using one, my chicken has never been overcooked.
The USDA recommends cooking chicken breast to an internal temperature of 165°F (74°C). Once it reaches this temperature, it’s safe to eat and should still be juicy. Even a few degrees over can make a difference in tenderness.
Pro tip: I sometimes pull my chicken off the heat at 160°F and let it rest, as the carryover cooking will bring it up to the safe 165°F while preventing it from overcooking.
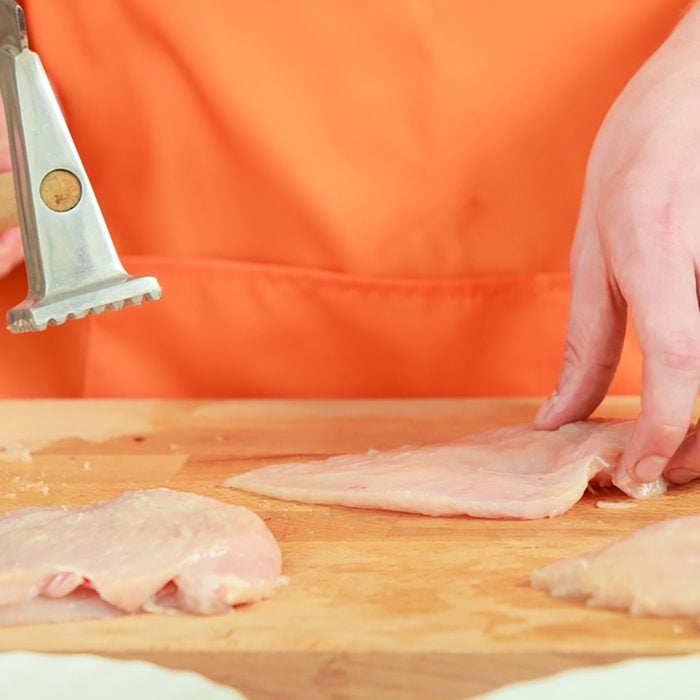
2. Pound It Out
One of the simplest and most effective techniques I use is pounding chicken breasts to an even thickness. Place the chicken between two sheets of plastic wrap and gently pound with a meat mallet (or the bottom of a heavy pan) until it’s even all the way across.
This doesn’t just ensure even cooking – it physically breaks down some of the muscle fibers, resulting in more tender chicken.
3. Brine Your Chicken
Brining has been a game-changer for my chicken cooking. A simple brine of salt, sugar, and water can transform your chicken from ordinary to extraordinary.
My Basic Brine Recipe:
- 4 cups water
- 1/4 cup kosher salt
- 2 tablespoons sugar
Dissolve the salt and sugar in the water, add your chicken breasts, and refrigerate for at least 30 minutes (though 2-4 hours is even better). The salt in the brine actually modifies the protein structure of the meat, helping it retain moisture during cooking.
4. Try Dry Brining
If you’re short on time or space, dry brining is a fantastic alternative. Simply season your chicken breasts liberally with salt and let them sit in the refrigerator for at least 1 hour or up to overnight.
The salt draws moisture out of the chicken initially, but then the chicken reabsorbs this now-seasoned liquid, resulting in juicier, more flavorful meat.
5. Marinate for Tenderness and Flavor
Marinating chicken serves two purposes: it adds flavor and can help tenderize the meat. Acidic ingredients like lemon juice, vinegar, or yogurt actually break down the tough muscle fibers.
My Go-To Tenderizing Marinade:
- 1/2 cup olive oil
- 1/4 cup lemon juice
- 3 minced garlic cloves
- 1 teaspoon salt
- 1/2 teaspoon black pepper
- 1 tablespoon herbs of your choice
Let the chicken marinate for at least 30 minutes, though longer (up to 24 hours) is even better for maximum tenderness.
6. Cook at Medium Heat
I’ve learned that patience pays off when cooking chicken. Use medium heat to allow the chicken to cook more evenly without drying out the exterior before the interior is done.
7. Try the Sear-and-Finish Method
For thicker chicken breasts, I love using this restaurant technique:
- Sear the chicken in a hot pan for about 2 minutes per side to develop a nice crust
- Transfer to a 350°F oven to finish cooking gently
- Use your thermometer to ensure it reaches 165°F
This gives you the best of both worlds – a flavorful exterior and a juicy interior.
8. Let It Rest!
This step is so important yet often overlooked. After cooking, let your chicken rest for 5-10 minutes before slicing. This allows the juices to redistribute throughout the meat instead of spilling out onto your cutting board.
I cover my chicken loosely with foil during this resting period to keep it warm without creating condensation that could make the crust soggy.
What If My Chicken Is Already Tough?
We’ve all been there – you’ve already overcooked your chicken, and now you’re faced with tough, dry meat. While you can’t completely reverse the damage, there are ways to salvage it:
- Slice it thin and add sauce – Thinly sliced tough chicken is more palatable, especially when paired with a flavorful sauce
- Shred it for other dishes – Tough chicken can be shredded and used in soups, casseroles, enchiladas, or chicken salad
- Simmer in broth – Gently simmering overcooked chicken in broth can help restore some moisture
Frequently Asked Questions About Tough Chicken Breasts
How can I tell if chicken is done without a thermometer?
While a thermometer is always best, in a pinch you can check if the juices run clear (not pink) when you pierce the thickest part. The chicken should also feel firm but not hard when pressed.
Does freezing chicken make it tough?
Freezing itself doesn’t necessarily make chicken tough, but improper thawing can. Always thaw chicken slowly in the refrigerator rather than using quick methods like hot water, which can partially cook the exterior while the interior remains frozen.
Can I use a slow cooker for tender chicken breasts?
Yes, but be careful! Chicken breasts can easily become overcooked in a slow cooker. Cook on low for 2-4 hours and check the temperature to avoid drying them out. Adding some liquid to the pot helps maintain moisture.
What’s the best way to reheat chicken without making it tough?
Low and slow is the key! Reheat chicken covered with a splash of water or broth at a low temperature, either in the oven (300°F) or in a skillet over medium-low heat. Avoid the microwave when possible, but if you must use it, use 50% power and cover the chicken.
The Bottom Line: Tender Chicken Is All About Technique
After years of serving tough chicken to my poor family, I’ve finally mastered the art of juicy, tender chicken breasts. The key takeaways I’ve learned:
- Don’t overcook (use a thermometer!)
- Create even thickness by pounding
- Brine or marinate whenever possible
- Cook at moderate temperatures
- Let the chicken rest before cutting
With these simple techniques, you’ll never have to suffer through tough, rubbery chicken again. Your meals will be more enjoyable, and you’ll feel like a kitchen hero when everyone raves about your perfectly cooked chicken!
What’s your biggest challenge when cooking chicken breasts? Have you tried any of these techniques? I’d love to hear your experiences in the comments!

Mistake #4: Not pounding the breasts out to an even thickness
If you’re cooking more than one chicken breast, you’ll benefit from making sure the breasts are all the same thickness. If they’re not, you’ll likely have a hard time getting them all to the proper internal temperature (165° F) without drying out a few.
Mistake #3: Not pounding out the meat
Pounding chicken breasts helps tenderize the meat. With your strength (and the force of a trusty meat tenderizer), you start to break down the proteins in the meat. Plus, with thinner breasts, you reduce the amount of time it takes to cook the breasts all the way through. This is helpful because we often end up overcooking it!