Hey there, fellow food preservers! If you’re looking to stock your pantry with ready-to-use protein that doesn’t need refrigeration, you’ve come to the right place As someone who’s been canning meats for years, I can tell you that home-canned chicken is a game-changer for quick meals and emergency preparedness
Today, I’m gonna walk you through exactly how to can chicken safely at home No shortcuts, just solid info that’ll help you fill your pantry shelves with jars of delicious chicken ready for soups, sandwiches, and last-minute dinners
Why Can Chicken?
Before we dive into the how-to, let’s talk about why you might want to can chicken in the first place:
- Convenience: Open a jar and dinner’s halfway done
- Emergency preparedness: No refrigeration needed
- Saves freezer space: Great if your freezer is getting full
- Ready-to-eat protein: Already cooked and tender
- Long shelf life: Typically good for 1-2 years (though safe longer)
What You’ll Need
Let’s gather our supplies before we start:
Essential Equipment
- Pressure canner (not a pressure cooker or water bath canner!)
- Mason jars (pint or quart size)
- New canning lids and rings
- Jar lifter
- Bubble remover tool
- Funnel (wide-mouth works best)
- Clean kitchen towels
- Tongs (helpful for handling meat)
Ingredients
- Chicken (boneless or bone-in)
- Canning/pickling salt (optional)
- Water or broth (for hot pack method)
Two Methods: Raw Pack vs. Hot Pack
There are two approved ways to can chicken safely: raw pack and hot pack. Both are completely safe when done correctly, but they give slightly different results.
Raw Pack Method
With raw pack, you place uncooked chicken in jars and process it. The chicken will cook during the canning process and create its own juices.
Hot Pack Method
For hot pack, you partially cook the chicken first (about 2/3 done), then pack it into jars with the cooking liquid before processing.
I’ll cover both methods but honestly the raw pack is simpler and what I use most often. The hot pack can give a slightly better quality product, especially for chicken breast which tends to be drier.
Step-by-Step Raw Pack Canning Instructions
Preparation
-
Start your canner: Fill your pressure canner with about 2-3 inches of water and begin heating it (warm but not boiling).
-
Prepare your jars: Wash jars, lids, and rings in hot, soapy water. Keep jars warm until ready to use (I place mine in the warm canner).
-
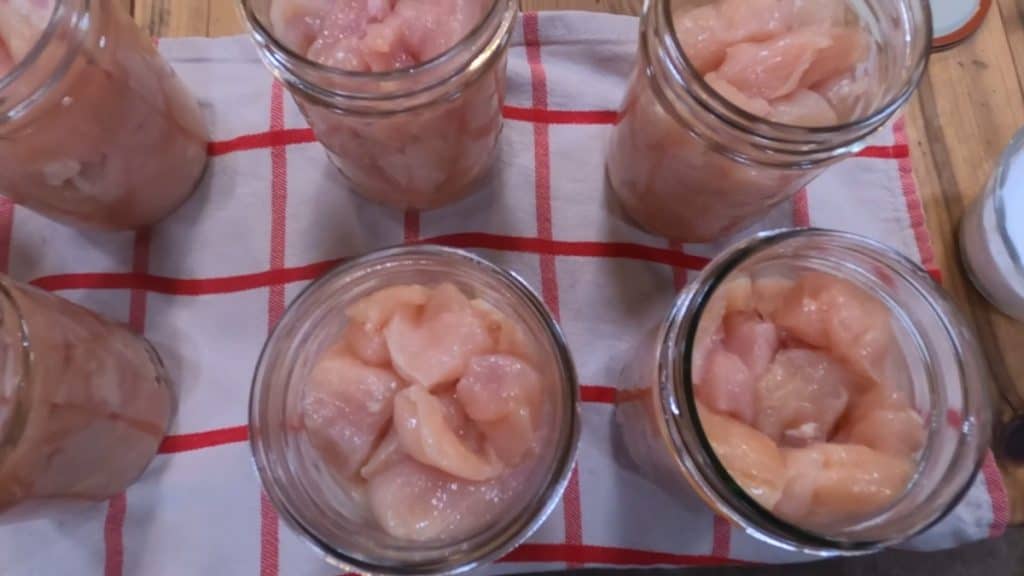
Prepare your chicken: Remove skin if desired (I recommend this as skin gets soggy when canned). Cut chicken into pieces that will fit in your jars. You can use bone-in or boneless chicken.
Packing the Jars
-
Fill jars: Pack raw chicken pieces into hot jars, leaving 1¼ inch headspace. For bone-in chicken, try to pack with meaty parts toward the outside of the jar.
-
Add salt (optional): Add ½ teaspoon salt per pint or 1 teaspoon per quart for flavor. (The salt isn’t necessary for preservation, just for taste.)
-
Remove air bubbles: Using your bubble tool, slide it between the jar and the chicken to release any trapped air pockets.
-
Check headspace: Make sure you still have 1¼ inch of headspace after removing air bubbles.
-
Wipe rims: Use a clean, damp cloth to wipe jar rims, removing any grease or food particles.
-
Add lids: Place lids on jars and screw on rings to fingertip tight (not super tight).
Processing
-
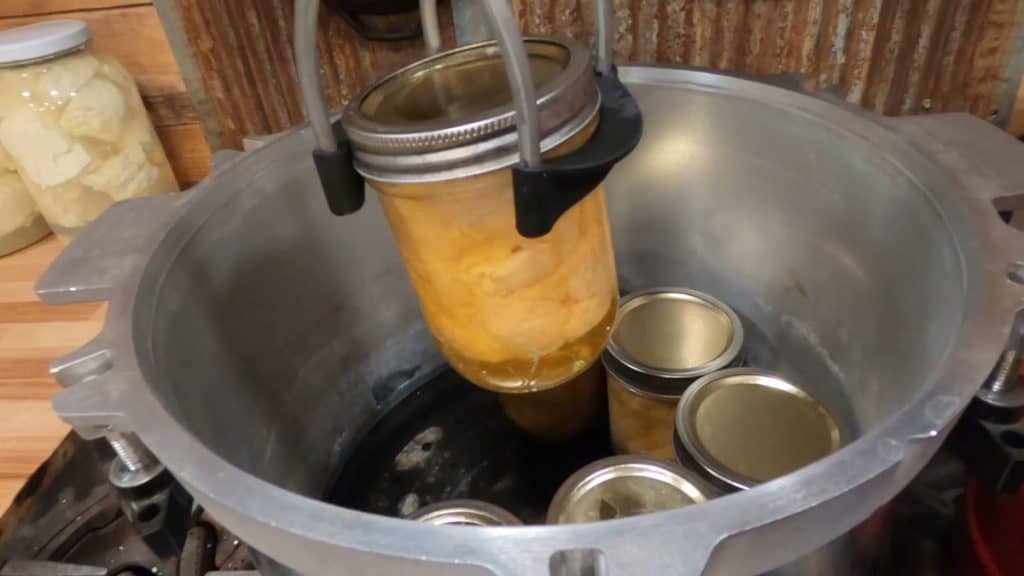
Load the canner: Place jars on the rack in your pressure canner.
-
Secure lid: Close canner lid and secure according to manufacturer’s directions.
-
Vent steam: Allow steam to vent from the canner for 10 minutes before adding weight or closing petcock.
-
Process at pressure: Process at the correct pressure for your altitude:
- Weighted gauge canner: 10 pounds pressure (sea level to 1,000 ft) or 15 pounds (above 1,000 ft)
- Dial gauge canner: 11 pounds (0-2,000 ft), 12 pounds (2,001-4,000 ft), 13 pounds (4,001-6,000 ft), 14 pounds (6,001-8,000 ft)
-
Process for the correct time:
- Bone-in chicken: Pints 65 minutes, Quarts 75 minutes
- Boneless chicken: Pints 75 minutes, Quarts 90 minutes
-
Cool naturally: Turn off heat and allow pressure to return to zero naturally. Don’t force cool!
-
Wait 5-10 minutes: After pressure drops to zero, wait 5-10 minutes, then carefully remove the weight and open the canner.
-
Remove jars: Using a jar lifter, remove jars and place on a towel in a draft-free area to cool for 12-24 hours.
Step-by-Step Hot Pack Canning Instructions
The hot pack method follows the same basic steps, with these differences:
-
Partially cook chicken: Simmer, bake, or steam chicken until about 2/3 done.
-
Pack with liquid: Place hot chicken in jars and add hot cooking broth, leaving 1¼ inch headspace.
-
Process the same: Use the same processing times and pressures as raw pack.
Tips for Better Results
Here are a few things I’ve learned through trial and error:
-
Add a little water to raw pack jars: Traditional raw pack doesn’t call for adding liquid, but I’ve found adding about ½ inch of hot water helps prevent the top pieces from drying out.
-
Pack bone-in pieces strategically: For drumsticks, try packing 4 legs with meaty sides down, then add 2-3 to the top with meaty sides up. This helps them nest together.
-
Use seasonings sparingly: You can add dried herbs, but avoid anything containing thickeners, cream, butter, or flour.
-
For white meat: Hot pack method tends to work better for chicken breast, keeping it more moist.
-
Chill fresh birds before canning: If you’re butchering your own chickens, chill them for 6-12 hours before canning to allow rigor mortis to pass.
Safety First!
Canning meat requires strict adherence to safety guidelines:
- ALWAYS use a pressure canner – water bath canning is NOT safe for chicken
- Follow processing times exactly
- Adjust for altitude if you live above 1,000 feet
- Check seals before storing
- When in doubt, throw it out
How to Use Your Canned Chicken
The best part about having canned chicken is how quickly you can make meals! Here are some of my favorite uses:
- Chicken salad sandwiches (just add mayo and seasonings)
- Quick soups (add broth, veggies, and noodles)
- Tacos or enchiladas (add taco seasoning)
- Casseroles (mix with pasta, sauce, and veggies)
- Chicken and gravy over mashed potatoes
Troubleshooting
My jars lost liquid during processing
This is usually caused by fluctuating pressure or rapid temperature changes. The chicken is still safe if the seal is intact, though the exposed pieces might dry out slightly.
My canned chicken looks clumped together
This is normal! The chicken will often form a solid mass during processing. It will easily break apart with a fork when opened.
The fat layer at the top looks weird
A layer of fat may form at the top of your jar – this is normal and acts as an additional seal. Simply remove it when you open the jar if you don’t want it.
FAQ
How long will canned chicken last?
Properly canned chicken is safe indefinitely as long as the seal remains intact, but quality is best if used within 1-2 years.
Can I add vegetables to my jars of chicken?
No, don’t add vegetables or other ingredients unless following a tested recipe specifically for chicken with vegetables.
Do I need to add salt?
No, salt is optional and only for flavor. It doesn’t affect preservation.
Can I can cooked leftover chicken?
It’s not recommended to can leftovers. Start with fresh or properly thawed frozen chicken.
Can I water bath can chicken?
NO! Chicken MUST be pressure canned. Water bath canning is not safe for meat.
Final Thoughts
Canning chicken might seem intimidating at first, but once you’ve done it a few times, you’ll wonder why you didn’t start sooner! There’s something incredibly satisfying about opening your pantry and seeing rows of home-canned meat ready for quick, nutritious meals.
P.S. Don’t forget to label your jars with the date and contents. You think you’ll remember, but trust me, six months from now, you’ll be glad you did!

Raw Pack or Hot Pack?
There are two ways to safely can chicken. You can raw pack chicken (this method) or hot pack chicken. The raw pack method is easier as you simply fill your jars with raw cubed chicken, add water and seasonings, and process.
When using the hot pack method, you first partially cook the chicken in liquid before packing it into the jars, and then processing.
Either method is fine. There is no need to pre-cook your chicken as it will cook fully inside the pressure canner.
Why I Love This Recipe
If you’ve been with us for a while you know I love having easy, ready-to-eat meals on my shelf, ready to grab and go for those busy weeknights when I just don’t have enough energy (or time) to cook a full meal from scratch.
If you’re in this same camp, be sure to read to the bottom of this post for a fun announcement (and opportunity) about getting home-canned meals on YOUR shelf in an upcoming challenge![mv_video jsonLd=”true” key=”zslratgk3qrwg8juqcuh” ratio=”16:9″ thumbnail=”https://mediavine-res.cloudinary.com/v1694983412/yommaljh4hwf9i8elbii.jpg” title=”Canning Chicken (Super Easy Raw Pack)”]
When it’s butchering time on the homestead, our freezer space is in high demand. In late summer/early fall we’re wrapping up the garden harvest, butchering chickens, and gearing up for the pigs and beef cattle to come in as well.
Needless to say, freezer space is in high demand! After butchering and freezing 153 chickens, the chicken freezer was full and the beef and pork freezer was housing chickens! This isn’t good when the pigs and cattle are scheduled to be butchered soon!
You don’t have to raise 150 chickens in order to can it, though. If you find a great deal on chicken from the grocery store (ideally, we recommend you stick to organic and free-range, when possible), you can bring it home and can it for your pantry shelves.
Below you’ll find all my best tips on safely pressure canning raw chicken. If you follow these steps carefully, you can be confident knowing your pantry shelves are lined with ready-to-eat meals for busy weeknights or meals you can pop open the jar and eat in case of an emergency or power outage. (Here are more of our tips for being prepared for emergencies, too!)