Have you ever tried to grill chicken on your electric grill only to end up with dry, flavorless meat? Trust me, I’ve been there too! After lots of trial and error (and some pretty sad chicken dinners), I’ve finally mastered the art of grilling chicken on an electric grill. Today, I’m gonna share all my tips and tricks so you can impress your family and friends with perfectly grilled chicken every time.
Electric grills are awesome for those of us who can’t use traditional charcoal or gas grills due to space limitations or apartment restrictions The good news is, with the right techniques, you can achieve juicy, delicious chicken that rivals any outdoor grill. Let’s dive in!
Understanding Your Electric Grill
Before we start slapping chicken on the grill, it’s important to understand how your electric grill works.
Types of Electric Grills
There are several types of electric grills available:
- Contact Grills: These have plates that press down on both sides of the chicken, cooking it quickly and evenly. Perfect for those grill marks we all love!
- Open Grills: Similar to traditional grills without the lid, offering plenty of cooking space.
- Griddle-Style Grills: Versatile options that allow you to cook chicken and other foods simultaneously.
- Tabletop Grills: Portable and ideal for small spaces or cooking smaller portions.
- Smokeless Grills: Designed to reduce smoke while still providing that delicious grilled flavor.
Benefits of Using an Electric Grill
Electric grills offer several advantages:
- Ease of Use: Just plug it in, set the temperature, and you’re ready to go!
- Consistent Heat: Provides even heating throughout the cooking process.
- Indoor Cooking: Perfect for apartments or when weather doesn’t permit outdoor grilling.
- Healthier Cooking: Excess fat drips away from the chicken for a leaner meal.
- Less Smoke: Produces less smoke than traditional grills, making it more comfortable to use indoors.
- Easy Clean-up: Most electric grills have non-stick surfaces or removable plates for simple cleaning.
Selecting the Right Chicken Cuts
The first step to amazing grilled chicken is choosing the right cut. Different cuts require different cooking methods and times.
Popular Chicken Cuts for Electric Grilling
- Chicken Breasts: Quick-cooking and versatile, but can dry out if not prepared properly.
- Chicken Thighs: Dark meat thighs are more forgiving and stay juicy on the grill.
- Drumsticks: Fun to eat and hard to overcook, making them perfect for beginners.
- Whole Chicken: You can spatchcock (butterfly) a whole chicken for even cooking.
I personally prefer boneless, skinless chicken breasts for their versatility, but if your new to grilling chicken, you might wanna start with thighs since they’re more forgiving.
Preparing Your Chicken for the Grill
Proper preparation is key to flavorful, juicy grilled chicken.
Evening Out Thickness
Chicken breasts often have uneven thickness, which can lead to inconsistent cooking. To fix this:
- Place the chicken breast between two sheets of plastic wrap.
- Use a meat mallet or heavy pan to pound the chicken to an even thickness of about ½ inch.
- This ensures uniform cooking and prevents the thinner parts from drying out before the thicker parts are done.
Marinating for Maximum Flavor
Marinating not only adds flavor but also helps keep the chicken moist during grilling.
Basic Marinade Components:
- Base: Use olive oil, yogurt, or vinegar as your foundation.
- Seasonings: Add herbs (basil, thyme, rosemary), spices (paprika, garlic powder), and acidic ingredients (lemon juice, vinegar).
- Timing: Marinate for at least 30 minutes, but no more than 2 hours for thin cuts and up to 8 hours for thicker cuts.
My Favorite Simple Marinade Recipe:
- ¼ cup olive oil
- 2 tablespoons lemon juice
- 2 cloves minced garlic
- 1 teaspoon dried herbs (thyme, rosemary, or oregano)
- Salt and pepper to taste
Mix all ingredients in a ziplock bag, add chicken, seal, and refrigerate.
Dry Rubs: A Quick Alternative
If you don’t have time to marinate, a good dry rub works wonders:
- Pat the chicken dry with paper towels.
- Mix salt, pepper, garlic powder, paprika, and your favorite herbs.
- Rub the mixture all over the chicken, pressing it in gently.
- Let it sit for about 15-20 minutes before grilling.
The Grilling Process: Step-by-Step
Now for the main event! Let’s grill that chicken to perfection.
Preheating Your Electric Grill
This step is absolutely crucial – don’t skip it!
- Turn on your electric grill and set it to medium-high heat (around 375-400°F).
- Allow it to preheat for 10-15 minutes.
- To check if it’s ready, sprinkle a few drops of water on the surface – if they sizzle, you’re good to go!
Preheating creates that initial sear that locks in juices and gives you those beautiful grill marks.
Oiling the Grates
Even with non-stick surfaces, a little oil helps prevent sticking:
- Use a high-heat cooking oil like canola or vegetable oil.
- Apply it to the grates using a brush or oil sprayer.
- Alternatively, lightly oil the chicken itself instead of the grill.
Placing and Cooking the Chicken
- Arrange the chicken on the grill with some space between pieces.
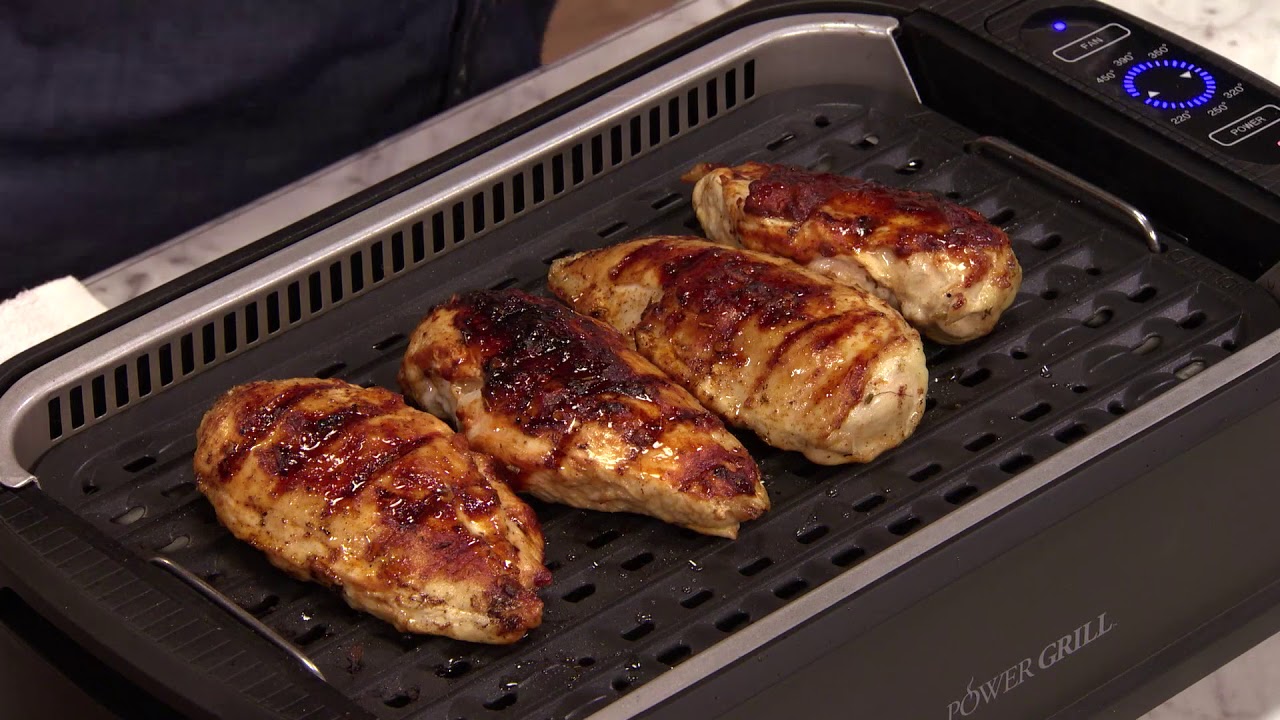
- For those coveted grill marks, place the chicken at a 45-degree angle to the grates.
- After a few minutes, rotate the chicken 90 degrees to create a crosshatch pattern.
- Close the lid if your grill has one.
Cooking Times by Cut
| Chicken Cut | Temperature | Approximate Cooking Time |
|---|---|---|
| Boneless, skinless breasts | 375-400°F | 6-8 minutes per side |
| Bone-in, skin-on chicken breasts | 375-400°F | 10-15 minutes per side |
| Thighs (boneless) | 375-400°F | 8-10 minutes per side |
| Thighs (bone-in) | 375-400°F | 10-12 minutes per side |
| Drumsticks | 375-400°F | 10-12 minutes per side |
| Whole chicken (spatchcocked) | 350-375°F | 20-30 minutes per pound |
Remember, these times are approximate! The best way to know if your chicken is done is by checking the internal temperature.
Checking for Doneness
Always use a meat thermometer to ensure chicken is properly cooked:
- Insert the thermometer into the thickest part of the meat (avoiding bone).
- Chicken is safe to eat when it reaches an internal temperature of 165°F (74°C).
- For thighs and drumsticks, I prefer to go a little higher (around 175°F) for more tender meat.
The Resting Period
Once your chicken reaches the target temperature:
- Remove it from the grill onto a clean plate.
- Loosely cover with aluminum foil.
- Let it rest for 5-10 minutes before cutting or serving.
This resting period allows the juices to redistribute throughout the meat, resulting in juicier chicken.
Pro Tips for Electric Grill Chicken Success
Basting for Extra Flavor
During the last few minutes of grilling, try basting your chicken with your favorite sauce:
- Brush on BBQ sauce, honey glaze, or teriyaki sauce.
- Allow it to caramelize slightly but watch carefully to prevent burning.
- Apply multiple thin layers rather than one thick layer for best results.
Using Wood Chips (If Available)
Some electric grills have a smoker box for wood chips:
- Soak wood chips in water for 30 minutes.
- Place them in the smoker box according to your grill’s instructions.
- Different woods impart different flavors – try hickory, mesquite, or applewood.
Getting Those Perfect Grill Marks
For restaurant-quality presentation:
- Make sure your grill is properly preheated.
- Place chicken at a 45-degree angle to the grates.
- Don’t move the chicken for at least 3-4 minutes.
- Rotate 90 degrees and cook for another 2-3 minutes before flipping.
Common Mistakes to Avoid
Overcooking the Chicken
This is probably the #1 mistake people make:
- Always use a meat thermometer rather than relying solely on cooking times.
- Remove chicken from the grill when it’s 1-2 degrees below target temperature as it will continue cooking during rest.
- Remember that boneless cuts cook faster than bone-in pieces.
Flipping Too Often
Resist the urge to constantly check and flip your chicken:
- Flip only once if possible.
- Premature flipping prevents proper searing and grill marks.
- Each time you flip, you lose some of those precious juices.
Pressing Down on the Chicken
I see this all the time and it makes me cringe!
- Pressing down with a spatula forces out the juices.
- Those juices = flavor and moisture.
- Let the grill do its job without interference.
Not Preheating Adequately
Starting with a cold or lukewarm grill leads to:
- Chicken sticking to the grates
- Longer cooking times
- Uneven cooking
- Poor grill marks
Always preheat for at least 10-15 minutes before cooking.
Frequently Asked Questions
Can I grill frozen chicken on an electric grill?
No, it’s strongly discouraged to grill frozen chicken. Grilling from frozen leads to uneven cooking, with the outside potentially burning before the inside reaches a safe temperature. Always thaw chicken completely in the refrigerator before grilling.
How do I prevent chicken from sticking to the electric grill?
Thoroughly preheating the grill and oiling the grates are crucial for preventing sticking. You can also marinate the chicken, as the marinade often contains oil that helps lubricate the surface.
What if my chicken is charring on the outside but still raw on the inside?
Lower your grill’s temperature and move the chicken to a cooler part of the grill if possible. You can also cover the grill with a lid to trap heat and allow the chicken to cook more evenly. Alternatively, finish cooking the chicken in the oven at 350°F.
Is it safe to eat pink chicken?
No, it’s not safe to eat pink chicken. Chicken must be cooked to an internal temperature of 165°F to kill harmful bacteria. Always use a meat thermometer to ensure proper doneness.
Wrapping Up
Grilling chicken on an electric grill doesn’t have to be complicated. With proper preparation, temperature control, and timing, you can achieve restaurant-quality results right at home. Remember to:
- Choose the right cut for your needs
- Prepare your chicken properly with even thickness
- Marinate or season generously
- Preheat your grill thoroughly
- Monitor internal temperature rather than just cooking time
- Let the chicken rest before serving
I hope these tips help you create amazing grilled chicken dishes! Electric grills might not have the traditional charcoal flavor, but they definitely make up for it with convenience and consistency. Next time your craving grilled chicken but can’t fire up the outdoor grill, give these techniques a try on your electric grill.
Marinate your chicken in yogurt
First, start with a yogurt-based marinade. Hana’s recipe, similar to that of tandoori chicken recipes, calls for a plain yogurt, which acts as a gentle meat tenderizer that renders a ridiculously moist interior while the dairy’s natural sugars result in a crisp, almost caramelized exterior on the chicken.
For 1½ to 2 lb. of preferably boneless, skinless chicken thighs (but you can use wings, or even chicken breast in a pinch) start with ½ cup of plain or greek yogurt. From here, choose your own marinade adventure. You can throw in chili pastes (like gochujang, sambal oelek, or red curry paste) or even go minimal with a squeeze of lemon juice and freshly grated garlic.
Set up your oven
After at least one hour or up to 24 hours of marinating, take your marinated chicken out of the fridge to bring its temperature up just a bit, for at least 20 minutes. Place your oven rack in the top third of the oven and then preheat it to the lowest broil setting. Line a large sheet pan with foil from edge to edge—this will allow for easy cleanup later! Place a wire rack on top of your lined sheet pan and spray with nonstick cooking spray or brush with oil. Remove chicken from the marinade, letting any excess marinade drip off before placing the chicken on your oiled wire rack.