Are you staring at a bag of frozen chicken tenderloins wondering how to turn them into a delicious dinner without thawing? You’re in luck! Cooking frozen chicken tenderloins directly in the oven is not only safe but also incredibly convenient for busy weeknights. I’ve perfected this method over years of emergency dinners, and I’m excited to share my expertise with you today.
Why Cook Frozen Chicken Tenderloins in the Oven?
Before diving into the how-to let’s talk about why oven-baking frozen chicken tenderloins is such a smart choice
- Time-saving – No need to plan ahead or wait for thawing
- Even cooking – The oven provides consistent heat for perfectly cooked chicken
- Hands-off cooking – Free up time to prepare sides or help kids with homework
- Juicy results – When done right, they retain moisture better than you might expect
- Versatile – Can be seasoned countless ways to match any meal
As a busy parent, I’ve relied on this cooking method countless times when I forgot to thaw meat or needed dinner in a hurry. It’s seriously been a lifesaver!
Step-by-Step: How to Cook Frozen Chicken Tenderloins in the Oven
Let’s get cooking! Here’s my foolproof method for perfectly cooked frozen chicken tenderloins:
1. Preheat Your Oven
Temperature: 400°F (200°C)
This temperature is the sweet spot – hot enough to cook the chicken quickly without drying it out. Make sure your oven is fully preheated before adding the chicken for best results.
2. Prepare Your Baking Sheet
Line a baking sheet with parchment paper or aluminum foil and give it a light coating of cooking spray or olive oil. This prevents sticking and makes cleanup a breeze. Trust me, you’ll thank yourself later!
3. Arrange the Frozen Tenderloins
Place the frozen chicken tenderloins on your prepared baking sheet in a single layer, making sure they don’t overlap or touch. This ensures even cooking and allows the hot air to circulate around each piece.
Pro tip: If some tenderloins are stuck together, don’t force them apart while frozen. Place them in the oven for about 5 minutes, then remove and gently separate them before continuing to bake.
4. Season Your Chicken
Here’s where you can get creative! For frozen chicken, I’ve found that generous seasoning is key since they tend to need more flavor. Some of my favorite options include:
- Basic blend: Salt, pepper, garlic powder, and paprika
- Italian style: Italian seasoning, salt, pepper, and a drizzle of olive oil
- Spicy kick: Cayenne pepper, chili powder, garlic powder, and onion powder
- Lemon herb: Lemon pepper, dried herbs, and a squeeze of fresh lemon juice (added after cooking)
Initially, the seasoning may not stick well to the frozen surface, but don’t worry! You can either:
- Season before baking and accept that some will fall off
- Drizzle with a little olive oil first to help seasonings adhere
- OR bake for 10 minutes first, then remove, season, and continue baking
5. Bake to Perfection
Cooking time: 25-35 minutes
The exact time will depend on the size and thickness of your tenderloins. This is where a meat thermometer becomes your best friend!
Important safety note: Chicken must reach an internal temperature of 165°F (74°C) to be safe to eat. Insert the thermometer into the thickest part of the tenderloin to check.
6. Rest Before Serving
Once your chicken reaches the proper temperature, remove the baking sheet from the oven and let the tenderloins rest for about 5 minutes before serving. This allows the juices to redistribute throughout the meat, resulting in juicier chicken.
Sheet Pan Dinner Idea: The Ultimate Time-Saver
One of my absolute favorite ways to use frozen chicken tenderloins is in a complete sheet pan dinner. It’s the ultimate convenience meal that delivers on flavor! Here’s how I do it:
- Preheat oven to 425°F
- Place frozen chicken tenderloins on one end of a large sheet pan
- Toss 3-4 cups of cubed butternut squash with olive oil and salt/pepper
- Add the seasoned squash to the opposite end of the pan
- Bake for 10-15 minutes
- Meanwhile, toss 3-4 cups of halved brussels sprouts with olive oil and seasonings
- Remove pan from oven, season the partially thawed chicken with your preferred seasoning
- Add the brussels sprouts to the center of the pan
- Return to oven and bake for another 15-20 minutes until chicken is cooked through (165°F) and vegetables are tender
This colorful combo of chicken, brussels sprouts, and butternut squash works beautifully together, but you can easily swap in other vegetables based on what you have on hand or what your family prefers.
Troubleshooting Tips
Even with the best instructions, things don’t always go as planned. Here are solutions to common issues:
Problem: Chicken is browning too quickly on the outside but still frozen inside
Solution: Lower the oven temperature to 375°F and cover the pan loosely with foil for part of the cooking time.
Problem: Chicken is rubbery or tough
Solution: You may have overcooked it. Next time, check the temperature earlier and remember that carryover cooking will continue to raise the temperature slightly after removing from the oven.
Problem: Seasonings won’t stick to the frozen chicken
Solution: Try the partial cooking method mentioned above – bake for 10 minutes, then remove and season when the exterior has thawed slightly.
Problem: Chicken sticks to the pan
Solution: Always use parchment paper or foil with a light coating of cooking spray or oil.
Serving Suggestions
Now that you’ve mastered cooking frozen chicken tenderloins, here are some delicious ways to serve them:
- Classic comfort: Serve with mashed potatoes and steamed vegetables
- Salad topper: Slice and add to a fresh salad for a protein boost
- Wrap it up: Use in wraps or sandwiches with your favorite toppings
- Dip-worthy: Serve with a variety of dipping sauces like BBQ, honey mustard, or buffalo sauce
- Bowl base: Add to grain bowls with roasted veggies and your favorite sauce
FAQs About Cooking Frozen Chicken Tenderloins
Q: Is it safe to cook chicken directly from frozen?
A: Yes! The USDA confirms it’s perfectly safe as long as you cook it to 165°F internal temperature. It will take about 50% longer than cooking thawed chicken.
Q: Can I bread frozen chicken tenderloins before baking?
A: Yes, but it’s tricky. For best results, cook the frozen tenderloins for about 10 minutes first, then remove, dip in egg wash and breading, and continue baking until done.
Q: How do I know when the chicken tenderloins are fully cooked?
A: Always use a meat thermometer to ensure the internal temperature reaches 165°F. Visually, the juices should run clear and the meat should no longer be pink inside.
Q: Can I cook frozen chicken tenderloins in a convection oven?
A: Absolutely! Reduce the temperature by 25°F (to 375°F) and check for doneness a few minutes earlier than you would in a conventional oven.
Q: How should I store leftover cooked chicken tenderloins?
A: Store in an airtight container in the refrigerator for up to 3-4 days. They’re great for meal prep!
The Bottom Line
Cooking frozen chicken tenderloins in the oven is a game-changer for busy nights. With this simple method, you can have a delicious, protein-packed meal on the table in about 30 minutes with minimal effort. I honestly don’t know what I’d do without this technique in my cooking arsenal!
Remember, the key points for success are:
- Preheat to 400°F
- Use a lined baking sheet
- Season generously
- Cook to 165°F internal temperature
- Let rest before serving
Give this method a try next time you’re in a dinner pinch – I guarantee it’ll become one of your go-to cooking techniques!
Do you have a favorite seasoning blend for chicken tenderloins? I’d love to hear about it in the comments below!
This post was updated on September 24, 2025 with additional tips and serving suggestions.
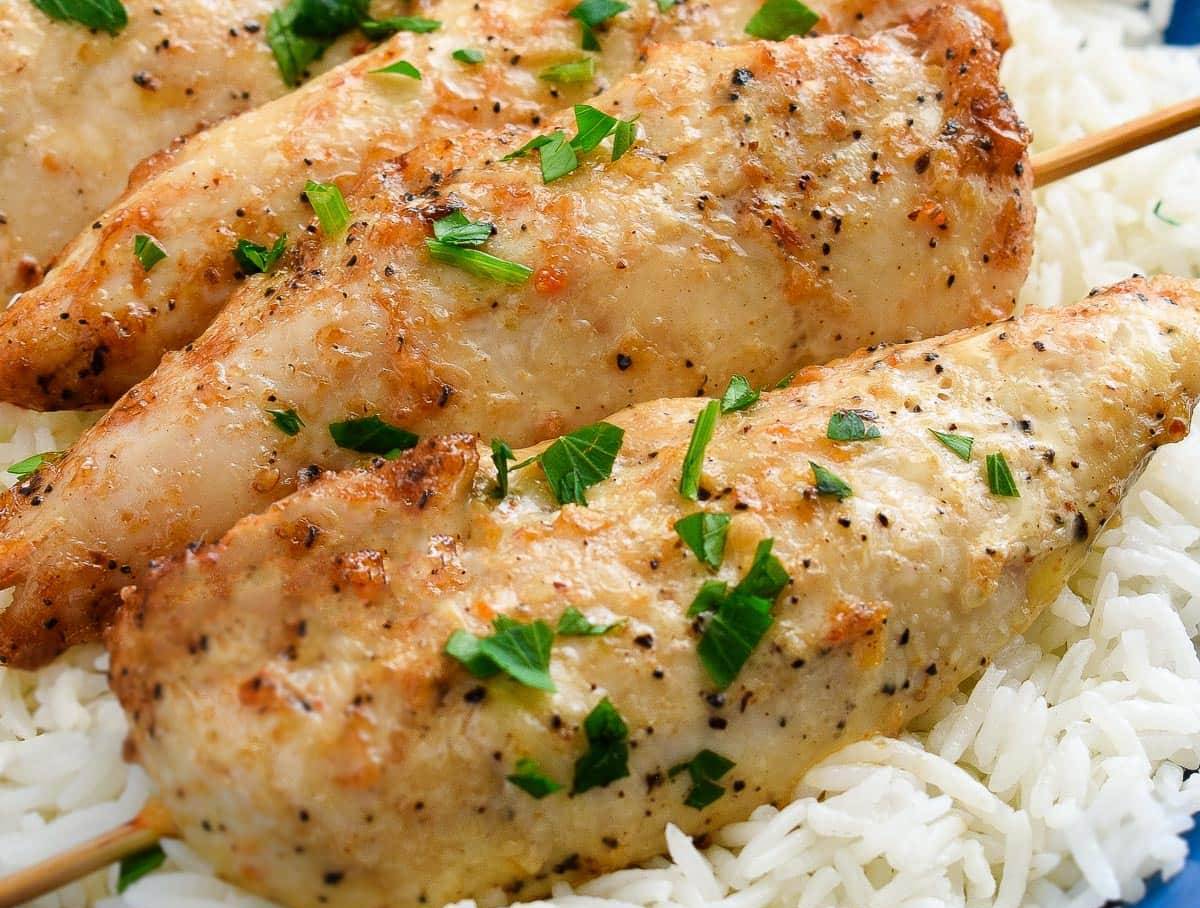
How to Make Oven Baked Chicken Tenders
Here’s an overview of this easy recipe. Find the full printable recipe at the bottom.
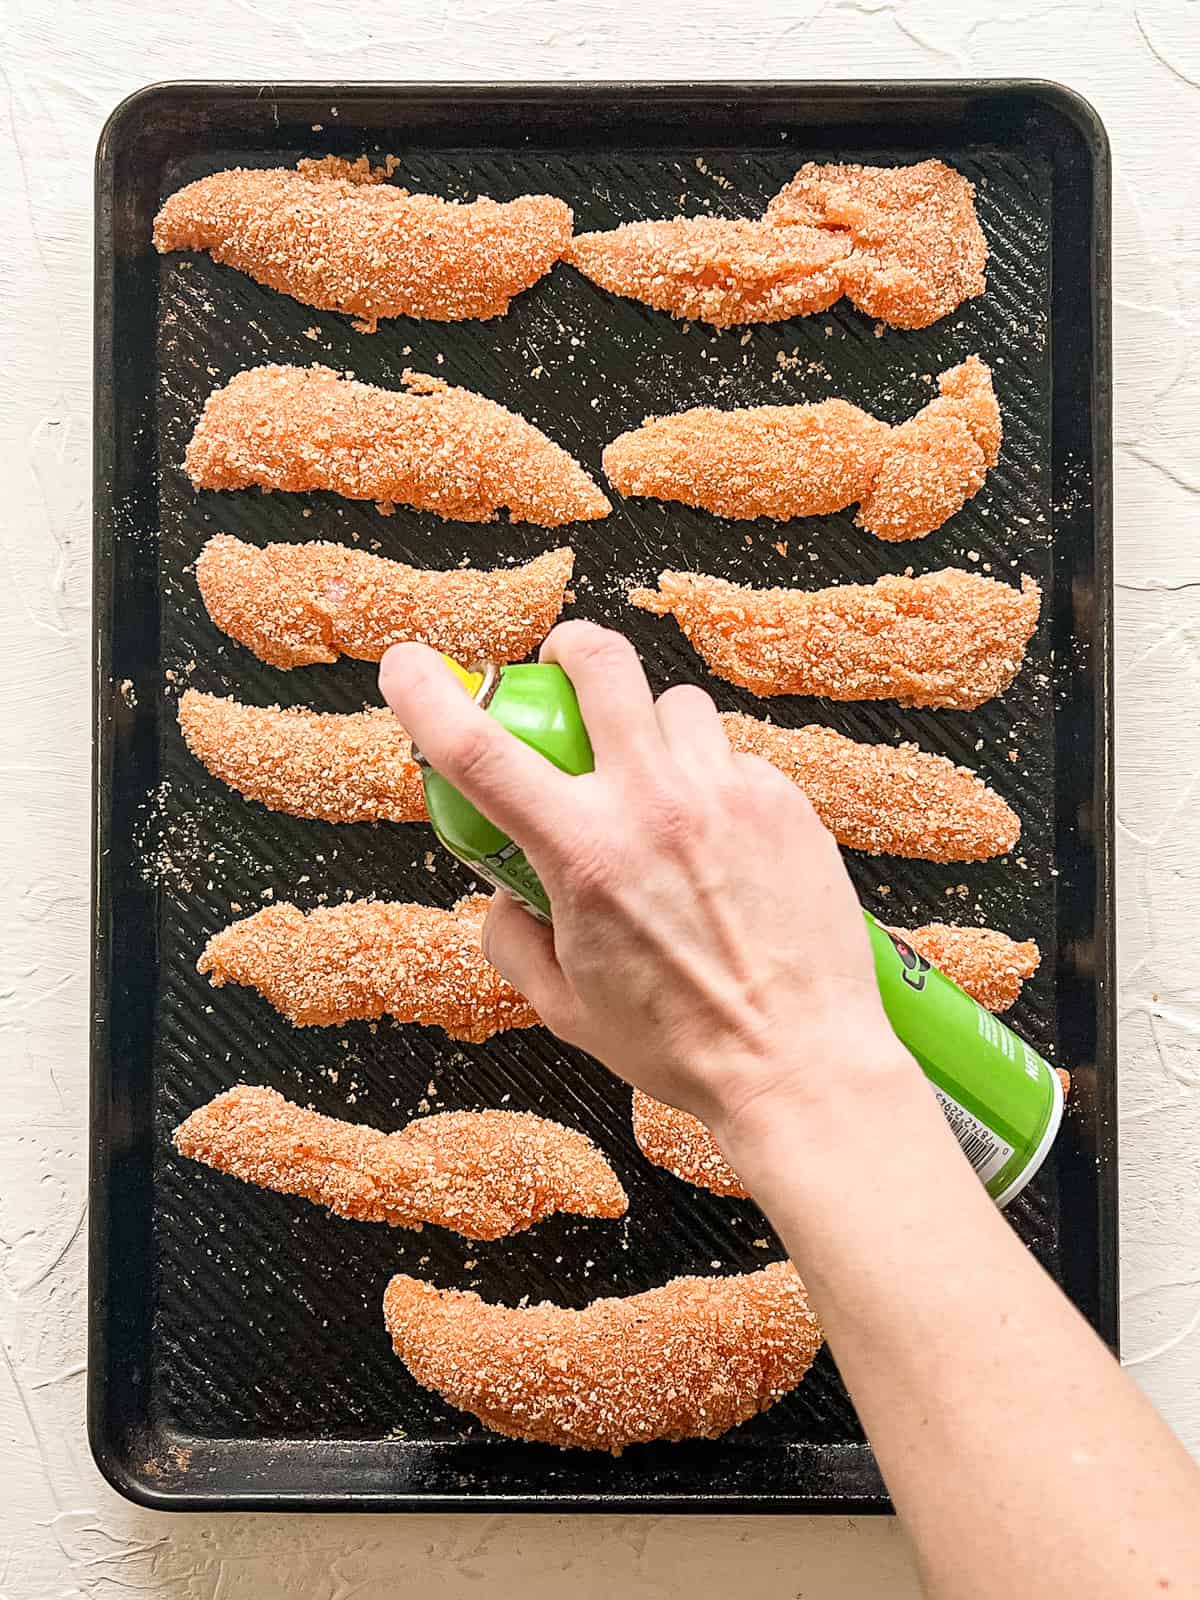
Preheat oven to 425°F. Generously spray a sheet pan with cooking spray.
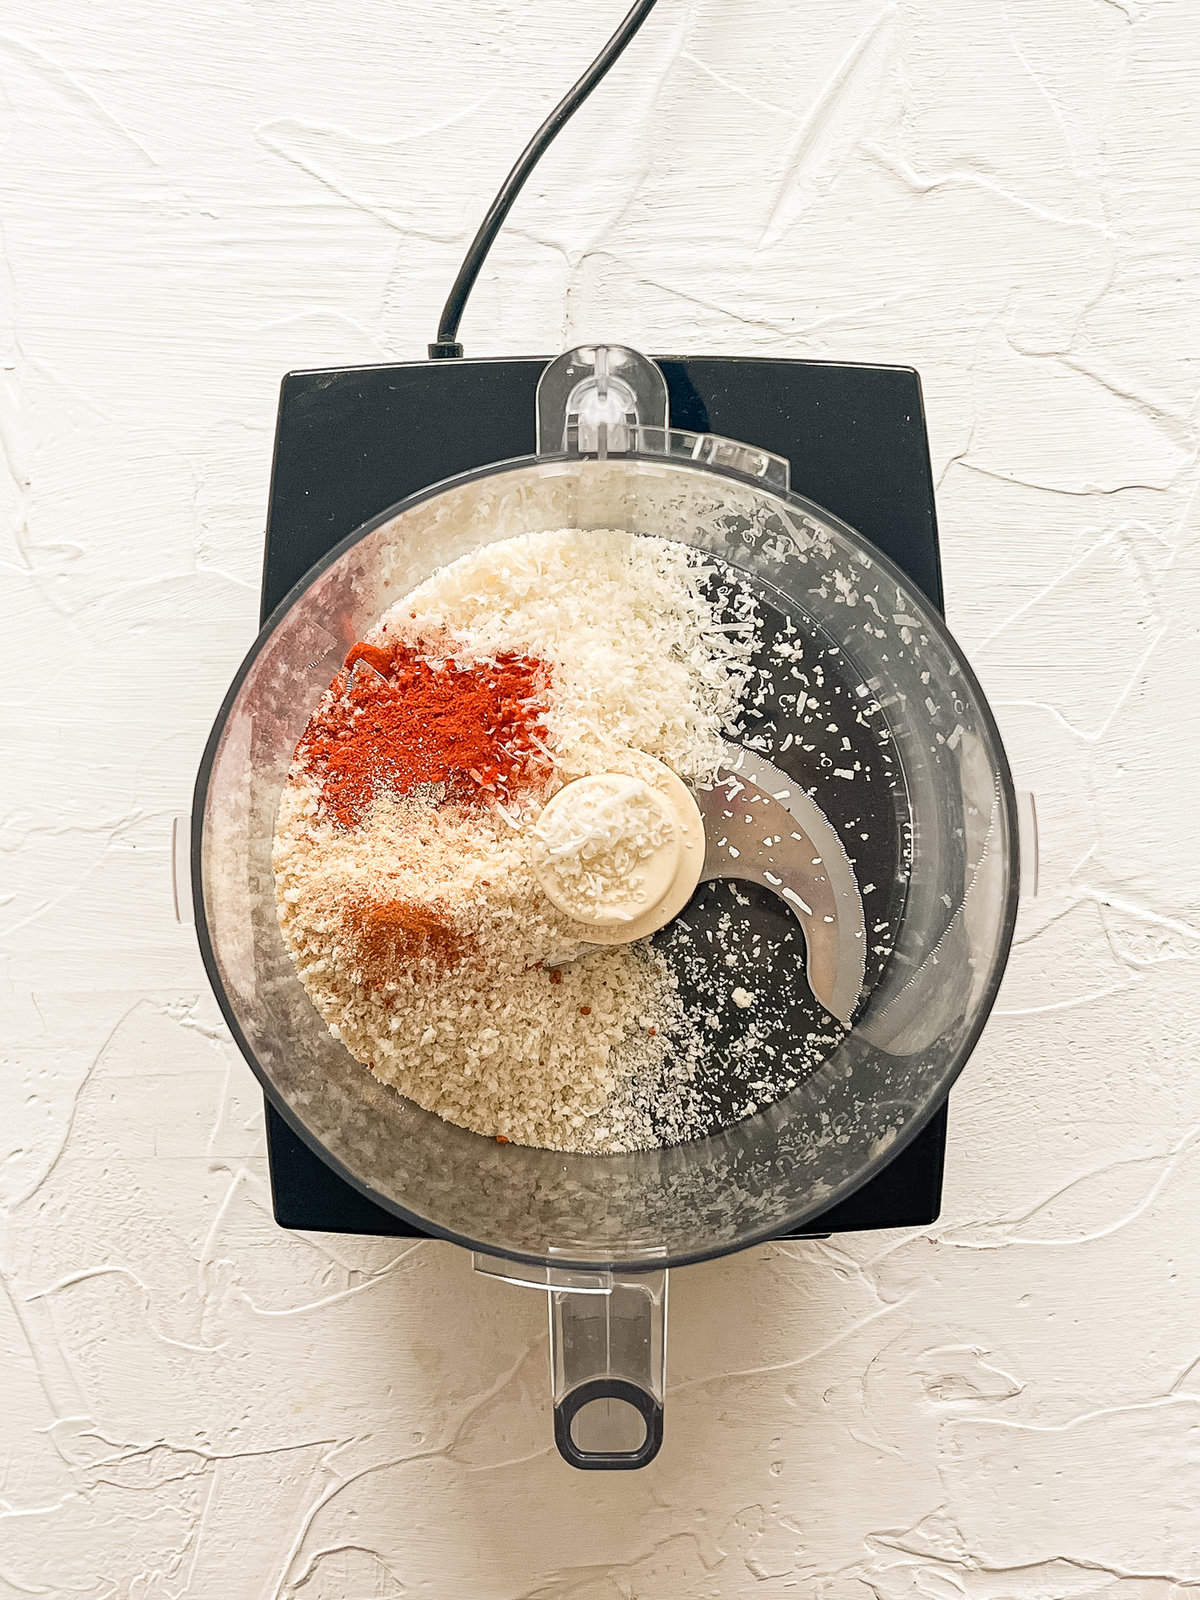
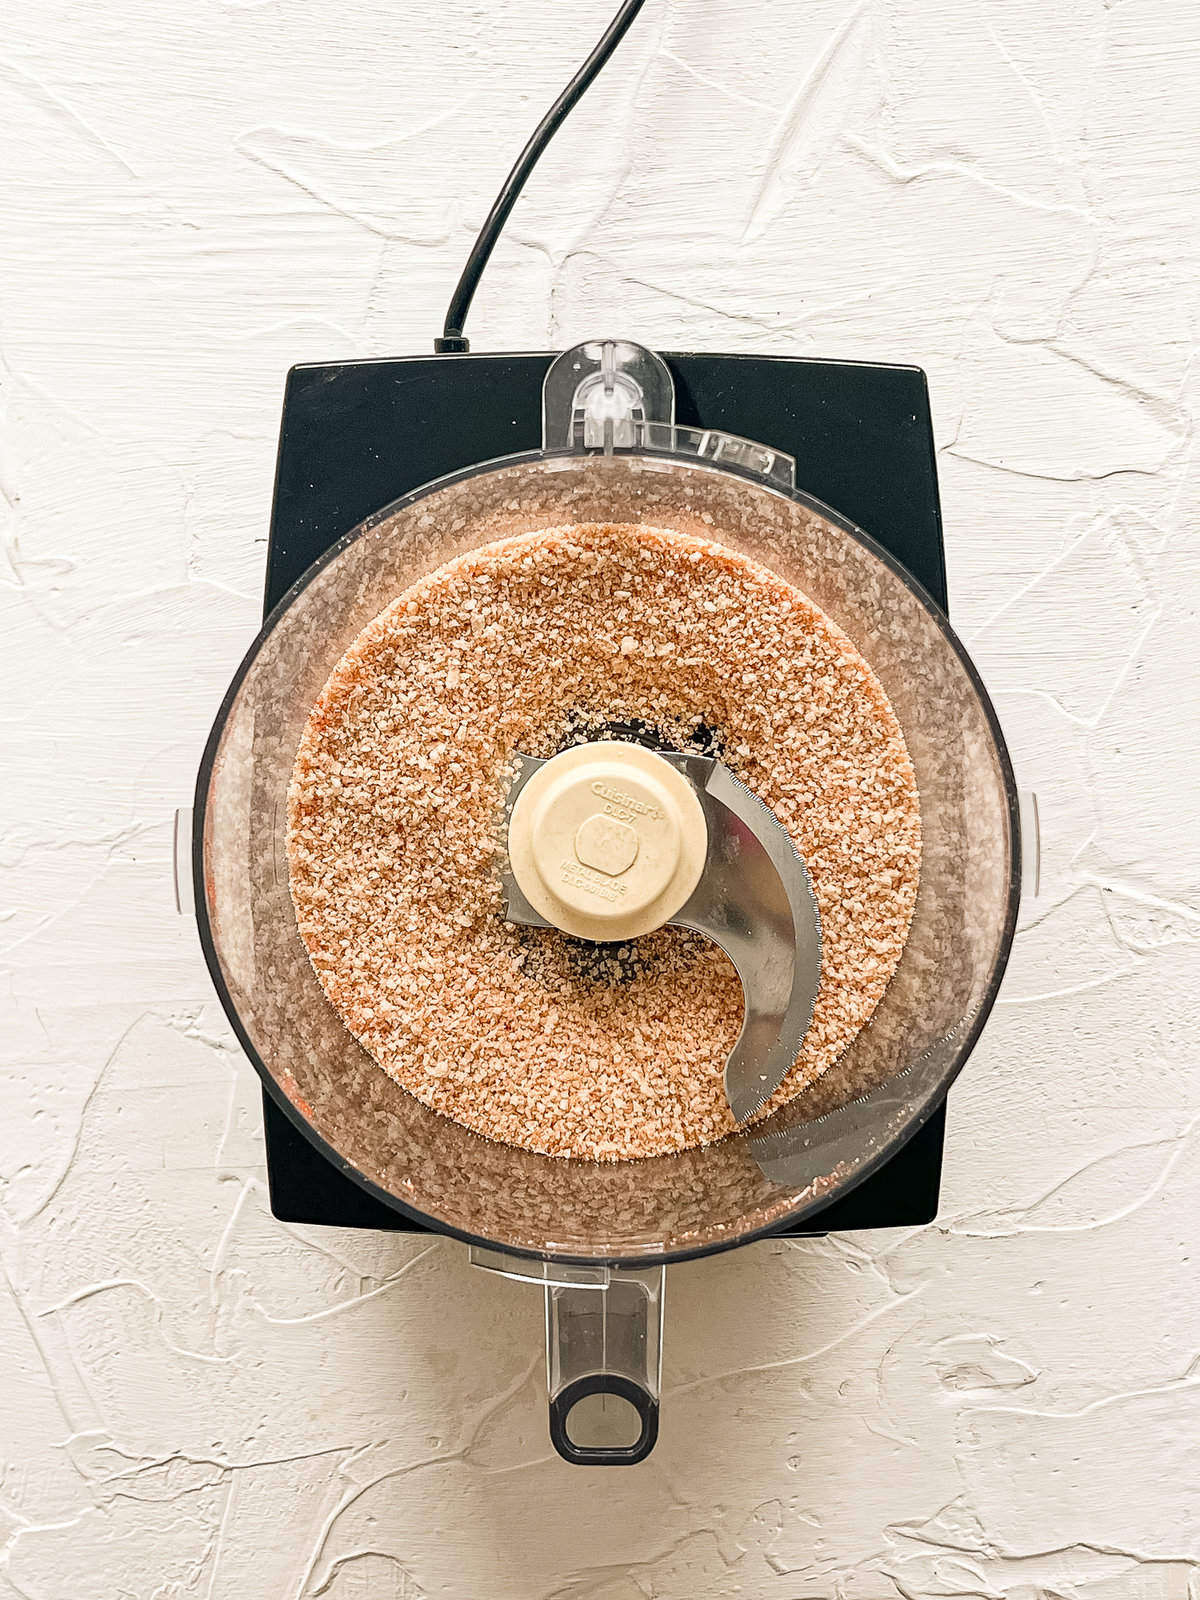
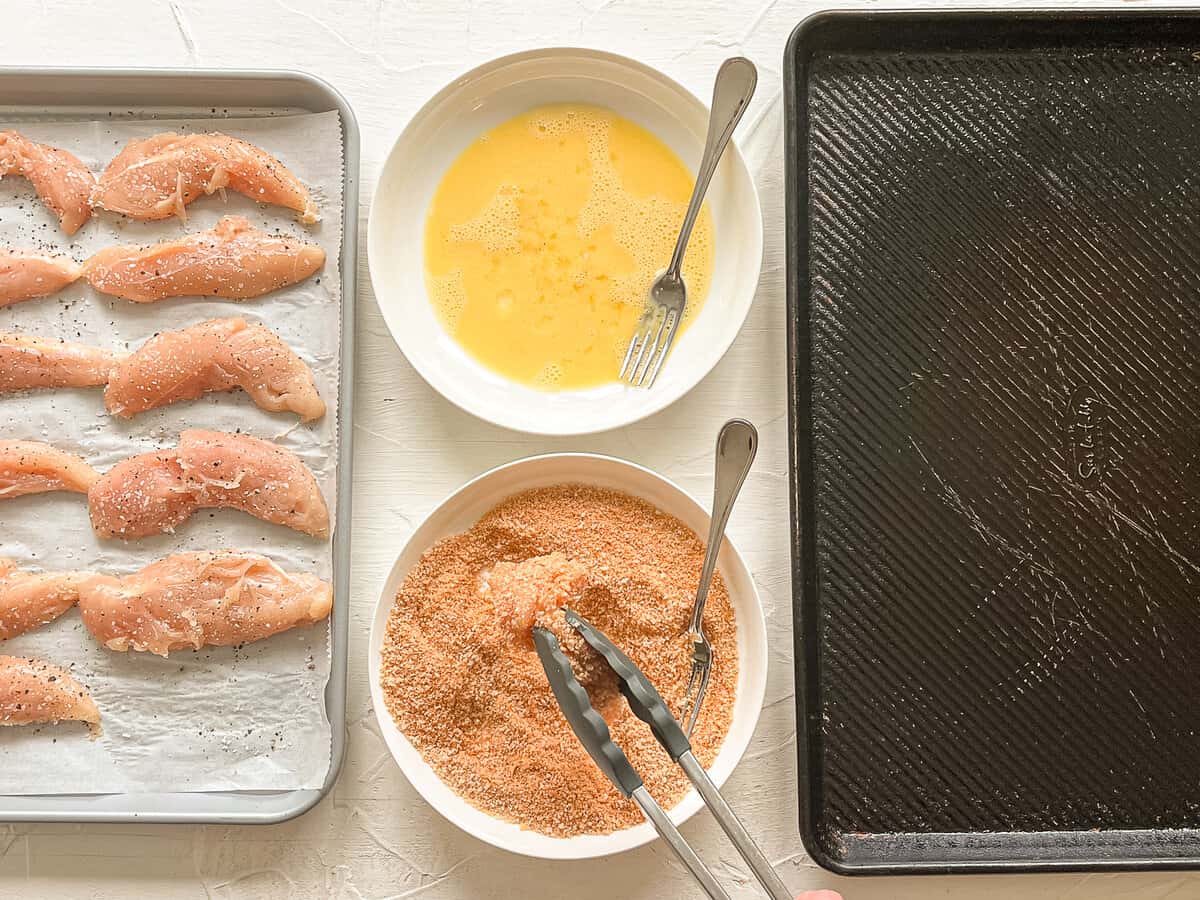
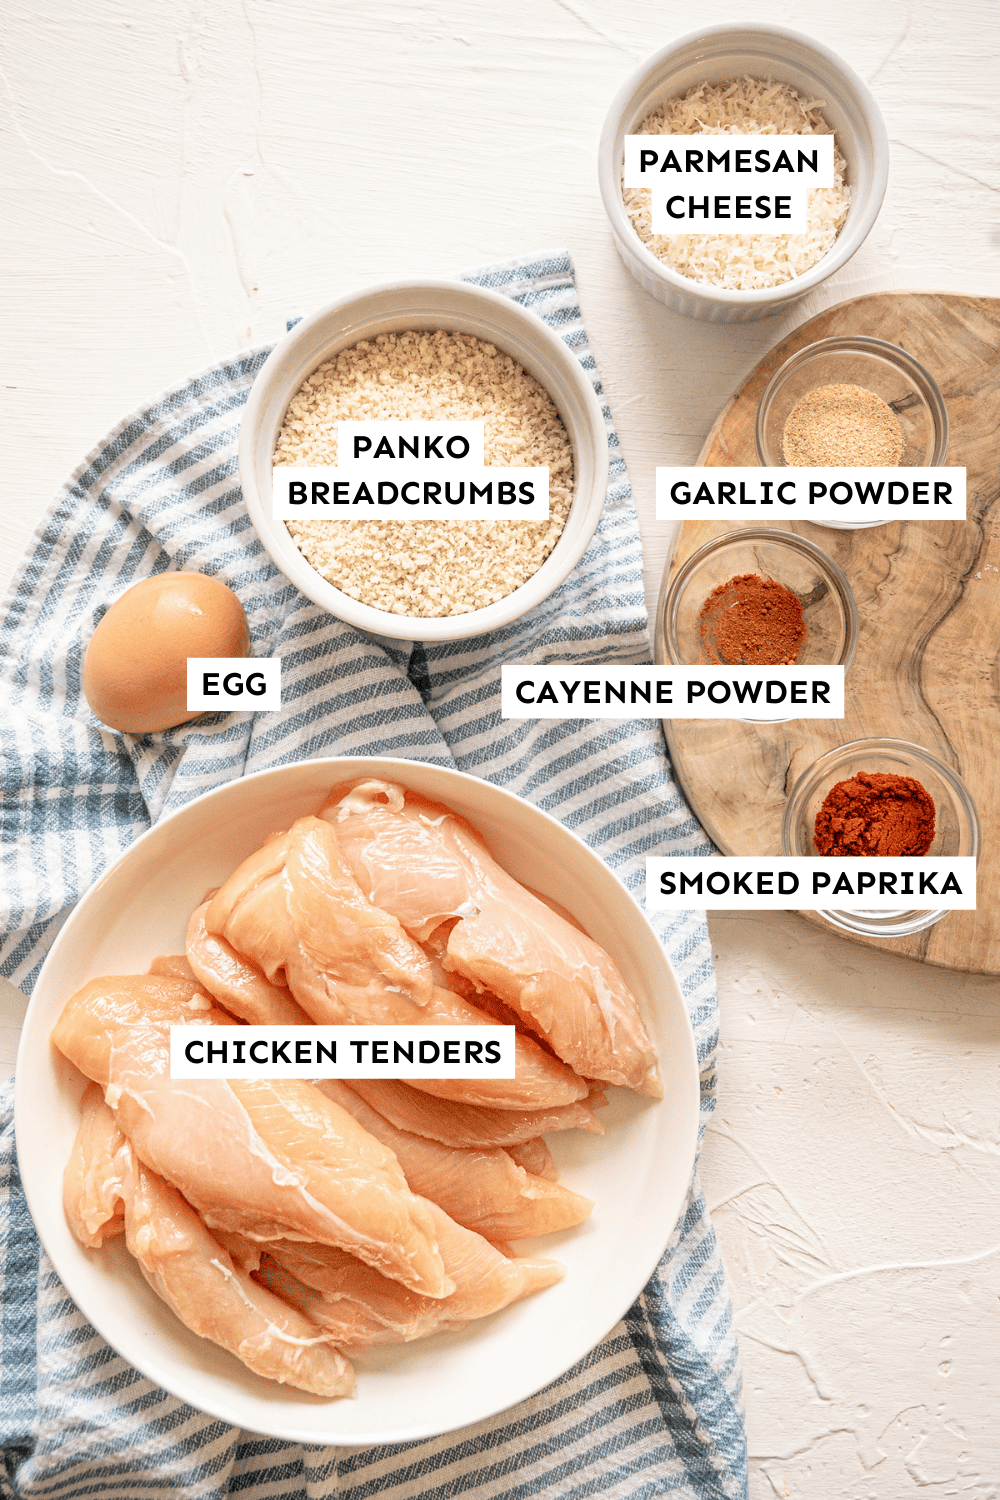
Add the Panko, Parmesan, paprika, garlic powder, and cayenne to a blender or food processor and pulse several times until breadcrumbs are a finer texture and everything is well combined. Pour this mixture into a shallow dish.
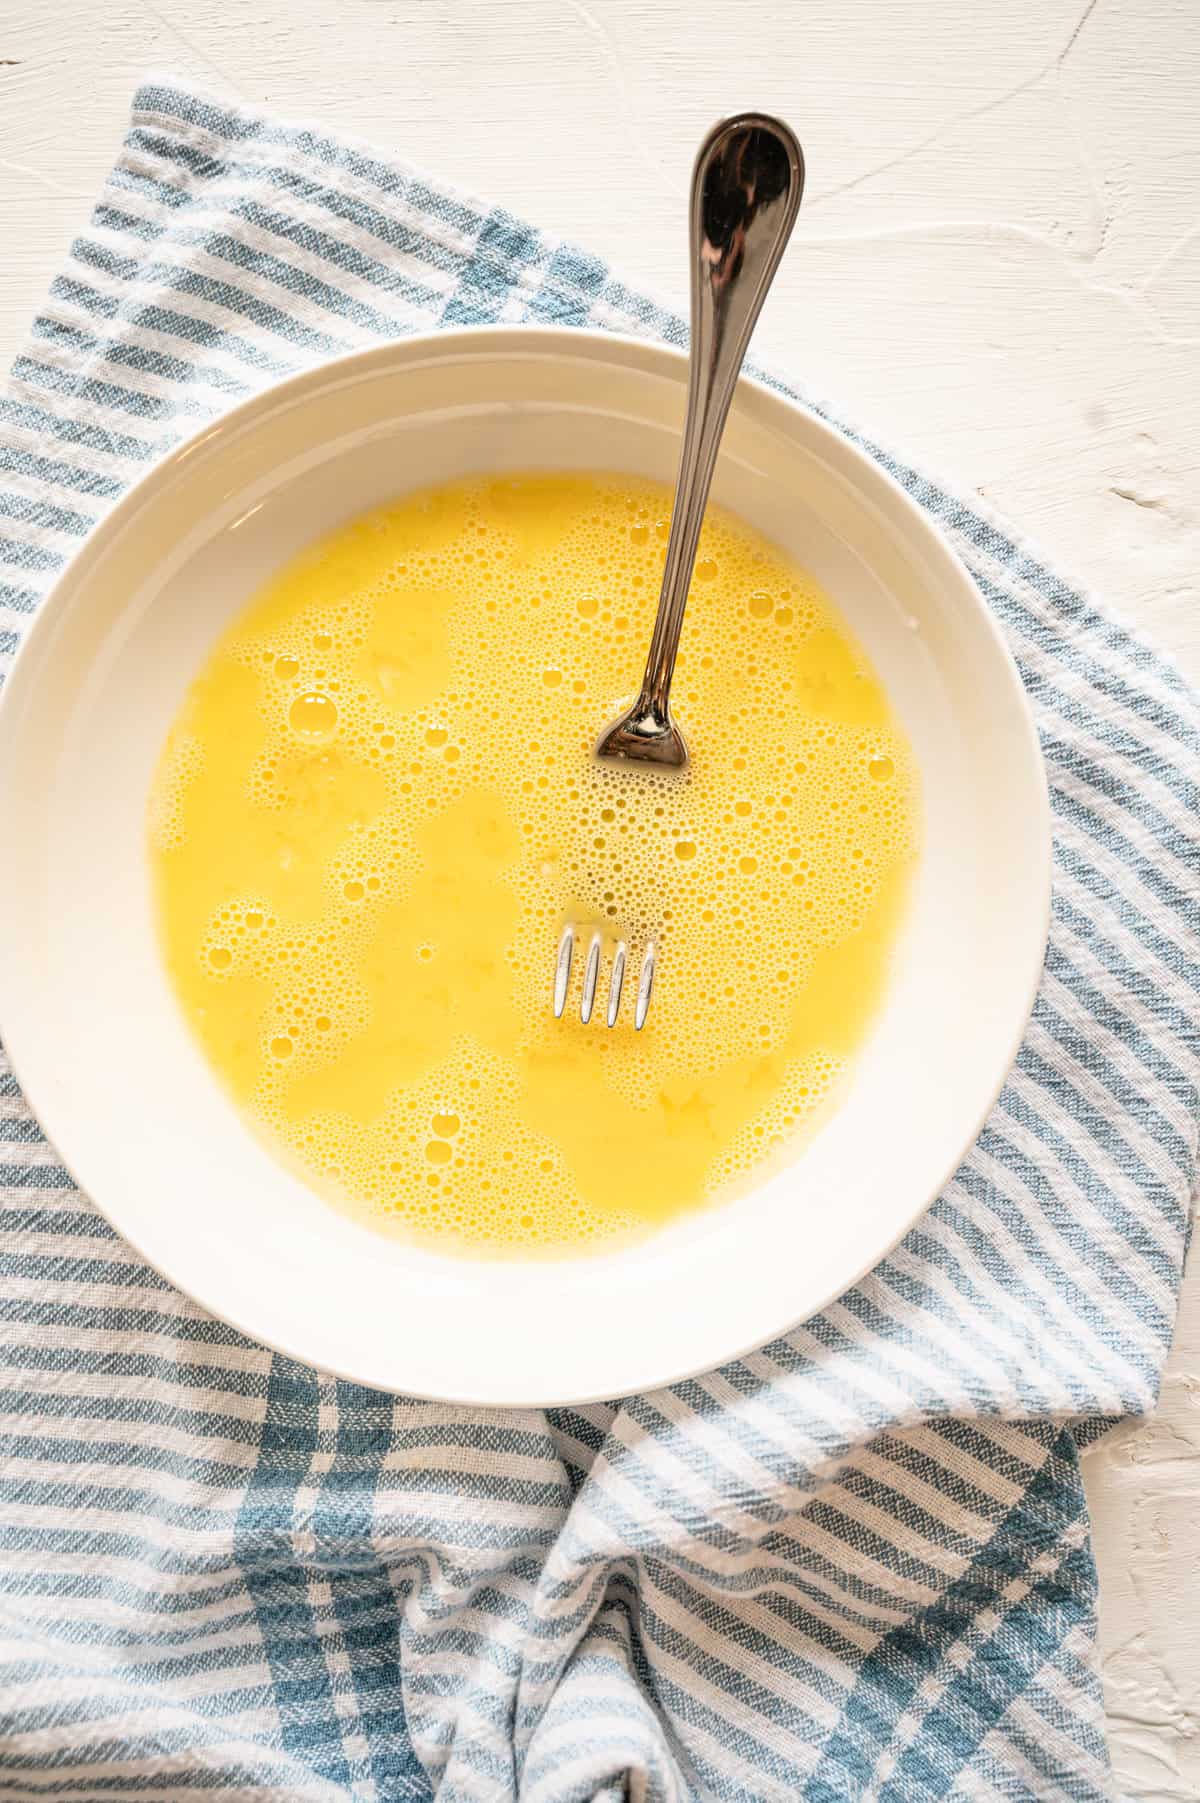
Add the egg and a splash of water to a second small bowl or shallow dish. Whisk with a fork until very smooth.
Trim off any tendon that is sticking out. Season both sides of the tenders evenly with salt and pepper.
Dredge each tender in the egg mixture, letting the excess drip off. Dredge the chicken in the breadcrumb mixture, pressing it in on both sides.
Place tenders on the pan and spray the tops with cooking spray.
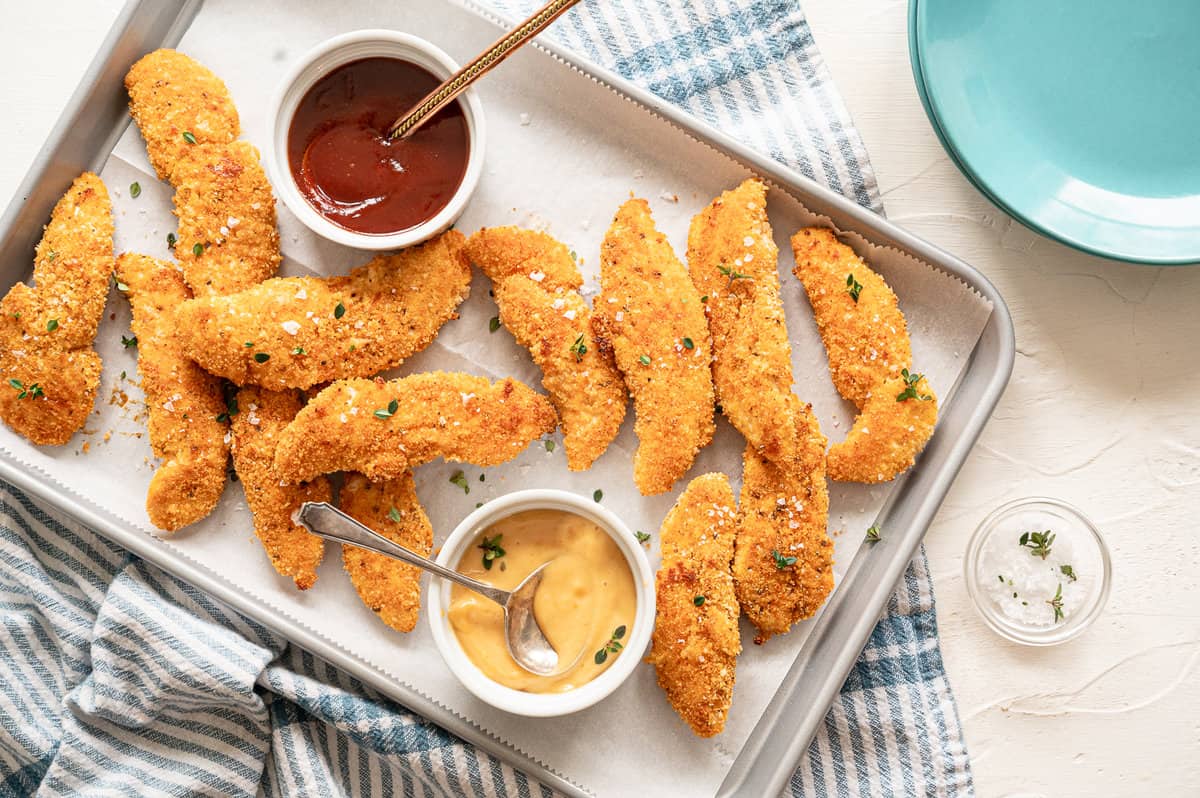
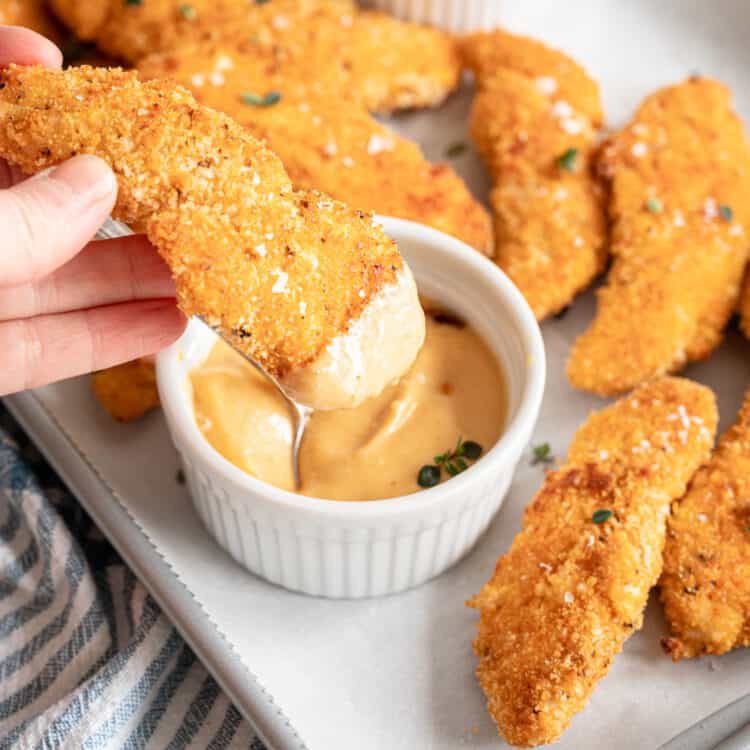
Bake on the lower third of the oven for 7-8 minutes, until golden brown on the bottom. Using a spatula, carefully flip over and bake another 5-6 minutes, until golden on top. Season with a little more salt right out of the oven, if desired. Let cool slightly and serve with your favorite dipping sauce.
Here are some side dish ideas that would go well with this recipe:
-
- Oven Roasted Broccoli – This cooks at the same temp and almost the same amount of time in the oven!
Why You’ll Love This (New & Improved!) Recipe
- Texture and flavor – Perfectly crispy and a nice balance of seasoning. All ages will like these. I tested these over and over until I got them just right. (My kids didn’t mind that!)
- Healthier – Oven baking is considered a healthier cooking method compared to deep-frying, which is often used for making chicken tenders in restaurants. Baking requires less oil, which reduces the overall fat content and calorie count of the dish.
- Freezer-friendly – Freeze them before baking and cook straight from frozen. I’ve tested the heck out of this recipe to make sure it’s perfect!
- Fast for a weeknight dinner – Takes less than 30 minutes.
- Kid-friendly – Like our Homemade Chicken Nuggets, this is a kid fave. Check out more kid-friendly freezer meals.
If you want to try a similar type of recipe that’s a little fancier, definitely check out our Crispy Chicken Cutlets with Lemon Butter Sauce. Mmmm!
Our Baked Chicken Tenders ingredients are so simple! You’ll find all these wholesome ingredients at your local Hy-Vee (Columbia).
- To cut your own with chicken tenders: Cut chicken breasts in half lengthwise to create two cutlets. Then, cut those in half vertically to create chicken tenders.
- I created this recipe with picky kids in mind. These are not very spicy at all. Feel free to kick up the paprika and cayenne some.
- My favorite way to enjoy these is with our Honey Mustard Dipping Sauce.
- Use 1 teaspoon Cajun seasoning or Old Bay seasoning in place of paprika for more heat and complexity. Omit cayenne pepper.
- Add 1/2 teaspoon Italian seasoning, crushed in hand, to the breading mixture.
- Add finely minced fresh herbs like parsley, thyme, or basil to add to the breading mixture.