Ever sat there staring at your incubator wondering, “When can I candle my chicken eggs?” I’ve been there too! The excitement of potentially seeing a developing chick inside that shell is almost unbearable But timing is everything when it comes to egg candling.
In this guide, I’ll walk you through exactly when to candle your chicken eggs for the best results, what to look for at each stage, and how to avoid common mistakes that might harm your developing chicks.
What Is Egg Candling Anyway?
Before we dive into timing, let’s get clear on what candling actually is. Egg candling is simply the process of shining a bright light through an eggshell to see what’s happening inside The name comes from the olden days when people literally used candles as their light source (thankfully, we have better options now!)
Candling lets us:
- Check if eggs are fertile
- Monitor embryo development
- Spot problems early
- Remove non-viable eggs before they go bad
The Best Times to Candle Chicken Eggs
The most critical thing to understand is that you shouldn’t candle eggs too often. Each time you handle the eggs and remove them from the incubator, you’re disrupting their development and potentially causing harm. Here’s the ideal candling schedule:
Before Incubation
Yep, even before you place eggs in the incubator! This initial check helps you:
- Identify hairline cracks that might allow bacteria to enter
- Remove eggs with obvious defects (wrinkled, deformed, or oddly shaped)
- Establish a baseline for comparison later
Day 7 (First Critical Check)
This is the sweet spot for your first real candling session. By day 7:
- Fertile eggs will show visible veins spreading out like a spider web
- You’ll see the embryo as a dark spot
- The air cell at the blunt end will be noticeable
- Non-viable eggs will be clear or show signs of trouble
Day 14 (Second Critical Check)
By this point, a lot more development has happened:
- The embryo takes up much more space
- Blood vessels are more extensive
- The air cell has grown larger
- Movement might be visible if you’re patient!
Optional: Day 10
Some breeders like to check around day 10 when:
- The chick has filled up more space
- The eye is visible as a large black blob
- Movement is more likely to be seen
Avoid Candling After Day 18
Once you reach day 18, it’s time for “lockdown” – no more candling! The chick is positioning itself for hatching, and disturbances can cause problems.
Tim Daniels from Poultry Keeper says: “I recommend candling chicken and duck eggs after 7 days of incubation and again at 14 days.”
What NOT To Do When Candling
I’ve made a few mistakes in my candling journey, so learn from me:
- Don’t candle daily – it disrupts development and can harm the embryo
- Don’t keep eggs out of the incubator for more than 30 minutes – temperature changes are bad news
- Don’t use marker pens to label eggs – the toxins can leach through the shell (use a pencil instead)
- Don’t handle eggs with dirty hands – bacteria can transfer through the porous shell
How to Candle Like a Pro
Ready to shine some light on those eggs? Here’s how to do it right:
- Find a dark room – the darker, the better for visibility
- Use a good light source – a bright LED flashlight or purpose-made candler works best
- Hold the egg with the blunt end up – this gives you the best view
- Place the light against the egg – create a good seal to prevent light leakage
- Rotate slowly to see different angles
- Work quickly to minimize time outside the incubator
What You’ll See When Candling
Fertile Developing Egg (Good News!)
- Day 7: Dark spot (embryo) with spider-like veins spreading out
- Day 14: Egg appears darker overall, less light passes through
- Air sac visible and growing at the blunt end
Infertile Egg (Clear Egg)
- Appears mostly transparent
- No veins or dark spots
- Just a shadow from the yolk floating inside
Early Death or “Quitter”
- Thin ring visible inside the egg (very early death)
- Cloudy appearance, contents may swish around
- Blood rings or streaks without proper vein development
The Happy Chicken Coop notes: “A thin ring around the inside of the egg indicates an early death. The embryo died at the start of incubation, usually within a couple of hours.”
Candling Dark-Shelled Eggs: The Challenge
Got Marans or Welsummer chickens with those chocolate-brown eggs? I feel your pain! Dark-shelled eggs are notoriously difficult to candle.
Tips for dark eggs:
- Use the brightest light possible
- Candle in a completely dark room
- Practice on light eggs first so you know what to look for
- Be patient and expect less visibility
- Consider waiting until day 10 when development is more obvious
DIY Egg Candling on a Budget
Don’t wanna spend money on a fancy candler? No problem! Here’s how to make your own:
- Find a bright LED flashlight (800+ lumens works great)
- Cut a hole in a piece of cardboard just smaller than your egg
- Place the flashlight behind the hole
- Voila! Instant egg candler
Annie from Strong Animals confirms: “A strong flashlight works great! Place the narrow end of the egg gently against the light.”
Why Candle? Preventing the Dreaded “Exploding Egg”
Why do we bother with candling anyway? One major reason is to prevent the nightmare scenario of a rotten egg exploding in your incubator. Bacteria growing in a non-viable egg creates gas pressure that can eventually cause the egg to burst, contaminating your entire batch.
Removing clear or dead eggs early keeps your incubator clean and your viable eggs safe.
Monitoring Air Sac Development
One cool thing about candling is watching the air sac grow. Located at the blunt end of the egg, the air sac should expand gradually throughout incubation.
The air sac tells you if your humidity levels are correct:
- Too small = humidity too high
- Too large = humidity too low
- Just right = chick will have enough air to breathe before hatching
Tim Daniels explains: “The egg will need to lose 13-14% of its total weight by Day 18 (lockdown). This should ensure there is sufficient air for the chick to breathe when it pips internally.”
Keeping Track of Your Eggs
I like to number each egg with a pencil (remember, no markers!) and keep notes on what I see during candling. This helps track progress and learn from each hatch.
Record things like:
- Air cell size
- Visible development
- Any concerns or unusual observations
- Temperature and humidity of the incubator
Final Thoughts: Patience is Key
Candling eggs is both science and art. It takes practice to get good at recognizing what you’re seeing, especially with darker eggs. Be patient with yourself and with the process.
Remember that a successful hatch rate of 80-85% is considered excellent even for commercial hatcheries. Don’t be discouraged by a few non-viable eggs – it’s completely normal.
The most important times to candle are day 7 and day 14, but remember to work quickly and minimize disruption to your developing chicks.
Have you tried candling your eggs yet? What day worked best for you to see development? Drop a comment below with your experiences!
Quick Candling Timeline Summary
| Day | What to Expect | Action |
|---|---|---|
| 0 | Check for cracks before incubation | Remove damaged eggs |
| 1-6 | Too early to see much | Avoid candling |
| 7 | Spider-like veins, visible embryo | First major candling check |
| 10 | Growing embryo, visible eye | Optional additional check |
| 14 | Darker egg, larger air sac | Second major candling check |
| 18-21 | Chick positioning for hatch | No more candling (lockdown) |
Happy hatching, fellow chicken enthusiasts!

What is happening inside the egg?
The below should give you an idea of what is going on inside the egg by day 8. I have used black and white photography to highlight the contrast. There are probably a few more blood than I have drawn, but I think this gives you a good idea of what’s inside the egg.
The embryo has grown significantly, and the eye is usually visible (the darkest ‘blob’ you see in the egg). There are digits on the feet, the heart enclosed in the thoracic cavity, and the embryo starts to look more like a chick. Feathers begin to grow from day 8.
There is a sack attached to the embryo that is called the allantois. This goes around the back and head of the embryo and holds the waste. It is the yukky bit you’ll find left in the shell when the chick hatches. The yolk sack is now very red and full of blood vessels that go out into the albumen (egg white). The air sack at the broad end of the egg has increased in size.
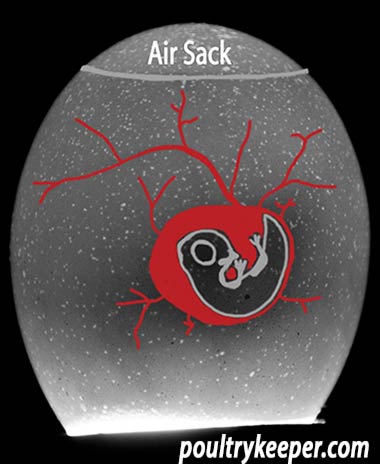
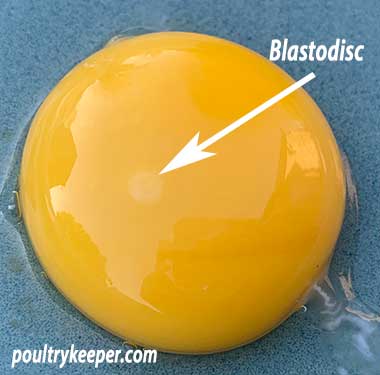
The blastoderm contains the chick’s genetic makeup, and it’s from here that the egg starts to develop. Blood vessels start to appear, stretching into the yolk to carry nutrients back to the embryo.
Of course, it would be great to be able to sex eggs before they hatch to save the heartache of raising unwanted male chicks! Various old wives tales circulate that say you can tell by circling a key or piece of metal on a string above an egg or that male chicks hatch from pointed eggs, females from round ended eggs. I’ve even seen ‘egg sexers‘ advertised on eBay where the seller says, “I don’t know how this works… it just does”.
Unfortunately, there is no proven way to tell the sex of an embryo in the egg, well, almost. The only proven way has been inserting a needle and taking a sample from inside the shell to see whether there was estrogen hormone present. Hardly a suitable method for the backyard keeper.
If there was an easy way, I’m sure the poultry industry would be using it now.
For autosexing breeds, or sex-linked crosses, you can determine the sex of day-old chicks, but for most pure breeds, you have to wait a while before you can sex them.
Incubator temperature should be maintained between 36 and 37.7°C (99° to 100°F); ideally, it should be set to average 37.5°C (99.5°F).
Too high a temperature is more damaging than too low a temperature. Mortality will increase if the incubation temperature drops below 35.6°C (96°F) or rises above 39.5°C (103°F) for several hours.
Beginners candling eggs FAQ’s
Egg candling is when we shine a bright light into an egg to see inside it. During incubation, candling an egg allows you to see the developing embryo inside the shell and provides a way to remove non-viable eggs.
Commercially, this enables egg packers to remove eggs with hairline cracks, blood-spots, or other undesirable contents.
The term ‘egg candling’ comes from the past before electric light bulbs when people used candles for light. Poultry breeders would place a candle inside a wooden box and cut a hole big enough to allow light to shine through the egg but small enough to stop the egg from falling into the box.
Candling does not damage the embryos inside the egg, providing you maintain the temperature of the egg.
Don’t keep eggs out of the incubator unnecessarily, and don’t overheat the egg if using an egg candler with a bulb. Modern LED versions do not give off heat and are a better option.
Egg candlers can be mains powered or battery operated. They tend to come in two varieties: The first is like a torch with a rubber seal around the end, and the second is a table-top unit with a place to sit the egg.
To be honest, a small ultra-bright torch is all you need, you can use your hand between the egg and torch to make a good seal.
Most candlers today use light-emitting diodes (LED’s) rather than electric bulbs. The advantage of LED is that it produces a bright white light without much heat.
I have tested several egg candlers, and in summary, I would not waste money on some of the cheap imported versions. The seal between the light source and the egg is not as good and doesn’t last. The LED is not usually very bright.
There are two egg candling devices I recommend and use regularly:
- This ultra bright, LED Torch. I found normal LED torches with batteries go dim as the batteries age, this one is rechargeable and you can top it up from time to time to keep it super bright.
- This ultra bright Titan Egg Candling device. I like this one because you don’t have to hold it. It sits on a surface and you can place an egg on the top.
Some large eggs can have more than one yolk. Double yolk eggs (or “double yolkers” as they are sometimes called) are the most common.
Double yolk eggs rarely hatch since the space and resources inside the egg are limited. If they do hatch, one or both can be deformed or much smaller.
When a chick hatches, it needs to rotate inside the shell to break free from its shell, which becomes almost impossible when there are two chicks inside an egg. There are some success stories, and they almost always need assistance in hatching.
As well as checking egg viability, candling eggs can free up space in your incubator. If you use a separate hatcher for the last few days of incubation (I find this is easier to clean), you can keep your incubator topped up with more eggs!
When to Candle Chicken Eggs | What is a Red Ring?
FAQ
When to candle chicken eggs?
You can start candling chicken eggs starting on day 5 after you’ve started incubating your chicken eggs. After that, you can do it every couple of days to monitor the growth and development of your chicks. Or you can simply leave them alone until they hatch. How Do I Know What I Am Looking For When Candling Chicken Eggs?
Can You candle chicken eggs every day?
You can candle your chicken eggs every day if you’d like, after day 3 you should be able to see something Be sure that your hands are clean and dry when you handle the eggs. Does Candling Hurt Eggs Candling chicken eggs or hatching eggs in general doesn’t hurt them.
Can You candle eggs before 7 days?
Candling eggs before 7 days might not yield clear results, as the embryo is still developing. After 10 days, candling becomes a bit riskier since the shell thickens and may block some visibility. 3. What do I need for candling? To candle your eggs, you’ll need a bright and focused light source.
How often should you candle eggs?
The rule of thumb for candling varies, some egg hatching masters candle only a few times on Day 1, 7, 14, and 16 and others candle daily up to day 16 or 17. The most vital key is having “soft” hands and delicately handling the eggs. Of course, the less you hold the eggs, the less chance there is of cracks or mishaps.
What does candling chicken eggs mean?
Simply put, candling chicken eggs means to hold them up to a bright light to see what’s going on inside. Candling will tell you whether you have baby chicks on the way or not. Just as its name suggests, historically eggs were held up to a candle to see if they were: • Yolkers- an egg that is not fertilized • Quitters- the embryo stops growing
How long after incubation should I candle my Eggs?
The precise timing of candling will depend on the type of eggs you are incubating. Different species have different incubation periods, so it’s crucial to understand these differences. However, as a general rule, candling should occur around 7 to 10 days after incubation begins.
How soon can I candle chicken eggs?
You should candle chicken eggs around Day 7, Day 14, and/or Day 18 of incubation in a very dark room to check for viability and development. At Day 7, look for a network of red blood veins and a dark spot indicating the embryo. By Day 14, the embryo will be larger and the egg will appear more solid, with visible structures like toes and the beak. Around Day 18, the air sac should be large, and you’ll see that the embryo fills most of the egg’s interior.
Can I candle eggs on day 3?
How do you know if an egg is fertile by candling?
You can do this by holding a bright light or candle against the egg in a dark room. A fertilised egg will show some development, such as veins, a dark spot (the embryo), and a shadowy mass. ( I tend to use my Iphone light in a very dark room.
Will eggs still hatch if they get cold?
Yes, fertilized eggs can still hatch after exposure to cold temperatures, though hatch rates decrease significantly and are dependent on the severity and duration of the cold. Eggs must not freeze, as freezing temperatures damage the embryo and can cause the shell to crack, which ruins the egg’s viability. Short periods of cold, like a few hours or even being refrigerated for a few days, can still result in some chicks hatching, but severe or prolonged cold stress will reduce or eliminate the chances of successful hatching.