Are you tired of ending up with dry chicken thighs when baking them? Maybe you’ve wondered if covering them with foil would help? I’ve been there too, and after much trial and error in my kitchen, I’m here to share what I’ve learned about this common cooking dilemma.
Baking chicken thighs seems simple enough but getting them perfectly juicy inside while maintaining that deliciously crispy skin outside can be tricky. The question of whether to cover chicken thighs with foil when baking them is one that many home cooks struggle with – and for good reason!
The Great Foil Debate: Benefits vs. Drawbacks
Benefits of Covering Chicken Thighs with Foil
When you cover chicken thighs with foil during baking, you’re creating several advantages:
- Moisture Retention: The foil traps steam and wetness inside the pan, helping your chicken thighs stay juicy.
- Even Cooking: Covering helps distribute heat more evenly, particularly useful if you’re baking multiple thighs.
- Easy Clean-Up: Let’s be honest – who doesn’t love less mess? Foil catches drips and spills, making clean-up much simpler.
I personally love how tender the meat becomes when it’s allowed to cook in its own juices under foil. There’s something magical about that sealed environment that helps the flavors develop more fully.
Drawbacks of Using Foil
However, covering chicken thighs isn’t always the best approach:
- Soft, Soggy Skin: If you’re looking for that crispy, golden skin (and who isn’t?), covering completely with foil works against you.
- Steaming Instead of Browning: The foil prevents the Maillard reaction – that beautiful browning that adds so much flavor.
- Reduced Flavor Concentration: Any juices released won’t reduce and concentrate when covered, potentially leading to less intense flavor.
The Perfect Compromise: The Partial Cover Method
After experimenting in my kitchen, I’ve found that a compromise approach works best for most chicken thigh recipes:
- Preheat your oven to 400°F
- Season your chicken thighs with your favorite spices (I love using a mix of salt, garlic powder, onion powder, pepper, and sometimes paprika)
- Place the thighs on a rimmed baking sheet, skin-side up
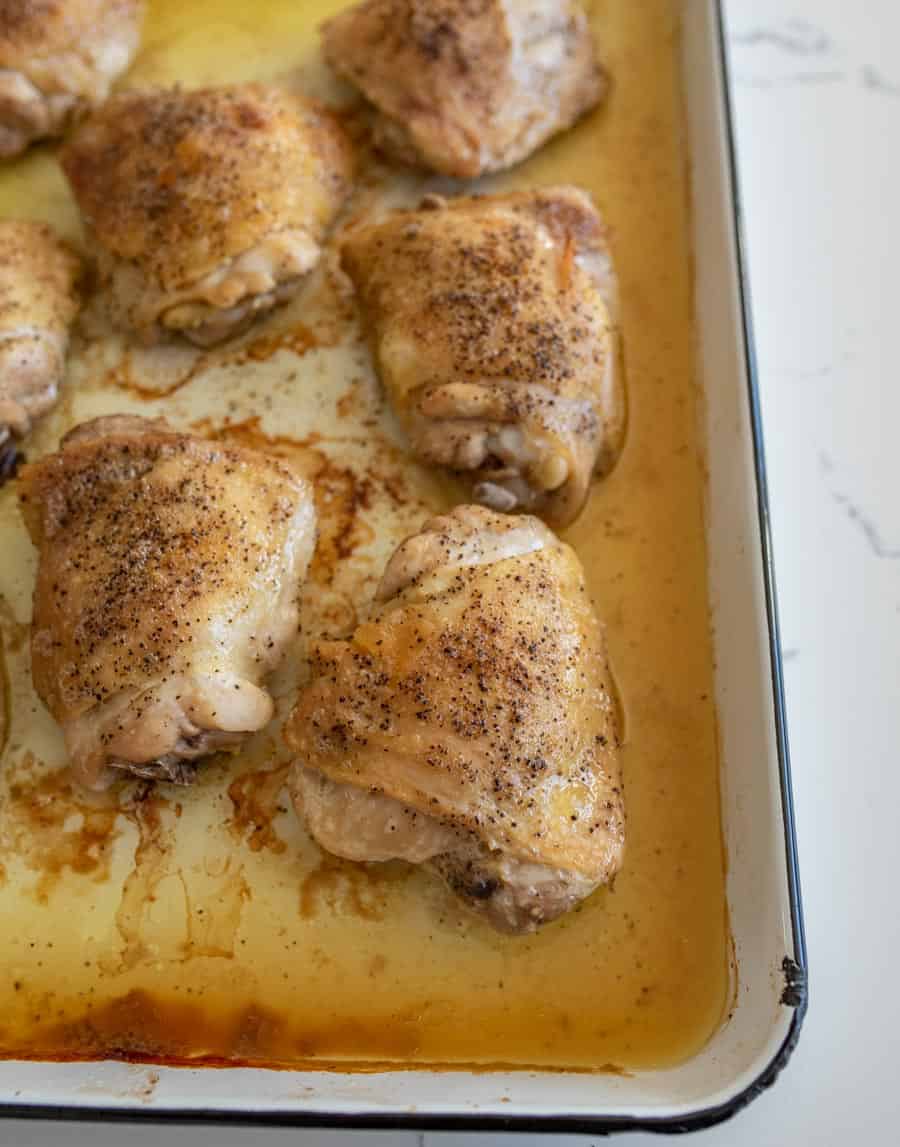
- Bake covered with foil for 40 minutes – this traps moisture and allows juices to stay intact
- Remove the foil and bake for an additional 10-20 minutes – this allows the skin to crisp up beautifully
This two-stage approach gives you the best of both worlds – juicy, tender meat from the covered portion of cooking, and crispy, flavorful skin from the uncovered finishing time
Temperature and Timing Considerations
Getting the temperature and timing right is crucial for perfect chicken thighs:
- Temperature: 400°F works great for most bone-in, skin-on thighs
- Total Cooking Time: 50-60 minutes (40 minutes covered + 10-20 minutes uncovered)
- Internal Temperature: Chicken thighs are done when they reach 165°F on an instant-read thermometer
Remember, chicken thighs are quite forgiving compared to chicken breasts. They have more fat, which helps them stay juicy even if you cook them a bit longer.
Tips for Extra Crispy Skin
If you’re like me and crave that ultra-crispy skin here are some additional tips
- Pat the chicken thighs completely dry with paper towels before seasoning
- Brush with melted butter before adding other seasonings
- If the skin is very long or overhangs the meat, trim it slightly
- For extra crispiness, remove the foil after 30 minutes instead of 40 and finish for 20-30 minutes uncovered
What About Those Delicious Pan Drippings?
Don’t waste those flavorful drippings! Here are two ways I like to use them:
Simple Au Jus Style:
- Remove chicken from the pan
- Pour the drippings into a serving bowl
- Serve alongside the chicken for dipping
Quick Gravy:
- Mix 2 tablespoons cornstarch with 1/4 cup cold water
- Add to the pan drippings in a small saucepan
- Heat over medium-high heat, whisking until the mixture boils and thickens (about 3 minutes)
Serving Suggestions
Chicken thighs are incredibly versatile! Some of my favorite sides to serve with them include:
- Mashed potatoes
- Green beans
- Corn salad
- Coleslaw
- Roasted vegetables (broccoli, zucchini, or beets work great)
- Baked potatoes
- Fresh fruit
- Simple side salad
For a Southern comfort meal, I pair them with mashed potatoes and green beans. If I’m feeling more Southwestern, I’ll serve them with black beans and corn salad.
Storing and Reheating Tips
Made too many chicken thighs? No problem! They store and reheat beautifully:
- Storage: Keep in an airtight container in the fridge for up to 5 days or freeze for up to 4 months
- Reheating: To keep them juicy, place on a baking sheet, cover with foil, and bake at 350°F for 10 minutes. Then remove the foil and bake another 10 minutes until heated through.
Leftover Ideas
Leftover chicken thighs are incredibly versatile! Use them in:
- Soups
- Burritos
- Quesadillas
- Sandwiches
- Chicken salad
- Casseroles
- Enchiladas
FAQ: Your Chicken Thigh Questions Answered
Should I use bone-in or boneless chicken thighs?
Bone-in, skin-on thighs tend to have more flavor and stay juicier during baking. The bones and skin help develop moisture and tenderness while adding flavor.
Can I use this method for boneless, skinless thighs?
Yes, but reduce the cooking time significantly. Boneless thighs may only need 20-30 minutes total, with maybe 15-20 minutes covered and 5-10 minutes uncovered.
How do I know when my chicken thighs are done?
Chicken thighs are done when they’re golden brown and crispy on the outside but register 165°F on an instant-read thermometer. The meat should no longer be pink when cut into.
What if I don’t have foil?
If you don’t have foil, you can use a baking dish with a lid, or even parchment paper as an alternative covering.
Can I add vegetables to roast alongside the chicken?
Absolutely! Just be aware that vegetables release moisture, which might affect how crispy your chicken skin gets. Consider adding them after you remove the foil.
My Final Thoughts
After much experimentation, I’ve found that the partial cover method – baking chicken thighs covered with foil for most of the cooking time and then uncovering to finish – gives the best results. You get juicy, tender meat AND crispy skin.
That said, cooking is personal! Some folks prefer super crispy skin and don’t mind slightly less juicy meat, while others prioritize tenderness above all else. Feel free to adjust the covered vs. uncovered cooking times to match your preference.
What I love most about this method is that it’s nearly foolproof. Even on those busy weeknights when I’m distracted by helping kids with homework or catching up on chores, these chicken thighs turn out delicious every time.
So next time you’re preparing to bake chicken thighs, remember this compromise approach. Cover them for most of the cooking time, then uncover to finish. Your family will think you’ve suddenly become a culinary genius when they taste how perfectly juicy and crispy those thighs are!
Have you tried both methods? Which do you prefer? I’d love to hear about your chicken thigh cooking adventures!

What to Serve with Baked Chicken Thighs
You can serve SO many things with baked chicken thighs! It’s such a versatile meal. Try serving with:
- Green beans
- Mashed potatoes
- Baked potatoes
- Fresh fruit
- A simple side salad
- Baked beans
- Corn salad
- Cole slaw
- Potato salad
- Roasted beets, broccoli, zucchini, or another favorite roasted veggie
Store baked chicken thighs in an airtight container in the fridge for up to 5 days. Freeze for up to 4 months.
You can use leftover chicken thighs in anything you’d use cooked or shredded chicken in! Add to soups, burritos, quesadillas, sandwiches, chicken salad, chicken casserole, or enchiladas!
To reheat baked chicken thighs, place them on a baking sheet, cover with foil, and bake at 350 degrees for 10 minutes. Remove the foil and bake another 10 minutes, or until heated through.
Chicken thighs are done cooking when they’re golden brown and crispy on the outside, but 165 degrees F on in the inside. The inside should also no longer be pink when you cut into the chicken.
This recipe automatically yields a nice and crispy skin thanks to the use of butter and finishing the thighs with the foil removed. If you want it extra-crispy, you can remove the foil after 30 minutes and finish the chicken for another 20-30 minutes uncovered.
How Long to Bake Chicken Thighs
Bake chicken thighs for 40 minutes covered with foil on a baking sheet. This traps in the moisture and allows the juices to stay intact. Remove the foil and bake an additional 10 to 20 minutes to finish the chicken and allow the skin to get crispy. An instant-read thermometer will register 165 degrees F. when finished.