Ever stared at a pack of chicken legs in your fridge and wondered how to transform them into something amazing? I totally get it – chicken legs (aka drumsticks) are cheap and tasty but cooking them perfectly can be tricky. Too often they end up with rubbery skin or dry meat that nobody wants to eat.
Well, I’ve spent countless hours testing different methods, and I’m excited to share what actually WORKS for perfect chicken legs every single time. No more disappointing dinners!
Why Chicken Legs Are Actually Amazing
Before we dive into cooking methods, let’s talk about why chicken legs deserve more love:
- Budget-friendly – usually way cheaper than chicken breasts
- Juicier meat – the dark meat stays moist even if you overcook a bit
- Kid-friendly – built-in handle makes them fun to eat
- Versatile – works with practically any seasoning or sauce
- Nutritious – good source of protein, plus minerals like selenium, iron, and zinc
The Basics: What You’ll Need
Getting ready to cook amazing chicken legs is super simple. Here’s what you’ll need:
- Chicken legs (duh!)
- Rimmed baking sheet
- Aluminum foil (for easy cleanup)
- Wire rack (optional but recommended)
- Paper towels
- Your favorite seasonings
- Meat thermometer (seriously, don’t skip this)
Step 1: Prep Your Chicken Legs Properly
The first step is honestly the most important for getting that crispy skin everybody loves.
- Pat them DRY – I mean REALLY dry. Use paper towels and get all the moisture off. Moisture = enemy of crispy skin!
- Trim any loose bits – Check for loose skin flaps or bone fragments and trim them away
- Let them come to room temp – Taking them out of the fridge 20-30 minutes before cooking helps them cook more evenly
Step 2: Season Those Legs!
Now comes the fun part – seasoning! Here’s my go-to simple seasoning mix that always works:
- 2 teaspoons kosher salt
- 2 teaspoons garlic powder
- 1 teaspoon black pepper
- 1 teaspoon paprika
- Optional: 1-2 teaspoons of other spices like oregano, chili powder, or your favorite blend
Mix all seasonings together, then toss with the chicken legs. Make sure every leg is coated evenly. Some folks like to add a little olive oil first to help the seasonings stick, but this can sometimes make the skin a bit less crispy, so I usually skip it.
Step 3: Set Up Your Baking Sheet
This might seem like a small detail, but it makes a HUGE difference:
- Line a rimmed baking sheet with foil (trust me, you’ll thank me later during cleanup)
- Place a wire rack on top of the foil if you have one
- If using the rack, spray it lightly with cooking spray
The wire rack is kind of my secret weapon here. It lets hot air circulate ALL around the chicken legs, which means crispy skin on all sides without having to flip them!
No rack? No problem! Just place the chicken directly on the foil, but you’ll need to flip them halfway through cooking.
Step 4: Bake at the RIGHT Temperature
After testing many different temps, I can confidently say that 425°F is the sweet spot for chicken legs. Here’s a handy temperature guide:
| Oven Temperature | Approximate Cooking Time |
|---|---|
| 375°F | 45-55 minutes |
| 400°F | 40-45 minutes |
| 425°F | 35-40 minutes (recommended!) |
Place your chicken legs on the rack with the thicker ends toward the outside edges of the pan (these areas cook hotter).
Step 5: Cook to the PERFECT Temperature
This is where most people mess up! For chicken legs, forget what you’ve heard about cooking chicken to just 165°F.
The magic happens at 185°-195°F internal temperature.
At this higher temp, the connective tissue breaks down, making the meat super tender, juicy, and literally falling off the bone. If you stop at 165°F, the legs will be safe to eat but might be kinda chewy and stringy.
Always use a meat thermometer to check – insert it into the thickest part of the meat without touching the bone.
Step 6: Let Them Rest!
Once your chicken legs reach that perfect internal temp, take them out and let them rest for about 5-10 minutes before serving. This lets the juices redistribute so they stay in the meat where you want them.
Troubleshooting: Common Problems & Fixes
Even with the best instructions, sometimes things go wrong. Here’s how to fix common issues:
Skin Not Crispy Enough?
- Did you pat the chicken COMPLETELY dry?
- Is your oven temperature accurate? Get an oven thermometer to check.
- For extra crispiness, you can broil for the last 2-3 minutes (but watch carefully!)
Chicken Cooking Unevenly?
- Place thicker ends toward the outside of the pan where it’s hotter
- Make sure legs aren’t touching each other
- Your oven might have hot spots – rotate the pan halfway through
Still Pink Near the Bone?
- This is normal sometimes! As long as the internal temp is 165°F+, it’s safe.
- With previously frozen drumsticks, bone marrow can release pigment during cooking, causing a harmless pink tinge.
Fancy Variations to Try
Once you’ve mastered the basic method, try these variations:
BBQ Style
Use a BBQ dry rub instead of the basic seasoning. During the last 5 minutes of cooking, brush with your favorite BBQ sauce for a sticky, delicious finish.
Lemon Herb
Add lemon zest to your seasoning mix, and squeeze fresh lemon juice over the legs right before serving. Sprinkle with fresh herbs like parsley.
Spicy Buffalo
After cooking, toss the legs in buffalo sauce mixed with a little melted butter. Return to the oven for 5 minutes to set the sauce.
Side Dishes That Pair Perfectly
What goes great with chicken legs? Here are some ideas:
- Creamy mashed potatoes
- Roasted vegetables
- Simple green salad
- Coleslaw
- Corn on the cob
- Dinner rolls or biscuits
Storing Leftovers (If You Have Any!)
If you somehow have leftovers (which rarely happens in my house!), here’s how to store them:
- Refrigerator: Store in an airtight container for up to 3-4 days
- Freezer: Wrap well and freeze for up to 3 months
- Reheating: For crispy skin, reheat in the oven or air fryer rather than microwave
Final Thoughts: Why This Method Works Every Time
I’ve tried so many different ways to cook chicken legs over the years, and this method consistently gives the best results. The high heat creates that crispy skin we all crave, while cooking to the higher internal temperature ensures tender, juicy meat that practically falls off the bone.
The best part? It’s practically foolproof. Even if you’re new to cooking, you can nail this recipe the first time if you follow these steps.
So next time you see chicken legs on sale at the grocery store, grab a pack (or three!) and give this method a try. Your family will think you suddenly became a professional chef!
Do you have any special tricks for cooking chicken legs? I’d love to hear about them in the comments below!
Note: Remember that while 165°F is considered safe for chicken according to the USDA, chicken legs specifically benefit from cooking to a higher internal temperature of 185°-195°F for the best texture and tenderness.
Boiling Chicken Legs (Drumsticks)
Chicken legs are one of the cheapest cuts of chicken you can buy at the store. They tend to be a little on the tough side if you make them by traditional means, but if you know how to make them the right way, these cheap little chicken legs can turn into a fabulous meal.
Boiling may not seem as appealing as say, the air fryer, but boiling is the perfect way to make chicken legs because it creates tender, mildly flavored chicken that can be seasoned to suit any meal.
Why boil chicken legs? I remember always getting a chicken leg to eat as a child. They were normally good, but sometimes you would get a chewy piece. Have you ever had that experience? Well, with chicken legs and even thighs, the dark meat needs longer to cook than white meat because of the bone inside. Which is why boiling is actually a great way to cook them.
If you just throw a drumstick on the grill or in the oven, many times the outside will be done before the inside, leaving the chicken leg safe to eat, but a bit chewy.
If you boil the chicken legs before you grill or roast them, you will find the outside of the legs to be flavorful and crispy while the meat inside is perfectly tender and ready to fall off the bone.
Can you boil chicken legs from frozen? Yes, frozen chicken legs can be boiled. You will need to increase the cooking time by about 5-10 minutes. Also, if the chicken legs are frozen into a block, it is a good idea to try to separate the chicken legs from the block. This may require some thawing.
Ways to use boiled chicken legs The chicken you get from boiling chicken thighs is perfect for soups, sandwiches, salads, enchiladas, pastas, and even just for snacking. Or you can just eat them as is.
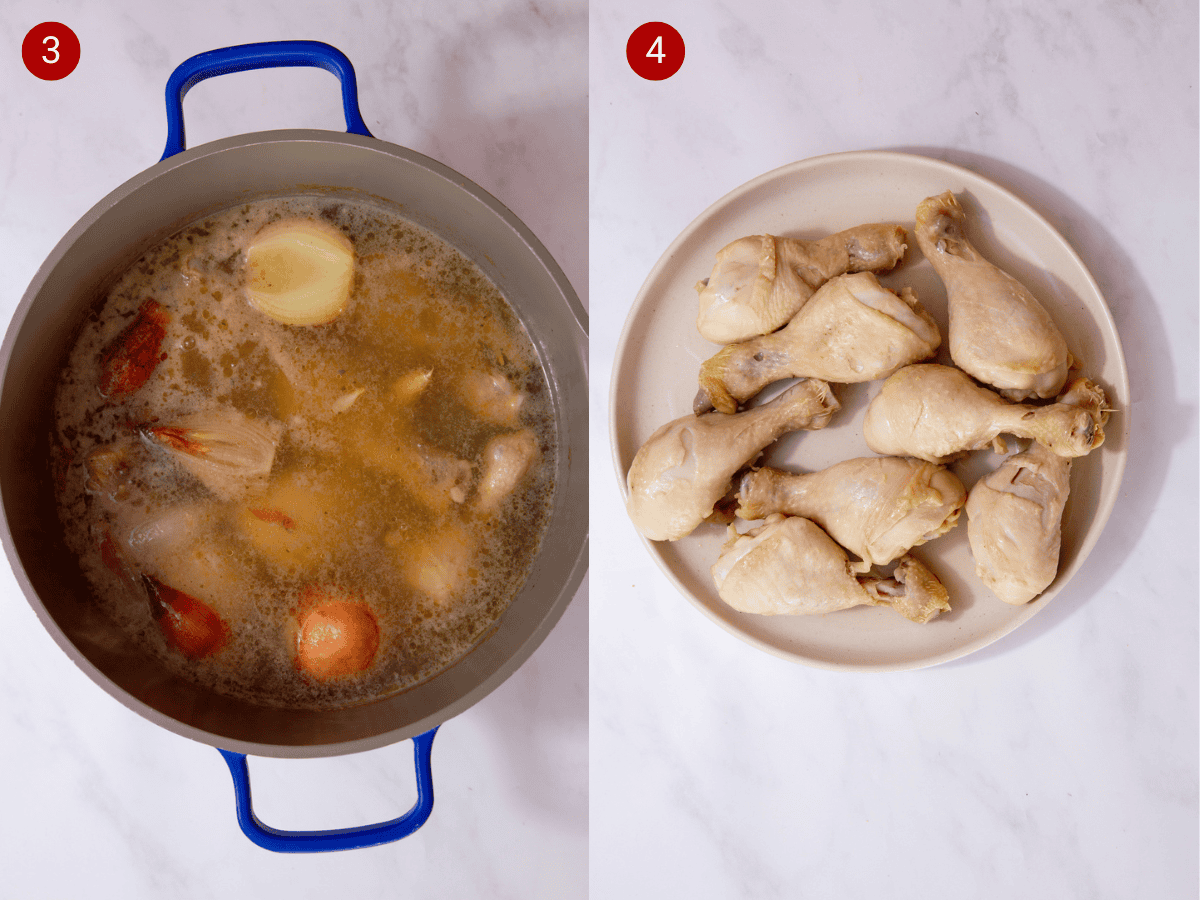
How to boil chicken legs
- To a large saucepan, add around 2 liters of just boiled water. Add the Hainanese paste or ginger, garlic cloves, onions and chicken stock cube. Season the water with salt and pepper. Stir to combine and bring to a low simmer ( 1).
- Place the chicken legs/drumsticks into the saucepan and cook for 20-25 minutes ( 2).

3. After this time, the internal temperature of the chicken leg is 165°C/ 75°C ( 3).
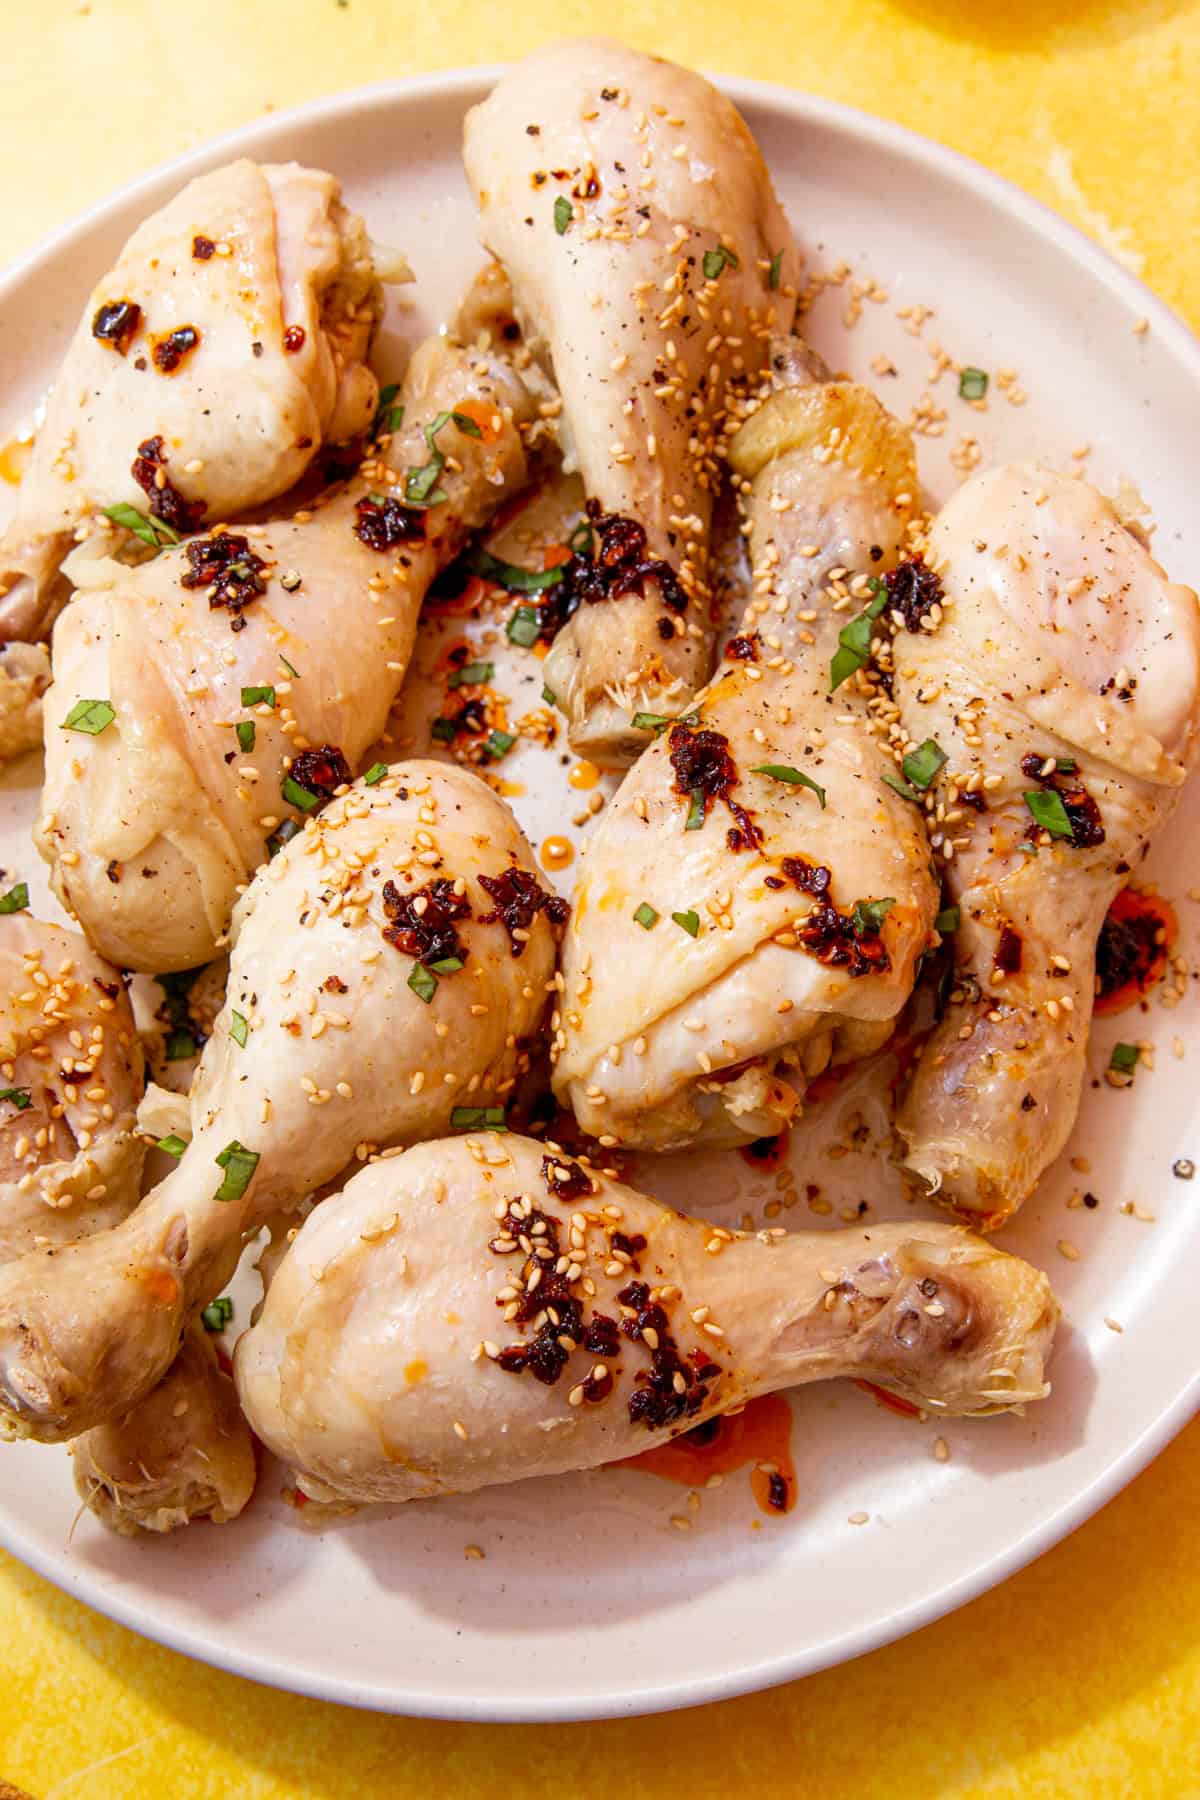
4. Carefully remove the chicken legs with tongs and place on a plate ( 4).
Top with garnishes of your choice, I love to use crispy chilli oil, sesame seeds and chopped Thai basil. Add a crack of black pepper and enjoy!
How to make the BEST Baked Chicken Legs! – Baked Chicken Legs Recipe
FAQ
What is the best way to cook a drumstick?
Here’s a quick overview. Arrange the drumsticks in a single layer on a parchment-lined, rimmed baking sheet and coat them with a paste made from olive oil and spices. Bake the drumsticks in an oven preheated to 400°F for about 40 minutes, until they are cooked through. Serve immediately.
How long does it take to cook chicken legs?
Chicken leg cooking times vary by method, but oven roasting at 400°F for 35-45 minutes is a common range, with the most critical factor being an internal temperature of 165°F (74°C) in the thickest part of the meat, checked with a meat thermometer. For boiling, cook for 30-40 minutes until 165°F is reached.
Should chicken legs be cooked covered or uncovered?
Do you bake drumsticks covered or uncovered? Drumsticks are typically baked uncovered in the oven. This allows them to get crispy and browned, which they won’t do if you cover them. You might end up with steamed drumsticks with soggy skin that way.