Have you ever pulled chicken legs out of the oven only to find them either still pink and underdone or dried out like leather? Yeah, me too. It’s super frustrating when you’re trying to get dinner on the table and your chicken isn’t cooperating. After years of chicken-cooking disasters, I’ve finally cracked the code on how long to cook chicken legs in the oven for that perfect juicy, tender result with crispy skin.
In this guide, I’m sharing everything I’ve learned about baking chicken legs – from temperature recommendations to seasoning tips that’ll make your family beg for seconds. Let’s dive right in!
The Perfect Cooking Time and Temperature
The million-dollar question: how long should you actually cook chicken legs in the oven? Well, it depends on your temperature setting, but here are the standard recommendations:
- At 425°F (220°C): 40-45 minutes
- At 400°F (200°C): 45-50 minutes
- At 375°F (190°C): 50-60 minutes
- At 350°F (175°C): 50-70 minutes (depending on how many legs you’re cooking)
For most home cooks, I find that cooking at 400-425°F gives the best results – crispy on the outside, juicy on the inside, and ready in under an hour. But honestly, you can adjust based on what else you might be cooking in the oven at the same time.
Don’t Trust Time Alone – Check the Temperature!
Here’s something super important that many recipes don’t emphasize enough: cooking times are just guidelines! The real way to know if your chicken legs are done is by checking their internal temperature.
According to food safety experts, chicken should reach a minimum internal temperature of 165°F (74°C) to be safe to eat. But for chicken legs specifically, I’ve found that letting them go a bit higher actually improves the texture.
- Bone-in chicken legs: Aim for 175°F (79°C)
- Boneless chicken legs: Aim for 170°F (77°C)
I can’t stress enough how valuable a good meat thermometer is. Insert it into the thickest part of the meat (not touching the bone) to get an accurate reading. Trust me, it’s worth the investment!
Step-by-Step Guide to Perfect Oven-Baked Chicken Legs
Let’s break this down into a super simple process:
1. Prep Work (10 minutes)
- Preheat your oven to 425°F (220°C).
- Pat the chicken legs dry with paper towels (this is KEY for crispy skin!).
- Line a rimmed baking sheet with parchment paper or aluminum foil for easy cleanup.
- If you have time, let the chicken sit at room temperature for 20 minutes (this helps it cook more evenly).
2. Season Like You Mean It (5 minutes)
Here’s a basic seasoning mix that never fails:
- 2 tablespoons olive oil
- 1 teaspoon kosher salt
- ½ teaspoon black pepper
- 1 teaspoon garlic powder
- 1 teaspoon onion powder
- 1 teaspoon smoked paprika
- ¼ teaspoon cayenne pepper (optional for heat)
Mix these together in a bowl, then coat the chicken legs thoroughly with this mixture. You can use your hands (wearing gloves if you prefer) or put everything in a zip-top bag and shake to coat.
3. Arrange for Success (2 minutes)
Place the seasoned chicken legs in a single layer on your prepared baking sheet. Don’t crowd them! They need space for the hot air to circulate and create that crispy skin we all love.
Pro tip: If you have a wire rack that fits your baking sheet, place it on top and arrange the chicken legs on that. This lifts them off the sheet and allows even more air circulation for maximum crispiness.
4. Bake to Perfection (40-45 minutes)
Pop the baking sheet in the preheated oven and let those legs cook for about 40-45 minutes. If you want extra crispy skin, you can:
- Baste with the pan juices about 15 minutes before they’re done
- Switch to broil for the last 2-3 minutes (but watch them like a hawk!)
5. Rest Before Serving (5 minutes)
This step is often skipped, but it’s crucial! Let the chicken legs rest for about 5 minutes after removing them from the oven. This allows the juices to redistribute throughout the meat, resulting in juicier chicken.
Visual Cues for Doneness
While a meat thermometer is the most reliable way to check doneness, there are some visual cues that can help:
- The skin should be golden brown and crispy, not pale and limp
- When pricked with a fork, the juices should run clear (not pink)
- The meat should feel firm when gently pressed
- No jiggling or wobbling when you move the drumstick
Common Questions About Baking Chicken Legs
Can I cook chicken legs from frozen?
While it’s technically possible, I don’t recommend it. Frozen chicken legs will cook unevenly, with the outside potentially drying out before the inside is safely cooked. Always thaw your chicken legs completely in the refrigerator before baking.
If you’re in a rush, you can safely thaw them in cold water (changing the water every 30 minutes), but never use hot water as this can encourage bacterial growth.
Should I cover chicken legs while baking?
This depends on what you’re going for! If you want crispy skin (which, let’s be honest, is the best part), then no – don’t cover them. Baking uncovered allows the skin to crisp up beautifully.
However, if you’re more concerned about moisture than crispy skin, you can cover them with foil for the first 30 minutes, then uncover for the last 10-15 minutes to crisp up the skin a bit.
Can I use boneless chicken legs?
Absolutely! Boneless chicken legs will cook faster than bone-in ones, so start checking the temperature around the 35-40 minute mark. They’re done when they reach an internal temperature of 170°F (77°C).
What if my chicken legs are browning too quickly?
If you notice the skin getting too dark before the chicken is cooked through, simply loosely cover the pan with aluminum foil. This will slow down the browning while allowing the meat to continue cooking.
Troubleshooting Common Chicken Leg Problems
Dry, Overcooked Chicken
This is usually caused by cooking too long or at too high a temperature. Remember to:
- Use a meat thermometer
- Remove the chicken at 175°F for bone-in legs
- Let the chicken rest after cooking
Skin Not Crispy Enough
For maximum crispiness:
- Pat the chicken dry before seasoning
- Don’t overcrowd the pan
- Use a wire rack if possible
- Consider broiling for the last few minutes
Undercooked Chicken
If your chicken legs aren’t cooking through properly:
- Make sure they’re fully thawed before cooking
- Check your oven temperature with an oven thermometer
- Don’t stack or crowd the chicken legs
- Allow enough cooking time (larger legs will take longer)
Storage and Leftovers
Got leftover chicken legs? Lucky you! They make great next-day lunches. Here’s how to store them:
- Refrigerate in an airtight container for 3-4 days
- Reheat in a 350°F oven for about 15 minutes until heated through
- For maximum crispiness when reheating, use an air fryer if you have one!
You can also remove the meat from leftover chicken legs to use in salads, sandwiches, or pasta dishes.
My Favorite Flavor Variations
While the basic seasoning mix I shared earlier is fantastic, don’t be afraid to experiment! Here are some of my favorite flavor profiles:
BBQ Style
- Replace the seasoning mix with your favorite BBQ rub
- Brush with BBQ sauce during the last 5-10 minutes of cooking
Lemon Herb
- Add zest of 1 lemon to your seasoning mix
- Add 1 teaspoon each of dried oregano and thyme
- Squeeze fresh lemon juice over the chicken after cooking
Honey Garlic
- Mix 3 tablespoons honey with 4 minced garlic cloves
- Brush over chicken legs during the last 10 minutes of cooking
What to Serve with Oven-Baked Chicken Legs
Since you’ve already got the oven going, why not make it a complete meal? These sides work perfectly at the same oven temperature:
- Roasted vegetables (broccoli, cauliflower, carrots)
- Baked potatoes or sweet potatoes
- Roasted Brussels sprouts with bacon
- Cauliflower tots
- Garlic bread
Final Thoughts
Baking chicken legs in the oven doesn’t have to be complicated. With the right temperature, seasoning, and a reliable meat thermometer, you can create juicy, flavorful chicken legs that your whole family will love.
Remember, the most important factors are:
- Proper seasoning
- Adequate cooking time
- Checking the internal temperature
- Allowing the chicken to rest before serving
Follow these guidelines, and you’ll have perfect chicken legs every single time! Do you have a favorite seasoning combo for chicken legs? I’d love to hear about it in the comments!

To play this video you need to enable JavaScript in your browser.
This video can not be played
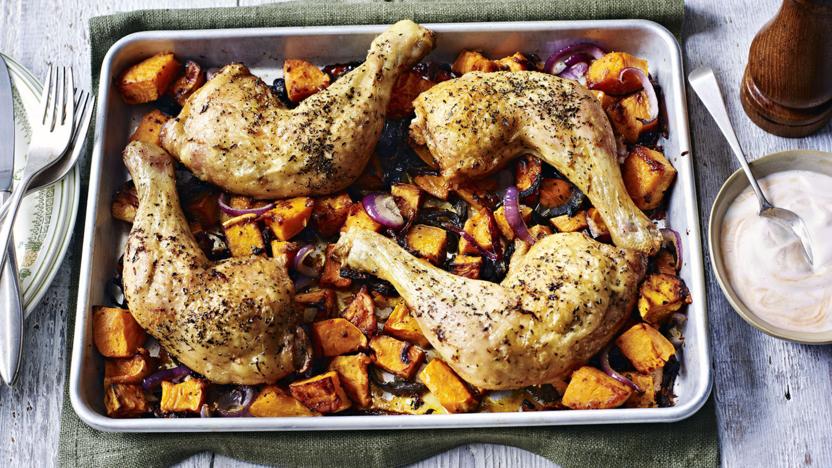
Try this chicken leg traybake for maximum flavour, minimum fuss! Roast everything in one tin with some herbs and garlic and youve got a very easy meal for four.
- 150g/5½oz natural yoghurt
- 1 tsp hot sauce (optional)
- Preheat the oven to 200C/180C Fan/Gas 6. Mix the garlic, oil and mixed herbs in a large bowl. Set aside a little of the herby oil for the chicken. Combine the sweet potatoes and onions in the large bowl with the herby oil, toss to coat then tip into a large roasting tray.
- Slather the chicken in the remaining herby oil and place on top of sweet potatoes and onions. Roast in the oven for 40 minutes or until cooked through. Give the tray a shake half way through to make sure the sweet potato doesnât stick to the roasting tray. The chicken is cooked if the juices run clear when a skewer is inserted into the thickest part of the thigh.
- Remove the tray from the oven. Leave it to rest for 10 minutes for the chicken to become tender.
- Meanwhile, mix together the yoghurt and hot sauce. Serve the chicken and vegetables with the yoghurt on top.