Hey there! I’m gonna share my absolute favorite shortcut for making the most delicious chicken pot pie without all the fuss of traditional pie crust If you’re anything like me – always looking for hearty, comforting meals that don’t take hours to prepare – then this Bisquick chicken pot pie recipe is about to become your new go-to dinner!
Why Make Chicken Pot Pie with Bisquick?
Let’s be real – traditional pot pies are amazing but can be a pain to make from scratch. That’s where Bisquick comes in to save dinner! Here’s why I love using Bisquick for pot pies:
- It’s super fast – Dinner on the table in under an hour!
- Uses simple ingredients – Most stuff you probably already have
- Kid-friendly – Even picky eaters tend to gobble this up
- Customizable – Adapt it based on what’s in your fridge
- Truly satisfying – That golden, flaky top is comfort food perfection
What You’ll Need
The beauty of this recipe is how simple the ingredient list is! Here’s what you’ll need:
Basic Ingredients:
- 1-2 cups cooked chicken, cubed or shredded
- 1 can (10.5 oz) condensed cream of chicken soup
- 1-2 cups frozen mixed vegetables
- 1 cup Bisquick baking mix
- 1/2 cup milk
- 1 egg
- Salt, pepper, and herbs to taste
That’s it! I always keep these staples on hand for those nights when I need something hearty but don’t have time to run to the store.
Step-by-Step Instructions
Alright, let’s get cooking! This is seriously one of the easiest recipes ever
Step 1: Prepare Your Filling
- Preheat your oven to 400°F (important first step!)
- In a bowl, combine your cooked chicken, frozen veggies (no need to thaw), and cream of chicken soup
- Season with salt, pepper, and dried thyme (or whatever herbs you like)
- Stir everything together until well combined
Pro tip For extra flavor, I sometimes sauté the veggies in a bit of butter first Totally optional but adds a nice touch!
Step 2: Make the Bisquick Topping
- In a separate bowl, mix together the Bisquick, milk, and egg
- Stir just until a soft dough forms – don’t overmix!
- The consistency should be thick enough to spread over the filling
Step 3: Assemble Your Pot Pie
- Pour the chicken filling into a 9-inch pie dish (ungreased)
- Top with the Bisquick mixture, spreading it evenly over the filling
- Use a spatula to make sure the entire filling is covered
My secret: Sometimes I sprinkle a little shredded cheddar on top before baking. The kids go crazy for this!
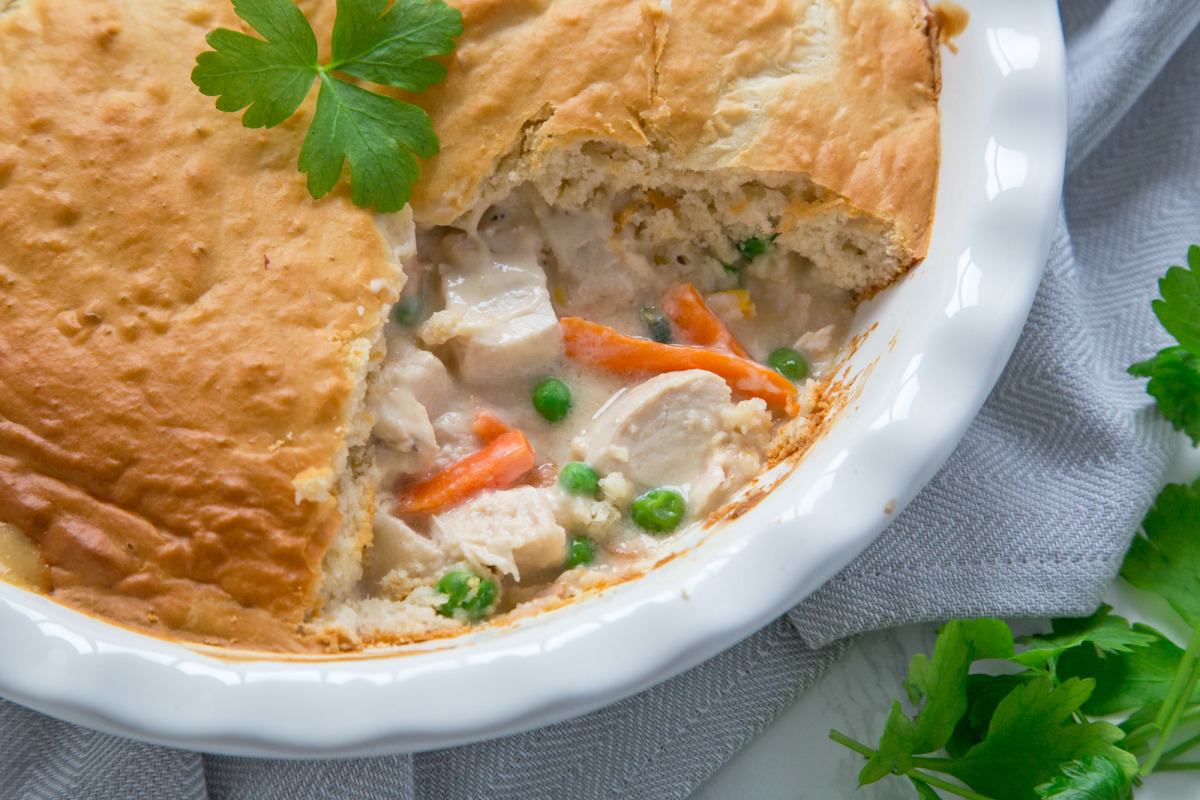
Step 4: Bake to Golden Perfection
- Bake at 400°F for about 25-30 minutes
- You’ll know it’s done when the top is beautifully golden brown and the filling is bubbling
- Let it rest for 5-10 minutes before serving (trust me on this one!)
Variations to Try
What I love about this recipe is how flexible it is! Here are some of my favorite ways to mix it up:
Meat Options:
- Use leftover turkey (great after Thanksgiving!)
- Try ground beef for a different twist
- Go meatless with extra veggies for a vegetarian version
Veggie Variations:
- Add mushrooms for an earthy flavor
- Throw in some spinach for extra nutrition
- Use whatever frozen veggie mix you have on hand
Flavor Boosters:
- Mix in 1/2 cup shredded cheese into the filling
- Add garlic powder and onion powder
- Use cream of mushroom soup instead of chicken
Make It Mini:
One of my family’s favorites is making individual pot pies in a muffin tin! Just:
- Follow the same recipe
- Divide filling among 12 muffin cups
- Top each with about 1 tablespoon of Bisquick mixture
- Bake for about 25 minutes
The kids absolutely LOVE having their own personal pot pies!
Common Questions & Troubleshooting
How do I keep the bottom from getting soggy?
If you’re worried about sogginess, try adding the Bisquick mixture to both the bottom and top of the pie. Put a thin layer on the bottom, add your filling, then top with the remaining Bisquick.
Can I make this ahead of time?
Absolutely! You can:
- Prep the filling a day ahead and refrigerate
- Assemble the entire pie and refrigerate unbaked (for up to 24 hours)
- Freeze the fully assembled unbaked pie for up to 3 months
Just add about 10-15 minutes to the baking time if cooking from cold.
What if my filling is too runny?
If your filling seems too liquidy, try:
- Adding 1-2 tablespoons of flour to the filling
- Using less chicken broth
- Making sure your chicken isn’t too wet when added
Can I use gluten-free Bisquick?
Yes! Gluten-free Bisquick works great as a substitute with no other recipe changes needed.
Storage and Reheating Tips
Got leftovers? Lucky you! Here’s how to handle them:
- Refrigerate: Store cooled leftovers in an airtight container for 3-4 days
- Freeze: Wrap individual portions tightly and freeze for up to 3 months
- Reheat: Warm in a 350°F oven for about 10 minutes or microwave individual portions
I actually think the flavors get even better the next day, making this perfect for meal prep!
Why This Recipe Works Every Time
What makes this Bisquick chicken pot pie so reliable is its simplicity. By using Bisquick, you get that perfect golden crust without the hassle of making pastry dough. The condensed soup provides the creamy base without needing to make a roux or white sauce.
I’ve made this probably a hundred times over the years, and it never disappoints. It’s my go-to for:
- Busy weeknights
- Comfort food cravings
- Using up leftover chicken
- Bringing a meal to a friend in need
Serving Suggestions
While this pot pie is definitely a complete meal on its own, I sometimes like to serve it with:
- A simple green salad
- Steamed broccoli or green beans
- Cranberry sauce (especially if using turkey!)
- Dinner rolls for sopping up extra sauce
Final Thoughts
Honestly, there’s something magical about pulling a golden, bubbling chicken pot pie out of the oven on a cold evening. The way the savory aroma fills the kitchen and how that first bite of creamy chicken and veggies wrapped in flaky crust just makes everything feel right in the world.
And the fact that it takes just minutes to throw together? That’s what I call winning at dinner!
So next time you’re craving comfort food but don’t have the time for anything complicated, remember this Bisquick chicken pot pie. It’s saved my dinner plans more times than I can count, and I’m betting it’ll become a regular in your rotation too!
Would love to hear if you try this recipe and what variations you come up with! Do you have any special add-ins that make your chicken pot pie extra special? Drop me a comment below!
Quick Recipe Card
Prep Time: 10 minutes
Cook Time: 30 minutes
Total Time: 40 minutes
Servings: 6
Ingredients:
- 1 cup cooked, cubed chicken
- 1 can (10.5 oz) condensed cream of chicken soup
- 1 2/3 cups frozen mixed vegetables
- 1/2 tsp dried thyme
- Salt and pepper to taste
- 1 cup Bisquick baking mix
- 1/2 cup milk
- 1 egg
Instructions:
- Preheat oven to 400°F
- Mix chicken, vegetables, soup, and seasonings in pie dish
- Combine Bisquick, milk, and egg in separate bowl
- Pour Bisquick mixture over filling
- Bake 25-30 minutes until golden
- Let stand 5 minutes before serving
Enjoy your delicious homemade chicken pot pie made easy with Bisquick!
Bisquick Chicken Pot Pie
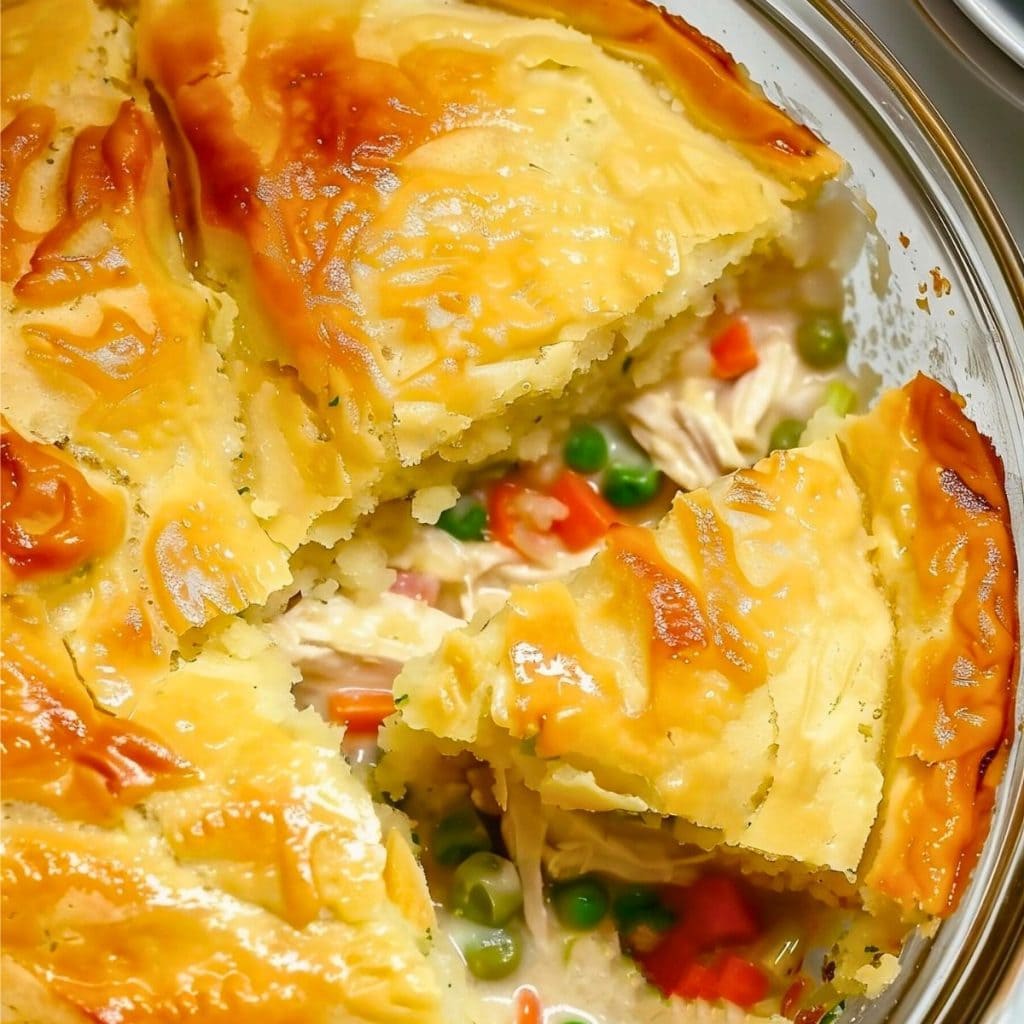
There’s nothing more heartwarming or belly-filling than a warm, flaky-crusted pot pie.
The succulent chunks of meat, the tender veggies, and the thick, creamy sauce are so irresistible.
And thanks to Bisquick, it’s beyond simple to whip up.
So forget about rolling pastry and just grab that box of baking mix! After just 10 minutes of prep, you’ll have dinner in the oven.
This might be the shortest ingredient list for a pot pie you’ve ever seen. You only need the following ingredients:
- Mixed veggies. Make life easier for yourself by using frozen mixed veggies. You can grab a bag at any grocery store that’ll save you tons of time. You won’t have to worry about chopping, dicing, washing, and peeling.
- Chicken. Use whatever cooked chicken you have on hand. You can pick up some canned chicken or use leftovers from last night’s dinner. Just be sure it’s fully cooked.
- Cream of chicken soup. A can of condensed soup will give you the thick, creamy sauce that makes pot pies so delectable.
- Bisquick. Original Bisquick is your secret ingredient in this recipe. It’s what saves you from having to make or buy a pie crust. Trust me, no one will ever know you didn’t painstakingly make the perfect pie.
- Milk. Whole milk works best in this recipe. It combines with the soup to make the sauce thick and delicious.
- Egg. You only need one. It’ll help hold everything together.
So check your pantry because you might already have everything you need!

Tips for the Best Chicken Pot Pie
Here are a few tips for making the best chicken pot pie!
- Make it herby. If you want to add extra herbs, go for it! I love to sprinkle some thyme, garlic powder, parsley, and other things into my pie.
- Use a deep-dish pie pan. This recipe works best in a 9 x 13-inch pie pan. The deep-dish ones are even better.
- Seasoned chicken is delicious. This is so easy because it calls for cooked chicken. And nothing beats the incredible flavor you get from rotisserie chicken.
- Sprinkle some cheese on top. You can do this when the pie has about 10 minutes left in the oven. It gives it an irresistible, yummy cheese topping.
- Use foil to keep it from burning. The pie needs to cook through completely, but sometimes the top may start to burn. If that happens, cover the top with aluminum foil.
As I’ve already mentioned, you can use whatever chicken you have for this recipe.
Of course, chicken is only one of your options. Here are a few popular variations on this recipe:
- Use turkey or beef instead of chicken. You can even eliminate the meat entirely and have a veggie pot pie instead.
- Use canned or fresh veggies if you don’t have frozen ones. Keep in mind that fresh veggies will need to be sauteed first. Otherwise, they might not cook fully.
- Additionally, canned veggies are more likely to become overcooked. Keep a close eye on the pie if using them.
- Add extra veggies. Even if you start with frozen mixed veggies, you don’t have to stop there. Add some extras, like mushrooms or spinach, if you want.
- Swap out the soup. Cream of celery or cream of mushroom will also work. They each give the pie a slightly different flavor than the cream of chicken soup.
- Any baking mix will work. Earlier, I said Bisquick was the star of this show, and now I’m saying you don’t need it!?! No, I’m not actually saying that. Bisquick works best.
- You can make the whole pie cheesy. I’ve already mentioned adding cheese to the top of the pie. But you can also make the inside cheesy!
Don’t just stick to cheddar, either. Try some of the more exotic varieties, like Gruyere, Gouda, or Pepper Jack.
You can also sprinkle a bit of parsley or other fresh herbs on top before serving.
Make any adjustments you like to suit your and your family’s tastes.

Now, let’s cover storage, freezing, and reheating.
To Store: Place fully cooled leftovers into an air-tight container. Or wrap the pie plate tightly in plastic wrap.
Either way, the leftovers should remain fresh for 3 to 4 days.
To Freeze: Transfer the cooled pot pie to a freezer-safe air-tight container. Add a date, and place it upright in the freezer.
It should be fine for up to 3 months.
Try to keep it closer to the front of the freezer. Shoving it in the back could cause freezer burn.
To Reheat: Reheat refrigerated leftovers in the microwave. Just cover a portion with plastic wrap then microwave in 30-second intervals until hot.
Or, for better texture, heat larger portions in the oven at 350°F for about 10 minutes.
Heat frozen leftovers for 15-20 minutes.
Oh, and check out my post on how to reheat rotisserie chicken so the meat stays nice and juicy!