Have you ever wondered why some chicken dishes are so incredibly tender that they practically fall off the bone? The secret might be braising! As someone who’s spent countless hours experimenting in the kitchen, I’ve found that braising chicken is one of those techniques that can transform an ordinary meal into something extraordinary.
Braised chicken is comfort food at its finest – succulent, flavorful, and surprisingly simple to prepare once you understand the basics. Whether you’re a novice cook or a seasoned chef, mastering this technique will elevate your cooking game significantly.
What Is Braised Chicken? A Culinary Deep Dive
Braised chicken is a cooking method where chicken is first seared to develop flavor and then gently simmered in liquid usually a flavorful broth wine, or sauce, until incredibly tender. This slow-cooking process breaks down tough connective tissues, resulting in a succulent and flavorful dish.
The beauty of braising is that it’s a two-step process that combines the best of both worlds – the caramelized flavors from searing and the tenderness achieved through slow, moist cooking.
The Art of Braising: A Time-Honored Technique
Braising has been around for centuries, and for good reason! It’s a versatile technique that’s applicable to various meats and vegetables, but it truly shines when applied to chicken. It transforms potentially dry or tough cuts into dishes brimming with flavor and boasting a melt-in-your-mouth texture.
The key lies in the two-stage process
1. Searing: Building the Foundation of Flavor
The initial sear is crucial for developing a rich Maillard reaction on the surface of the chicken. This browning process not only adds color but also unlocks complex flavors that permeate the entire dish. Think of it as building the flavor foundation upon which the braise will rest.
When I’m searing chicken, I prefer using:
- A cast-iron skillet
- A Dutch oven
- A heavy-bottomed pot
The goal is consistent, even browning on all sides of the chicken pieces. I usually use a bit of olive or vegetable oil for this step.
2. Simmering: Tenderness Through Time
Once seared, the chicken is submerged, partially or fully, in a flavorful liquid. This liquid slowly tenderizes the chicken as it simmers over low heat. The long, slow cook time allows the liquid to penetrate the meat, imbuing it with its own distinct flavor profile and breaking down tough collagen into gelatin.
The key here is gentle simmering, not a rapid boil, to ensure even cooking and prevent the chicken from drying out.
Regional Variations and Flavor Profiles
One thing I absolutely love about braised chicken is how versatile it is across different culinary traditions. Here are some global variations that showcase just how adaptable this technique can be:
Coq au Vin: A French Classic
Perhaps the most iconic example is Coq au Vin, a French classic featuring chicken braised in red wine, typically Burgundy. The dish is often enriched with mushrooms, bacon (lardons), and pearl onions, creating a deeply savory and sophisticated flavor profile.
Chicken Cacciatore: Italian Hunter’s Stew
In Italy, Chicken Cacciatore, or “hunter’s stew,” features chicken braised with tomatoes, peppers, onions, mushrooms, and herbs. The vibrant tomato sauce provides a bright and acidic counterpoint to the rich chicken, making it a comforting and satisfying meal.
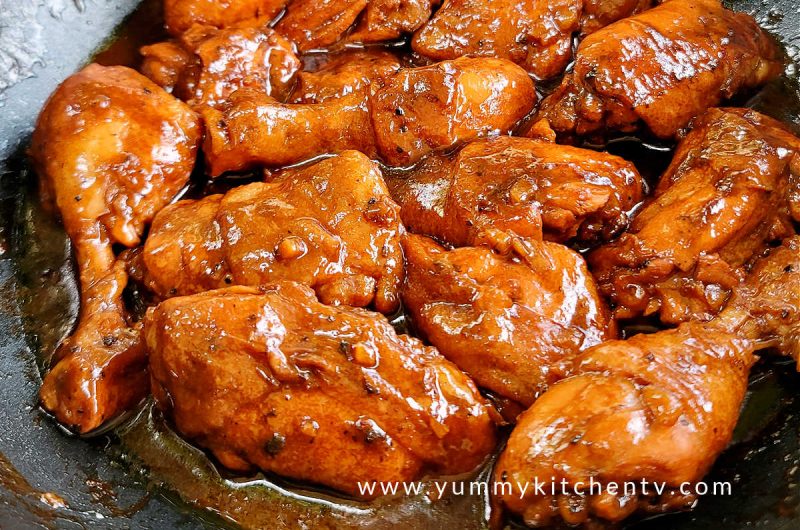
Adobo: A Filipino Staple
Filipino Adobo braises chicken in soy sauce, vinegar, garlic, and peppercorns. The resulting sauce is a complex blend of salty, sour, and savory flavors that penetrate the chicken deeply. I tried making this last month and my family couldn’t get enough!
Mexican Mole: A Rich and Complex Sauce
While often associated with other proteins, braised chicken is exceptional when paired with Mexican Mole. This complex sauce, made with chilies, spices, nuts, and sometimes chocolate, creates a deeply flavorful and intensely aromatic dish that is both rich and satisfying.
How to Braise Chicken Breasts
While most people associate braising with bone-in, skin-on chicken pieces, you can absolutely braise boneless, skinless chicken breasts too! Here’s my go-to method:
- Prep pan: Coat the bottom of a heavy large skillet (preferably cast iron) with oil and heat over high heat.
- Sear chicken: Place chicken breasts in a single layer in hot skillet and cook for 1 minute or until lightly browned. Turn over and cook 1 minute.
- Add liquid and seasoning(s): Add about 1/2 cup of your chosen liquid (sherry, wine, broth, etc.) and seasonings like a bay leaf or herb sprigs. Bring to a boil; reduce heat, cover, and simmer.
- Cook until done: Simmer until an instant read thermometer inserted into the thickest portion reads 160 to 165 degrees F, around 15 to 20 minutes.
- Cool: Remove chicken from pan and set aside to cool if you’re using it in another recipe.
Braising Liquid Options
The liquid you choose will significantly impact the flavor of your finished dish. Here are some excellent options:
- Dry white wine
- Dry sherry
- Chicken or vegetable broth
- Water (if you’re adding lots of herbs and aromatics)
- Tomato juice or sauce
- Beer or cider
- Coconut milk
Frequently Asked Questions About Braised Chicken
What type of chicken is best for braising?
Dark meat, like chicken thighs and drumsticks, is generally preferred for braising because it contains more fat and connective tissue, which break down during the long cooking process, resulting in a more tender and flavorful result. However, bone-in, skin-on chicken breasts can also be braised successfully, although they might require slightly less cooking time. Even boneless, skinless breasts can be braised to wonderful tenderness!
Can I braise chicken in a slow cooker or Instant Pot?
Yes! Both slow cookers and Instant Pots are excellent tools for braising chicken. In a slow cooker, sear the chicken first, then transfer it to the slow cooker with your chosen braising liquid and cook on low for 6-8 hours. In an Instant Pot, use the sauté function to sear the chicken, then add the braising liquid and cook on high pressure for 15-20 minutes, followed by a natural pressure release.
How much liquid should I use when braising chicken?
The amount of liquid needed depends on the recipe and the size of your pot. Generally, the liquid should come about halfway up the chicken pieces, or just enough to partially submerge them. You don’t want to completely drown the chicken, as this can dilute the flavors.
How do I know when the braised chicken is done?
The chicken is done when it is fork-tender, meaning you can easily pierce it with a fork and the meat readily pulls away from the bone. The internal temperature should reach 165°F (74°C).
Can I add vegetables to the braising pot?
Absolutely! Adding vegetables like carrots, onions, celery, potatoes, and mushrooms to the braising pot not only adds flavor but also creates a complete and satisfying meal. Add root vegetables earlier in the cooking process so they have time to soften, and add more delicate vegetables later to prevent them from becoming mushy.
How do I thicken the braising sauce?
If the braising sauce is too thin, you can thicken it in several ways:
- Remove the chicken from the pot and reduce the sauce over medium-high heat
- Make a slurry of cornstarch or flour and water and whisk it into the simmering sauce
- Use a roux (equal parts butter and flour cooked together)
What’s the difference between braising and stewing?
While similar, braising typically involves larger pieces of meat cooked partially submerged in liquid, whereas stewing involves smaller pieces of meat completely submerged in liquid. Braising often starts with searing, while stewing may not.
How long does braised chicken last?
Properly stored, cooked braised chicken will last for 3-4 days in the refrigerator or up to 2-3 months in the freezer. Make sure to cool the chicken completely before storing it in an airtight container.
What to Serve with Braised Chicken
Braised chicken pairs wonderfully with sides that can soak up its delicious sauce. Some of my favorites include:
- Mashed potatoes
- Fluffy rice
- Creamy polenta
- Pasta
- Couscous
- Crusty bread
- Roasted vegetables
Why I Love Braised Chicken
I gotta tell you, braising chicken has become one of my favorite cooking methods for family dinners. There’s something almost magical about the transformation that happens during the braising process. Chicken that might otherwise be ordinary becomes extraordinary, infused with deep flavors and a texture that’s just perfect.
Plus, it’s pretty forgiving! You don’t have to watch it constantly like you do with some other cooking methods. Once it’s simmering away, you can go about preparing the rest of your meal or even put your feet up for a bit.
The other thing I love about braised chicken? It’s even better the next day! The flavors have time to meld and intensify overnight, making leftovers something to look forward to rather than just a convenient meal.
Final Thoughts
Braising chicken is one of those techniques that delivers results far beyond the effort required. It allows you to create restaurant-quality dishes with relatively little active cooking time. Whether you’re preparing a weeknight dinner or a special occasion meal, understanding how to braise chicken opens up a world of culinary possibilities.
So next time you’re looking to elevate your chicken game, try braising! Start with a simple recipe like basic braised chicken thighs with herbs, and once you’re comfortable with the technique, branch out to more complex flavor profiles. Your taste buds (and dinner guests) will thank you!
What’s your favorite braised chicken recipe? I’d love to hear about your experiences with this wonderful cooking technique!
How To Make Braised Chicken Thighs
- Vegetable Oil: Vegetable oil has a high smoke point, which makes it perfect for getting a nice sear on our chicken thighs.
- Chicken Thighs: Look for bone-in, skin-on chicken thighs for this recipe. I use around 6, but depending on the size of your chicken thighs, you may have one less or more.
- Shallots: Shallots will cook down beautifully in our sauce, adding so much flavor and texture to the final bite. I recommend opting for shallots instead of a yellow or red onion—they have a more mild flavor.
- Ginger & Garlic: Garlic is a flavor superstar in countless of our recipes, and is joined by ginger here for a fragrant, spiced flavor.
- Sake: You can use sake or a dry white wine in this recipe—either will do!
- Reduced-Sodium Soy Sauce: Do not, I repeat, do not, use full-sodium soy sauce. Your final dish will be far too salty if you do.
- Granulated Sugar: Some granulated sugar doesn’t make our sauce overly sweet, but it will balance all of our other flavors with a hint of sweetness.
- Sesame Oil: Sesame oil is wonderful for adding a toasted, almost nutty flavor. Definitely don’t add more than what is called for—a little goes a long way.
First, arrange a rack in the center of your oven, and preheat it to 425°. Then, in a large, deep, ovenproof skillet, heat vegetable oil over high heat. Season both sides of your chicken thighs well with salt and pepper, then add to the skillet skin-side down. Cook, turning the chicken halfway through, until deeply golden—this should take around 6 minutes per side. Once done, transfer to a plate while you prepare the sauce.

In the same skillet, cook your shallots, ginger, and garlic over medium-high heat. Cook, while stirring, until they are fragrant. Then, add the wine and cook until reduced by about half, making sure you’re stirring frequently. Once reduced, add the water, soy sauce, and sugar and bring to a boil. Once boiling, add the chicken skin-side up back into the skillet, tucking them between the shallots.

Transfer the skillet to the oven to braise the chicken uncovered. Cook until an instant-read thermometer inserted into the thickest part registers 165°—this should take around 35 minutes, but keep an eye on it. Once done, transfer the chicken to a platter, and return the skillet to high heat. Cook the sauce while stirring occasionally until it has thickened. This should take around 3 minutes, but again, keep an eye on it. Once done, pour the sauce and sesame oil over the chicken, then top with sesame seeds and scallions before serving.
The full list of ingredients and instructions can be found in the recipe below.
- What is braising exactly? It’s a two-step cooking process that involves an initial fry (or sear) followed by slow simmer in a liquid like wine or broth. The result is extremely tender meat with a flavorful crust. Basically, it’s the best of both worlds!
What To Serve With Braised Chicken Thighs
I love to serve these thighs over fluffy, white rice to soak up that delicious sauce, but I also think this would go great with some bok choy or roasted asparagus.
If you have any leftovers, they should keep in an airtight container in the fridge for up to 5 days and in the freezer for up to 4 months.
- 1 Tbsp. vegetable oil
- 2 1/2 lb. bone-in, skin-on chicken thighs (about 6)
- Kosher salt
- Freshly ground black pepper
- 4 small shallots, peeled, halved if large
- 1 (2″) piece ginger, peeled, grated
- 5 garlic cloves, grated
- 3/4 cup sake or dry white wine
- 3/4 cup water
- 2/3 cup reduced-sodium soy sauce
- 1/4 cup (50 g.) granulated sugar
- 1 Tbsp. toasted sesame oil
- Toasted sesame seeds, thinly sliced scallions, and cooked white rice, for serving
-
- Step 1 Arrange a rack in center of oven; preheat to 425°. In a large, deep, ovenproof skillet over high heat, heat vegetable oil. Season chicken with salt and pepper. Add chicken to skillet skin side down and cook, turning halfway through, until deeply golden, about 6 minutes per side. Transfer to a plate.
- Step 2 In same skillet over medium-high heat, cook shallots, ginger, and garlic, stirring, until fragrant, about 1 minute. Add wine and cook, stirring frequently, until reduced by about half, about 3 minutes. Add water, soy sauce, and sugar and bring to a boil. Nestle chicken skin side up in skillet, tucking in between shallots.
- Step 3 Transfer skillet to oven and braise chicken, uncovered, until an instant-read thermometer inserted into thickest part registers 165°, about 35 minutes.
- Step 4 Transfer chicken to a platter. Return skillet to high heat and cook, stirring occasionally, until sauce is thickened, about 3 minutes. Pour sauce and sesame oil over chicken.
- Step 5 Top with sesame seeds and scallions. Serve with rice alongside.