Have you ever wrestled with a roll of chicken wire that seems to have a mind of its own? You’re not alone! Getting chicken wire stretched tight enough to look professional is one of those seemingly simple tasks that can drive even experienced DIYers crazy I’ve been there myself – tugging at stubborn rolls, battling against sagging sections, and wondering if there’s some secret technique I’m missing
After years of trial and error (and a few choice words muttered under my breath), I’ve finally mastered the art of stretching chicken wire. Today, I’m gonna share everything I’ve learned to help you get that perfect, tight installation for your chicken coop, garden fence, or whatever project you’re tackling.
What Exactly Is Chicken Wire?
Before diving into stretching techniques, let’s make sure we’re on the same page about what we’re working with:
Chicken wire (also called poultry netting) is a flexible mesh made from thin metal wires arranged in hexagonal patterns. It comes in various specifications:
- Materials: Usually galvanized steel, stainless steel, or PVC-coated wire
- Mesh sizes: Common openings include 1/2″, 1″, and 2″ hexagons
- Wire gauge: Varies by manufacturer (thinner gauge numbers mean thicker wire)
- Sold in: Rolls of various widths and lengths
The inherent flexibility that makes chicken wire so versatile also makes it challenging to stretch properly. But that’s what we’re here to fix!
Why Proper Stretching Matters
You might wonder if stretching chicken wire really matters. Trust me it does! Here’s why
- Appearance: Saggy, loose chicken wire looks amateur and messy
- Functionality: Loose wire can allow small predators to push through or chickens to escape
- Durability: Properly tensioned wire holds its shape better over time
- Stability: Taut wire provides better resistance against animals pushing or leaning on it
- Less maintenance: You won’t need to constantly re-tighten sagging sections
Essential Tools and Materials
Before starting, gather these items:
- Chicken wire (slightly more than you need)
- Heavy-duty gloves (chicken wire edges are SHARP!)
- Wire cutters
- Pliers (regular and needle-nose)
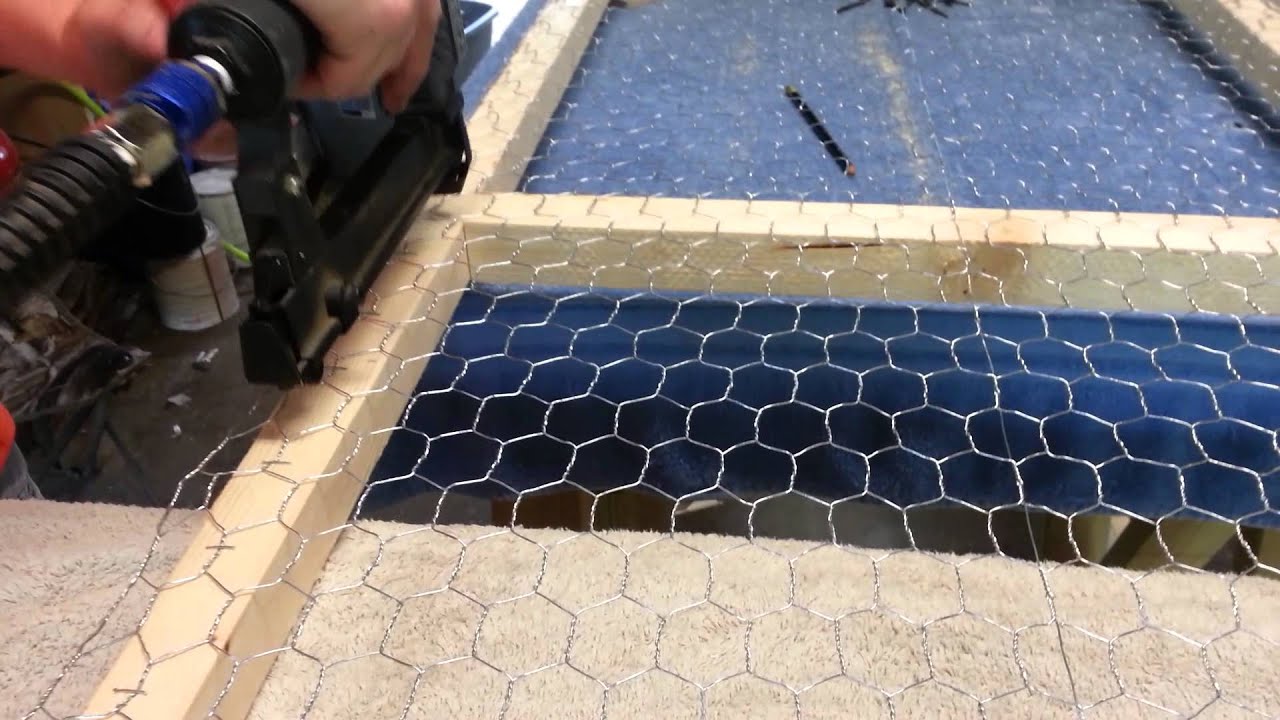
- Staple gun with heavy-duty staples (or fencing nails)
- Zip ties (optional but helpful)
- A helper (makes the job MUCH easier)
- Stretching boards (for one particular method we’ll discuss)
Preparation: The Key to Success
Proper prep work makes all the difference:
- Clear your workspace – Remove debris, rocks, and branches from the fence line
- Measure carefully – Cut chicken wire about 5-10% longer than needed to allow for stretching
- Unroll completely – Lay out the chicken wire flat on the ground to help remove the “memory” of being rolled
- Walk on it – Yes, really! Walking on unrolled chicken wire helps flatten it and remove some curl
- Plan your anchor points – Identify where you’ll secure the wire for maximum tension
Stretching Method 1: The Two-Person Technique
This is the most straightforward approach for smaller projects
- Secure one end – Staple or nail one edge of the chicken wire to your first post/frame
- Pull from opposite end – Have your helper hold the secured end while you pull the wire toward the opposite post
- Apply diagonal tension – Pull slightly upward and outward to create even tension across the entire width
- Work in sections – For longer runs, secure as you go every few feet
- Check tension constantly – Look for even tightness across the entire panel
- Secure permanently – Once properly stretched, add additional staples or fasteners every 6-8 inches
Stretching Method 2: The Board Method
This clever technique works amazingly well, especially for solo workers:
- Get two straight boards – They should be the same width as your chicken wire
- Unroll the chicken wire – Lay it flat on the ground
- Attach to boards – Place one board under the top edge of the wire and nail the wire to it; repeat with the second board at the bottom edge
- Position the boards – Bring them to your installation area
- Secure the top board – Nail it to your post or frame
- Pull the bottom board – Pull downward to create tension and nail it in place
- Add middle supports – Once the top and bottom are secure, add staples or nails in the middle sections
This method distributes tension evenly across the entire width and creates a professional-looking installation.
Stretching Method 3: Section-by-Section Approach
For longer runs or complex installations:
- Secure the top first – Stretch and secure the top edge all the way to a corner or end
- Go back to start – Return to your starting point
- Stretch the bottom – Pull the bottom straight down and secure it
- Secure the end – Go to the opposite end, stretch the bottom and secure it
- Work the middle – Moving along the fence line, stretch straight down and secure the middle sections
Tips for Dealing with Particularly Stubborn Chicken Wire
Sometimes, despite your best efforts, chicken wire just doesn’t want to cooperate. Here are some tricks I’ve learned:
- Let it rest – Unroll the wire and leave it flat with weights on it for a day or two before installation
- Use the “upside down” trick – Unroll the wire so the end curls into the ground, weigh it down, and leave it for a couple days
- Apply heat – In cold weather, working in a warmer area can make the wire more pliable
- Smaller sections – Work with manageable lengths rather than trying to stretch long runs
- Diagonal tension – Always pull at a slight angle rather than perfectly straight
Securing Your Stretched Chicken Wire
Once you’ve got that perfect tension, you need to secure it properly:
- Staples: Use heavy-duty staples every 6-8 inches along framing
- Zip ties: Great for attaching to metal posts or other wire fencing
- Wire: You can use thinner wire to tie chicken wire to supports
- U-nails: These work well for attaching to wooden frames
- Hog rings: Special clips that can be applied with pliers to join sections
Common Problems and Solutions
Problem: Wire still sags after installation
Solution: Check your anchor points – you may need additional support posts. Also, consider adding a tension wire along the top and bottom.
Problem: Chicken wire won’t stay flat against the ground
Solution: Dig a small trench (about 12 inches deep), bury part of the wire, and backfill with soil.
Problem: Difficulty maintaining even tension across the width
Solution: Use the board method described above or work with a helper to pull evenly from both sides.
Problem: Wire keeps curling back up
Solution: Unroll it “upside down” so the curl bites into the ground, then weigh it down for a couple of days before installation.
Real-World Applications and Examples
Chicken wire isn’t just for chicken coops! Here are some projects where proper stretching techniques make all the difference:
- Garden fencing: Keep rabbits and other critters out
- Compost bin walls: Allow airflow while containing materials
- Craft projects: From decorative garden elements to lampshades
- Small animal enclosures: For rabbits, guinea pigs, etc.
- Trellis material: Support for climbing plants
- Childproofing: Securing balconies or stairways
Final Thoughts
Stretching chicken wire properly is more art than science. It takes practice and patience, but the results are worth it. Remember these key points:
- Preparation is crucial – take time to unroll and flatten the wire
- Use diagonal tension rather than pulling straight
- Secure both sides and top/bottom evenly
- Work in manageable sections
- Check tension frequently as you go
With these techniques in your DIY arsenal, you’ll never have to live with saggy, unprofessional chicken wire again. Your projects will look better, function better, and last longer.
Have you tried any of these methods? Do you have your own special technique for stretching chicken wire? I’d love to hear your experiences and tips in the comments below!
FAQ: Your Chicken Wire Questions Answered
Q: Can chicken wire be stretched after it’s already installed?
A: It’s difficult but possible. You’ll need to remove most fasteners except at one end, then re-stretch and secure. It’s usually easier to start fresh.
Q: How tight should chicken wire be?
A: Tight enough that it doesn’t visibly sag or move easily when pressed, but not so tight that it distorts the hexagonal pattern significantly.
Q: Is it better to stretch chicken wire vertically or horizontally?
A: For most installations, stretching horizontally along the length of the fence line works best, but applying diagonal tension as you go.
Q: How do I join two pieces of chicken wire?
A: Overlap the edges by at least 3-4 inches, then secure with hog rings, zip ties, or by weaving wire through both sections.
Q: Can I use chicken wire for a permanent fence?
A: Chicken wire isn’t ideal for permanent, standalone fencing as it can deteriorate over time. For permanent installations, consider using it in combination with more durable materials or choosing heavier gauge hardware cloth instead.
Remember, practice makes perfect. Your first attempt might not be flawless, but each time you work with chicken wire, you’ll get better at achieving that professional, tight installation we all want!