The content from 101 Cooking For Two describes a pan-seared oven-baked chicken breast recipe that takes about 30 minutes It explains the process of searing chicken on the stovetop and then finishing it in the oven to reach 165°F internal temperature
Chef’s Resource provides a comprehensive guide on why you should sear chicken breast before baking, explaining the science behind the Maillard reaction, troubleshooting common problems, and answering various FAQs about the technique.
Bradley’s Fine Diner offers information about the benefits of searing chicken before baking, including enhanced flavor, better texture, faster cooking, improved appearance, and retaining juices.
Now I’ll create an article based on this information:
Have you ever struggled with dry, flavorless chicken breasts? We’ve all been there. You pop them in the oven hoping for a delicious meal, only to end up with bland, rubbery chicken that nobody wants to eat. But what if I told you there’s a simple trick that could transform your chicken game forever?
Yes, you absolutely should sear your chicken before baking it. This simple technique makes a world of difference in flavor, texture, and juiciness. And today, I’m gonna share exactly why and how to do it right.
Why Searing Chicken Before Baking Makes All the Difference
When I first tried the sear-then-bake method, I was honestly shocked at how much better my chicken turned out Here’s why this technique works so darn well
1. It’s All About That Flavor Boost
Searing triggers what food scientists call the Maillard reaction – a fancy term for that magical browning process that happens when proteins and sugars are exposed to high heat. This reaction creates complex, savory flavors that you simply can’t achieve through baking alone.
Think about it – which would you rather eat: pale, bland-looking chicken or chicken with a gorgeous golden-brown crust packed with rich flavors? The answer’s pretty obvious!
2. The Texture is Way Better
One of the biggest problems with just baking chicken is the texture. But when you sear first:
- The outside gets this amazing crispy crust
- The inside stays tender and juicy
- You get a delightful contrast between the exterior and interior
This textural difference isn’t just nice – it’s what makes restaurant-quality chicken so satisfying.
3. It Actually Saves You Time
Believe it or not, the sear-then-bake method can actually be faster than just baking alone. Since the chicken is partially cooked during the searing process, it needs less time in the oven. This means:
- Dinner on the table faster
- Less chance of overcooking and drying out your chicken
- Less overall cooking time
4. Your Chicken Will Look Way More Appetizing
Let’s be honest – appearance matters when it comes to food. Chicken that’s just baked often looks pale and unappetizing. But that beautiful brown crust from searing? That’s what makes people go “wow” when you serve dinner.
5. It Locks in Those Precious Juices
Perhaps the most important benefit: searing helps create a barrier that keeps moisture inside the chicken as it bakes. This is crucial for preventing the dreaded dry chicken problem we’ve all experienced.
How to Perfectly Sear Chicken Before Baking: Step-by-Step
Now that you know why searing is so important, let’s talk about how to do it right. I’ve messed this up plenty of times before getting it right, so learn from my mistakes!
What You’ll Need:
- Boneless, skinless chicken breasts (about 10-12 oz each)
- Salt, pepper, and your favorite seasonings
- 1 teaspoon high-heat oil (avocado, canola, or grapeseed work great)
- An oven-safe skillet (cast iron is perfect)
- Paper towels
- Meat thermometer
Step 1: Prep Your Chicken Right
Start by patting those chicken breasts completely dry with paper towels. This step is SUPER important! Any excess moisture will cause the chicken to steam rather than sear, and you’ll miss out on that beautiful browning.
If your chicken breasts are over ¾ inch thick, consider flattening them slightly with a meat mallet or the bottom of a heavy pan. This helps them cook more evenly.
Season generously with salt and pepper or your favorite seasoning blend. (I love using a mixture of salt, pepper, and garlic powder).
Step 2: Get Your Pan Properly Hot
Heat your oven-safe skillet over medium-high heat until it’s really hot. Add a teaspoon of oil and let it get shimmering hot. This takes about 1-2 minutes.
Pro tip: If you add the chicken when the pan isn’t hot enough, it’ll stick and won’t develop that amazing crust.
Step 3: Sear Like You Mean It
Carefully place your chicken breasts in the hot pan, making sure not to overcrowd it. For best results:
- Let them cook without moving them for about 3-4 minutes
- They should be getting nicely browned on the bottom
- Flip once and sear the other side for another 3-4 minutes
- You want the chicken to be almost the color you want when eating
Step 4: Finish in the Oven
Preheat your oven to 375°F (if using convection) or 400°F (conventional oven). Once both sides are beautifully seared, transfer the entire skillet to the oven.
Bake until the chicken reaches an internal temperature of 165°F. This usually takes:
- About 15 minutes for average-sized breasts
- 10 minutes for thinner pieces
- Up to 20 minutes for thicker pieces
Always use a meat thermometer to check for doneness. This is the only reliable way to know your chicken is properly cooked without overdoing it.
Step 5: Let It Rest (Don’t Skip This!)
This might be the hardest part – you need to let that beautiful chicken rest for about 5 minutes before cutting into it. I know you’re hungry, but this resting period allows the juices to redistribute throughout the meat instead of spilling out onto your cutting board.
Common Problems (And How to Fix Them)
Problem: My Chicken Isn’t Browning Properly
Solution: Make sure your pan is hot enough before adding the chicken, the chicken is thoroughly dried with paper towels, and you’re not overcrowding the pan.
Problem: My Chicken Is Burning on the Outside
Solution: Your heat is probably too high. Reduce it slightly and keep a closer eye on the searing process.
Problem: My Chicken Is Still Dry
Solution: You might be overcooking it in the oven. Use a meat thermometer and remove the chicken as soon as it hits 165°F. Also, don’t skip the resting period!
Problem: My Chicken Is Sticking to the Pan
Solution: Make sure your pan is properly heated before adding oil, then heat the oil before adding chicken. Don’t try to flip the chicken too early – it will naturally release from the pan when a proper crust has formed.
What Type of Pan Works Best?
For the best results, I strongly recommend using a cast iron skillet. Here’s why:
- It maintains even heat distribution
- It can go straight from stovetop to oven
- It creates an amazing sear
- It’s relatively non-stick when properly seasoned
If you don’t have cast iron, any oven-safe, heavy-bottomed skillet will work. Just make sure it can handle high heat and go into the oven safely (watch those plastic handles!).
FAQ About Searing Chicken Before Baking
Can I use bone-in chicken for this method?
Yes! Bone-in chicken works great with this method. Just keep in mind that it will take longer to cook through in the oven. Use your meat thermometer to ensure it reaches the proper temperature.
What oil is best for searing chicken?
Use oils with high smoke points like avocado, canola, or grapeseed oil. Avoid olive oil or butter by themselves as they can burn at high searing temperatures. If you want the flavor of butter, add it at the end of the searing process.
Can I marinate my chicken before searing?
Yes, but make sure to pat the chicken very dry before searing, or the marinade will prevent proper browning. Marinades containing sugar can burn quickly, so be cautious with those.
How thick should my chicken breasts be?
Ideally, chicken breasts should be no more than ¾ to 1 inch thick for this method. If they’re thicker, pound them slightly to even out the thickness for more consistent cooking.
Can I add vegetables to the pan while baking?
Absolutely! After transferring the seared chicken to the oven, you can add quick-cooking vegetables around it. They’ll absorb all those delicious flavors from the chicken.
The 30-Minute Weeknight Dinner Solution
One of the things I love most about this technique is how perfect it is for busy weeknights. From start to finish, you can have an amazing chicken dinner on the table in about 30 minutes.
This was my go-to method for years when I’d get home late from work but still wanted a proper home-cooked meal. I’d take 5-10 minutes to prep and sear the chicken, pop it in the oven while I unwound from the day, and dinner would be ready in 15-20 minutes.
It’s faster than ordering takeout, way healthier, and honestly tastes better than a lot of restaurant chicken I’ve had.
Final Thoughts: Give Searing a Try!
If you’ve been struggling with boring, dry chicken breasts, I really hope you’ll give this sear-then-bake method a try. It’s been a total game-changer in my kitchen, and I bet it will be in yours too.
The combination of that flavorful, crispy exterior with a juicy, tender interior is hard to beat. And once you master this technique, you can apply it to other proteins like pork chops, steaks, and more.
Remember – good cooking often comes down to simple techniques applied well. Searing before baking is definitely one of those techniques worth adding to your cooking arsenal!
Have you tried searing chicken before baking? What were your results? Drop a comment below with your experiences or questions!
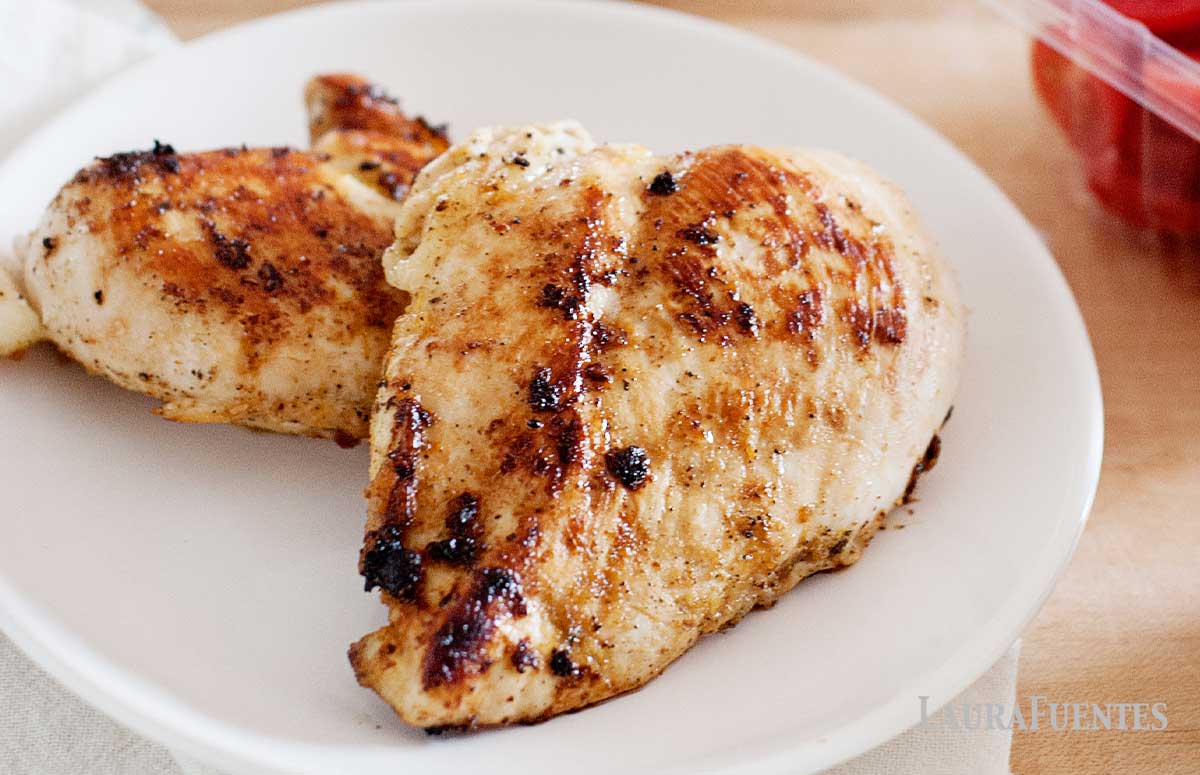
What Does it Mean to Sear Chicken
To sear chicken means to cook it at a high temperature in a hot pan until a golden-brown crust forms on the surface. This is done with oil so the chicken’s surface ‘sears’ evenly without sticking.
Searing gives chicken and other meats that mouthwatering look and flavor in addition to sealing all the juices inside the meat.
You can cook chicken in this fashion for a quick entreé or before baking it in the oven if you want your chicken to have a crisp crust on the outside.
How to Know when Seared Chicken is Done
Seared chicken is done when the internal temperature reaches 165F for chicken breasts and 175F for thighs. Both surfaces should have an even, golden brown exterior.
If you are baking the chicken after searing, you don’t need to cook it as long, you’ll flip it once the chicken is easy to lift from the pan.