Deboning a chicken might seem intimidating at first, but with the right techniques and tools, anyone can master this valuable culinary skill. I’ve been deboning chickens for years, and I’m excited to share a comprehensive guide that combines insights from professional chefs and my own experience. Whether you’re preparing a stuffed chicken, making a roulade, or just want more control over your chicken pieces, learning to debone will elevate your cooking game.
Why Should You Learn to Debone a Chicken?
Before diving into the steps, let’s understand the benefits:
- Even, faster cooking times without bones
- Ability to create impressive stuffed chicken dishes
- More versatile chicken pieces for various recipes
- Makes carving and serving much easier
- Allows you to make rich chicken stock from the bones
Essential Tools You’ll Need
Having the right equipment makes deboning much easier
- Sharp boning knife (6-inch flexible blade works best)
- Sturdy cutting board (preferably with a groove to catch juices)
- Kitchen shears for trimming
- Paper towels for cleaning your hands and workspace
Preparing Your Workspace
Safety and cleanliness are critical when handling raw poultry
- Thoroughly clean your work surface
- Wash your hands before and after handling raw chicken
- Keep separate cutting boards for poultry and other foods
- Have a bowl ready for bones if you plan to make stock
Detailed Step-by-Step Deboning Process
Step 1: Position the Chicken
- Rinse the chicken thoroughly under cold water
- Pat dry with paper towels
- Place the chicken breast-side down with legs facing toward you
Step 2: Remove the Backbone
- Locate the backbone running down the middle of the chicken
- Using your knife, cut along one side of the backbone from tail to neck
- Repeat on the other side to completely remove the backbone
- Set the backbone aside for making stock later
This first major cut is crucial—stay close to the bone to preserve as much meat as possible.
Step 3: Access the Keel Bone (Breastbone)
- Make a small 1/2-inch slit through the cartilage in front of the keel bone
- Crack open the keel bone by folding the chicken outward
- Break the delicate skin on either side of the keel bone with your finger
- Pull out the keel bone completely
The keel bone is the breastbone located at the front of the bird, opposite from the backbone. Removing it cleanly will give you better access to the rest of the chicken.
Step 4: Separate the Chicken
- Flip the chicken over
- Slice down the middle where the keel bone used to be
- Cut the bird into halves
- Separate the thighs from the breasts by cutting through the joint
Always try to cut through joints rather than bones—it’s much easier! When you find resistance, adjust your knife position to find the joint.
Step 5: Debone the Chicken Breasts
- Remove the wing tips and discard (or save for stock)
- Separate the wings from the breasts at the “shoulder” joint
- Carefully remove the rib bones from the breast
- Trim any excess cartilage or fat
When cutting around bones, try to stay as close as possible to preserve maximum meat.
Step 6: Debone the Chicken Legs (Drumsticks)
- Score the leg around the “handle” of the drumstick
- Use your knife to scrape the meat from the bone
- Make a slice through the meat to reach the bone
- Slide the meat off the bone and remove it
Scoring means making small, shallow cuts through the skin or meat—this helps you manipulate the meat more easily.
Step 7: Debone the Chicken Thighs
- Score around the thigh bones
- Carefully scrape the meat away from the bone
- Cut away any meat still attached to the bone
- Remove the thigh bone completely
Thigh bones can be a bit tricky because of the joint structure, but with practice, you’ll get better at navigating this part.
Step 8: Final Trimming and Shaping
- Check for any remaining small bones or cartilage
- Trim excess fat or skin if desired
- Shape the deboned chicken pieces as needed for your recipe
- If making a whole deboned chicken, you can now stuff and tie it
Alternative Deboning Methods
The Whole Bird Method
If you want to keep the chicken whole for stuffing:
- Follow steps 1-3 above
- Instead of cutting the chicken in half, carefully continue deboning around the carcass
- Remove the leg and wing bones while keeping the skin intact
- Leave the wing tips attached for presentation if desired
Spatchcocking (Butterflying)
For a partial deboning that’s great for grilling:
- Remove only the backbone
- Flatten the chicken by pressing down on the breastbone
- This allows for more even cooking while keeping most bones intact
Tips for Success from a Home Cook
I’ve messed up plenty of chickens while learning this skill, so let me share what I’ve learned:
- Work slowly at first—speed comes with practice
- Keep your knife sharp—a dull knife is dangerous and will tear the meat
- Use your fingers to feel for bones and joints
- Don’t worry if you tear the skin—it happens to everyone
- Practice makes perfect—each chicken gets easier!
What to Do with Your Deboned Chicken
Now that you’ve successfully deboned your chicken, here are some delicious ways to use it:
- Stuffed whole chicken with herbs, bread stuffing, or rice
- Chicken roulade (rolled and tied)
- Even-cooking roasts without worrying about different cooking times for different parts
- Stir-fries with perfectly sized pieces
- Chicken salad with uniform pieces
Don’t Waste Those Bones!
The bones and scraps make amazing chicken stock:
- Place all bones, wing tips, and cartilage in a large pot
- Add aromatics like onion, carrot, and celery
- Cover with cold water and simmer for 2-4 hours
- Strain and use for soups, sauces, or freeze for later
Common Questions About Deboning Chicken
Is it better to debone a raw or cooked chicken?
Raw chicken is significantly easier to debone. The meat is firmer and easier to work with, whereas cooked chicken tends to fall apart more easily.
How long does it take to debone a chicken?
As a beginner, expect to spend 30-45 minutes on your first attempt. With practice, you can get this down to 15-20 minutes.
What if I tear the skin while deboning?
Don’t panic! Small tears aren’t a big deal. For larger tears, you can use butcher’s twine to stitch the skin back together or secure it with toothpicks before cooking.
Can I debone just part of the chicken?
Absolutely! Many recipes call for boneless breasts or thighs while leaving other parts bone-in. Feel free to debone only what you need.
Safety Reminders
When working with raw chicken, always:
- Wash hands thoroughly before and after handling
- Sanitize all surfaces that contact the raw chicken
- Cook chicken to an internal temperature of 165°F (74°C)
- Refrigerate or freeze deboned chicken promptly if not cooking immediately
Learning to debone a chicken takes practice, but it’s so rewarding! I still remember my first attempt—it wasn’t pretty, but the chicken still tasted great. Now I can debone a whole chicken in under 20 minutes, and the presentation of my stuffed chickens has improved tremendously.
Give it a try, and don’t get discouraged if your first attempt isn’t perfect. Each time you’ll get better, and soon you’ll be deboning chickens like a pro chef!

How to Debone Chicken Breasts
 10.Cut off the wing tips. Discard.
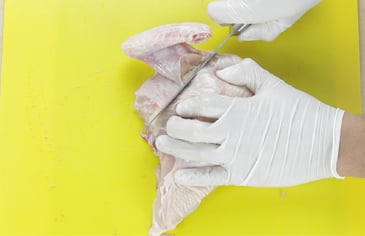 11.Separate the wings and breasts at the “shoulder” joint.
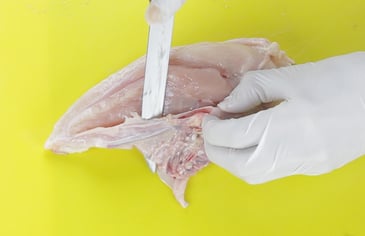 12.Remove the rib bones. Discard.
 10.Cut off the wing tips. Discard.
 11.Separate the wings and breasts at the “shoulder” joint.
 12.Remove the rib bones. Discard.
How to Debone a Whole Chicken
Our video walks you through how to debone a whole chicken step by step.