Hey there fellow food lovers! If you’ve ever stood over a hot stove wonderin’ “how long does it take to pan sear chicken breast?” then you’re in the right spot. I’m here to spill all the juicy deets on gettin’ that perfect golden crust while keepin’ the inside tender and moist. Spoiler alert it usually takes about 15 minutes total dependin’ on a few things. But don’t just take my word for it—stick with me, and I’ll walk ya through every step, trick, and tidbit to make sure your chicken game is on point!
At our lil’ kitchen corner, we’re all about makin’ cooking simple, fun, and downright delicious. Pan-searing chicken breast is one of those skills that looks fancy but is super easy once ya know the timing and a few hacks. Whether you’re a newbie or a seasoned home cook, I’ve got your back with a breakdown that’s gonna turn your meals into somethin’ special. Let’s dive right in!
What Is Pan Searing, Anyway?
Before we get to the nitty-gritty of timing, let’s chat about what pan-searing even means. It’s a quick cooking method where you cook chicken (or other meats) in a hot pan with a bit of oil or butter to get a crispy, golden-brown crust on the outside while lockin’ in the juices inside. It’s perfect for chicken breast ‘cause it cooks fast and adds a ton of flavor without needin’ a bunch of fancy gear. All ya need is a good skillet, some heat, and a lil’ patience.
Why do we love it? ‘Cause it’s quick versatile and makes your kitchen smell amazin’. Plus, a well-seared chicken breast is the base for tons of meals—think salads, sandwiches, or a hearty dinner with some veggies on the side.
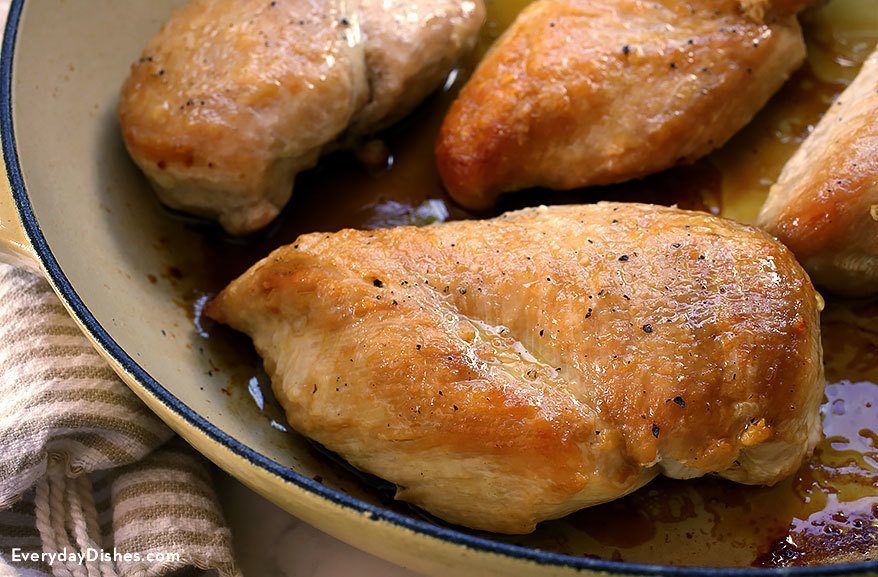
How Long Does It Take to Pan Sear Chicken Breast? The Straight Answer
Alright, let’s cut to the chase. For a typical boneless, skinless chicken breast (about 6 ounces), pan-searing usually takes around 15 minutes total. That breaks down to about 9 minutes on the first side and 6 minutes on the flip side over medium heat. If you’re workin’ with a thicker piece or a bone-in breast, it might stretch to 18-20 minutes. And for smaller or thinner cuts, you might be done in 10-12 minutes.
Here’s the kicker though—timing ain’t set in stone. It depends on your pan, your stove, the chicken’s thickness, and even if it’s straight outta the fridge or room temp. Don’t worry, I’m gonna break down all them factors so you ain’t guessin’
Step-by-Step: Pan Searing Chicken Breast Like a Pro
I’ve messed up my fair share of chicken breasts—dry, chewy disasters, y’all—so I’ve learned the hard way how to nail this. Follow these steps, and you’ll be servin’ up restaurant-quality chicken in no time.
What You’ll Need
- Boneless, skinless chicken breasts (or bone-in if you fancy)
- Salt and pepper (keep it simple, or get creative with spices)
- 1-2 tablespoons of oil (canola, avocado, or whatever’s high-heat friendly)
- A teaspoon of butter (optional, for extra richness)
- A heavy skillet or sauté pan (cast iron is my jam)
- Tongs (don’t use a fork, you’ll lose them juices)
- Meat thermometer (if you wanna be super sure it’s done)
The Process
- Prep That Chicken: Pat your chicken dry with paper towels. Wet chicken don’t sear—it steams, and we ain’t about that life. Season it up with salt and pepper on both sides. If you’ve got time, let it sit in the fridge uncovered for 30 minutes or even overnight. This dries it out more for a better crust.
- Get It Room Temp: If you can, let the chicken sit out for 20-30 minutes before cookin’. Cold chicken straight from the fridge cooks uneven, and we want every bite perfect.
- Heat Up the Pan: Grab your skillet, add 1-2 tablespoons of oil, and heat it over medium to medium-low till it shimmers. Too hot, and you’ll burn the outside before the inside’s done. Too low, and you won’t get that sear. If you’re usin’ a stainless steel pan, wait till it’s nice and hot before droppin’ the chicken.
- First Side Down: Lay the chicken in the pan, smooth side down. Don’t overcrowd—give ‘em space to breathe. Let it cook without touchin’ it for about 9 minutes. You’ll see the edges turnin’ pale golden brown. Resist the urge to poke or move it; let that crust form!
- Add a Lil’ Butter: After those 9 minutes, toss in a teaspoon of butter if you’re feelin’ fancy. Swirl it around, liftin’ the chicken a bit so it gets under there. Cook another minute till it’s deep golden.
- Flip It Good: Turn the chicken over and cook the other side for about 6 minutes. If you’ve got a thermometer, check for 165°F in the thickest part. No thermo? Cut into it—juices should run clear, not pink.
- Rest It: Take the chicken outta the pan and let it chill on a plate for 3-5 minutes. This locks in the juices so it don’t dry out when you slice it.
And there ya go—perfectly seared chicken breast in roughly 15 minutes of cookin’ time, plus a bit of prep. Easy peasy, right?
What Affects Pan Searing Time? Don’t Get Caught Off Guard
Now, I know I said 15 minutes, but let’s be real—sometimes it’s faster, sometimes slower. Here’s why your timing might be a lil’ different and how to roll with it.
- Thickness of the Chicken: A thin breast (like ½ inch) might only need 3-5 minutes per side, while a thick ol’ chunk (1 inch or more) could take 8-10 per side. If they ain’t uniform, pound ‘em with a meat mallet or rollin’ pin in a zip-top bag to even ‘em out.
- Bone-In vs. Boneless: Bone-in breasts take longer—think 10-12 minutes per side—’cause the bone slows down the heat gettin’ to the meat. Skin-on also adds a couple minutes if you’re crisping it up.
- Pan and Heat Level: A heavy cast iron holds heat better and might cook faster than a thin non-stick pan. Gas stoves heat quicker than electric, too. Start with medium heat and adjust if it’s browning too fast or too slow.
- Starting Temperature: Cold chicken straight from the fridge needs a couple extra minutes compared to room-temp chicken. That’s why I always say let it sit out a bit if you got time.
- Crowding the Pan: If you stuff too many breasts in there, they’ll steam instead of sear, and that adds time. Cook in batches if you’re feedin’ a crowd.
Pro tip: if you’re unsure, err on the side of checkin’ early. Overcooked chicken is tough as leather, and ain’t nobody got time for that.
How Do Ya Know When It’s Done? No Guesswork Needed
I’ve ruined plenty of dinners by cuttin’ into chicken too soon or waitin’ too long. Here’s how to tell if your pan-seared chicken breast is ready to eat without second-guessin’ yourself.
- Use a Thermometer: Best way, hands down. Stick it in the thickest part—165°F means it’s safe to eat. Pull it off at 163°F if you’re lettin’ it rest, ‘cause it’ll creep up a couple degrees.
- Check the Juices: If you don’t got a thermometer, make a small cut. Clear juices mean it’s done; pink or red means give it another minute or two.
- Feel the Firmness: Press it with your tongs or finger. If it feels springy like the base of your thumb, it’s likely done. If it’s soft like raw meat, keep cookin’. This takes practice, but you’ll get the hang of it.
- Look at the Color: After flippin’, the seared side should be a deep golden brown, not pale or burnt. Both sides should match when it’s ready.
Don’t keep flippin’ it over and over—you’ll lose that crust and mess up the timing. Trust the process, y’all.
Common Mistakes When Pan Searing Chicken (I’ve Done ‘Em All)
I ain’t perfect, and I’ve botched this more times than I can count. Here’s what to watch out for so you don’t repeat my dumb mistakes.
- Movin’ It Too Soon: If you try to flip the chicken before that crust forms, it’ll stick and tear. Wait till it releases easy from the pan—usually after them 9 minutes on the first side.
- Usin’ Too Much Heat: Crankin’ the burner to high might seem like a shortcut, but you’ll char the outside while the inside’s raw. Medium to medium-low is your sweet spot.
- Not Dryin’ the Chicken: Wet chicken won’t sear, period. Pat it dry, or you’re just boilin’ it in its own juice.
- Skippin’ the Rest: Slicin’ right after cookin’ makes all them juices spill out. Let it rest a few minutes to keep it moist.
- Overcrowdin’: I said it before, but it bears repeatin’. Too many pieces in the pan lowers the temp and steams ‘em. Sear in batches if needed.
Avoid these, and you’re golden—literally and figuratively!
Spice It Up: Seasoning Ideas for Your Chicken
Salt and pepper are classic, but why stop there? I love gettin’ creative with flavors to keep things fresh. Here’s some ideas to jazz up your pan-seared chicken breast without addin’ much time.
- Garlic Powder and Paprika: A lil’ smoky, a lil’ savory—sprinkle on before searing for a killer crust.
- Lemon Pepper: Bright and zesty, perfect if you’re pairin’ with a salad.
- Italian Herbs: Mix some dried basil, oregano, and thyme for a Mediterranean vibe.
- Cayenne Kick: If you like heat, a pinch of cayenne or chili powder brings the fire.
- Honey Mustard Glaze: Brush on a mix of honey and mustard after searing for a sweet-tangy finish.
Experiment, y’all! Half the fun of cookin’ is makin’ it your own.
What to Serve with Pan-Seared Chicken Breast
Now that you’ve got your perfectly cooked chicken, what’s it gonna sit next to on the plate? I’ve got some faves that pair awesome and don’t take forever to whip up.
- Simple Green Salad: Toss some greens with a light vinaigrette. Add feta or nuts if you’re feelin’ extra.
- Roasted Veggies: Throw some carrots, zucchini, or asparagus in the oven while the chicken cooks. Drizzle with olive oil, salt, and pepper—done.
- Mashed Taters: Creamy potatoes with a bit of garlic or butter are comfort food heaven.
- Brown Rice: Keeps it healthy and soaks up any juices from the chicken.
- Garlic Bread: ‘Cause who don’t love a crispy, buttery slice to mop up the plate?
For lunch, slice that chicken up and toss it on a sandwich with some mayo and lettuce. Boom, meal prep sorted.
Storing and Reheating: Make It Last
I always cook extra chicken for leftovers ‘cause it’s a lifesaver on busy days. Here’s how to store and reheat without losin’ that juicy goodness.
- Storing: Let the chicken cool completely, then pop it in an airtight container. It’ll stay fresh in the fridge for 3 days. Wanna freeze it? Wrap each piece tight in plastic wrap or use freezer-safe bags—good for up to 2 months. Thaw overnight in the fridge when you’re ready.
- Reheating: Don’t just nuke it dry! Use a skillet over medium heat with a splash of broth or water to keep it moist. Sear each side for a minute or two till it hits 165°F inside. If you’re in a rush, microwave it wrapped in a damp paper towel for a couple minutes, but check the temp.
Leftovers are gold for quick salads, wraps, or stir-fries. Don’t let ‘em go to waste!
Why Pan Searing Is My Go-To Method
I’ve baked, grilled, and poached chicken, but pan-searing always wins for me. Why? It’s fast—under 20 minutes from start to finish. It’s cheap—chicken breast ain’t breakin’ the bank, and you only need basic stuff like oil and salt. And the flavor? That golden crust adds a depth you just don’t get from boilin’ or steamin’. Plus, it’s a solid protein hit, packin’ around 38 grams per serving with low fat if you’re watchin’ that.
It’s also super flexible. Need a quick lunch? Sear a breast and slice it over greens. Fancy dinner? Pair it with a nice sauce or some roasted roots. I’ve even used it as a base for meal prep, cookin’ a batch on Sunday for the week ahead.
Health Benefits of Chicken Breast (Yeah, It’s Good for Ya)
Speakin’ of protein, let’s talk why chicken breast is a staple in my kitchen. It’s lean, mean, and packed with stuff your body loves. It’s got potassium and magnesium for your heart, plus B vitamins to keep your energy up. If you’re tryin’ to build muscle or drop a few pounds, the high protein helps ya feel full longer. There’s even choline in there, which is fancy talk for somethin’ that helps your brain stay sharp.
Pan-searing keeps it light too—only about 9 grams of fat per serving if you don’t go overboard on the oil or butter. It fits into all kinda diets, whether you’re watchin’ carbs, avoidin’ gluten, or just tryin’ to eat better.
FAQs: Your Burnin’ Questions Answered
I know y’all might still have some questions ‘bout pan-searin’ chicken breast, so let’s tackle a few common ones I’ve heard (or asked myself back in the day).
- Can I use olive oil instead of canola? Yup, but be careful—olive oil burns easier at high heat. Use a light or refined version if you can, or mix it with a bit of butter for flavor. I stick to canola or avocado oil for a cleaner sear.
- What if my chicken ain’t cookin’ through in 15 minutes? Check the thickness—might need a few more minutes per side. Lower the heat a tad if the outside’s burnin’ but the inside’s raw. And always double-check with a thermometer or juice test.
- Do I gotta use butter? Nah, it’s optional. Butter adds richness, but oil alone works fine. If you’re cuttin’ fat, skip it altogether.
- How do I keep it from stickin’ to the pan? Make sure the pan’s hot and oiled before addin’ the chicken. Don’t move it till it releases on its own—patience is key!
- Can I pan-sear frozen chicken? Not ideal, ‘cause it’ll steam more than sear and cook uneven. Thaw it first in the fridge overnight for best results. If you’re desperate, thaw it in cold water for a bit before cookin’.
Got more questions? Hit me up in the comments, and I’ll do my best to help ya out.
Final Thoughts: Masterin’ the Pan Sear
So, how long does it take to pan sear chicken breast? ‘Bout 15 minutes for a standard boneless piece—9 on the first side, 6 on the second—though it can vary based on size, heat, and all that jazz. We’ve covered the steps, the pitfalls, the flavor hacks, and even how to store it for later. Pan-searing ain’t just a cooking trick; it’s a lifestyle, y’all. Once you get it down, you’ll be whippin’ up juicy, golden chicken like it’s no biggie.
I love this method ‘cause it’s quick enough for a weeknight but impressive enough for guests. Keep practicin’, don’t be afraid to mess up a few times (lord knows I have), and soon you’ll be the chicken-searin’ champ of your crew. What’s your fave way to season or serve it? Drop your ideas below—I’m always lookin’ for new inspo to try in my kitchen!
Keep cookin’, keep eatin’, and keep lovin’ every bite. We got this!
How do you keep chicken breast from sticking to stainless steel pans?
Give your chicken space to breathe in the pan – overcrowding leads to steam and sticking. Once the meat touches the hot surface, resist moving it for 4-5 minutes until a golden crust develops naturally.
Monitor the sizzle sound while cooking. A steady sizzle indicates perfect temperature, while aggressive popping means your pan runs too hot. Should the sound fade, your heat needs adjusting upward.
Create a natural non-stick surface by allowing the proteins to form a proper crust. Think of it like developing a protective barrier between the meat and pan. When the chicken releases effortlessly, youll know youve mastered the technique.
Perfect Pan-Seared Chicken Breasts: A Complete Guide to Stainless Steel Success
Proper pan temperature is fundamental for perfect chicken breasts. Begin by placing your stainless steel pan over medium heat for 2-3 minutes. Test readiness by sprinkling a few water droplets – they should form mercury-like beads that dance across the surface.
Pat your chicken breasts completely dry with paper towels and bring them to room temperature. This crucial step prevents sticking and ensures even cooking from start to finish.
Apply a thin coating of high-smoke-point oil to the pans surface. Avoid overcrowding by leaving ample space between pieces. Keep a meat thermometer nearby to monitor internal temperature throughout the cooking process.
For optimal results, maintain consistent heat and resist the urge to move the chicken until a golden crust forms on the second side.