Hey there, kitchen warriors! If you’re wondering how long to cook thinly sliced chicken breast on the stove, I’ve gotcha covered with a straight-up answer it usually takes about 3-5 minutes per side, so roughly 6-10 minutes total, depending on how thin it is and how hot your stove’s crankin’. The magic trick is makin’ sure the internal temp hits 165°F (74°C) for safe eatin’ But hold up—there’s more to it than just slappin’ it in a pan and flippin’ it We’re gonna dive deep into the hows, whys, and some killer tips to keep that chicken juicy as heck.
I’ve burned my fair share of chicken in my kitchen shenanigans, so trust me when I say I learned the hard way. Stick with me, and I’ll walk ya through everything from timing to seasoning, with a few oopsies of my own thrown in for good measure. Let’s get cookin’!
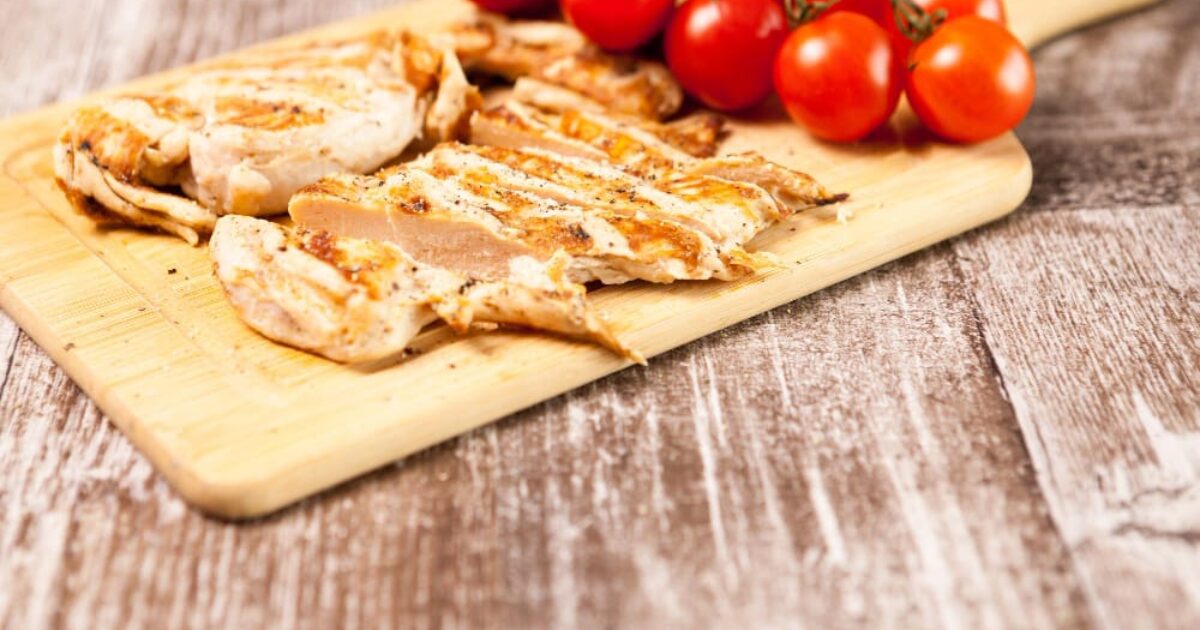
Why Thinly Sliced Chicken Breast Rocks for Stove Cooking
First off let’s chat about why thin chicken is the bomb for quick meals. Unlike those chunky breasts that take forever thinly sliced cuts cook up in a snap, makin’ ‘em perfect for busy weeknights when you’re starvin’ but don’t wanna wait. Plus, they soak up flavors real nice and get that golden sear without much fuss.
Here’s why we love ‘em:
- Speedy Cooking: Done in under 10 minutes most times.
- Even Heat: Thinner means no raw middle or burnt outside.
- Versatility: Slap ‘em in tacos, salads, or just eat straight up.
But, ya gotta be careful—thin cuts can dry out faster than a desert if you ain’t payin’ attention. Let’s nail the timing and technique so that don’t happen.
How Long Exactly? Breakin’ Down the Cooking Time
Alright, back to the big question how long to cook thinly sliced chicken breast on the stove? Like I said, it’s generally 3-5 minutes per side over medium heat But that’s not set in stone A few things mess with the clock, so lemme break it down for ya.
Factors That Mess With Your Cooking Time
- How Thin Is It?: If it’s super skinny, like 1/4 inch, you might be done in 2-3 minutes a side. Closer to 1/2 inch? Lean toward 4-5 minutes each.
- Heat Level: Medium heat is your sweet spot. Crank it too high, and the outside chars before the inside’s ready. Too low, and it takes forever and gets rubbery.
- Pan Type: Cast iron holds heat like a champ and cooks even. Non-stick is great for no mess but might not brown as good. Stainless steel? Middle of the road.
- Chicken Temp: Straight from the fridge? Add a minute or two. If it’s been sittin’ out a bit (no more than 2 hours, safety first!), it cooks quicker.
- Covered or Not: Lid on traps steam and speeds things up, but you might miss that crispy sear.
So, a rough guide? Aim for 6-10 minutes total, flippin’ halfway, and check that temp. Grab a meat thermometer if you’ve got one—165°F in the thickest part, and you’re golden.
Quick Timing Table for Reference
| Thickness | Heat Level | Time Per Side | Total Time |
|---|---|---|---|
| 1/4 inch | Medium | 2-3 minutes | 4-6 minutes |
| 1/2 inch | Medium | 3-5 minutes | 6-10 minutes |
| 1/4 inch | Medium-High | 1.5-2 minutes | 3-4 minutes |
This ain’t gospel, just a startin’ point. Keep an eye on it, ‘cause every stove’s a lil’ different.
Step-by-Step: Cooking Thin Chicken Breast on the Stove
Now that ya got the timing down, let’s walk through how to actually do this thang. I’m keepin’ it simple, so even if you’re new to the kitchen game, you’ll crush it.
- Prep That Chicken: Pat them slices dry with a paper towel. Wet chicken don’t sear—it steams. Season both sides with salt, pepper, and whatever else ya fancy. I’m a sucker for garlic powder and a pinch of paprika.
- Heat Up the Pan: Grab a skillet and set it on medium heat. Add a tablespoon of oil—olive, avocado, whatever’s got a high smoke point. Wait ‘til it shimmers. Hot pan, cold oil, food won’t stick. Old trick I picked up.
- Lay It Down: Place the chicken in the pan, no overcrowdin’. If they’re packed like sardines, they won’t brown right. Give ‘em space to breathe.
- Sear and Wait: Let it cook 3-5 minutes without pokin’ at it. You want that golden crust. Flippin’ too soon kills the vibe.
- Flip It: Turn it over and cook another 3-5 minutes. If it’s real thin, check sooner. Look for golden brown on both sides.
- Check If It’s Done: Best way? Meat thermometer to 165°F. No fancy tool? Cut into the thickest bit—juices should run clear, no pink. But don’t keep cuttin’, or you’ll lose all the good stuff.
- Rest It: Take it off the heat and let it chill for 5 minutes before slicin’. This locks in the juices. Trust me, don’t skip this or it’s gonna be dry as cardboard.
That’s the basic deal. Takes less time than scrollin’ through your phone, and you’ve got dinner ready.
My Big Chicken Flub: A Lesson Learned
Lemme tell ya ‘bout the time I totally botched this. First time cookin’ thin chicken, I cranked the heat to high thinkin’ it’d be faster. Big mistake. Outside was black as coal, inside was raw as sushi. Flippin’ heck, I was mad! Had to toss it and order pizza. Lesson? Medium heat, patience, and don’t walk away to watch TV. Keep your eyes on the prize, folks. I ain’t makin’ that goof again, and neither should you.
Tips to Keep That Chicken Juicy and Tasty
Dry chicken is the worst, right? I’ve got some tricks up my sleeve to make sure yours stays tender and full of flavor. Been there, done that, and I’m sharin’ the goods.
- Don’t Overcook It, Duh: Biggest sin in chicken cookin’. Stick to that 165°F mark and pull it off the heat. It’ll keep cookin’ a bit from leftover heat.
- Brine If Ya Got Time: Soak it in salty water for 30 minutes to 2 hours before. Sounds weird, but it keeps the meat moist. I do this when I’m feelin’ fancy.
- Pound It Even: If one end’s thicker, smash it with a mallet or even a heavy pan. Even thickness means even cookin’. No raw spots, no overdone bits.
- Sear Like a Boss: Hot pan, good oil, don’t move it for a few minutes. That crust traps the juices inside. Yum!
- Marinate for Flavor: Toss it in a mix of lemon juice, oil, and herbs for at least 30 minutes. Not only tastier, but helps with moisture too. I love a zesty vibe.
- Restin’ Is Key: I said it before, I’ll say it again—let it sit after cookin’. Cut too soon, and all the juice runs out. Give it 5 minutes, you won’t regret it.
- Pan Choice Matters: Use somethin’ that spreads heat nice. Cast iron’s my go-to, but a decent stainless works. Hot spots mess things up.
Try these, and your chicken won’t be no Sahara Desert disaster. Promise.
Seasoning Ideas to Jazz It Up
Plain chicken is borin’ as heck. Let’s spice it up! Salt and pepper are a must, but don’t stop there. Here’s some combos I mess with in my kitchen:
- Classic Comfort: Garlic powder, onion powder, and a sprinkle of thyme. Feels like home.
- Smoky Kick: Paprika (smoked if ya got it), cumin, and a dash of chili powder. Bit of a bite, lotta depth.
- Italian Vibes: Oregano, basil, and a lil’ red pepper flake. Pair it with pasta, and you’re golden.
- Zesty Zing: Lemon zest, rosemary, and a pinch of black pepper. Bright and fresh for summer nights.
Mix and match, rub it on before cookin’, or even make a lil’ marinade. Get wild with it!
What If Things Go Sideways? Troubleshootin’ Time
Even with the best plans, kitchen oopsies happen. Here’s how to fix ‘em when cookin’ thin chicken on the stove.
- Burnin’ Too Fast: If the outside’s brownin’ quick but inside’s raw, turn the heat down to medium-low. Splash a spoonful of water or broth in the pan, cover it, and let steam finish the job.
- Stickin’ to the Pan: Didn’t heat the pan enough, or not enough oil. Let it sit a sec longer—sometimes it releases when the sear’s right. Next time, more oil and hotter pan.
- Dry as a Bone: Overcooked it, huh? Next batch, watch the clock closer or use a thermometer. For now, slice it thin and toss in a sauce to mask it.
- Still Pink Inside: Don’t freak. Pop it back in the pan for a minute or two on low. Check temp again. Better safe than sick.
Mistakes ain’t the end of the world. We’ve all been there, and each flub teaches ya somethin’.
Can Ya Cook Frozen Thin Chicken on the Stove?
Quick heads-up: I don’t recommend cookin’ frozen chicken straight on the stove. It don’t cook even, and you’re likely to end up with a dry outside and raw middle. Thaw it in the fridge overnight first for best results. If you’re in a pinch, ya can, but expect to double the cookin’ time and keep heat lower to avoid burnin’. Still, thawin’ is the way to go, my friend.
Addin’ Veggies or Sides Right in the Pan
Wanna make it a one-pan wonder? You totally can. Toss in quick-cookin’ veggies like sliced peppers, onions, or zucchini in the last couple minutes. They’ll pick up the chicken flavors and be tender-crisp. Just don’t add ‘em too early, or they’ll turn to mush. I love doin’ this for a fast stir-fry vibe—less dishes, more yum.
Storin’ and Reheatin’ Your Chicken
Cooked too much? No prob. Here’s the deal on keepin’ it:
- Fridge Life: Stick it in an airtight container, and it’s good for 3-4 days in the fridge. Perfect for meal prep.
- Freezin’ It: Wrap tight in plastic or use a freezer bag. Stays decent for 2-3 months. Thaw in fridge before reheatin’.
- Reheatin’: Microwave works, but add a splash of water to keep it moist. Or, warm it in a pan with a lil’ oil over low heat. Don’t overdo it, or it’s rubber city.
I always make extra for sandwiches or salads later. Saves me when I’m too lazy to cook again.
Why a Meat Thermometer Is Your BFF
I keep harpin’ on this 165°F thing, and here’s why: guessin’ don’t cut it with chicken. Raw poultry can make ya sick, and overcookin’ ruins the vibe. A cheap meat thermometer takes the stress out. Stick it in the thickest part, wait a sec, and boom—ya know if it’s ready. I got mine for like ten bucks, and it’s saved my bacon (or chicken, ha) more times than I can count.
Variations to Switch Up Your Chicken Game
Bored of the same ol’ thing? Here’s some twists to keep your taste buds happy. I’ve tried most of these, and they’re legit.
- Crispy Coating: Dip in flour or breadcrumbs before cookin’ for a crunchy bite. Takes an extra minute per side, but worth it.
- Sauce It Up: After searin’, toss in a lil’ broth, cream, or lemon juice to make a quick pan sauce. Spoon it over—fancy without tryin’.
- Stir-Fry Style: Cut into strips, cook quick with soy sauce and ginger, throw in veggies. Dinner in under 15 minutes.
- Herb Butter Finish: After flippin’, add a pat of butter mixed with chopped herbs to the pan. Baste it over the chicken. So rich, y’all.
Experiment! Half the fun of cookin’ is makin’ it your own. I’m always messin’ around with flavors, and sometimes it’s a total win.
Pairin’ Your Chicken with Killer Sides
Chicken’s great, but it shines with the right pals on the plate. Here’s what I usually whip up alongside:
- Veggie Power: Steamed broccoli or sautéed green beans. Quick and keeps it healthy.
- Starchy Goodness: Rice, mashed taters, or even a crusty bread to soak up juices.
- Fresh Kick: Simple salad with a tangy dressin’. Cuts through the richness.
- Grain Vibes: Quinoa or couscous if I’m feelin’ a bit hippy-dippy.
Mix it up based on what ya got in the pantry. No need to overthink it.
Final Thoughts: Masterin’ Thin Chicken on the Stove
So, to wrap this up, cookin’ thinly sliced chicken breast on the stove ain’t no rocket science. Stick to 3-5 minutes per side, watch that heat, and don’t skimp on restin’ it after. Whether you’re a newbie or a kitchen vet, these tips’ll help ya avoid the dry, sad chicken blues. I’ve shared my flops and fixes, so you don’t gotta learn the hard way like I did.
Keep playin’ with flavors, don’t be scared to mess up, and remember—cookin’ is ‘bout havin’ fun and feedin’ folks you love (or just yourself, no shame). Got a fave way to cook thin chicken? Drop it in the comments or shoot me a holler. I’m always down to swap ideas and up my game. Now, go get that skillet hot and make some magic!
Why anyone can cook chicken cutlets at home:
- You can buy thinly sliced chicken breasts at the store, so that you don’t have to pound out your own chicken breasts.
- Use store bought Panko bread crumbs.
- There are minimal ingredients to this recipe.
- The cutlets cook very quickly thanks to the thinness of the chicken.
- The method is simple and straight forward with just a few easy steps.
- Thinly Sliced Chicken Breasts
- Panko Bread Crumbs (can use gluten free here as well)
- Flour (can also use gluten free all purpose flour)
- Eggs
- Salt and Pepper
- High quality oil: I like to use avocado oil, or a mix of avocado oil and olive oil. The avocado oil can cook at a higher temp so it keeps the olive oil from burning.
There is truly nothing better than a fresh cutlet straight from the pan. I simply shallow fry the cutlets on each side for 4-5 minutes until golden brown and chicken has been cooked through. From there, I remove the crispy cutlets to a paper towel lined baking sheet to let excess oil drain and sprinkle with salt and pepper. Serve as you wish from there!
You can of course also cook these cutlets in the air fryer as well, but nothing compares to the real deal pan fried cutlet. BUT if you want to air fry the cutlets, follow all instructions up until the frying point and spray with oil on both sides. Air fry for 6-8 minutes until golden, flipping once.
How To: Pan-Fry Chicken Breasts
FAQ
How long does it take to cook thin chicken breast?
Bake for 20 minutes or until the internal temperature reaches 165 degrees Fahrenheit. How long does thin chicken breast take to cook on stove? A: Thin chicken breasts take about 15 minutes to cook on the stove. What temp should I bake thin chicken breast?
How long does it take to cook thin sliced chicken?
The cooking time for thin sliced chicken breast will vary depending on its thickness. On average, it takes about 2-3 minutes per side to cook thin sliced chicken breast on the stove. However, it is important to use a meat thermometer to ensure the internal temperature reaches 165°F (74°C) for safe consumption.
Can you cook thin sliced chicken breast on the stove?
You can use either oil or butter to cook thin sliced chicken breast on the stove. Both options add flavor and prevent sticking. Oil is a healthier choice, while butter can add richness to the dish. Ultimately, it depends on your personal preference. How long should I cook thin sliced chicken breast on the stove?
How long do you cook chicken breast in a pan?
Be cautious to avoid overcrowding the pan, as this can interfere with the cooking process. Cook the chicken for approximately 3-4 minutes on each side, or until they are cooked through and reach an internal temperature of 165°F (74°C). Thinly sliced chicken breasts cook quickly, so keep a close eye on them to avoid overcooking.
How do you cook chicken on a stovetop?
Follow these easy steps to create a flavorful and tender chicken breast right on your stovetop. Start by seasoning your thinly sliced chicken breast. Sprinkle both sides with salt, pepper, and any additional herbs or spices you prefer. This will add flavor to the chicken as it cooks.
How do you season thin sliced chicken breast?
The best way to season thin sliced chicken breast is to use a combination of spices and herbs. You can use a basic seasoning mix like salt, pepper, garlic powder, and paprika, or experiment with your favorite herbs and spices to create your own unique flavor profile. How do I prevent thin sliced chicken breast from drying out while cooking?
How long do thin cut chicken breasts take to cook in the oven?
Preheat your oven to 400°F/ 205°C
Using tongs, evenly coat the chicken with the seasoning, then add the oil and toss to combine. Place on a large baking tray, ensuring no pieces are overlapping. Cook for 8-12 minutes, or until the internal temp reaches 165℉ (74℃).
How to know when thin sliced chicken breast is done?
How long do you cook chicken breast in a frying pan?
Pan-fried chicken breast recipe
Take off the cling film and season well. 2. Heat the oil in a frying pan then add the chicken breasts (skin-side down, if they have skin) and cook for 2-3 minutes or until browned. Then turn over, cover and cook on the other side for 7-8 minutes or until cooked through.
How long do chicken breast pieces take to cook on the stove?
Cubed chicken will cook in a pan in just 7 minutes.
There is also a visual cue to look for when checking for doneness that doesn’t involve burning your fingertips. Using the tip of a knife, poke a few chicken pieces. If the juices run red, they need more time, if it’s clear, the chicken is cooked.