Hey there, kitchen warriors! If you’ve ever stood over a sizzling pan wondering, “How long do I cook chicken breast each side?” then you’re in the right spot. I’ve botched enough chicken dinners to know the struggle—too raw, too dry, or just plain sad. But lemme tell ya, I’ve cracked the code, and I’m sharing it with ya straight up. For a standard boneless, skinless chicken breast, you’re lookin’ at 5 to 7 minutes per side over medium to medium-high heat. The magic number inside? 165°F. Grab a meat thermometer to be sure, ‘cause guessing ain’t worth the risk of chewy or undercooked meat.
Now before we dive deeper let’s get why this timing matters and how to nail it every dang time. Whether you’re whipping up a quick weeknight meal or prepping protein for the week, this guide’s got your back. We’re talkin’ prep, cookin’, and even some flavor hacks to keep them breasts (oops, I mean those breasts) scrummy and tender. So, let’s roll up our sleeves and get to it!
Why Timing is Everything When Cooking Chicken Breast
Timing ain’t just a number—it’s the difference between a juicy, golden piece of chicken and a rubbery disaster. Cook it too short, and you’re riskin’ some nasty bugs like salmonella. Too long, and you might as well serve shoe leather. Here’s the deal with cooking chicken breast each side:
- Thickness Rules: A thicker breast (like 1 inch or more) needs more time, closer to 7-8 minutes per side on a lower heat to cook through without burning. Thin ones, or if ya pounded ‘em to about ½ inch, can be done in 4-5 minutes per side with a hotter pan.
- Heat Levels: Medium to medium-high heat gives ya that nice brown crust without torching the outside before the inside’s ready. Too high, and it’s charred on the outside, raw in the middle. Too low, and it just steams—yuck.
- Pan and Oil: Your skillet and the oil ya use can tweak the timing a smidge. A heavy cast iron holds heat better, so ya might need less time than with a flimsy pan.
I’ve learned this the hard way—used to crank the heat to “get it done quick” and ended up with a blackened mess. Trust me, patience pays off here. Stick to 5-7 minutes per side for most boneless breasts, and adjust based on how thick they are. We’ll get into the step-by-step in a sec, but first, let’s prep that bird right.
Prepping Your Chicken Breast Like a Pro
Before ya even think about slappin’ that chicken in the pan, a lil’ prep goes a long way. I used to skip this stuff, thinkin’ it was extra work, but nah, it’s the secret to even cooking and max flavor. Here’s what I do
- Trim the Fat: Grab a sharp knife and cut off any extra fat or weird bits hangin’ off the breast. It helps it cook evenly and looks better on the plate.
- Pound It Out: If the breast is thicker on one end, use a meat mallet (or even a rolling pin in a pinch) to flatten it to about ½ to 1 inch thick. This makes sure it cooks at the same rate all over. No more raw spots while the thin end dries out!
- Season Like You Mean It: Don’t be shy here. At the very least, hit it with salt and pepper on both sides. I love mixin’ up some smoky paprika or a lil’ garlic powder for a kick. Rub it in good so every bite’s got flavor.
- Let It Chill (or Warm Up): If you’re pullin’ it straight from the fridge, let it sit on the counter for 15-30 minutes. Cold chicken cooks unevenly—trust me, I’ve had enough half-frozen disasters to know. Room temp means it’ll sear better.
Preppin’ ain’t just about looks; it sets ya up for that perfect cook time. Once it’s ready, let’s fire up the stove and get to the main event—figuring out how long to cook chicken breast each side in real time.
Step-by-Step: Cooking Chicken Breast in a Pan
Alright, let’s cook this bad boy. Pan-searing is my go-to ‘cause it’s fast and gives ya that crispy, golden outside with a juicy inside Here’s how I do it, step by stupid-simple step, so ya don’t mess it up like I did the first hundred times
- Heat the Pan: Grab a big skillet—cast iron if ya got it, ‘cause it rocks for this. Add a tablespoon of cooking oil (I use veggie oil or avocado oil for high heat) and heat it over medium to medium-high. Wait ‘til it’s shimmery but not smokin’. Too hot, and you’ll burn the oil.
- Lay Down the Chicken: Place them breasts in the pan, makin’ sure they ain’t crowded. If they’re touchin’, they’ll steam instead of sear. Let ‘em sit—no pokin’, no proddin’, no movin’!
- Cook the First Side: Here’s the big question—how long to cook chicken breast each side? For a standard boneless breast, leave it alone for 5 to 7 minutes. You’re lookin’ for a golden-brown bottom. If it sticks when ya try to flip it, it ain’t ready yet. Give it another minute.
- Flip and Finish: Turn it over and cook the other side for another 5 to 7 minutes. If it’s a thicker piece, ya might need up to 8 minutes per side on a slightly lower heat (medium-low). The goal is an internal temp of 165°F. No guessin’—more on checkin’ that below.
- Add a Lil’ Extra: For some next-level yum, toss in a tablespoon of butter right at the end. Let it melt, then flip the chicken a couple times to coat it in that buttery goodness. It picks up all the tasty bits from the pan bottom.
Once it’s done, don’t just dig in. There’s one more step that’s gotta happen, and it’s a game-changer.
Resting: The Secret to Juicy Chicken
I used to slice into my chicken the second it came off the pan, and guess what? All them juices just ran out, leavin’ me with dry meat. Don’t be me. Let that chicken rest for 5-10 minutes after cookin’. Here’s why and how:
- Juice Lock-In: Restin’ lets the juices settle back into the meat instead of spillin’ all over your cuttin’ board. It’s like givin’ the chicken a lil’ breather to get itself together.
- How to Do It: Move the breasts to a clean plate or cuttin’ board. Cover ‘em loosely with foil to keep ‘em warm. Use this time to whip up a side or just stare at your masterpiece.
- Slice Smart: After restin’, cut against the grain (that means across the little lines in the meat). It makes every bite more tender.
Restin’ ain’t optional if ya want that perfect, moist bite. But before we even think about slicin’, let’s make sure it’s actually cooked through.
Checking for Doneness: No More Guesswork
Wonderin’ how long to cook chicken breast each side is one thing, but knowin’ it’s done is another. I’ve had some close calls with pink-in-the-middle chicken, and I ain’t about that life no more. Here’s how to be 100% sure:
- Meat Thermometer: This lil’ gadget is worth its weight in gold. Stick it into the thickest part of the breast. If it reads 165°F, you’re golden. If not, back in the pan it goes for a minute or two.
- Juice Check: No thermometer? Cut a small slit in the thickest spot. If the juices run clear (not pink or red), it’s good to go. If there’s any pink, keep cookin’.
- Feel Test (Risky): If ya press on it and it feels firm but still got a lil’ bounce, it’s prob’ly done. But honestly, this ain’t reliable unless you’ve cooked a million chickens. Stick to the first two methods.
Don’t skip this. Undercooked chicken can mess ya up, and overcooked is just sad. Aim for that 165°F sweet spot, and remember, it might keep cookin’ a tad while it rests due to carryover heat.
How Thickness and Heat Mess with Cook Times
I mentioned earlier that thickness and heat change how long to cook chicken breast each side, so let’s break it down with a quick table to keep it crystal. This is based on boneless, skinless breasts, ‘cause bone-in takes way longer and usually needs an oven finish.
| Thickness | Heat Level | Time Per Side | Notes |
|---|---|---|---|
| Thin (½ inch or less) | Medium to Medium-High | 4-5 minutes | Faster cook, watch for burning. |
| Standard (¾-1 inch) | Medium | 5-7 minutes | Perfect for most store-bought breasts. |
| Thick (1 inch+) | Medium-Low | 7-8 minutes | Lower heat to avoid raw middle. |
If ya got a super thick piece, consider slicin’ it in half horizontally or poundin’ it down. Ain’t no shame in makin’ life easier. And if your stove’s a lil’ wacky (like mine sometimes), adjust the heat a notch up or down based on how fast it’s brownin’. The goal ain’t just time—it’s that internal 165°F.
Flavor Twists to Keep It Fresh
Now that ya know how long to cook chicken breast each side, let’s jazz it up. Plain chicken gets old fast, so I’m always switchin’ up the vibes. Here are some seasoning and topping ideas I’ve played with:
- Smoky Kick: Mix some smoked paprika with a pinch of cayenne. Rub it on before cookin’ for a BBQ-ish vibe without the grill.
- Zesty Lemon: Squeeze some fresh lemon juice over it after cookin’, or grate some zest into your seasoning mix. Brightens up everything!
- Herby Goodness: Dried Italian herbs or fresh rosemary and thyme—chop ‘em fine and pat ‘em on. Smells like a fancy restaurant in your kitchen.
- Spicy Twist: A lil’ chili powder or taco seasoning can turn it into somethin’ perfect for wraps or tacos. Add some lime for extra oomph.
- Top It Off: After it’s cooked and rested, throw on some melted cheese, crispy bacon bits, or even a dollop of salsa. Makes it feel like a whole new dish.
I’ve also marinated ‘em overnight in a mix of olive oil, garlic, and lemon juice. Game-changer for tenderness. Just don’t marinate too long with acidic stuff, or it’ll get mushy. A few hours to a day is plenty.
Common Screw-Ups and How to Dodge ‘Em
I’ve made every mistake in the book when figurin’ out how long to cook chicken breast each side, so lemme save ya some grief. Here’s what to watch out for:
- Flippin’ Too Soon: If ya try to turn it and it sticks, it ain’t ready. Leave it be ‘til it releases easy. Forcin’ it tears the crust off.
- Crowdin’ the Pan: Too many pieces at once means they steam, not sear. Cook in batches if ya gotta. Give ‘em space to breathe.
- Skippin’ the Rest: I know, you’re hungry, but cuttin’ in right away lets all the good stuff drip out. Patience, my friend.
- High Heat Haste: Crankin’ the burner to max might seem faster, but it just burns the outside. Medium is your buddy for even cookin’.
I remember one time I had folks over and tried to rush it—ended up with half-raw chicken and a lotta awkward apologies. Learn from my dumb moves and take your time.
Why Pan-Searing Beats Other Methods (Sometimes)
I’ve baked and grilled chicken plenty, but pan-searin’ is often my jam for a reason. It’s quick—way faster than waitin’ for an oven to preheat. Plus, ya get that crispy, browned outside that don’t happen with bakin’. Grillin’ is dope for smoky flavor, but not everyone’s got a grill, and weather can be a pain. In a pan, ya got control, and cleanup ain’t too bad if ya don’t burn nothin’.
That said, if ya got a huge batch or bone-in breasts, the oven might be better to cook ‘em through without burnin’ the outside. Pan-searin’ shines for boneless cuts when ya want dinner on the table in 20 minutes flat. Stick to 5-7 minutes per side, and you’re usually set.
Pairin’ Your Chicken with Killer Sides
Chicken breast is versatile as heck, so while ya got it restin’, think about what to serve with it. I’m a sucker for simple stuff that don’t take much brainpower. Here’s what I pair mine with:
- Veggie Vibes: Sauté some green beans or broccoli in the same pan with leftover chicken bits for extra flavor. Takes like 5 minutes.
- Carb Love: Mashed taters or a quick rice pilaf soaks up any juices. If I’m lazy, I just toast some bread.
- Salad Freshness: Slice the chicken and toss it over a Caesar or mixed greens. Keeps it light and healthy-ish.
- Saucy Magic: Whip up a quick pan sauce with butter, garlic, and a splash of broth or white wine. Drizzle it over everything.
I’ve turned a basic pan-seared breast into a full-on meal just by addin’ a couple sides. It’s also awesome for meal prep—cook a few at once, slice ‘em up, and throw ‘em into salads or wraps all week.
Tools You Don’t Wanna Skimp On
Ya don’t need a fancy kitchen to nail this, but a few things make life easier when sortin’ out how long to cook chicken breast each side. Here’s my must-haves:
- Good Skillet: A heavy-bottom pan, like cast iron or stainless steel, heats even and gets that sear right. Non-stick works, but ya won’t get as much crust.
- Meat Thermometer: I said it before, I’ll say it again—get one. Cheap ones are like 10 bucks, and it saves ya from guessin’ games.
- Tongs: Flip without stabbin’ the meat and losin’ juices. A fork works, but it’s messier.
- Cuttin’ Board: Somethin’ sturdy for restin’ and slicin’. Bonus if it’s got a groove for catchin’ drips.
I’ve cooked without half this stuff before, but havin’ ‘em now makes me feel like a legit chef. Invest a lil’ if ya can—it pays off.
Final Thoughts from My Kitchen to Yours
Figurin’ out how long to cook chicken breast each side don’t gotta be a mystery. Stick to 5-7 minutes per side for most boneless breasts, check that internal temp at 165°F, and let it rest before ya dig in. I’ve gone from burnin’ and undercookin’ to servin’ up juicy, golden chicken that even my picky family raves about. It’s all about the prep, the patience, and not skippin’ the little things like restin’ the meat.
Try this out next time you’re in the kitchen, and tweak the flavors to your likin’. Got a fave seasoning or side ya pair it with? Drop a comment or hit me up—I’m always down to swap ideas. Cookin’ chicken right ain’t just a skill; it’s a confidence boost. So go make that pan sizzle, and let’s eat good tonight!

How to Cook Chicken on the Stove

Step 1: Flatten the Chicken
Place the chicken in a plastic bag, then use a meat mallet or rolling pin to pound. Shoot for about ½ to ¾ inch thickness. I find that anything over 8 ounces will end up being too wide after flattening, so you may need to cook in two batches.
Chicken breasts are admittedly a challenge to cook evenly because of their shape. They are thicker on one side and thin out and taper on the other. Flatten the thick end so that the entire piece is level.
Experimentation Encouraged: Another option is to slice the chicken in half horizontally lengthwise to create two cutlets out of one piece. This technique works nicely if the meat is very thick, 1 inch or bigger.
Pro Tip: If the tenders are still attached, they add bulk, making it harder to flatten. I like to pull them off and make baked chicken tenders for the kids. They love it!

Step 2: Dry the Surface
After flattening the meat, dry both sides with paper towels. This process wicks up any extra moisture on the surface that could cause it to steam instead of brown. We want to kickstart the flavor and color development in the pan.

Step 3: Season the Meat
Combine salt, black pepper, garlic powder, onion powder, and Italian seasoning. A little goes a long way! Sprinkle the chicken evenly with the seasoning blend, about ½ teaspoon per side.

Don’t let the concentrated dry rub sit on the chicken too long. The salt will draw moisture to the surface. If this happens, blot it with a paper towel before adding it to the pan.
Tips for Perfect Execution: I use paprika for its deep golden hue and earthy flavor, opting for sweet, smoked, or spicy varieties to add complexity. Use it sparingly and maintain moderate heat to prevent burning. Skip the paprika and herbs for a darker golden brown color so they don’t char.

Step 4: Pan-Sear the Chicken
Make sure the oil is nice and hot but not smoky. Once the pieces go in, press them down for better contact with the surface, then do not move. I repeat, let it sear! Keep a close eye on the color change while the chicken develops a crust, about 5 to 7 minutes. This will make it easy to flip over. Begin cooking on medium-high heat, then lower to medium after flipping.
A cast iron skillet or stainless steel pan helps create a golden-brown crust. The trick to using them correctly is to preheat the pan and heat the oil before adding the meat. This process creates a better nonstick surface. Since we are using moderate heat, using a nonstick pan is also okay if you feel more comfortable.
Ingredient Chemistry: The preheated fat and moderate heat drive off any excess moisture from the meat.

Step 5: Baste with Butter
Butter is optional, but it’s such a good idea! After flipping, I add a tablespoon. Let the fat melt, then baste with it. The process coats the surface to prevent the meat from drying out. Throw in some sprigs of rosemary or thyme to infuse fresh herb aromatics into the dish.
Use an instant-read thermometer to check the internal temperature on the thickest part of the breast. It’s okay if the juices run slightly pink, but the meat should not be raw in the center. I poke it parallel into the meat for the most accurate result. It should be between 160 to 165ºF (71 to 74ºC).
Ingredient Chemistry: When the milk solids brown, they add more color and a nutty flavor that sticks to the meat. It’s delicious! I wait until after the initial sear because I don’t want the water in the butter to interfere with browning or the solids to burn.

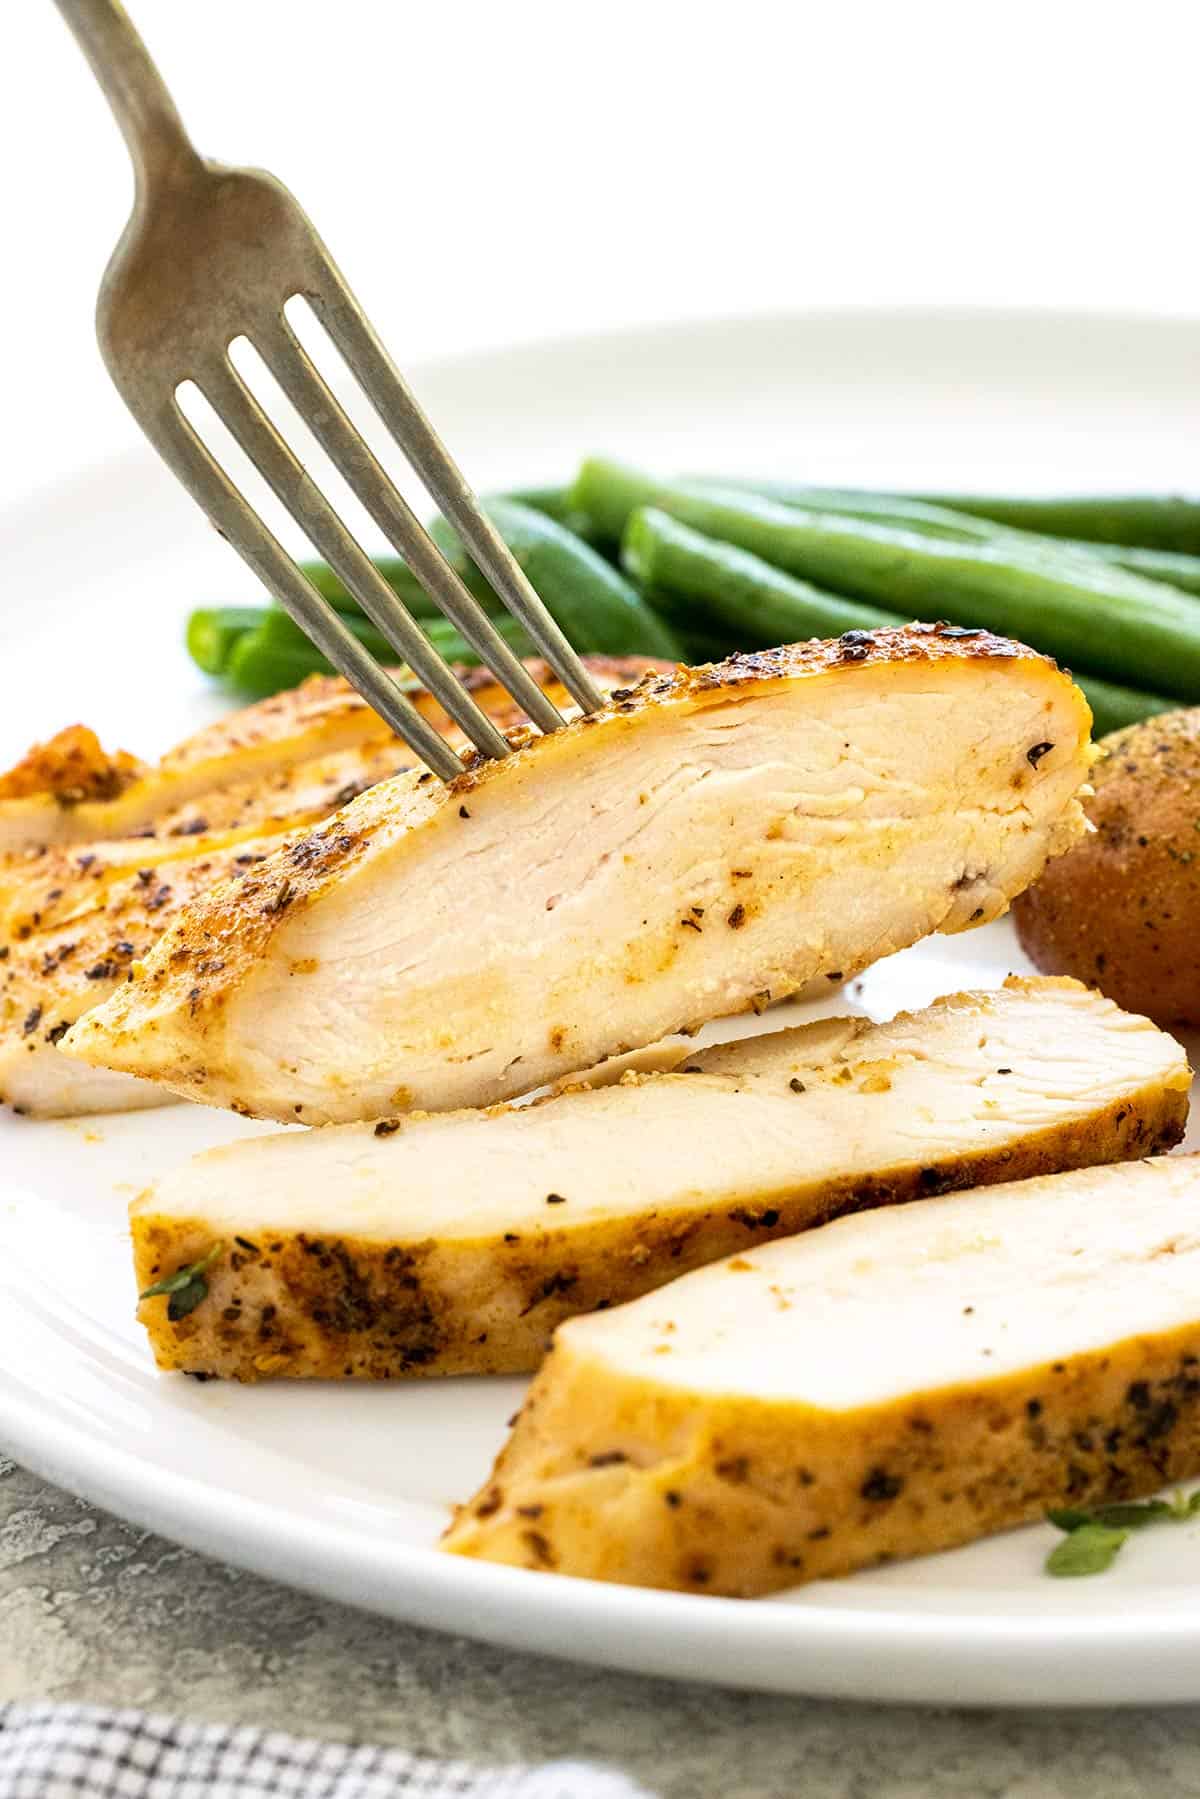
Step 6: Rest, then Slice
Give the chicken about 5 minutes to rest before serving to allow the flavorful juices to redistribute into the muscle fibers. Resting keeps the meat moist instead of running out onto the cutting board. Serve the chicken as whole pieces, slices, or dice to use in chicken recipes.
Yes! What does brining chicken do? The salt solution increases the seasoning and juiciness. Dissolve 2/3 cup kosher salt or ½ cup of table salt in 2 quarts of water. Add the chicken and refrigerate for at least 30 minutes or up to 24 hours. Dry the surface well before cooking.
For more flavor dimensions, add a chicken marinade. The citrus juices, salt, and aromatics like garlic and soy sauce increase the savory umami taste. With acid in the marinade, you only need 30 minutes or up to 1 hour. The meat may turn mushy in texture if left longer. Pat dry before cooking.
Use a simple pan-searing technique. This involves high-heat browning in a skillet and then transferring it to the oven to gently finish cooking. However, you can use just the stovetop if you flatten the chicken first. This step ensures even cooking, and using moderate and consistent heat is critical to preventing the meat from drying out. If the cooking oil is preheated, the chicken will get brown and juicy.
Chicken breasts flattened to about ½ inch thick and cooked in a preheated pan over moderate heat, about 5 to 7 minutes per side. Larger pieces of chicken will take longer to cook. Target an internal temperature of 160 to 165ºF (71 to 74ºC).
Absolutely! The flavorful fond left in the skillet from the juices and cooked bits is excellent for making a pan sauce or homemade gravy. Use the drippings from the pan, or add 1 tablespoon of butter if previously omitted, plus 1 to 2 tablespoons of flour to make a roux. Add 1 cup of chicken stock or broth to thin out the sauce, whisk, and cook over medium-high heat until thickened.
Now that you know How to Cook Chicken on the Stove, please leave a star rating and let me know how it went in the comments below!
Jump To a Section
Chicken is a classic dinner-time staple but can quickly become dried out and bland. To avoid that, I’m sharing my go-to juicy stove top chicken breasts recipe. I utilize a simple pan-sear method that adds flavor to the surface while ensuring moist and tender meat. The key to success is heat management.
You’ll need to give the protein enough time for the exterior to brown, then reduce the intensity to gently finish cooking. Once you master this simple technique, the possibilities are endless. Get creative with entree portions, kick up the protein level for salads, or shred up pieces to use in soups and casseroles.

- Chicken: I recommend using boneless, skinless chicken breasts between 6 to 10 ounces.
- Oil: The best cooking oil for stovetop chicken breasts is olive oil for a slightly fruity taste.
- Butter: The flavorful fat is used to baste the chicken right before serving. The extra lipid coating keeps the chicken moist.
- Seasoning: I season the chicken breasts with a concentrated and bold spice blend. I use a combination of salt, black pepper, paprika, garlic powder, onion powder, and Italian seasoning.
See the recipe card below for all ingredients and measurements (US and metric).
If you cook chicken breast often, you’ll want to switch up the flavor profile to keep each meal exciting. It’s easy to customize!
- Chicken Options: For bone-in chicken breasts, sear both sides, then transfer to the oven and ake at 350ºF (177ºC) until fully cooked. Depending on size, this could take 20 to 30 minutes of cooking time. If you prefer dark meat, boneless or bone-in chicken thighs can be used. The doneness should reach about 170ºF (77ºC) to tenderize the tougher muscle fibers.
- Oil: If you prefer a more neutral-tasting oil, use a high smoke point oil like avocado, vegetable, or canola oil.
- Butter Swap: For a dairy-free option, use margarin or other plant-based butter. For a browned butter taste, use ghee.
- Herbs: To infuse the butter with an herbaceous flavor, add a few springs of thyme or rosemary to the pan as you baste. Garnish the chicken with freshly chopped herbs like parsley, basil, tarragon, or chives.
The Best Chicken Breast You’ll Ever Make (Restaurant-Quality) | Epicurious 101
FAQ
How long should you cook chicken breast on each side?
Is 10 minutes enough to cook chicken breast?
- 6 to 7-ounce chicken breasts: about 10 to 11 minutes total
- 8 to 9-ounce chicken breasts: about 11 to 12 minutes total
- 10-ounce or larger chicken breasts: about 13 to 14 minutes total